Controlling the stove vent flaps from inside
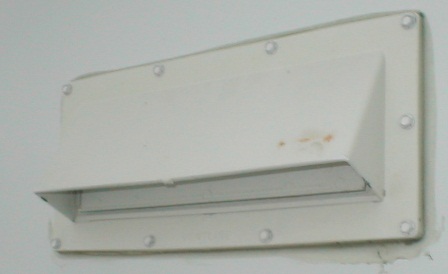
In progress..Our stove vent consists of an exterior vent housing that has 2 lil tabs on it to lock door closed. And the interior vent/fan housing which also has a small flap door. When the vent is in use it blows open these lil doors. Works just fine however...
Going down the road the outer door if not secured can flap in the wind and break. I generally keep it locked. Problem is once at camp this thing is 8' off the ground. I can reach with awing pull to unlock, but an inconvenience. Am always forgetting to open, turn on the vent usually late at night or early morning -no air going out. So its outside, stretching to unlock. using stick or awning pull, it’s a bit difficult. I broke one off the lock tabs and center support-(am in the process of replacing vent). The real issue is once unlocked, slightest breeze the outer, but more annoying, the inner door flaps-tap tap tap. Will end up going outside and try to engage so we can sleep. Point is having an easy way to lock & unlock the outer vent flap from inside would be ideal and is the goal.
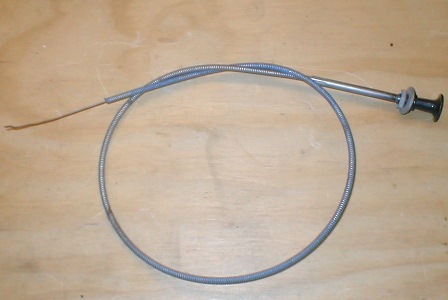
Several options. On my dad’s old camper metal vent the door was spring loaded to open, you simple unhooked a small chain to release or pull it in closed. But that won't work on plastic vent. A recent thread on RV.net got me revisiting again (that and as noted I broke vent last outing, needs replacing so now's the time). One fella, KKELLER14K's thread, simply ran a straight wire thru front of vent housing- hooked into outer door-simply pulls in or out. Couldn't be any simpler. Another user wnjj's thread, kinda trick used 1/4 turn cabinet door locks, ran springs to the flap, works well and I thought I might copy. A mention was also made of another who used an old throttle/choke cable, Would be similar to operation as to 1st mod-
Armed with the ideas of what others have done I proceeded-with the idea I would be sort of merging these ideas. As I need to replace the outer vent decided to drop vent take it all to the shop to re engineer the vent closure. This is what I did or more accurately figured what I should have done..So with nothing better to do I proceeded.
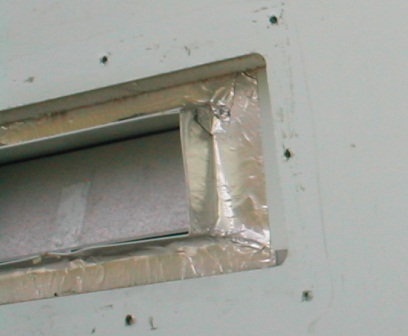
A side note- when working over stove. If yours is like ours it has a thin metal cover and open vent slot, remove the cover! It is rather thin and can EASILY be bent. It, with stove top pulls straight up at edges of stove top. Also whether or not you remove top cover- put a towel over the oven vents and open spaces. You cannot retrieve anything that falls down the oven vent-realizing this I may add a piece of stainless screen under the open oven vents, The other openings/gaps-who knows where they lead? Hasn't been a problem-but now that I actual looked....
Continuing ahead and take apart see what I can come up with. In looking online at the vent opening configurations at Ventline. On some of the vent the inner door is full width-they are supplied with a spring lock to keep door closed (you can see on KKELLERK14s thread. I also saw the switch and resister used to make fan 2 speed, same motor as single speed. So since its out I'm going to reinstall stock motor previously removed, install a resister and second switch (hi/low). If I can't figure out the flap door thing I'll just put it back like it was....
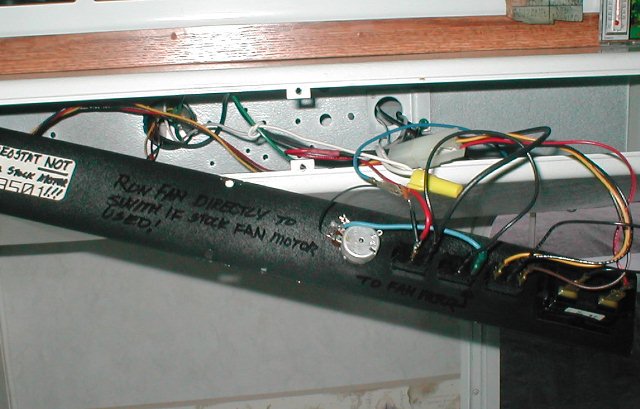
You can see the rheostat I had used to control replacement motor speed. This sort of works, motor only draws 0.1 amps, but the air flow is still a lil shy. Using the resister I can reinstall stock motor for better flow- and cut its 1.5 amp draw to 0.9-already verified. The rheostat will be removed (it would smoke with stock motor-hence the warnings & reminders to self)

Looking at it though is where my plan became convoluted. I want the outer door closed when cable is pushed in- pull to open. Means reversing the movement. Plus I want a transition from steel cable to non rusting material going thru outer door, don't want the steel cable going thru outside.(I'm a block from beach)
Otherwise think you could just use cable, when cable seats again vent face the door would be in full open, pulled out would close, use cable stop to limit pull, one may be needed to 'push' door open if too much wire weight on door
This is what I came up with. I was going to use a simple flat pivot bar to reverse the direction of movement -but nothing inside housing that will work to mount. Thinking about wnjj's mod realized axial would work, instead of latch on each side a rod running side to side with 2 arms.
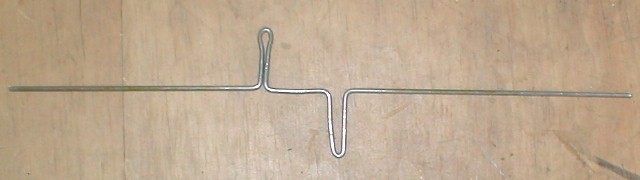
Above is what I bent up from coat hanger. It's easy to work with cheap to proto, the cable will push/pull-rod pivots other leg with connected rod to door will push/pull in opposite direction. Trick will be in adjustment of lengths. Then realized if I just used clamp on ends I could adjust as needed. I had a mess of small steel rod ends with set screw. Just collars, available any hardware in the specialty bins. I did have to get longer set screws cause smallest is 1/8" hole in collar. Using will allow this to come apart-cable attached from face of vent if fixed means I can't pull face to rewire.
Drill two holes in sides of housing, bent one end of pivot rod 1/2" 90°, inserted bent end of rod thru one side, then worked it in till other end would clear fan hole- then insert opposite side. Bent the other end over 90° with a 1 1/2" leg, thinking I will add screws as rotation stops so rod couldn't over travel door swing. Inner door is removed-not slotting it until final assembly. Hole in door : as both the vent and cover are in the shop I had to reinstall in camper to mark, took back to shop, Drilled hole in outer door (my vent is out, if drilling outer door on camper & cant access, heat a wire or ice pick, with door locked shut carefully push thru door), Adjusted cable length (wire cut long), with door pulled shut made link rod, cable handle against vent tightened pull stops, when pulling cable in door is just short of full open tightened remaining stops
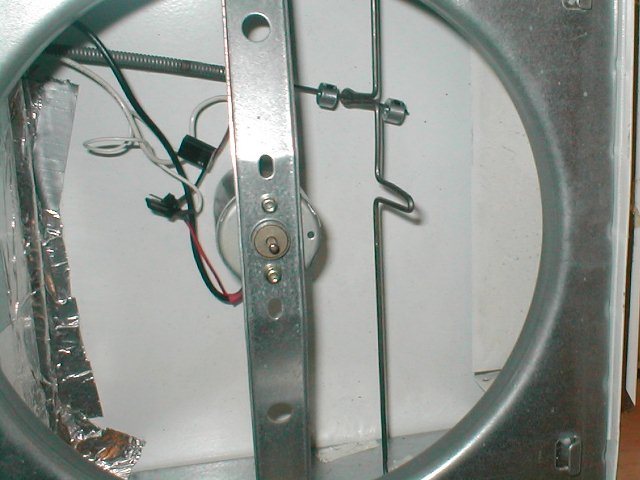
Assembled to verify function-having doubts...Works!
Sorta...Though functions it did let me to see what I actually should do, But the idea works.
1: Pivot loops should be 90° to rotation. Because loops are flat to rotation cant pivot if stops are close, so had to leave quite a gap which creates to much slop, and then rod doesn't full pivot. Ill twist loop that cable uses & bend end of cable wire 90° with stops on either end. Will make length of cable nonadjustable but it causes full rotation of rod when handle moved in& out. Other loop will still need to be flat for adjustment for length, will be from pivot rod to door. I can guesstimate +/- 1/2" adjust final fit when reinstalled in camper. So I'll leave the other loop as is, flat to rotation (but closed) so outer link can slide thru loop to adjust length. As it only needs to hold door closed Ill adjust in that direction, any slop will be how far door opens which will be assisted by fan.
2. The open loop was an attempt to allow door to swing freely closed when rod in open position and fan off. However outer link rod travels up loop instead of pivoting. So will just make hole in door a tad larger so it can swing. Make another closed loop.
3. Instead of the sliding collars that I'm using swivel stops would work better. Wire going thru loops with stops on either side, swivel stops would go in loop and wire goes thru them. This would allow end to pivot in loop, wire would slide thru for adjustment. These can be purchased or could be made with simple small screws with a hole drilled, insert screw thru loops, a nut loosely then wire thru hole another nut clamps. But I've already these other ends so I'm using.
4. My spacing of loops is off, the loop cable attaches to needs to be a little higher, its causing cable to bend to reach.
5: Instead of bending over opposite end of pivot rod to contain in housing I used a stop collar to contain. Bending makes it semi-permanent. Only need a stop when pulling so I'll put another rod end on cable- pulling it hits sheath when door is fully open.
Big fuzzy pic. Prototyp2. Re-bend a new wire
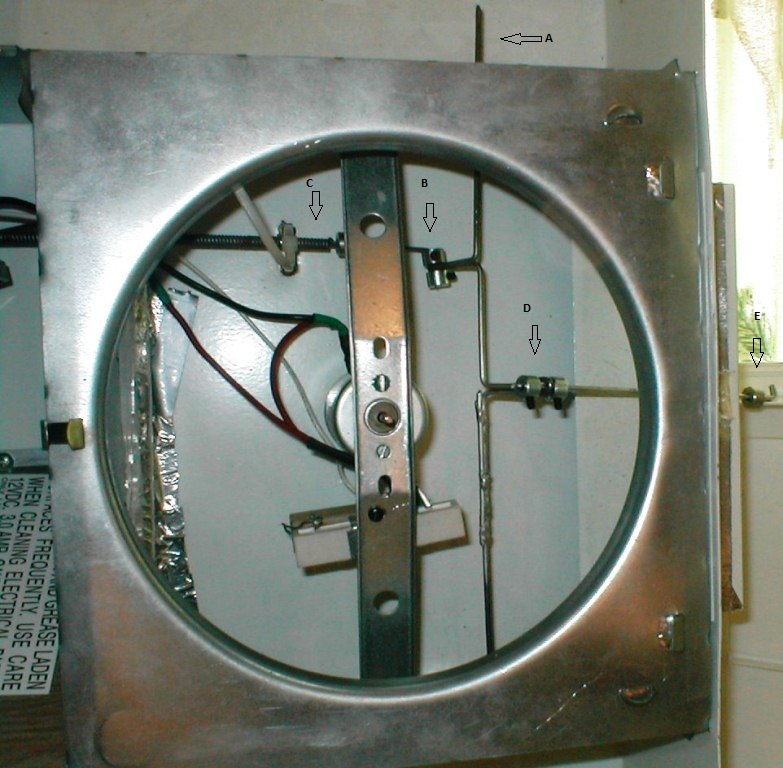
Loop for cable [B] is 90° to original and bout 3/4" more from door link loop [D]. Door link loop is also a closed loop now. I also made B loop lil shorter and D loop longer-decreases travel of cable to about 3/4",increases travel of door link (1 1/4"). You can see the cable out stop against sheath [C]. I used another cable stop at [A] instead of bending over so rod is easily removable. other end of rod is bent to 90°. Door link is aluminum rod, bent at end to pull door, I have an extra stop that can be placed against inside of door to push [E]. Still debating on that-as door even with weight of rod on it will swing closed with fan off and swing open with fan on, nice to have the door closed with fan off. Think I'll try it floating, if door doesn't open I can easily add it back from outside (testing verified pusher not required so not used-allows door to freely swing closed when fan off).
Assemble and loosely reinstalled vent in camper and vent cover to outside wall. Adjust the rods secured. Tested WOW it actually works-surprisingly well-very cool. Such a simple idea but spent several hours figuring it out. Took it back down and to the shop. Plan was once prototyped to weld up a nicer rod-once all the angles lengths etc. was figured out. But it works too well. Ill pull apart and document/pattern all the numbers-never know might want to make another for a 12 year old vent
Lastly; What you're not seeing is the inner vent door. It was removed during all this. Figured just in the way setting this up. I want this completely free to swing so will cut a slot in it to clear rod. Some folks remove inner door but one it blocks against marauding bugs, & how ever so slight it might be, thermal isolation from outside. Thought making the hole in it would be simple once rod set between pivot and door. Remove link rod, reinstall inner door. Sighting for rod hole proved difficult with vent reinstalled in camper but got it. Door has tabs that swings on plastic push rivets, slight prying it comes off easily. Guessed at location, took out & drill hole. Reinstall door & rod, check, enlarge-several times in & out until slot let inner door swing freely regardless of rod position. Once inner door was clearance, remove outside vent, putty and reinstall. Install readjust all linkage, reconnect wiring reinstall face panel.
Vent door closed.
Done!
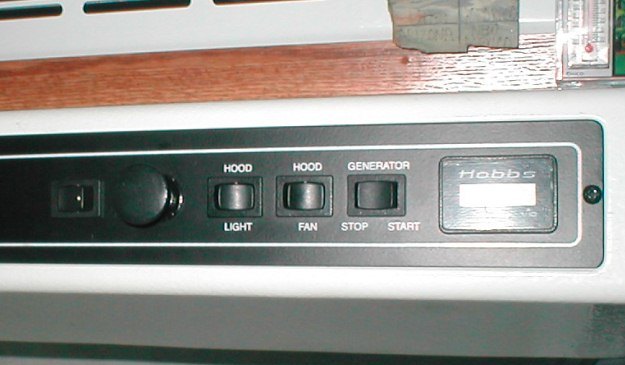
New cable actuated vent lock, new switch far left hi/low for vent fan motor, now 2 speed (see below). A lot quieter on low speed but still pushes doors open &draws a lot more air than previous attempts. Astoundingly both doors work freely as they did before, the inner door blows open and closes when fan off, so does the exterior door. So I removed the pusher stop. Stoked...pull knob out to unlock door-rod slides thru hole in doors-they stay closed-until fan turned on- they both open-turn off fan they both close, rather amazes me I didn't think they would or at least the outside one. Energy well spent, now that it's done.
Door unlocked-opens when fan on
Drew up to document what I did in Autocad drawing with numbers that might help-saved as pdf file (need acrobat reader to view. With some of the process in design, some considered options
Pages 1 & 2 black&white plots clearer for printing Page 1 Page 2
single page screen shot, both dwgs in color Vent drawing
Changing the stock motor to 2 speed
-
As mentioned I noted when at ventline web site a resister is used in conjunction with different switch to make it 2 speed. This will be 3rd time messing with vent motor. Stock motor & fan is just loud, uses a lot of power, and just loud. I tried a cpu muffin fan- Was cool-worked, very lower power consumption but the one I chose really didn't pull enough air (need at least 150cfm or better).
Then when disassembling an old HP printer to recycle I found in it a motor that is similar to what's used in vent same size/splined shaft. Tested it, pulls way more air than the muffin fan and actually used LESS power. So replaced the muffing fan. However it also was marginal-at least when brewing coffee in the morning.
So I'm now I'm reinstalling the stock motor. I have a couple of old resisters. Tested and brought consumption from 1.5 to 0.9 amps. At the lower power it is considerably quieter but still pulling a lot of air. I'm adding a switch that will either send pull power to motor or thru resisters for partial power. Unfortunately I did not record values of the resistors.
Since vent housing was out I added resisters to motor mount-you can see in 3rd pic above. This will help them survive as they generate a lot of heat. Wire that went from on off switch to motor on vent housing face runs to new switch I've added. New switch sends it (full power) either directly to motor or to resister then to motor.The old RC charger I robbed for discharge resisters had identical switch as what is on the vent so installed on face since it matches. Was going to put on side of box, probably never use on high.
Previous did work for general venting/removing fumes from oven-heat just couldn't keep up with the steam in morning-which is a big deal in the camper-especial on winter mornings. When /if I come across a muffin fan with higher cfm I'll replace the motor yet again because of the amp draw. Why the mfgs don't include or offer as option a simple effective variable or min fixed 3 speed switch similar to what's on a better roof vent is beyond me.
Previous install of the muffin fan at Muffin Fan page.
Back to Ourelkhorn Camper Modifications page