|
QUITE FAN! Leaving this page up with the different approaches over the years to address the stove vent fan noise.
Recently changed switch to PWM electroninc varible speed controller. Also replaced motor and required fan blade (smaller shaft) with a new style motor. Some info and methods can be had on this page but if your looking to quite down the ven install a PWM controller. PWM controller page.
Update 04/2018: Well just finished installing a PWM speed controller in our Fantastic vent, bypassing its 3 speed switch. Uses less power at slow speeds, variable speed adjustment. Would be a perfect replacement for existing switch and resistors-doing exactly what I've been stumbling thru trying to accomplish. Slow down and quiet fan, with variable speed to adjust as needed. Doesn't change poor design of fan itself. For about $10 bucks-, Still leaving page up for what little may be gleaned and mechanical ways to modify fan. Still believe correct muffin fan is the cure-short of total fan shroud replacement...
....UPDATE 04/12: Changed the motor yet again, well reinstalled the stock one. I should take this page down but there may be information you could use. The muffin fan worked and is optimum choice IF you get one with high enough CFM. One I originally used was too low ~80cfm. Replaced 06/10 with an old printer motor. Which was more cfm and even less power consumption-but still wasn't enough flow in the morning to pull out steam from coffee pot, old printer motor seems to have slowed own, not as fast as when I 1st installed. Though either worked well for general venting (ie removing heat and fumes when oven on). When recently adding an interior vent door control I was at the ventline site looking at housings. I noted on the 2 speed vents same motor is used but has a resister and a differnt switch-to either run full power or thru resistor. Hmm I have a bunch of old RC discharge resistors, I had tried before couple different variable speed switches with no success-didn't think to try a large, The switch on one old charger is identical to what's used on vent. So I reinstalled the stock motor. Used 2 inline resistors, added switch. Noise is ok @low, half power amp use though still high is cut from 1.5 amps to 0.9 amps. (see vent page) Still on the high side amp wise but its drawing air on low and can be turned to high (gosh I forgot how REALLY loud that thing is). But this works for awhile. Ill will replace if/when I get a muffin with at least 150cfm. Just FYI
....UPDATE 06/10: Well we used the muffin fan as installed below for a few months now, quite-the leds were nice and it was working but-. I noted last outing that maybe 3/4 of the steam from coffee pot was flowing out past vent. The vent doors were still opening but just didn’t seem to be pulling air out. I’ve left this page intact because the muffing fan works but really need a higher CFM than I used-Id guess at least 150CFM min, 120mmX120mm(6"). There are some links at bottom of page but if you look you can find many options. I just bought on impulse and gave it a whirl.
Returning home I checked a motor I had pulled out of old HP 540 printer. Its almost Identical to stock vent motor, same spline shaft just a bit taller. (ie look before you throw out those old electronics. This motor is labeled RS-555SH tons out there however there are many variations? used in a lot of small toys, electronics, printers, tools etc.). Put the original fan blade on it, hooked up to power supply- drawing 0.15 amps! That’s less than muffin fan 0.3amps at high & only 79cfm. Its moving bout twice as much air. So removed the muffin fan & installed the recycled printer motor with old blade-yup lot more air- bit louder though not near as loud as stock motor, lost my midnight snack light but this motor more effective for moving air. When I wired muffin fan (below) in I had left stock wiring intact so I can install either a can replacement motor or muffin fan (when I find a larger CFM one cheap) as I don’t know how long this old motor will work.
There’s probably a thousand dc motors we could chose from but finding/identifying them is difficult, muffin fans are easier to locate/identify -CFM verses power consumption and noise level, and relatively cheap. However you need minor mod to install. On to original replacement..
Well last week my computer OS registry dumped (backed up your stuff recently??). Decided after a lot of work trying to restore to add new larger HD, hook up old hd as slave and start from there. So went looking for new HD, Anyway I'm standing there in the store- and on the top shelf I notice a whole shelf of cpu fans. Hmm, that's what Id rather be doing. After picking new HD for computer I looked at the fans again. I started comparing the CFM ratings. Rather small-then I picked up one, three speed fan, rated 39/56/79 CFM, had led lights. Hmmm still kind low on CFM, but 79 might open the vent hood door, largest CFM they’ve got. The leds would make some nice low power night lights....power consumption minimal- but will it actually pull enough air?..What the heck, so I picked it up. Its an Antec Tricool, 3 speed/3 led - 120x120mm.
Install, Computer muffin fan in place of stock can motor:
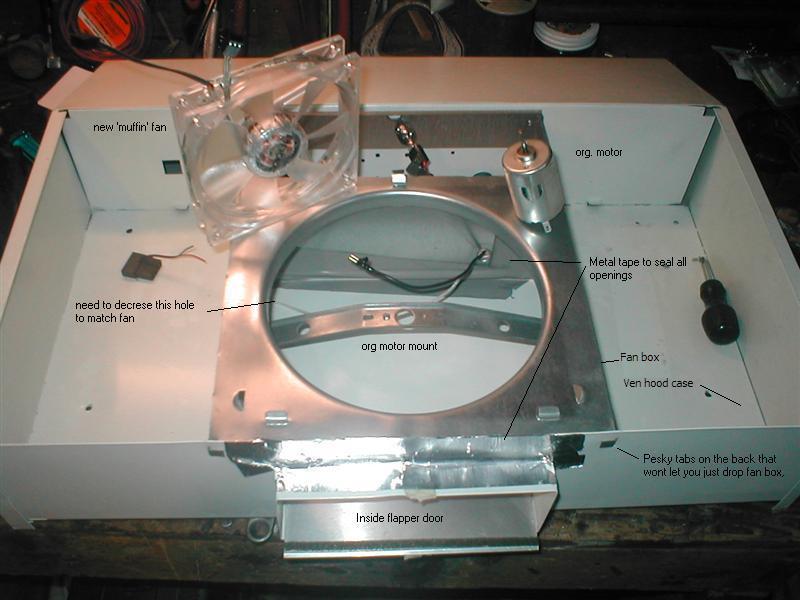
Take to shop to see what needs to be done to replace fan. Oh I also seen why the fan box wouldn't come off, It has tabs that go thru hood case and are bent over. You cant access after hood in installed. Why use tabs if it screws on-redundant makes removal impossible installed. Oh well , I could cut them off for future ease of working on the fan-but I'm going to seal the box to case so separation wouldn't be easy-and I guess tabs do hold the back of box against the back of case.
Above I've started the install. To remove the fan & motor: Mine the fan is just pressed on the motor shaft, a bit of effort and it just pulls off. 2 screws hold on motor. Unplug 2 wires, black on mine is hot. The case has a cross bar that held original motor. Looking at the pancake motor/fan I could easily make something to hold it that would screw to existing brace. There's enough room between brace and fan screen. I'll need to make a cover or something to make the opening smaller. Proceeding to use metal tape I seal all the edges/ holes inside the fan box. I want any air the fan pulls to go OUT and not back inside the camper, might help it push open the 2 flapper vent doors.
I realized I could just cover area of the metal screen to resize opening instead of making another cover. Then I realized the muffin fan could just sit on the screen instead of making a mount. The fan has a plug on wires if I need to remove. So I mounted the fan to screen, used metal tape to cover & seal the areas around it. I soldered the fan plug wires to back side of org motor wire terminals (in case I want to reinstall org motor). Covered in heat shrink. The fan has an extra plug for cpu monitoring -just wrapped &left on. The 3-speed switch for right now will just protrude from under screen. Its actually more of a selector than a constant use switch. It does not turn off the fan, only selects speed. Its wired to org motor wires, so existing vent switch turns on fan. If you need to change speed-you use the 3-speed switch. As I still don't know if this fan will work so this is how I mounted.
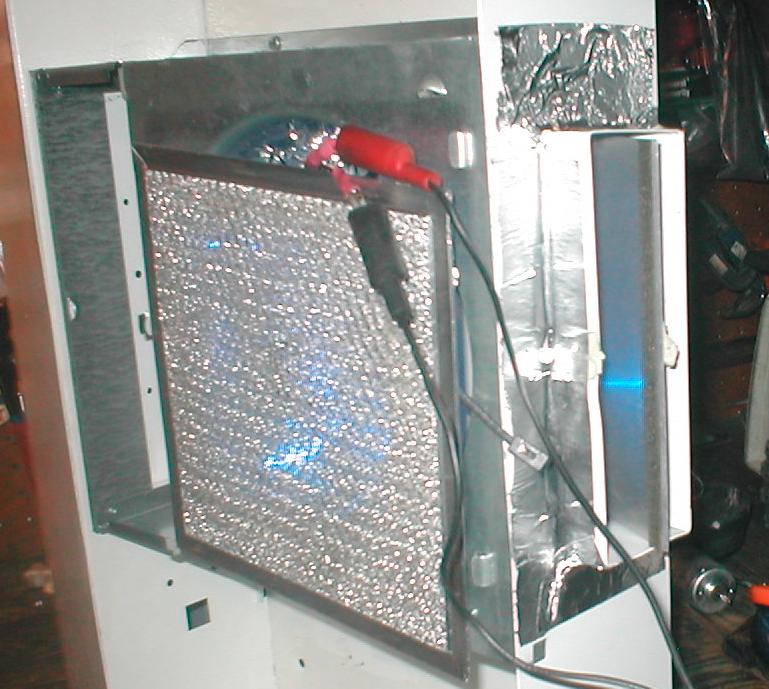
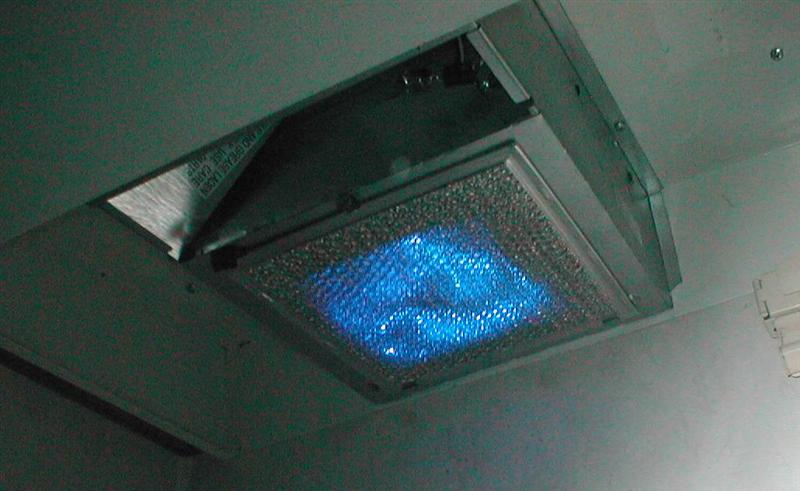
Above-I stood hood on side & closed the flap door, hooked up 12v, turned on the fan, at low speed it opened the door! COOL. The lights are really bright but are filtered thru the screen. Now that I know it works Ill reinstall the fan on the screen, Using a piece of disposable cutting board sheet material Ill cut hole size of fan, place on screen then mount fan to screen using wire ties. That way screen can be removed by unplugging the motor, undoing ties to remove fan and hole cover for washing. (in the years we've had this camper I think I washed screen once, course now that we may actually use fan, may need it more often :) The switch needs to be changed-don’t know how long it will last . When/if I find something Ill cut off old switch, put a plug on motor leads and run to new switch. Again this isn't an on/off switch- 3 wires come from motor, one of the wires is hot (low speed), switch connects, I assume, the 2nd wire for medium, 3rd for high. Motor has 3 sets of windings, odd lil thing
Whoo Who! Snack light!-
ON EDIT: Recent post on RV net got me looking again, wished Id seen these before. I bought off the shelf but there are a lot of options on fans, these 2 higher cfm AND come with a variable speed controllers-perfect. Most, though I did find one,-speed controller doesn’t turn fan off so you need to add or reuse existing power switch.
Back to Ourelkhorn Camper Modifications page
|