Add Ubiquiti WiFi antenna and booster to camper
Something we've been pondering, increasing range of access to Cell phone and WiFi service. All voodoo and magic to me. While on the road we often try to find place that has WiFi so we can 'check in'. WiFi access is limited in range so need to be near a source. Cell service usually not a problem on the road, at camp though generally cant get signal (if present) inside of camper. In remote areas cell is the only viable source, if lucky, to access. So that was first want- cell phone booster. I also had assumed that Wifi booster would be more involved and expensive than cell booster.Brief research into cell boosters realized quite the opposite is true though. It costs, so hadn't really pursued other than wishfully thinking. Wifi booster would be nice but without Cell service when in remote areas just not a lot of motivation.
However recent thread on RV.net poster installed a Wifi system for under $250, then another mentioned the Ubiquiti System for about half. I checked it out, kind of cart before the horse in my opinion as far as access but when in a campground that has WiFi will be nice to actually sit inside the camper. Cheap enough to try. Though cell access is main goal, for the cost this will allow access to better campground Wifi signal without walking around with laptop in tow or connect to hotspots thru semi protected network on the road. Get me started on better connectivity.
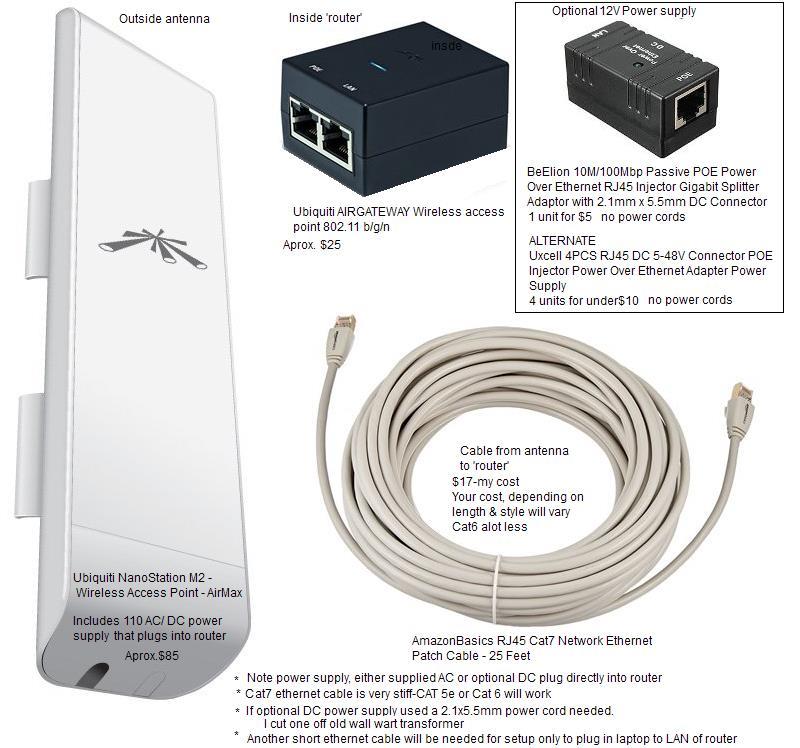
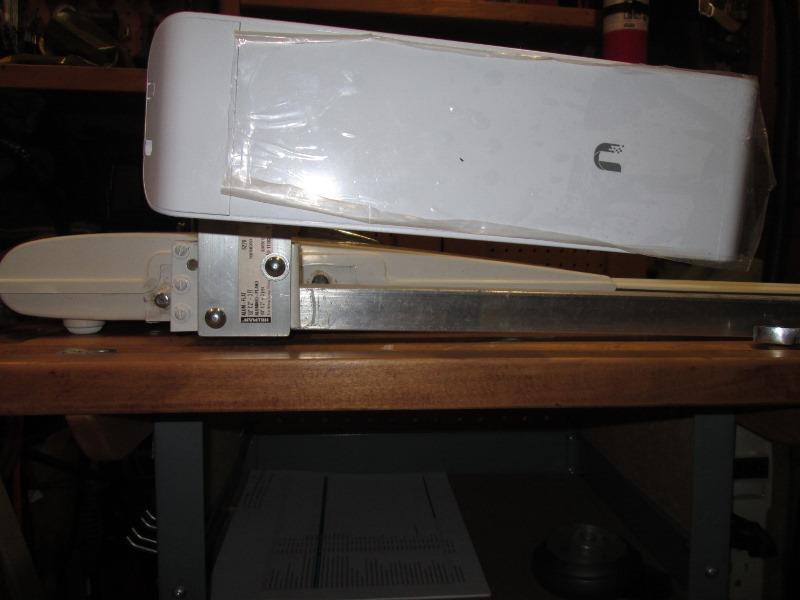
Components I used. Ubiquiti Nanostation M2 directional antenna and Ubiquiti Airgateway access 'router.(Note 2019, scince my install the 'Airgateway' router has been replaced by 'airCube' router, the airgateway no longer available) I used CAT 7 ethernet cable because I had to route thru and with a huge bundle of other AC and DC cables and wanted extra insurance of clean signal. Its a pain due to stiffness. I used optional 12v power supply instead of the included AC/DC power supply to run directly off batteries instead of 110 (shore or inverter)
- Split into sections, This page done while doing the install-mostly for my own reference.
- TOP of this page
- Install Ubiquiti outside antenna to Winegard TV antenna
- Prep and pre wire, mount the 'router'
- Run Ethernet cable
- Testing and Use
- links that might help
I'll add some links to installs and videos that simplifies install/setup of the Ubiquity system (bottom of page). Caveat in inexpensive WiFi system is its not plug and play. Some software setup required, entering numbers and changing parameter/settings, fairly simple but can be a stumbling block. Quite few have outlined so Im not addressing any of that. I was able to follow along and get it setup and am amazed at the increase in range. If I had to redo from scratch I would need to re watch others step by step instructions so doing any possible reader a favor by not trying to explain.
All Im doing here, other than recommending the Ubiquity NanostaionM2 WiFi antenna w/AirGateway access point is my physical install. Pretty straight forward. The Ubiquiti antenna is directional (pointing at source) so you need to be able to rotate to find best signal. Many install on a pole. I choose to mount to existing Winegard antenna, 1) for the height, 2) can rotate from inside camper and 3) its there-no extra setup
I went into this because it was relatively cheap and easy, not really expecting a lot. But now that its done, WOW, it is simply amazing at the range and strength of signal. Well worth the effort.
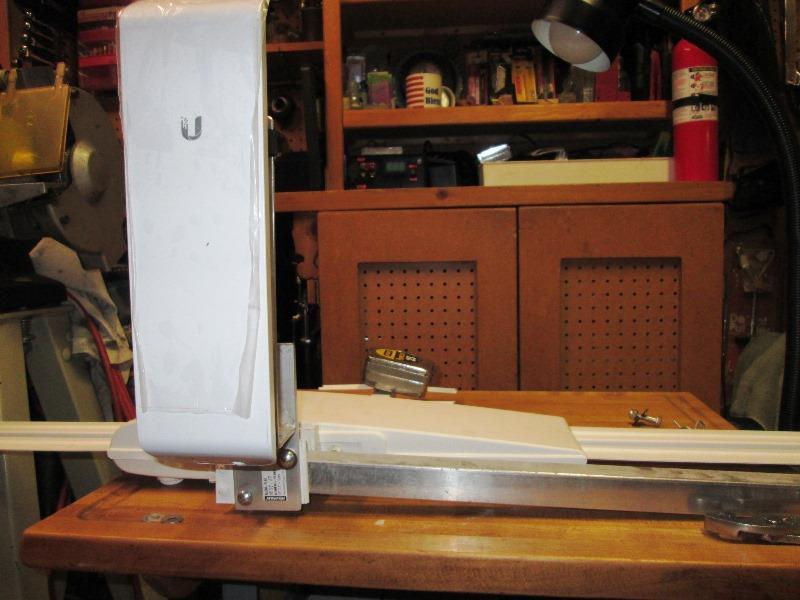
I laid out components in shop to set up and ensure it worked before installing in camper. Accessing the Nanostations software thru laptop, following others guides was easier than I thought, a little confusing at points but watch enough videos until it makes sense. Hardest part was changing settings temporarily on laptop itself. Once working I was picking up over 40 SSID sources with antenna lying on workbench!
With everything working I was eager to install in camper. First is install outside Ubiquiti Nanostation antenna. Then mount the inside Airgateway and run power. Last is run the ethernet cable, the task in my opinion, from roof to inside router.
The rest that follows is how I installed our system.
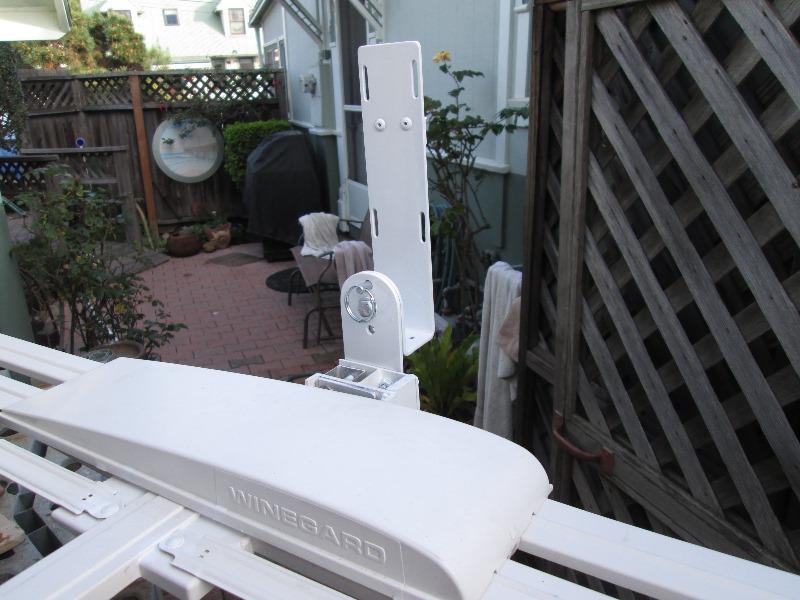
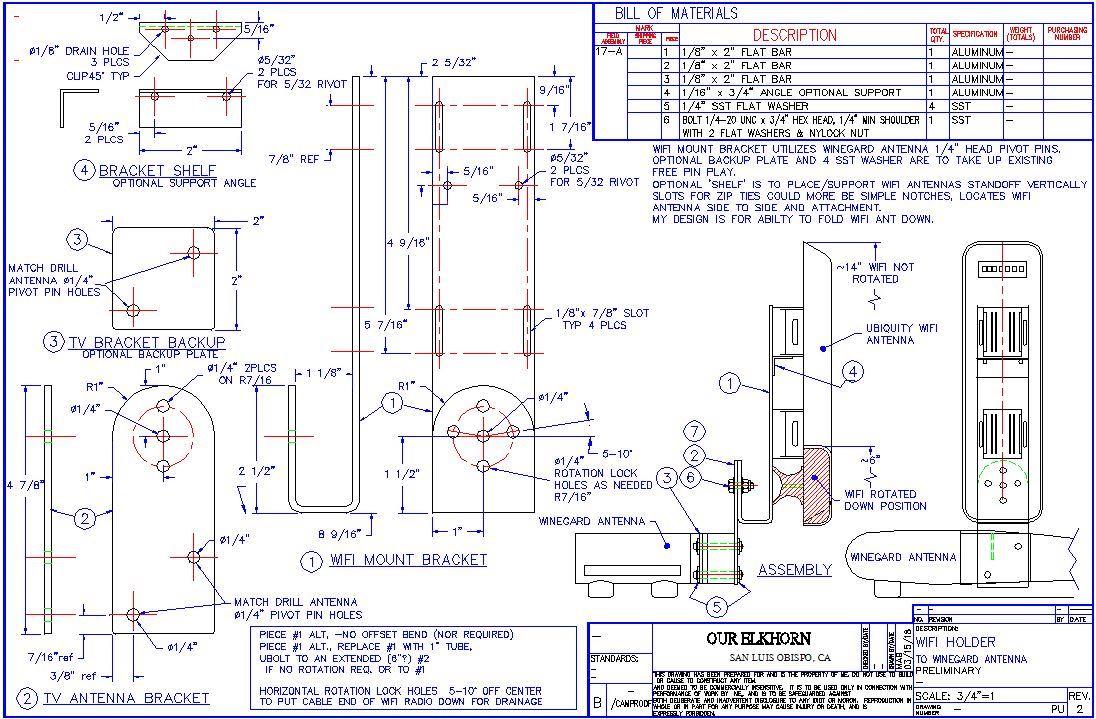
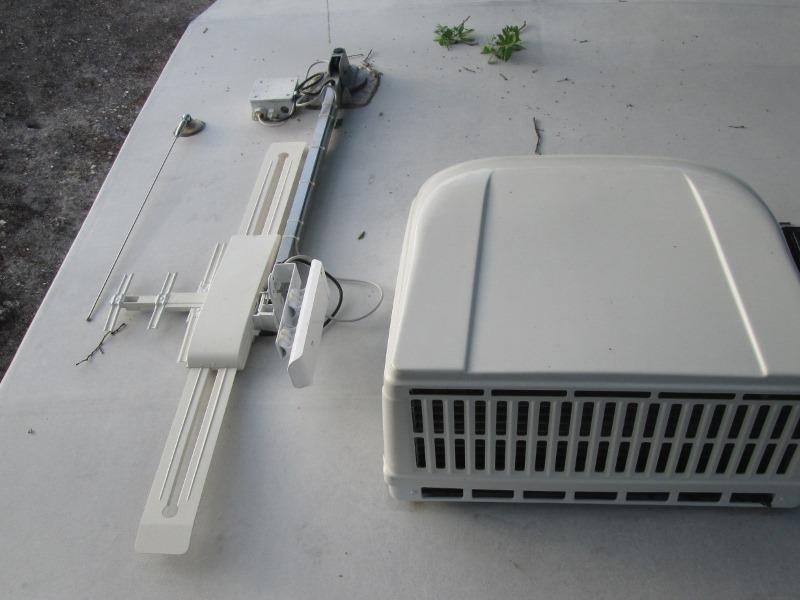
WIFI Antenna mounted to TV antenna
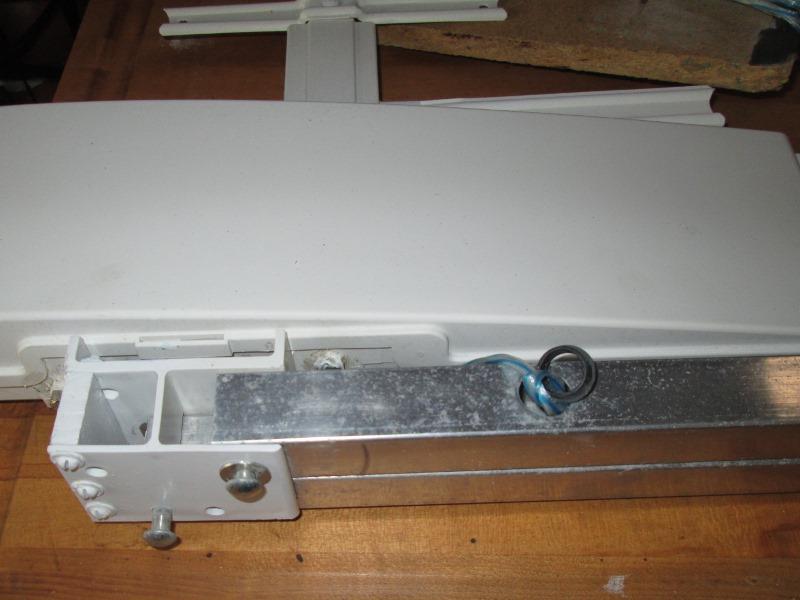
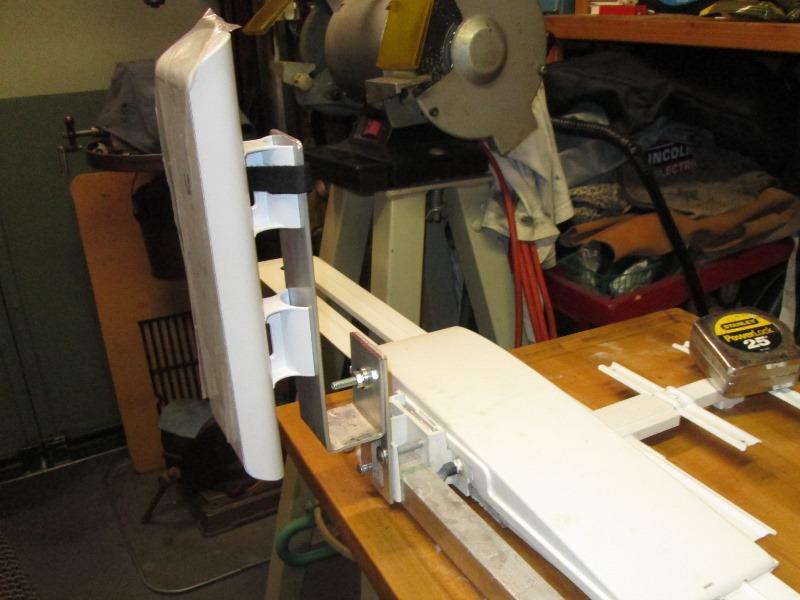
In the shop is when I realized using the existing pins for the head would rotate the new wifi antenna with the head keeping vertical. All I need is means to rotate when on the road or stored. Easy enough to make a plate that attaches to head using pins.
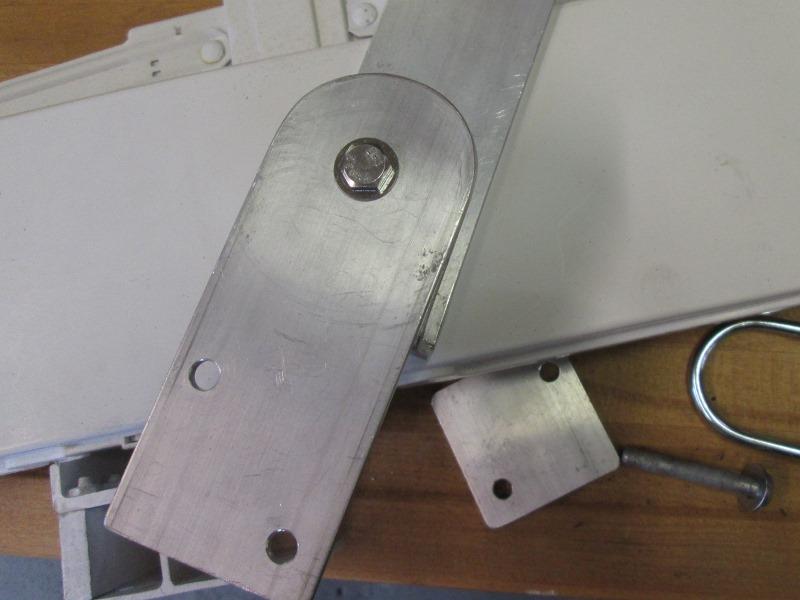
Simple 1/8"x 2" aluminum flat bar that attaches to Winegard mount. On the workbench is smaller backup plate.

To mounted bar is another plate. Both drilled so larger plate can rotate. Both drilled with holes about pivot bolt to insert pins and retain in what ever rotated position I want. Forward for on the road or rearward for storage. Also for storage is I bent the WiFi mount plate to place WiFi ant closer to air conditioner. Otherwise it could have been flat.
I then slotted (drill a bunch of holes then cleaned up) for zip ties. Distance between slots will locate WiFi ant side to side.
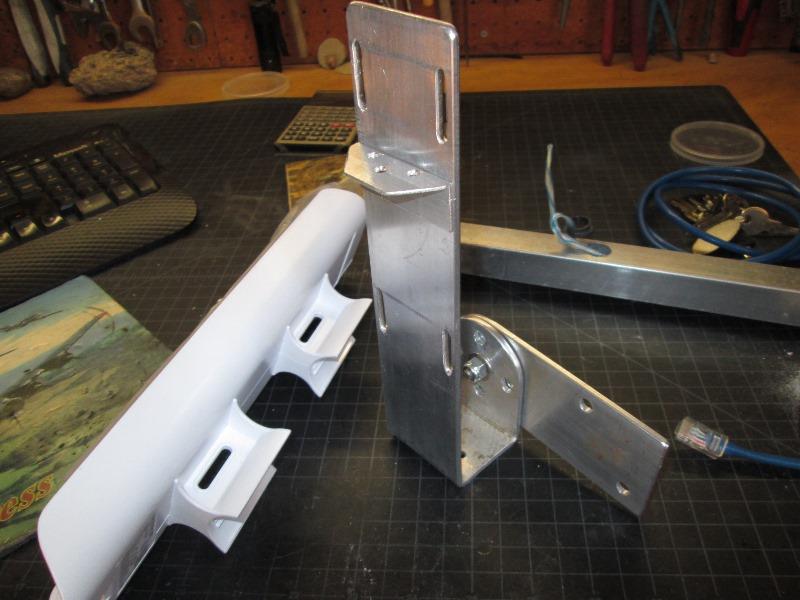
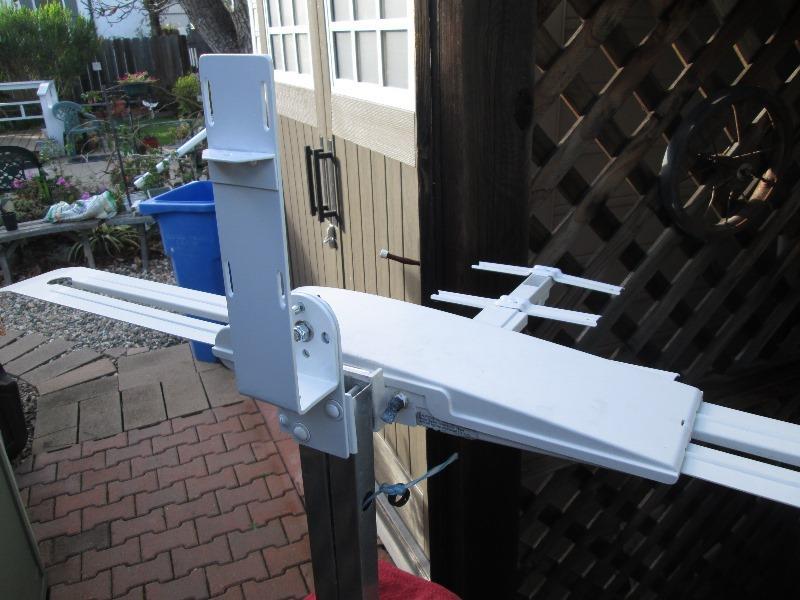
A bit later but better shows rotation lock holes. Add small piece of angle for ant to set on. If not for the wanted stand off simple flat bar mount. Even the slots could have bee notches. Spend as much or little effort as you want.
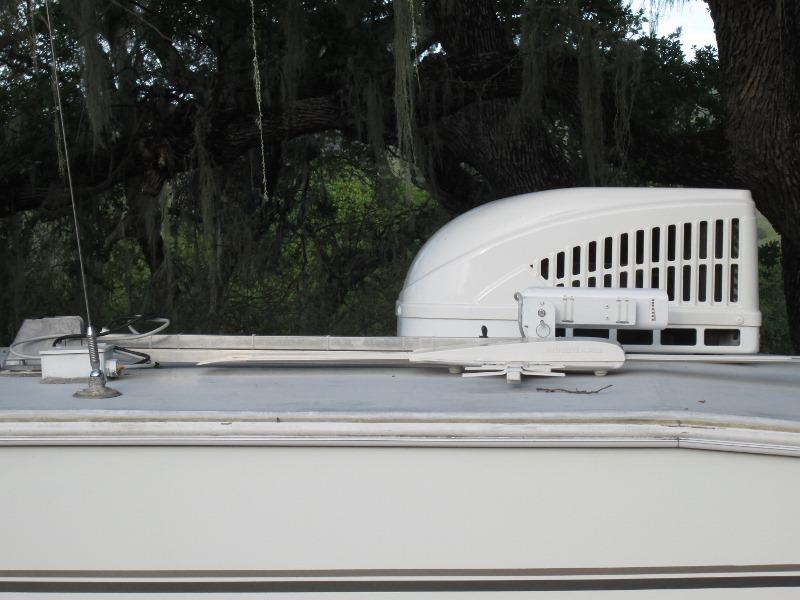
Winegard stowed down, Wifi ant rotated down. Note this was before I added rotation lock holes which keeps bottom of Wifi antenna lower or angle opposite of what's shown. This would be on the road rotation. If you hadn't noticed our Winegard head is flipped side to side so its 'wingman' feature doesn't hit AC when lowered.
And Winegard stowed position but Wifi ant up. As it points right at the AC this may or likely may not work. depends on signal source.
Honestly considered the flat part of bent flat bar as another pivot point. Instead of the U bend simple 90�. Add another 90� bent piece between the 2. Clear as mud but it would allow the outer half not only rotate as it does but also pivot vertically. Minor redesign to get 360� but it actually would have been easier than the double bend on the one piece. Advantageous in high winds or stealth camping. But done.
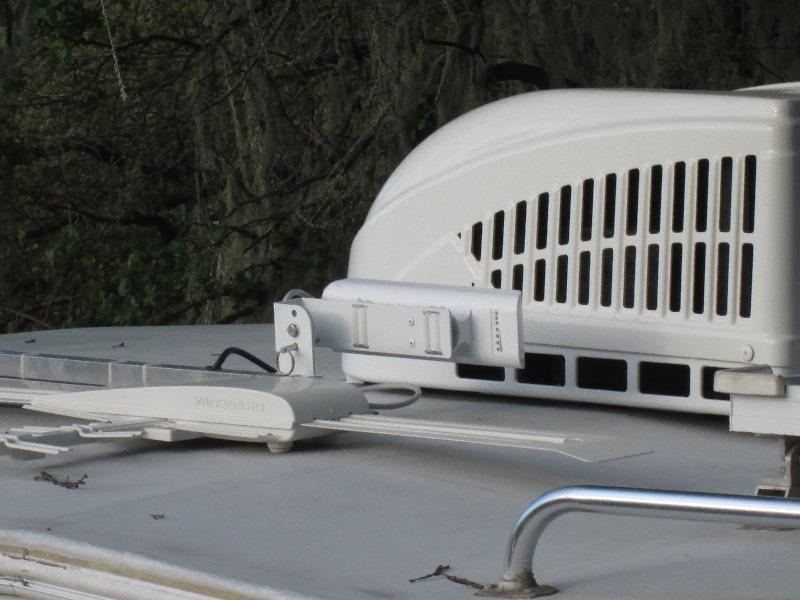
Winegard in raised position. Cleaned up and painted new mount
Ready to replace on camper. Single lock pin to pull to rotate the new Wifi antenna. Always mounted ready to use, raise and point. Disadvantage is getting on the roof as I wont drive with it rotated up even when Winegard down. Too much force may be transferred to the Winegard plastic. Ideally some sort of support so it stays in vertical position on the road. Have a simple idea that mounts to roof but maybe later.
Opens drawing if curious
in new tab
Back to the Index
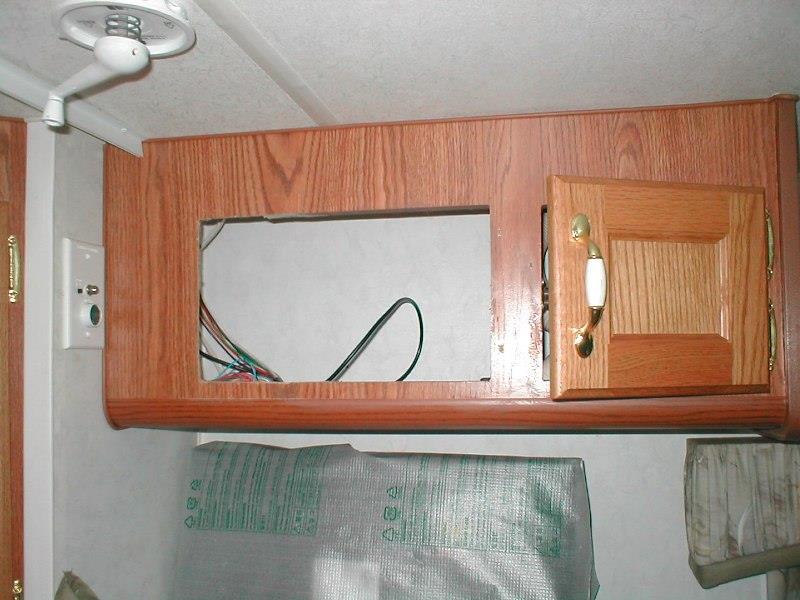
Inside: Mounting the 'router'
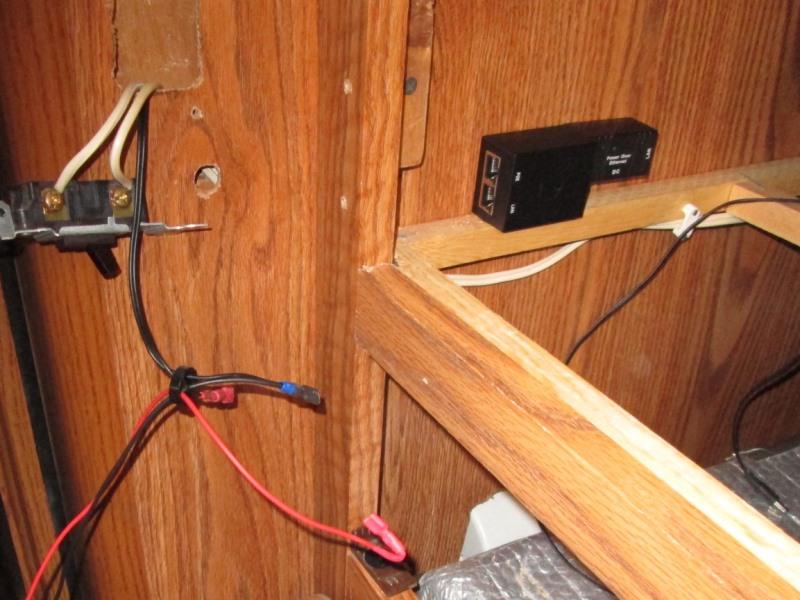
Wires run and soldered ends to plug into switch. Plan was- Push wires thru hole with the retaining nut slid on as shown, attach to rocker switch then install switch retaining nut reaching thru light switch hole. Total fail. Once wires plugged onto switch retaining nut will not go past terminals. Wall too shallow to plug onto switch once mounted...err.
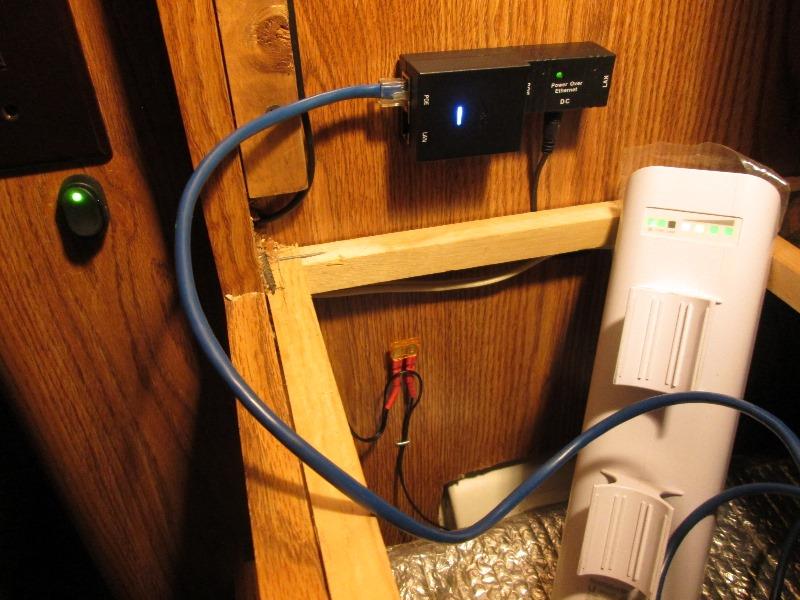
Ended up cutting off the solder on connectors, pull wires thru hole, slide retaining nut over wires then solder wires directly to switch. Install switch thru light switch hole. Once switch mounted and wired, connected one lead to source, the switched power runs thru 5amp fuse then to one wire of the 2.1x5.5mm DC male power cord (plugs into 12v power supply). Ground wire to other wire of power plug. That worked. Temporarily mount Airgateway router and 12v power supply to wall.. Tested everything works.
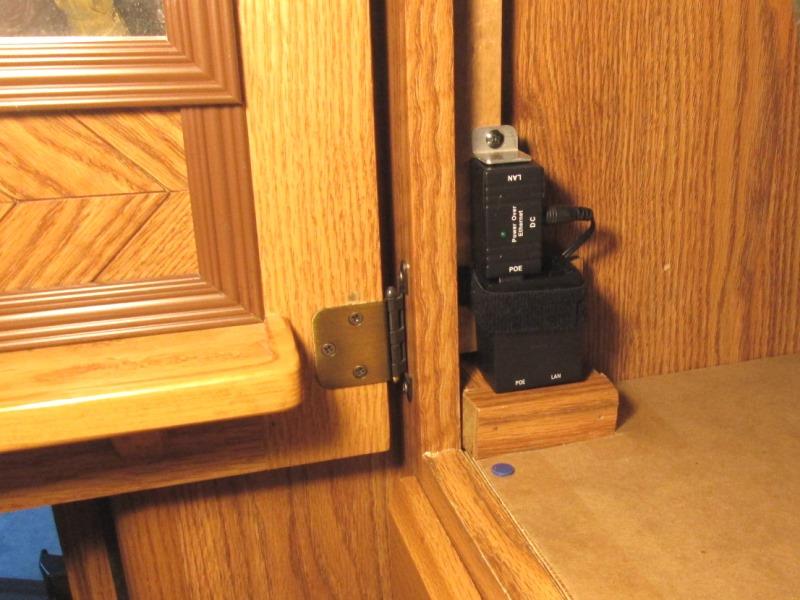
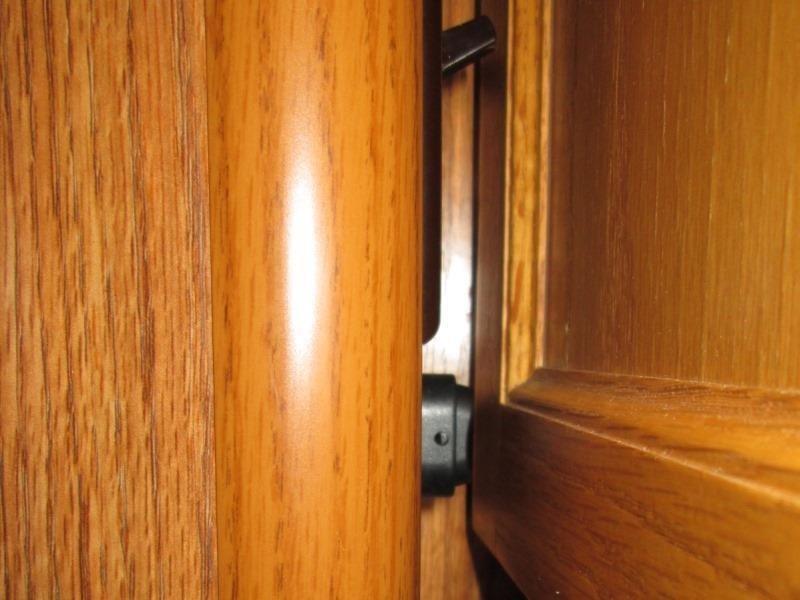
Locate Airgateway, boxed cables enter thru cabinets bottom. Added the clip to retain vertically, velcro strap to hold in position. Everything easily removable. Remounted the closet door...uh houston...
Oopps
Turn on switch, open door, look inside closet to verify working and see routers pilot light is off. Close the door and switch is off? Turned it back on- same thing open door and Airgateway isn't powered? Close the door and the switch is off again, what the heck? Honestly did this a few times before I saw door frame touches new switch pushing it half between on and off. Worse Turns it off if its on, but turns it on if its off. The light switch is inside of door frame so not a problem. With door off just didn't see issue when I placed switch.
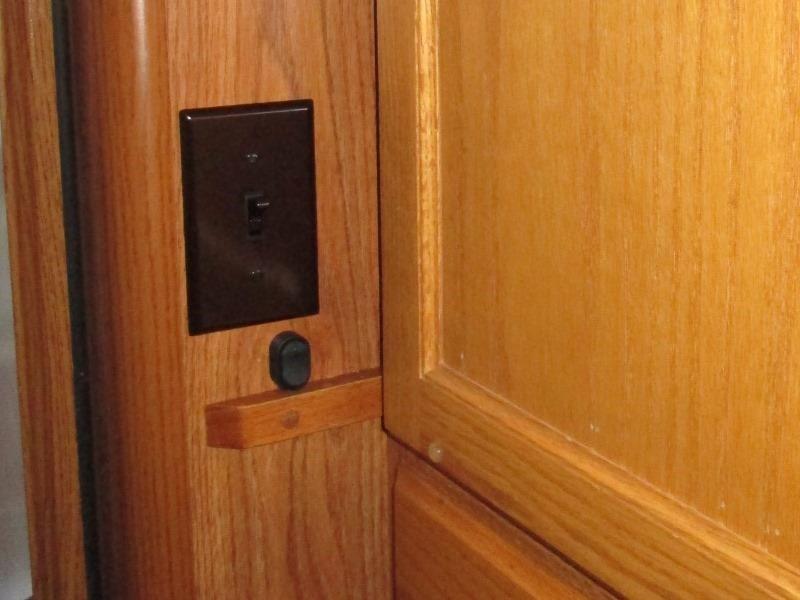
Cant move the rocker switch at this point. Only thing I could come up with added small 1x1 blocks top and bottom of door. Sure glad I decided to add switch, more that I removed the door to make 'easier'.
Running the Ethernet cable.
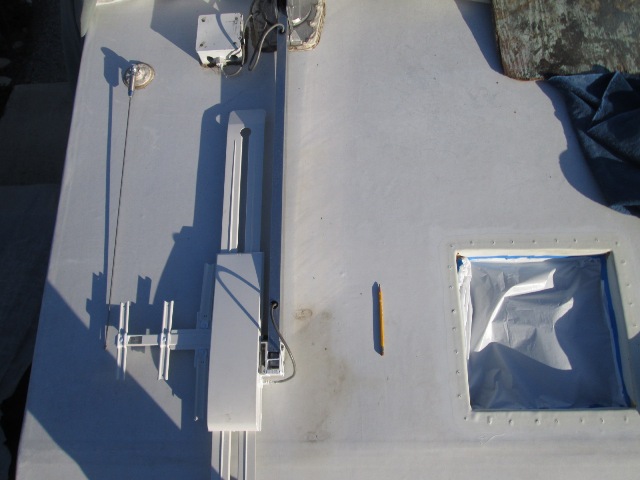
Didn't get pictures on roof-this is an older one but shows the access box. Leads directly into overhead cabinet inside, there are previously added pull strings. Installed Winegard with new Wifi ant. Guesstimate needed exterior length and pulled wire into camper. Took several in and out trips to keep from tangling. Once close attached cable to WiFi antenna., looped at ant and base. Ran antennas thru all range movement to verify then button up roof.
Update: Considerably later (a year) but finally got up on roof to take pictures of mounted ant.
Didn't notice till I posted, wifi antenna is rotated in storage position. Normally rests 180� from shown.
Traveling, cable end would be at rear instead of facing into the wind. As shown is when camper not in use and covered. Oh well. Kinda bugged me hadnt taken pictures of it installed. Almost see added second gland nut to access box for wifi cable, goes thru roof to inside cabinet.
When we get to camp its accessing from side of camper and rotating the wifi antenna 90� up. Using our new ladder can easily reach to unclip and rotate verticaly.
Running Ethernet cable inside.
End of cabinet has a false wall that hides where wires and cables drop from roof access box into cabinet. I had replaced the TV cable in the past and at that time added the access box and pull strings. Sure simplified

Once inside I removed everything from upper cabinet including microwave. Drilled 1" hole thru all joining walls to reach back of wardrobe.
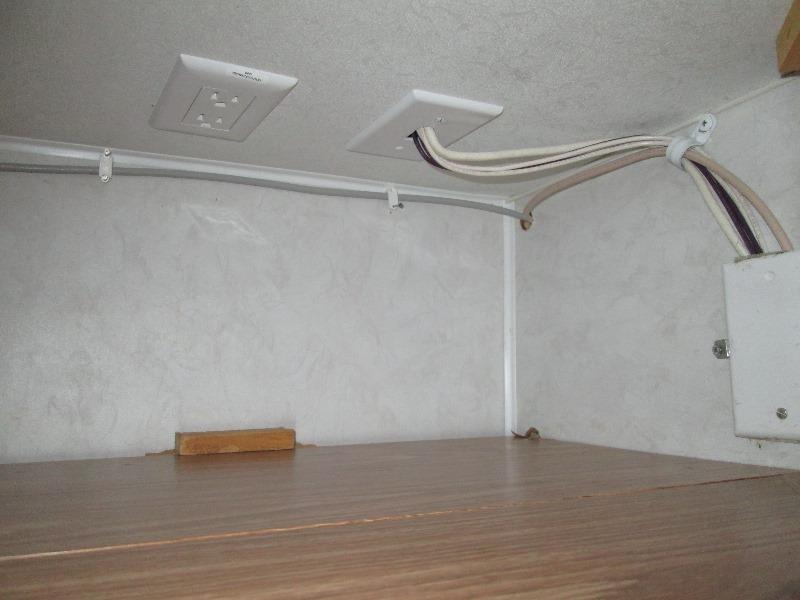
Ran the new ether net cable (gray) across thru tops of cabinets. The wardrobe has a false back wall. Bought cable down behind wall, then under wardrobe bottom and connected to Airgateway router. Ethernet cable was 25', I only ended up with about 5' extra that's looped behind wardrobe false wall. Button it up.
Testing and use
So impressed with the antenna and booster for Wifi and the difference it made we decided to spring for Cell phone antenna and booster. Not nears as inexpensive, quite a plunge but if it works half as well- we'll be happy.
UPDATE: Few months later but this system is just awesome. For actual cost and ease of use- well worth the effort. 2 fold-primary is where outside WIFI source available can directly access without having to sit outside or walk with laptops nearer to source-- Secondary and how 50% of the time we used was connecting the WIFI to my cell phone after installing Cell phone booster. Why?
When at a campground even though we can now get strong clear signal inside of camper and generally good enough to do whatever, it doesn't improve the signal being broadcast. Often the speed/ connectivity of the sites signal is not that great. Depends on campground system-number of folks using etc and what we are trying to do. Also some campgrounds use a security login page that doesn't play well with the Ubiquiti system. I gather appears to source as not what is trying to access, meaning our laptops can access directly but going thru the router access is seen as risk or something, so either wont connect or dumps. There is a way to work around but hadn't set up. We only had this issue a few times while out for several weeks.
Setting up phone as hotspot and connecting via the Wifi allows to rebroadcast phone to allow any of our devices to connect simultaneously. Drawback is there is some cost involved if using a lot of data, though we never have incurred additional charges. Plus is, just about anywhere, we have access to the internet -with all devices. Which in itself using the 2 systems, cell & wifi together covers our needs. Free easy if campground accessible-over the phone when needed and on the road.
A bit later....
This was outside of the Badlands at a small park taking a break from driving for a couple of days. Systems work awesome. Major storm blew in and relaxing /recharging in the camper was welcome. Im surfing the internet while Margaret texting the kids.
Links that might help to setup
Once logged onto a signal all other devices only connect to your router, no other setup required. Suggest you watch the videos/sites, compare the info, when you go to set up it will make more sense.
- Ubiquiti NanoStation (on a mac machine) long video but thorough, this is the one I followed using others to interpret initial Mac/Windows settings windows.
Ubiquiti NanoStation (on windows machine) Very good written instructions
Ubiquiti NanoStation (video on a windows machine) shows windows screens shots
Ubiquiti NanoStation (video on a windows machine) good windows screen shots, annoying music
Ubiquiti NanoStation (video on a windows machine & mac description) good but skips thru some details
AC receptacle Added for ability to use the AC adapters for this and Cell booster if we have power.
Cell antenna and booster addition
Back to Ourelkhorn Camper Modifications page
1802