Replace TV and old TV swivel mount table, add TV sound system
- Well another unplanned convoluted project.
- briefly install old camper TV in home for use with satellite service
- Picking up new TV
- Rework a new articulating TV arm to replace old arm & table
- Adding a shelf for receiver
- Modifying an inexpensive sound bar into a component system
- Adding a speaker shelf
- Hardwire all incoming signal sources to TV (no more coax swapping)
- This page actually covers several projects-I should split up but not, Ill try to clean up maybe even spell check after a bit...
The reasoning
We had added satellite option to camper a while back (see Satellite page) It was set up using a borrowed receiver (and her account) as our DirecTV contract had a few months left before we could get another box. As it expired decided to buy another box and add service for it. Though primarily for camper I decided it would be silly not to run wire etc and be able to utilize new box in the house when not in camper. Course means picking up another small TV for spare bedroom. And that is when project started moving...It occurred to me-since I need another TV, I could put the new one in camper. As the old 15" TV in camper is pre digital and were still using the extra tuner box when using over the air antenna, it would work with in house for satellite. Replacing camper TV with new one that has digital tuner means we could get rid of the tuner box all the extra wiring-cool.
Adding the cable to spare room pretty simple, moved camper TV, activating new box even simpler. Nice-granddaughters have their own TV when visiting and 'need' to watch cartoons or what ever. Most time I spent was going thru the channels and blocking 80%. Wow there is some trash out there.
Back to the top
Now the camper
- Went shopping for camper TV. Wasnít planned but when I was looking a lot of the new small TVs have dvd players. Changing out our antique vcr/dvd combo unit with a blueray has been on the list. If I get TV with dvd then I can dump the old and very large player and use built in player until/if that happens. That would get rid of the rats nest of cables and coaxes 2 extra units plugged in. New blue ray when that happens would only be a single hdmi. Convincing my self got a new LCD with dvd.
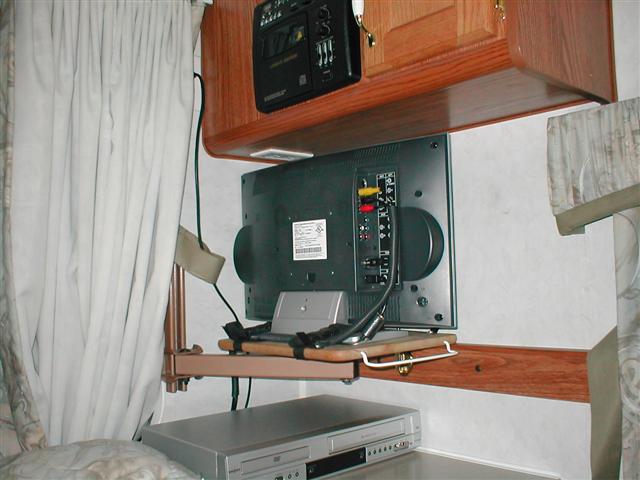
Our Old TV and pivoting arm/table. This picture was before the OTA digital switch and added tuner box, and since added satellite box. Which added a lot of cables. Looked like wiring fiasco from 1980's electronic center. Removing all the old equipment and wiring was odd, because it all worked- but amazing how many cables, patch cords etc was back there. Looks naked now-.
Setting new TV on swivel table was when I began to regret moving into the 21st century. Old shelf is going to need reworking to lower a bit larger TV. But the new TVs stand is VERY wobbly, itís not going to support TV on the road. Iím unsure how Iím going to secure. Before past TVs have been attached to table-table was locked down when traveling as shown above. This TV and stand will need additional securing-.
Back to the top
Mounting new TV
-
Deciding I need to rework old mount, I removed and put it in the vise. Hopefully while working on old swivel mount an idea for securing new TV will gel.
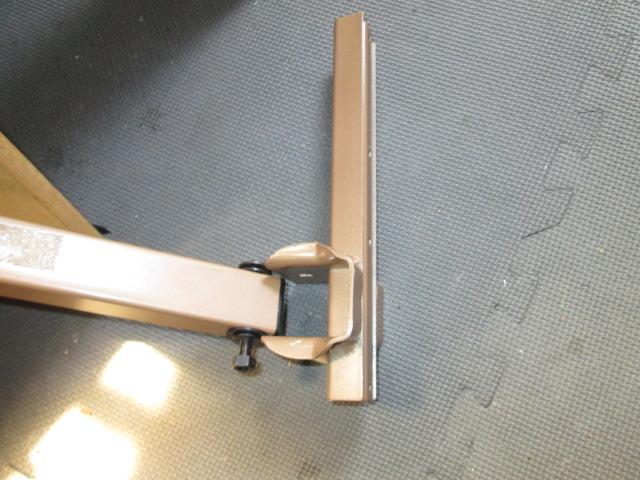
Need to cut some welds, move support and reweld. Allow lowering table, not redrilling wall mount. Will require lowering the 1x2 on wall that table rests on in 'park'. As I positioned air cutoff wheel I paused.
It dawned on me that if I simply replaced the old table with an articulating arm, it would not require additional support to mount TV on old table as new arms bolts to back of TV. TV would swing over and I could simple strap it. Wouldnít have to mod old table arm or move the 1x on wall, wouldnít be utilizing the very weak included TV base, be a lot cleaner install.
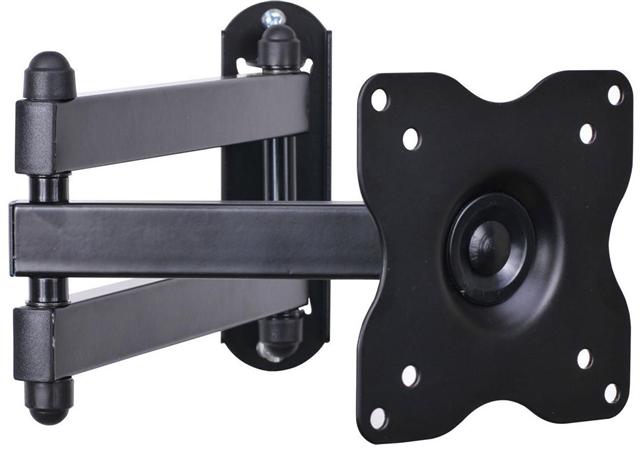
Put the cut-off wheel away and got on line. to see what might work
I have one I installed in the shop on computer monitor. Itís nice. A VideoSecu JE-NR70-QR6N, 14 bucks-free ship thru amazon. It would work for camper so will order another. In the meantime, not wanting to wait for new one to arrive I'll rob the unit out of shop to get camper set up.
edit: later when replacement for shop arm arrived it came but was a ML12B model-while virtually identical it has a different single tilt/rotate ball adjustment head, Kinda nice feature as it allows installing on TV then 'hanging' on arm. Makes installation easier-good for larger TVs unless you have help. But I donít like the single tilt/rotation adjustment-it appears a bit stronger But only after adjusting tilt & rotation then tightening the ball mount. Was going to swap heads (interchangeable) but as we seem to play with the rotation/elev. in camper due to different viewing locations. Ill keep the old one in camper put the new one in shop because I only use to swing monitor out of the way in shop.
Pivot and reach are almost the same between the articulating arm and old table ~12 1/2". Canít really tell if TV will reach wall or new wider TV will clear cabinet to see from dinette. No help for it- figure Ill mount, if its short then Ill get arm with longer reach. Mounted arm to wall, hung TV, swung around. Nope doesnít reach wall, nor does it clear cabinet when pivoted around to view from dinette.
Looked at the arm mount and TV trying to see how much longer it needs to be. The VideoSecu arm, and many of the small arms, are advertised at 15" extension but that is straight out, at right angle, as used, its about 12 1/2". Seems all it needs is about the difference between front and back arms. Too bad couldnít just order a single back arm to replace the shorter front one-unlikely. So I guess its finding longer mount waiting for it to arrive.
Went ahead & verified my plan and what to order..with a longer arm TV will fold up flat against wall, its weight will set on 1x4 on wall. Some webbing straps will hold it for traveling, Ill use foam for some vibration isolation. It will rotate around enough to be seen from dinette. This will work.
But it occurred to me...Why couldnít I just make a new longer arm the length I need...? TV is only 9#s, weight will only be hanging from extended arm when in use. On the road, mount really wont see weight or leverage? If it doesnít work-they sell new ones...
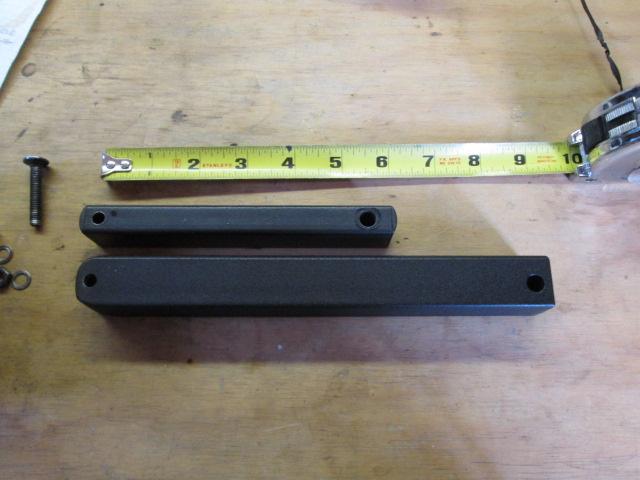
So thatís where Iím at. Disassemble arms, made a new one. This inexpensive mount uses simple 1x1/2 tube. Have some 1x1, which will work. So cut a new arm. Added 3" between pivot holes, new one is 8 1/8" old one was 5 1/8" .
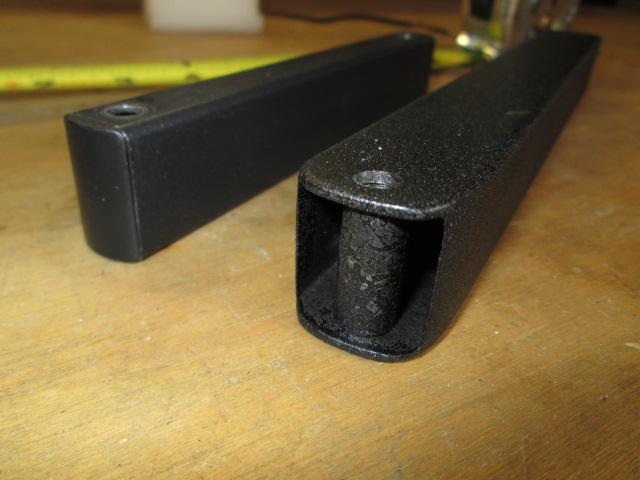
Added spacers inside, painted with textured flat black. Rustoleum truck bed coating-not the rubberized coating. Has a nice texture-very hard. Use it a lot. Did have to grind end round to clear inside of pivot mount. The 1x1 is, well, a 1/2" wider.
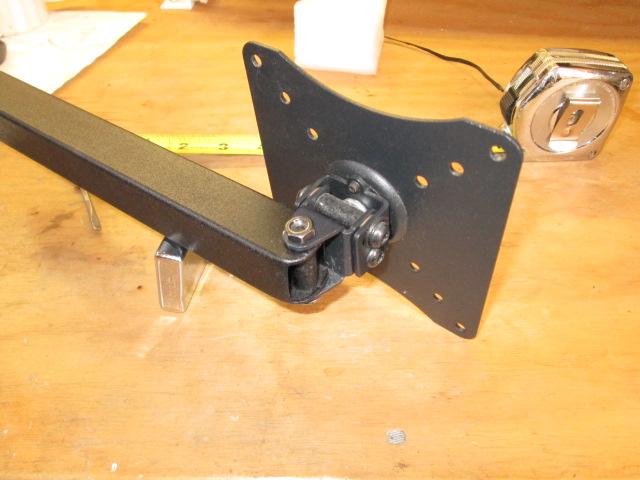
Now to see if it works or extra leverage too much.
And It works. Simply wasnít sure, but again I think because TV is so light.
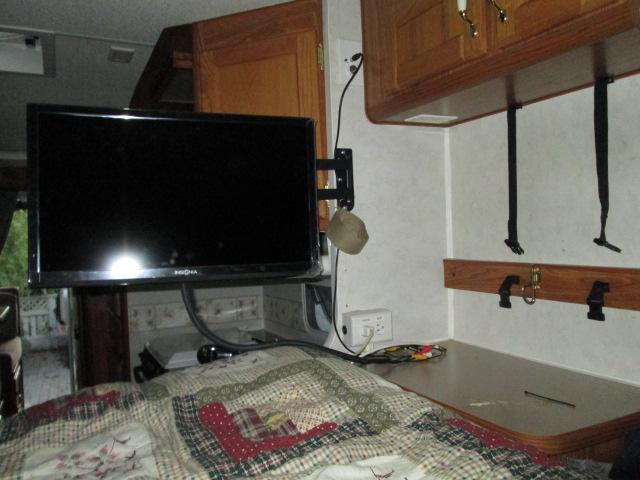
Trying to get wiring buttoned up-but the sound on the new TVs is horrible. Decided to check out small sound bar. Basically a self-contained pair of speakers and controller is a small rectangular box. But as there isnít really a place to mount-its on hold. Will work slick but another entire project now so shelved, till we get back from planned outing. So wiring will get roughed out till then.
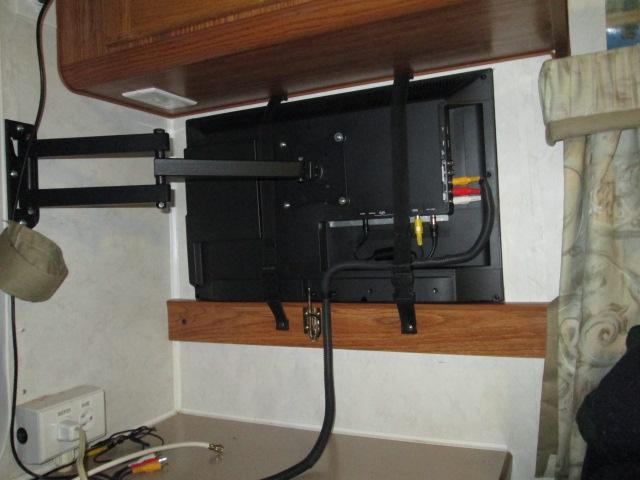
Moved straps that previously held TV to old table on wall and support 1x4. Swings around against wall and clip the straps. Nice is the old table latch slips into recess on TV helping it not slide. I cover the TV when not in use and it will cushion it in the travel position. Securing this new TV was a bit puzzling but think this will function. As mentioned still need to clean up wiring..
Just an odd chain of events that led to new TV, mostly due to converting to satellite. But larger so my old eyes can see it more easily, has built in OTA tuner, has built in dvd so getting rid of 2 extra boxes, though adding satellite box (because, since the digital OTA switch we rarely get TV). Finally got rid of the old swivel mount, which sooner or later a necessity to mount newer TVs. Now the grandkids have a TV when they stay over. All in all, though unplanned, will be nice once completed.
Back to the top
And I took it all apart and started over..
-
One; Its the cords.. old TV on old table mount, cords draped across table regardless of where TV rotated. New TV with arm, the cords kinda hang. To reach when in the watching position cords are on the bed when parked in travel position. As TV needs to rotate 180 can't tie up. Hmm.
Second is I need a place for the new sat receiver. Also a place for sound bar control box if when we get one. Stuff setting on the now much too low cabinet/drawer top just makes wiring even more an issue.
The fix:
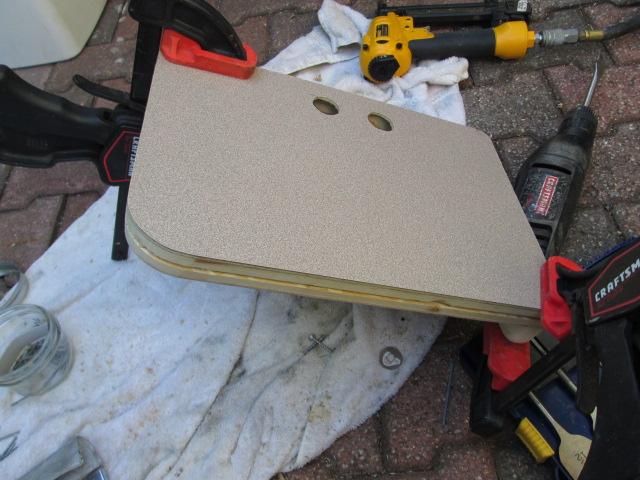
Making a table, actually a shelf. I have some matching paneling I was going to use but we have a counter top extension we have never used. It was intended to set between kitchen cabinet and refer at foot of bed making a counter top extension. After 12+ years it has never moved from stored position at side of bed. Matches existing top, has flexible trim. So I cut it to fit, recut the slot for plastic trim-drilled some cord holes and mounted under TV support board.
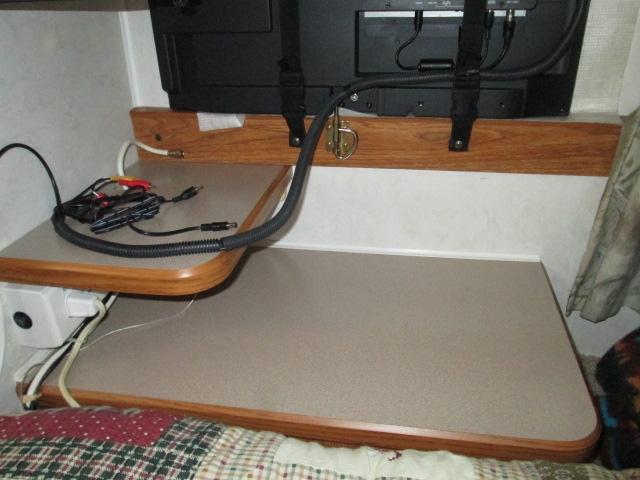
New table. Place for boxes, cords at same level, frees up cabinet top. Nice.
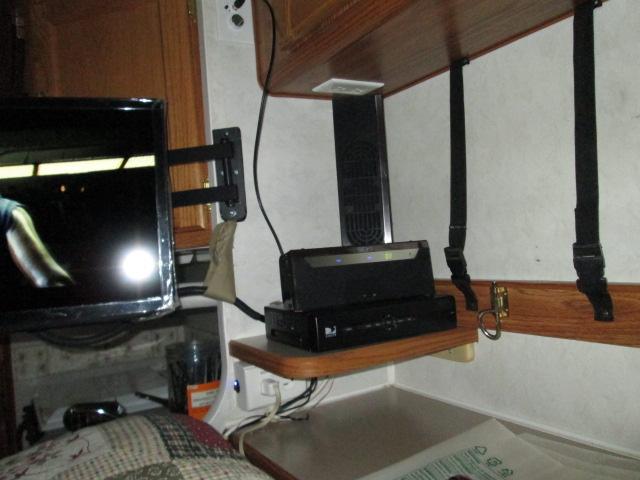
Picture quite a bit later but showing purpose of new shelf. Having the receiver elevated also better when using the remote. Still need some cable clamps (using the curtain tie back for now) find some white looming for exposed lower wiring. Also add 2 small hooks at outer edges of TV to support wires so loom doesnít hang. As the new TV has multiple signal inputs and electronically selects source (verses old one we had to swap cables) the ant/cable lead can remain hooked up so Iím going to route thru upper cabinet and down corner (with white cable). Getting there- wont be until everything installed Ill make the wires & cables 'disappear'.
Oh - had to make an angled stand off for the articulating arm wall bracket. As the arms will only fold 180į in relation to wall bracket, or wont rotate further than wall its mounted to, it put the tv parallel to wall. This puts it just slightly over end of bed. Parked at max travel when watching it would likely hit feet or if knocked when getting up working wall mount screws. Just needs to swing further back. Cut a piece of 2x2 with face at about 20į or so. Shaped to match bracket profile. Mounted with longer screws thru bracket and block allows TV to swing further back away from bed. Kinda see comparing picture above with one 4 up above.
Back to the top
Adding sound...
-
As I mentioned I after hanging TV sounds was horrible. I picked up a $50 sound bar. Figured has to be better than TV.
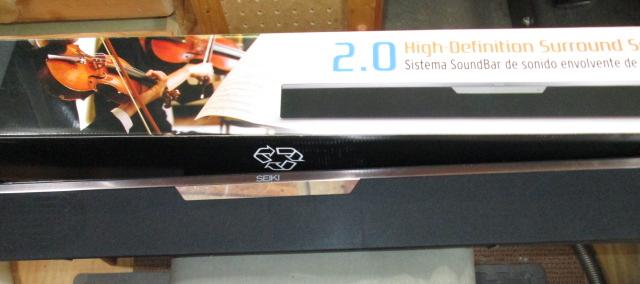
The TV just sounds horrible and its turned ALL the way up just to hear. Though I did note when TV swung over to wall the sound improves dramatically both in level and depth. When rotated toward dinette sounds,,ok, I guess sound bouncing off curtain and smaller space of bedroom. I assume that if it were mounted on wall sound would be decent-but as its hanging out in space when in bed, pretty bad. Ok if watching news or just killing time but for movies not.
At any rate other than some detail cleanup of wiring really want to install the sound bar. I hooked it hooked it up and it sounds pretty good. Problem is no place to mount a 4'+ long box. Looked at installing on ceiling which works but we'd be whacking our heads getting up in the bead. It would set perfectly on the shelf thatís at head of bed but speakers really should be in front. Thinking I might split box I opened up
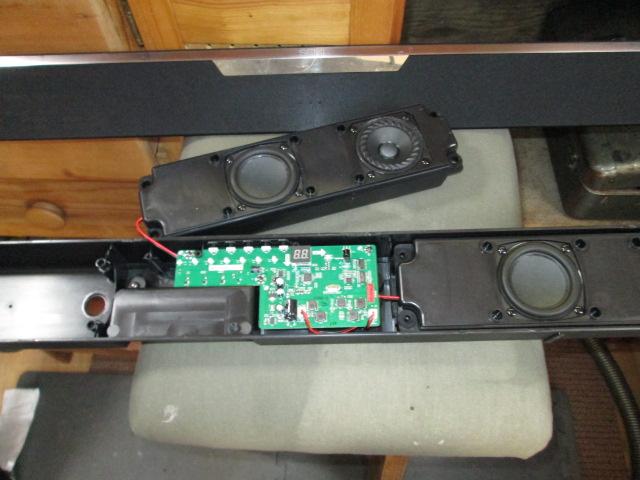
I took cover off to see what was inside. What I found is the speakers are self-contained boxes within the overall box. Controls and circuit board are in center section so will be easy to simply cut into 3rds. Mount the speakers vertically against walls, mount the controller section near TV. Rewire speakers to reach. Amazingly this unit lends itself to the modifications Iím planning.
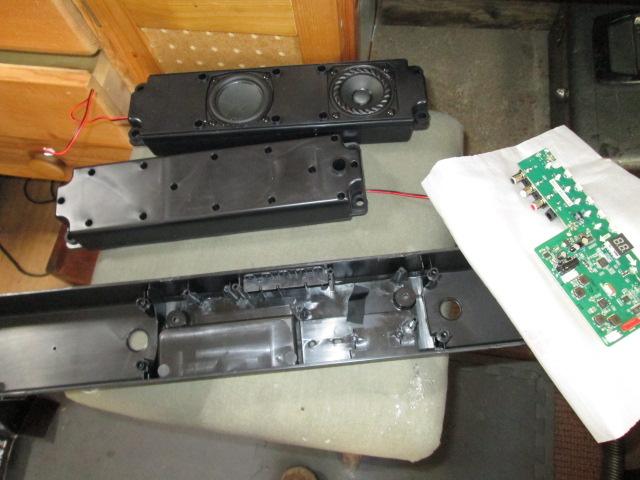
Here I unplugged the speakers from circuit board, removed them and circuit board. The buttons are part of main box and poke thru to switches on board. The main box attaches to each speaker with 4 screws at each speaker, the grills attach to each speaker with 4 plastic plugs. So cutting grills and box at either side of circuit board will yield 2 self-contained speaker boxes-slick. The center section though will need a few screws to hold grill on. This will be easy (if I donít screw up cutting). Worst case though is not utilizing the exterior box and grills for speakers. There is a web at either side of C/B, so I'll cut there so center section has some structure (and ends).
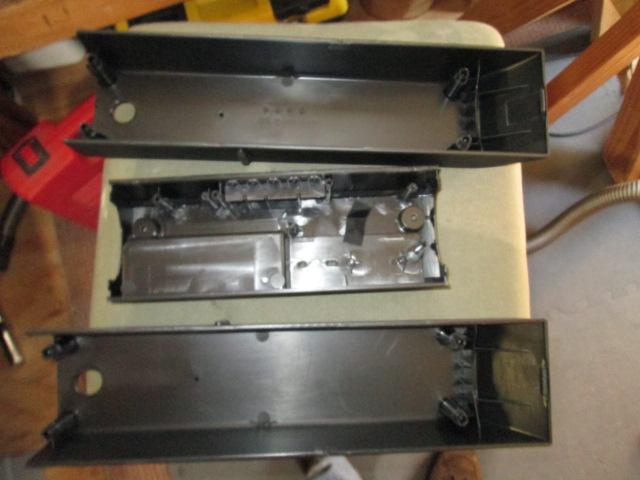
Used a saws all because of width and length of blade, I can make a full cut. Started at higher speed on back and cut up thru both side but slow enough not to melt. With blade riding next to web cut off speaker ends. The whole time waiting for blade to catch and crack box. But I got it. Whether! 3 boxes. The grills I first cut fabric with razor. Then cut the grill to match. Speaker boxes are done-just rescrew to box and put on grills after rewiring-so Ill do last.
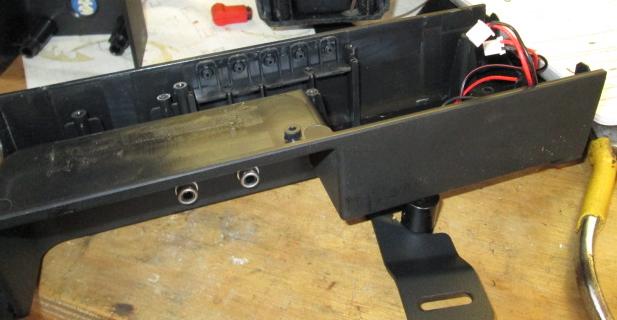
The center section though a bit more involved so doing first. There is enough plastic on grill to run a couple of screws thru box top into and hold. For bottom there's a blank unused boss on of face. So its drilling thru the boss to outside of box with small bit, put grill on then drill thru box boss and thru the grill, then open up grill hole a bit larger. Use small screw thru grill face into boss. Worked great until I drilled thru the grill and hit fabric. It caught a ripped out a section. Drat, oh well Ill make a trim pieces to cover. The center control box doesnít need the fabric-but its attached to grill by the melt process?
My intent was to splice new wires long enough to reach speakers onto wires that plug into circuit board, reinstall circuit board plug in and put grill on. However I remembered having some old RCA jacks-so instead I installed the jacks shown on box and solder the circuit board leads to them. I donít see need for removing but better than hardwiring.
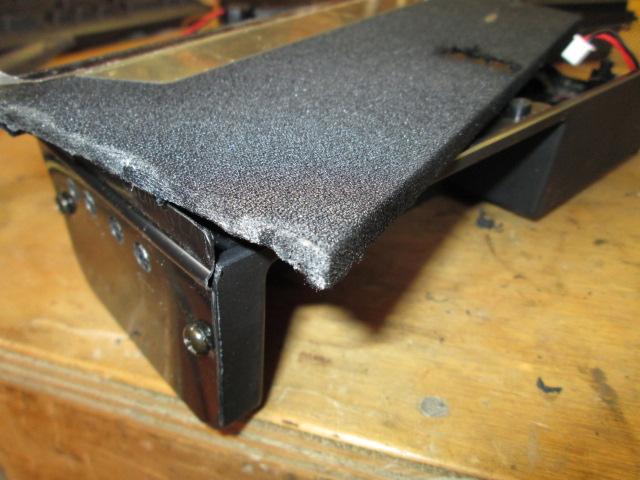
Two things happened. First the ends if you look at prior pic donít reach the grill, rather large gap. My plan was gluing in some window screen so control box could get some air and give box a bit more finished looked. I did the side that sets against the wall first and it looks like crap. Second when I re-stretched the fabric to fold over and glue it looked like crap.
So on the end that shows I made a side plate out of some black plastic. It will cover edge of grill and side of box. I did drill some holes in it and add screen behind so box. Not too shabby-
Finishing speakers
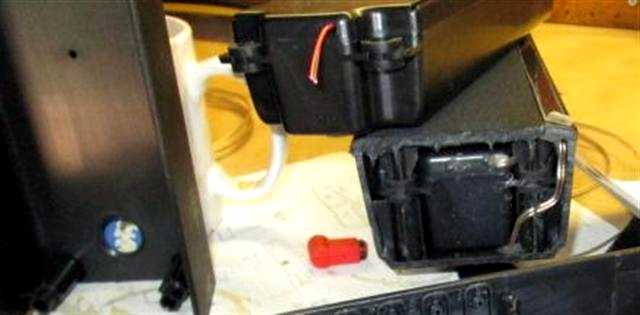
I had cut the wires when I removed speakers leaving the plug end in controller section and about 2" hanging out of box. I thought I was going to just splice new extended leads from controller to these. But now that I have RCA jacks on box I need plugs on speakers, decided to open up and make the splice inside of box. The 2 halves of speaker boxes actually have a rubber gasket. Routed the new wires out of speakers and thru grommet on boxes. The speakers are sealed except the bass port and all wiring is glued, I assume to prevent any vibration noise. So I resealed new holes and glued the wires with hot glue. The two speakers in each box are separated & isolated from each other. The little bass ports are simply 'cute'.
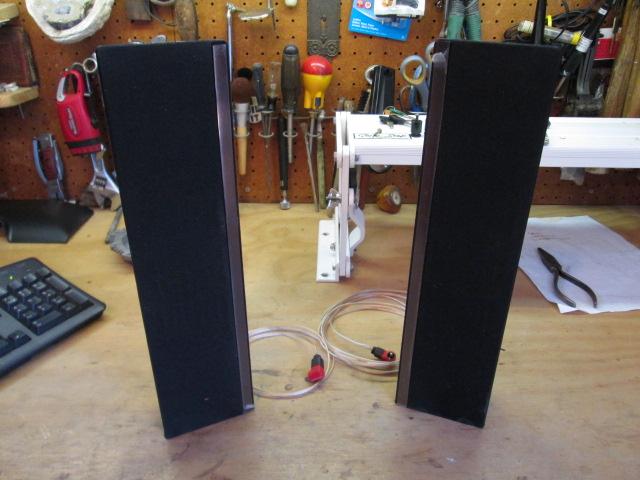
Cool .."tower" speakers. These will easily fit wherever I want plus they are independent units and could be used with any driver. As the entire sound system is really just the circuit board Iím going to see what a replacement/spare would cost.

This is the right speaker-sounds awesome in corner. I canít believe the quality of sound and the bass response from such a tiny speaker in a plastic box.
Back to the top
Another small shelf for left speaker.
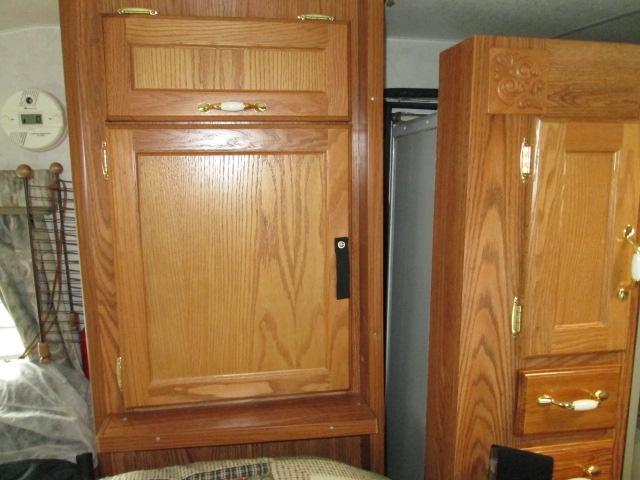
The left speaker I've no place to set at equal distance, no balance control, plus speaker with something behind it is dramatically improved sound & volume...so another shelf is in order, already added as shown in picture.
This one I used some left over paneling to match wardrobe. I cut 'shelf' at tapered at an angle so it doesnít protrude over bed too much yet enough room for speaker at end.
I installed a full vertical 1x4 on the end at wardrobe cabinet, mostly to support shelf but also for a sound board back, these speakers respond to having something behind. Second big plus is this will stop stuff thatís stored beside bed from falling behind slide when itís in.
Course the door handle ended up in the wrong place, speaker cant set on shelf. I may move up a bit, but for now just replaced with strap.
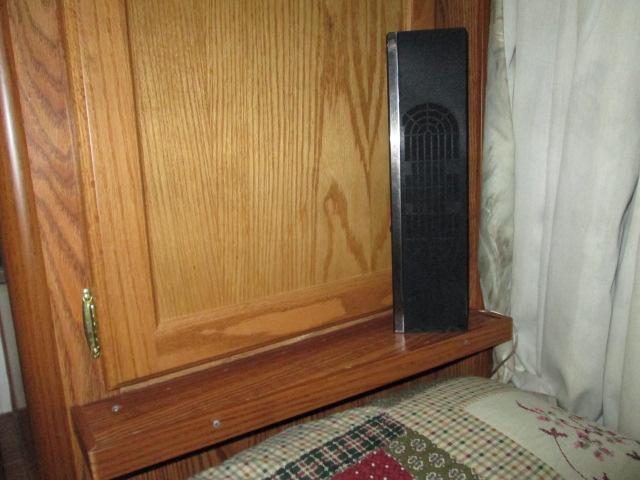
Bonus..When getting up into the bed -usually hand off each other stuff when snacking-now weíve a place to set stuff, specifically drinks-cool, never though about a shelf.
And a bonus # 2, a round-to-it...The left speaker is a pain, constantly having to shuffle it around to get in cabinet. Likely put the speaker on a hinge so it flips out of the way-which would then let me do something with the wire that is kinda looped. Probably go thru the shelf from underneath.
UPDATE 1/2015
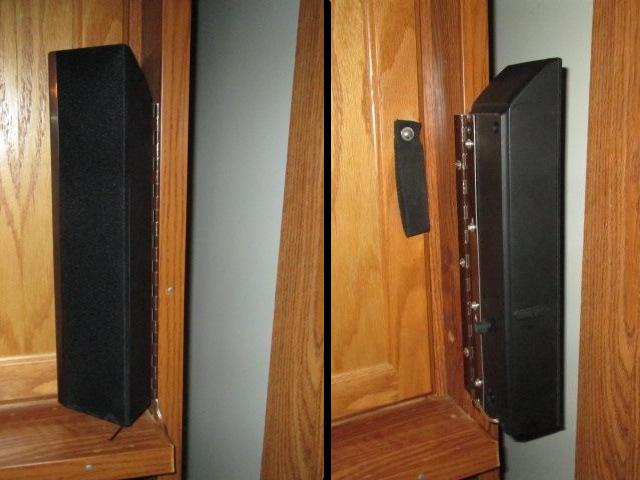
And fixed-last outing left speaker hit the floor like 3 times? Been using over a year-not sure what the problem was? So finally addressing before it gets broke, lucky didnt pull the wire out. Opened up case, rivited a full height piano hinge, attatched to the end board.
All in all this was well worth the effort. Custom 'sound system' for the camper-about 58 bucks all totaled. Re-purposed lots of old stuff. Just sounds awesome. Handy shelves-wont need to look and see whatís jamming the slide. Only real negative is added power usage, however, we watched a movie and I didnít see any more power usage, actually meter show higher, 12.6v, over norm 12.4 but Iím attributing for the moment to batteries were in float mode up till the time I turned TV on. But I am also thinking the new TV usage is way less and compensates for the sound bar. However we will only use for movies. The satellite receiver does seem to draw a bit so wont compound that with the sound system.
Another nice thing though the new TV is twice the size, its half the weight of the old one. Though weight added with left shelf the right one is half of what was stored so a wash I think. The TV arm definitely saved a few pounds over old one. Got rid of the VCR/DVD, even if replaced down the road with a blue ray player probably will be 1/3 the weight. Did gain on weight of speakers but all in all think we shed several pounds. Where did this all start? Oh yea-we got satellite.
Fun project we'll get to enjoy I hope for a few years.
Back to the top
Look Ma! no wires!...
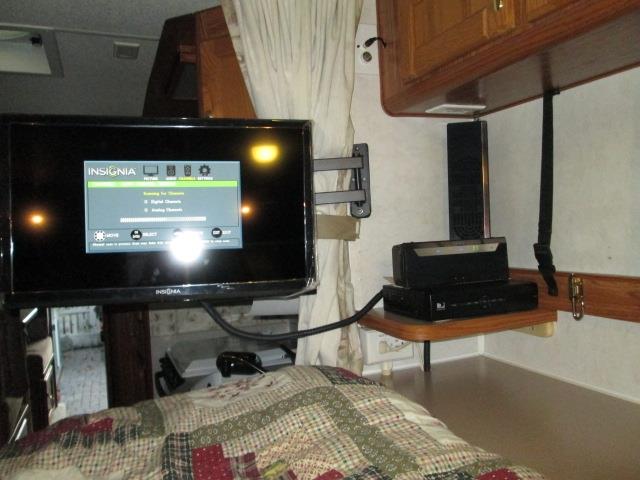
Well compared to what we use to look at. Tidied Up the wiring. Drilled upper cabinet to route roof antenna cable thru. Comes down in corner and cable clamped to wall. Drilled into bottom cabinet to run wires inside and out the side at foot of bed instead of draped over edge. Nice, well nicer. Stuck a piece of black loom over wires between the 2 tops but think Im going to split a piece of 1" pvc (white). I don't have pics of what a mess it was before that last couple of years. Not much else I can do with loomed cable going to tv- could tie to arm but then it'd have to run down to receiver. This will work. Still think Im going to glue on some small plastic hooks at the outer corner-shave off any real hook so cable will just lay on it-so it can easily fall when rotated.
Swing TV over, turn on the inverter, Using remote control select OTA, CATV, SAT or DVD. No more digging for electric cords, swapping coax cables! Pretty stoked.
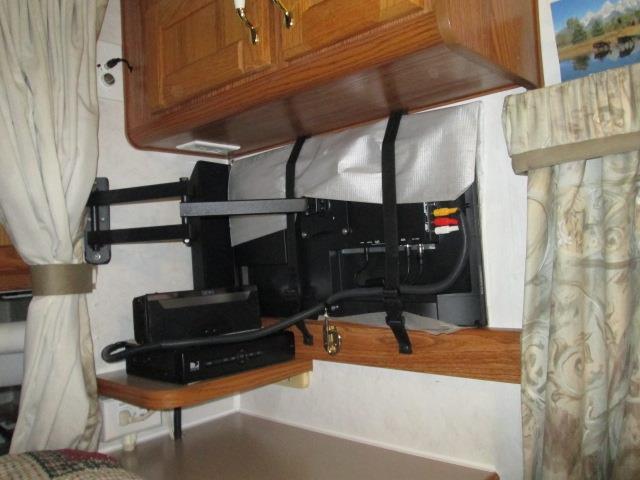
And parked with foam static bag. helps keep the dust moisture down and cushions it. Done, well need to attach speakers to wall, requires disassembly again-match drill thru case into wall then slot the speaker case, reassembly and 'slide speakers onto screws, or something, TBD. That and add a traveling strap for receiver. Details
We did go camping for a few days-shared a site with a large owl not 10' feet from my chair. Kinda cool, long as we were sitting he didn't mind, fascinating creature. Fortunately though he spent the night down a few hundred yards. At any rate the setup worked great. Used the satellite dish one evening 4 hrs and the built in dvd 3 hrs another. Used the sound system both nights. We didn't notice any difference in power consumption between the 2 or more than old setup, still seems better, meter showed 12.4v lowest and that was 4 hrs on satellite. Stayed at 12.6v the one evening we played cards. Previously lucky to see 12.2 (when I start shutting stuff down).
Doesn't quite add up but thats what were seeing. Maybe-the old dvd/vcr player did use that much more then new built in, that I can see. Maybe the OTA digital converter receiver box did use more than satellite receiver-that would surprise me. Finding it hard that this larger tv uses less than old 15"LCD, even though we turn off tvs internal speakers, cant believe it equals 3amp sound bar. Not complaining just unexpected and puzzling. We'll keep an eye on it till its proven, but its looking good. I think real use with over the air antenna and no converter box (built in digital tuner) may really yield some nice numbers if what we've seen so far is true. We did recently replace batteries, had excellent solar. Still just have never seen these kind of numbers in 12+ years. Maybe my panel meters broke. I need to check battery water so Ill verify with multi meter solar and converter numbers.
Update: I added a watt meter to our inverter input because I simply didn't believe what I was seeing as far as 12v usage. Watt meter page. As the 'entertainment' center (TV w/ DVD, Sound Bar, Satellite receiver, everything except the Antenna power supply) all run entirely off inverter, lets me see exactly what were using to watch TV, including the inverter usage. The numbers are amazing-.
Back to the top
Back to Ourelkhorn Camper Modifications page