Sections
- Intro & project plans
Verify equipment works and I can find satellite
Modified camper Well add a separate satellite feed...
Paint Dish I may repaint white as originally planned but itÆs no longer a gray billboard
Options & Kits Some options to what I did and available kits to adjust elevation/make arm foldable
Modify Winegard tripod Add level adjusters to legs, pin legs, clip mast clamp
Modify, add adjusters to dish assembly divided into sub-sections
Make LNB arm removable
Add Elevation adjuster
Add Tilt center pivot and micro adjusterAdding center pivot bolt is #1 recomendation
Add Azimuth adjuster
Finsihed pics and Things to do
Adding Satellite TV to camper /Convert an 18x20 SD satellite dish to HD
-
If you have satellite service at home, all you need is another satellite dish, (portable or roof mounted) receiver (one from home or 'rent' another) and you can access your service from camper. A thread on RV.net caused me recently to start thinking about this-we've only been using Sat for about 18 months. Since the over the air conversion to digital we rarely ever where we camp get TV. Looking around I stumbled on a Satellite forum & thread about using the older/smaller dish to receive HD. I figured if I do this might as well go for HD verses SD.
First-we are waiting until our contract with DirecTV is up before doing the HD conversion as we need another receiver. 6 months out. So this page only shows modifications to dish mount IÆve made so far. ( Painting, change nuts to wing nuts, make arm removable for more compact storage-add elevation adjustment assembly and modify small tripod). When contract expires IÆll get another receiver and renegotiate contract. Until then IÆm using the SD (standard definition) LNB head and receiver.
If your only wanting to know how to convert the smaller 18x20 dish to HD (high definition) I'll add link to forum where I found the information. The current HD 'Slimline' dish (DirecTV) is quite large. Which is the whole point of this exercise. Adding the ability to receive HD satellite TV signal in the camper BUT in the smallest package possible. IF you can live with SD-simply get a round 18" dish with a single LNB. Can be had sometimes free for old dishes-complete kits (dish, tripod, wire) or any all components can be had on EBay etc. (receivers too but caution advised-I wouldnÆt). SD dish with a single LNB is much easier to setup. Again youÆll use your home service, use receiver out of house or get another SD receiver ($6.00 monthly).
As mentioned DBSTALK forum thread this is the thread that motivated me.thread no longer exists?) It is simply mounting the small HD SL3 head to an older oval dish. I canÆt help any more than that. There is a wealth of information relating to satellite TV- on the DBStalk forum. The thread starts out modifying a small round dish, then progresses to oval dish (which you need for HD). Also starts using the large HD LNB then using the smaller LNB head... Some have better reception with using a Dish network dish but requires more modification. DBSTALK.com, Lots of discussion and a good place to start-I'll probably go that direction but for now IÆm using the 18x20 oval DirecTV dish. Other than choice of dish- converting an oval dish basically is just swapping in the HD head.
Deciding to try this I found locally on craigslist an 18x20 dish. It came with an SD head and an HD head (LNBs) but the HD head is the large one which wonÆt work & won't use. When/if I convert to HD IÆll get the smaller SL3 head. But like I mentioned wonÆt be 'for a while. Here is progress so far & mods done. None of these mods are needed for use-just what I felt like doing. Well maybe the elevation adjustment, more precisely being able to adjust than just trying to get back to where it was,
Set up and tested dish works
-
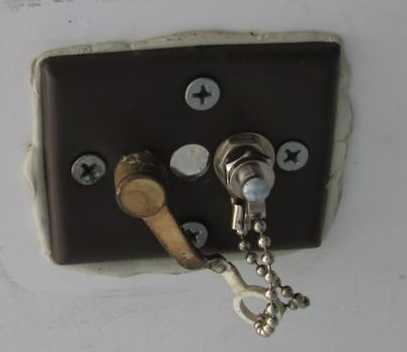
First decided I needed to try and set up-verify that dish LNB works and more importantly that I can find the satellites. IÆve never set up dish before, and borrowed receiver will allow access. Well after 2 hours I gave up. I could get 95%+ on the 110 satellites but zero on 101 and 119. Receiver wont validate if there not all dialed in. Got on line and found instructions. I should have been focusing on the 101 satellite first instead of 110. Using the on screen tone had all three satellites in 10 minutes. Receiver checked validation. Wala! 300+ channels. So dish works-receiver allows access to my home account (borrowed account).
I can see where the single SD satellite would certainly be easier. Once good signal found-itÆs a matter of a little tweaking of dish to get good numbers across the board. Where a single satellite LNB requires only focusing on one sat. I can also see a pencil and tablet being handy to write down where dish is at before adjusting. Details
Have a tripod for the dish on order-itÆs the small Winegard. IÆm sure IÆll modify it. Mostly add some kind of adjustment to legs for leveling. Later IÆm copying a simpler roof rail hanger so when I can dish will be on camper. But the tripod will be only way to attempt dish where there are trees etc. I also can see this will only be set up if weÆre going to be somewhere for a few days. Maybe it'll get easier-maybe it'll get old. But still an option, something to play with.
Modified camper
-
As I couldnÆt find enough cable in the camper to identify (assume rj59) I removed the cable inlet panel from camper. Even so I donÆt want current Winegard powered OTA antenna, cable TV feed and satellite feed interconnected. Redrilled a new panel for 2 connectors. Connect existing coax that feeds the Winegard/cable fitting on inside wall plate. The other is a direct line of RJ6 to feed Directv box when carried.
As soon as the putty stops oozing ill caulk, paint and somehow label. One with metal cap is for connecting the satellite dish RJ6 cable. So IÆll have a direct feed from Sat to receiver. Wish I could say easy but running a short 5'piece of cable inside took forever. Entrance is under water heater, then snaking up-drilling thru cabinet to get by bed-oh well done.
Although I 'may' add a splitter A/B box inside but needs research. Be nice not to have to be playing with coax feed at TV inside, Normal OTA(over the air)/DVD/cable input or Sat. At some point storage bracket for dish and a mount for use on camper.
Painted dish
-
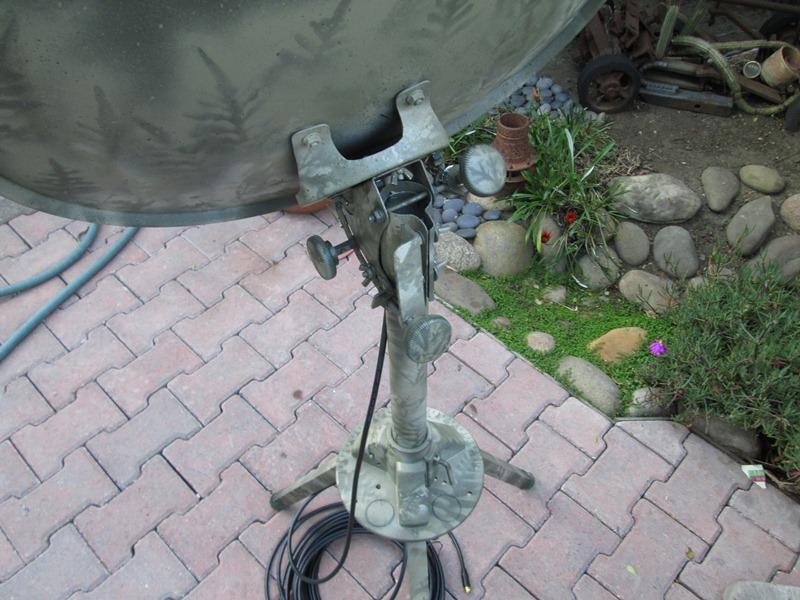
After replacing all the nuts with wing nuts for no-tool adjusting decided to get rid of the black advertising on dish. Light wiping with acetone pretty much came right off. Not sure what the dishes are coated with- but gray only came off where I rubbed fairly hard. Then decided to paint. Was going to paint a flat white- be not so pronounced on camper. Ended up though only non gloss paint I had on hand was some flat greens. Went back and forth on color and finally just sprayed it green as for now its setting on ground. IÆm sure it will get repainted. Came out pretty dark so threw some fern fronds on it and dusted with a lighter green...kinda nice-breaks up the silhouette a bit- kind of hokey- but maybe it wonÆt grow legs.
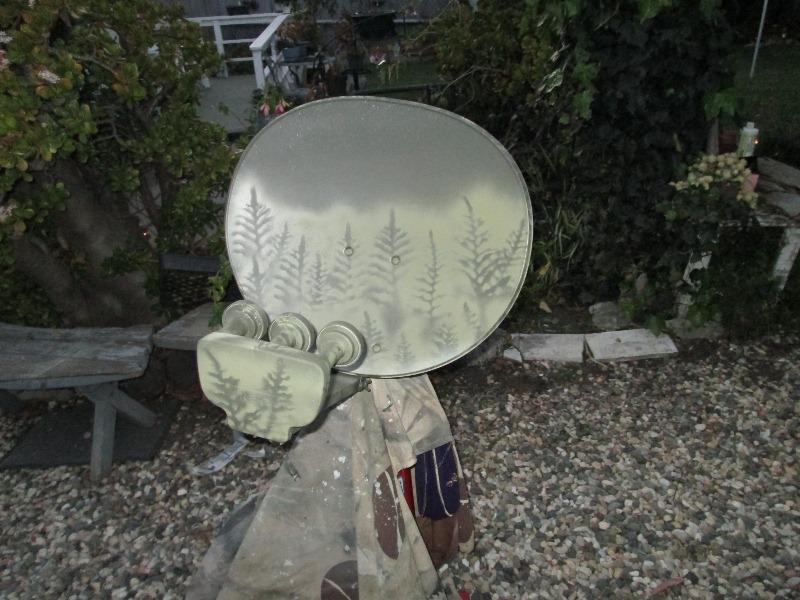
Disassembled everything and painted dark base green then reassembled and repainted masking off only the caps on LNB.
Az a lot of wing nuts...

Options & kits
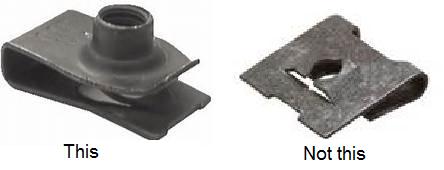
- Kinda fun, harder to explain. Just one of many ways this could be done. If you didnÆt have welder this could made just bolted thru angle, just drilling thru holes. For knob thread could be just tapping angle or drilling hole using a jnut or clip nut, speed nut, called various things & not welded, just needs female thread, not just a split hole. Hardware or automotive.
For knobs I happen to have a bunch of old awing knobs- problem is there a bit short-they do make knobs that have a hex recess and accept a standard bolt.
 Options
 Options
If you 'made' adjusting knob, either all thread into a purchased knob or a simple wing nut on long bolt then you could get full travel. Making stop though without welder, might bend up a piece of flat bar. Use longer dish carriage dish bolt to secure but pretty sure other attachment required. Because inside needs to clear pole maybe 2 small rivets or very small screws & nuts? Or you could copy or purchase the tv4rv.com adjuster.
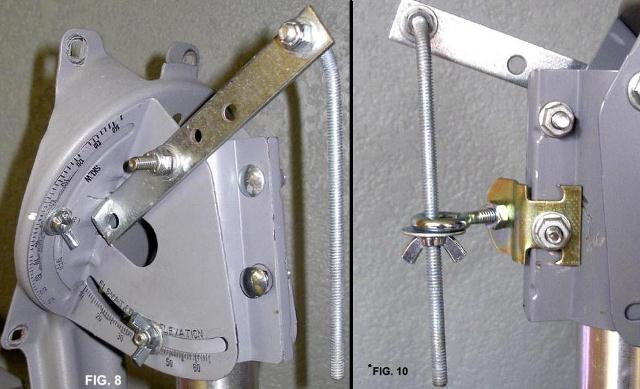
This is tv4rv.com elevation kit, simple very functional bolt on. Though pic looks like a working proto type not sure if this is what you actually receive, but then again itÆs like $12. Also shows different dish mount but similar. They also make a hinge kit so that LNB arm folds.
Tripod
-
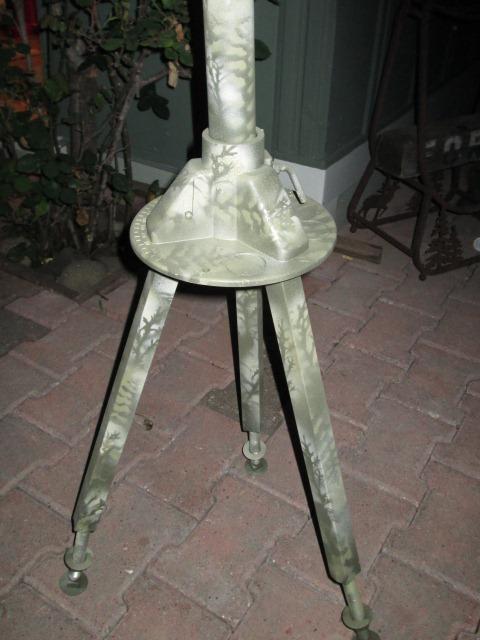
Meanwhile lil Winegard tripod arrived-Tr2000. Found a return for 1/2 price. yup reviews about it being small were correct. But looking to save weight & space will work for me. It will need to be religiously tied down. Oddly the weight of arm and head, pointing azimuth, is centered between 2 legs, just barley stands, wants to topple forward. If turned 180░ itÆs a lot more stable, just curious. Would require setting the azimuth number to north and use dish north arrow pointing at satellite and reverse the degrees/ little too much thought so Ill ensure anchoring dish and use as designed.
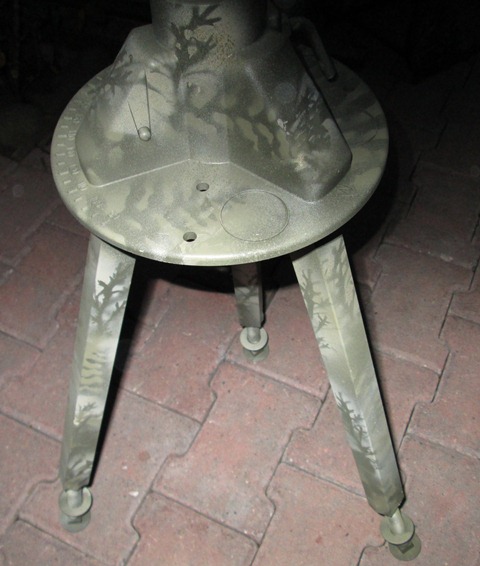
Painted. Legs, (set in for pic) simply pop into pockets. Leveling is accomplished by pivoting. Fine for relatively flat locations less someone bumps it or wind blows. Went to Hardware, was going to get some 1/2 square nuts to weld into bottoms of legs. Use carriage attached would still fit in box. Umm legs are aluminum. Good thing didnÆt get the 1/2" squares. I just swaged nuts into legs. If I have ANY issues IÆll get some thin wall steel Or possibly find or make aluminum nuts to weld to al legs. (see update below)
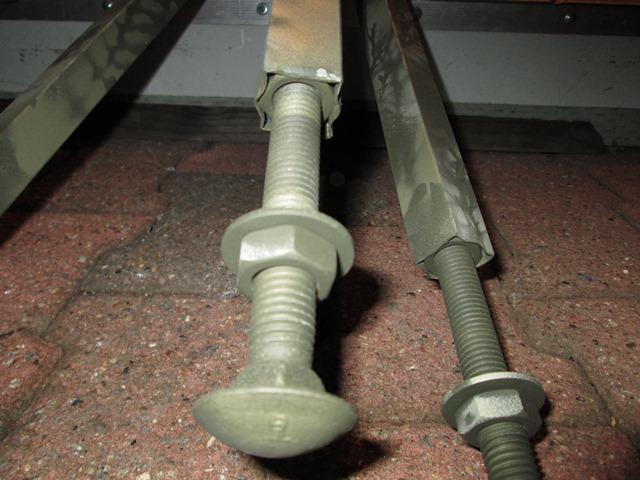
Just leveler detail. Take a lot to push further in but nuts could wallow or simply pull out. Needs welding-so al nuts or steel tube. Carriage bolts are 5" long so tons of adjustment. just run bolts in or out run jam nut up finger tight , simple.
The legs popping in, pivoting inside of pocket kind of nice simple feature-but if you pick up or tilt, the legs swing in, especially now with added leveler weight. IÆm going to drill thru pockets and legs & lynch pin in full outward position.
Whole point of this project other than the ability to connect to satellite for TV is to make the dish as storable as possible, ease of reassembly and breakdown. I'll be spending enough time when dialing in satellites so trying to make that as painless as possible. However it will more than likely spend most of its time in various cubby holes. Documenting this was more time consuming than piddling in the shop.
UPDATE: Well that didnt work...
Replaced the leg leveler nuts. Just setting up in shop the hex nuts started stretching the tube. Had some 1/2"x 1" aluminum flat bar, cut 6 pieces to length to fit inside leg tube. Welded 2 together to make 3 1x1x1" cubes. Filed sides to fit inside legs. Then drilled and tapped cubes with 5/8-11 thread. Removed previous nut, stretched the legs back to square, inserted the cubes into legs leaving 1/8" stick out welded to ends of legs. Not pretty but functional.
Side note: I added these for leveling the mast- have 4 1/2" plus of travel but looking at them fully extended adds 2" outward placement of leg, or increases distance between legs by 4". A lot more stable. Course I now could cut off 3"-4" from mast...nah but would be even more stable.
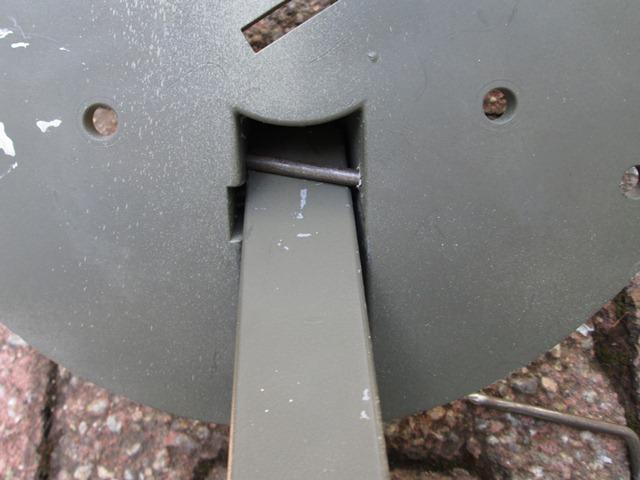
To fix legs from swinging I just drilled thru base at an angle behind legs, drill bit skinned paint on legs. Needs to be CLOSE,1/16" slop at top allows 1" or 2 at bottom. . Cut some 1/8" steel rod, tapered one end, bent the other end 60░. Simply drop pins into holes after inserting legs. Nails would work. I drilled behind leg instead of thru cause I know they'd end up different-donÆt want to be matching legs to specific pocket.
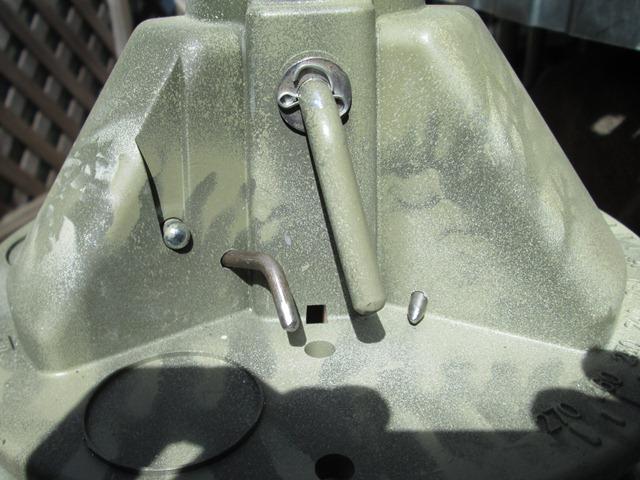
Also drilled the mast pin for cotter pin so it wonÆt fall out when removing the mast, was rather annoying. A simple thin pal nut would work, regular nut too thick.
Modify dish assembly
-
Now the fun part, modifying and adding micro adjusters to the dish. Several issues I want to address. One is making the arm removable for more compact storage. Second, to micro-adjust elevation, tilt & azimuth. Intended, you simply loosen the respective bolts and manually turn. However just a lot of slop and the bolts you loosen to adjust also holds together. Maybe because itÆs so old- but just loosening and retightening bolts, dish moves. End up moving whole dish over adjusting/readjusting just to get back.
- Make LNB arm removable
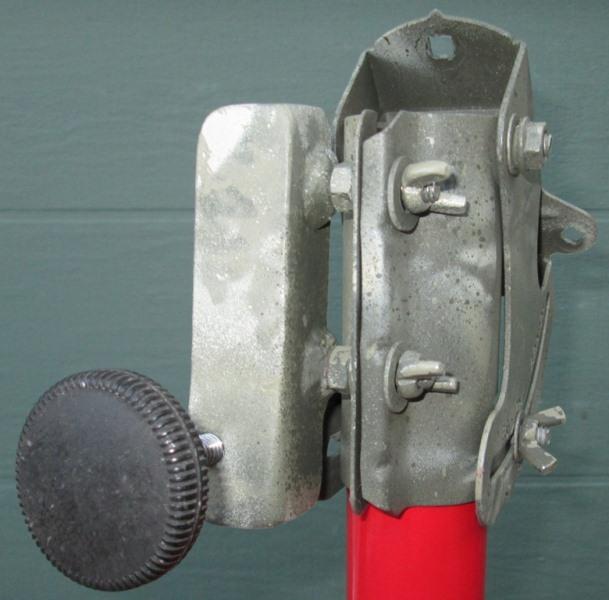
There are kits to hinge (see options&kits) but if removable I can more easily store the parts. The arm is isnÆt welded, isnÆt riveted sort of punched.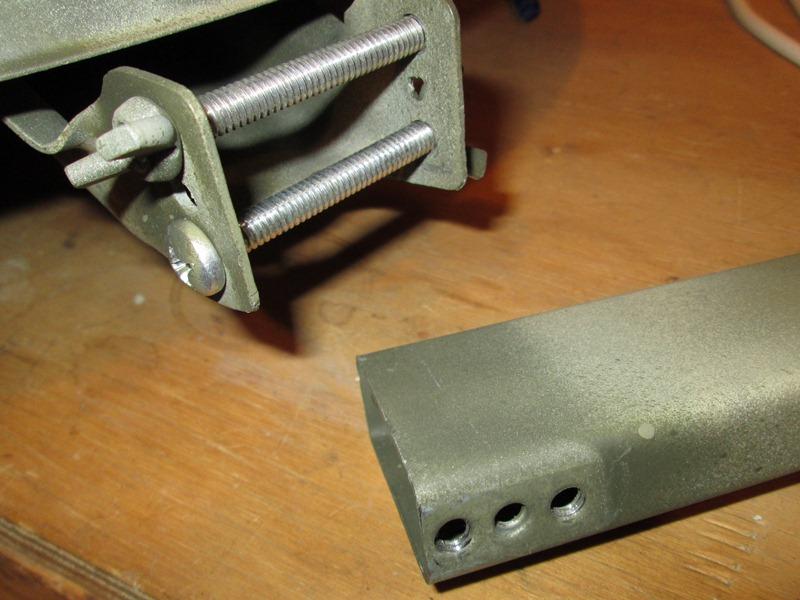
At any rate I drilled out the 6 smushed thru connections with 13/64". Separated arm from bracket/ redrill the bracket holes to 1/4". Tapped the arm holes with 1/4-20 thread. (Note the way the metal is stretched to make original connection allowed taping the otherwise thin material). Used some all thread screws with wing nuts to reattach arm to bracket. IÆve seen some just use pins but I want zero movement, though wing nuts actually tighten and secure, threaded inside holes one less source of slop. (NOTE if your just drilling out and bolting mark so angle or distance relationship doesnÆt change much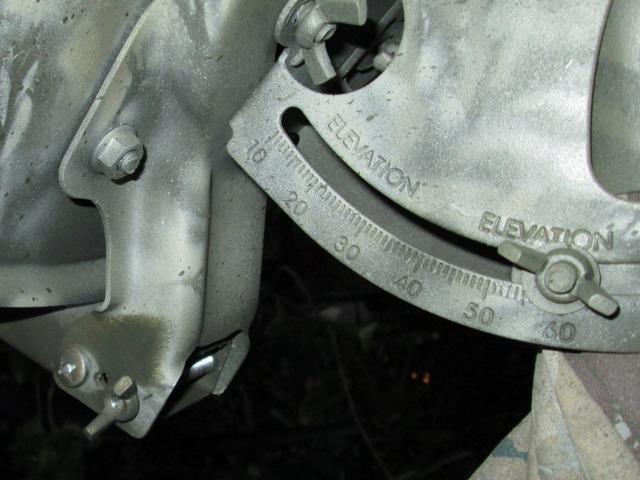
Remounted arm to dish bracket
- ELEVATION adjuster
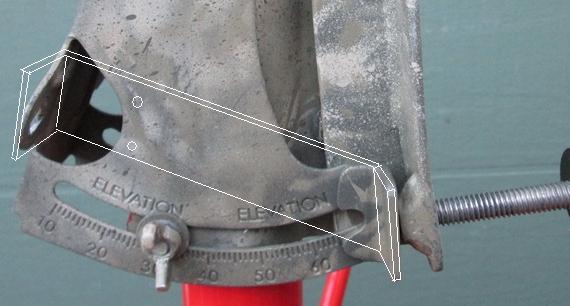
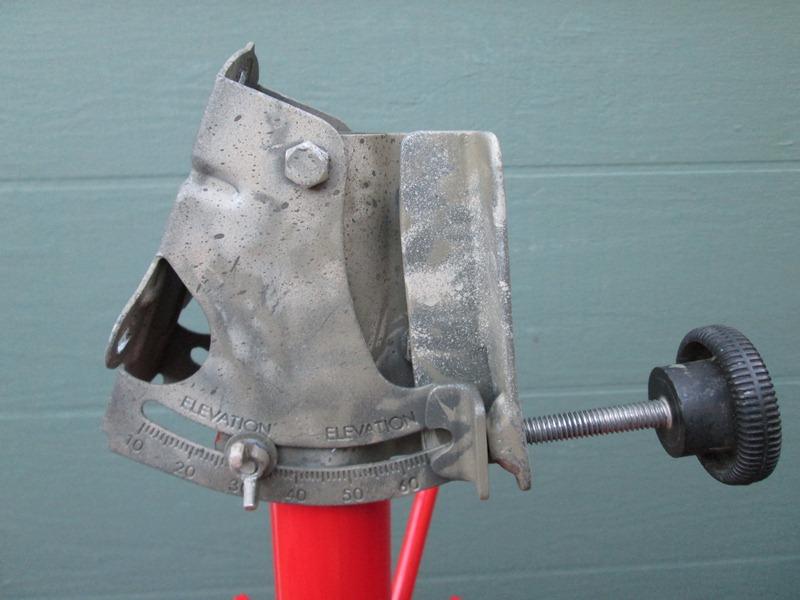
I was going to copy the kit available from tv4rv.com (see options below). Gathering up parts to duplicate & looking at kit picture (see options & kits) I realized all it did was push the dish, relied on dish weight to return. Well that simplifies it. Then I found old adjusting knob and looked to see if I could utilize the plan changed Though I'm mostly adding because when you loosen nuts to adjust elevation the dish falls- micro tuning would be more controlled. But the falling was a pain. Have a bunch of old awning knobs, would make good adjusting knobs. What I came up with was tapping a piece of angle to get the knob thread parallel to elevation bracket. Weld a piece to elevation bracket so knob pushes dish thru arc, back off knob and dish weight follows. Now when readjusting soon as you loosen nuts dish doesnÆt fall or move and end up starting over. Several ways this could be done. this is what I came up with stuff on hand.
Bracket to hold elevation adjusting knob. I welded heads of longer pole clamp bolts to 1x angle with a bit of lean so knob thread points down a bit. (note 1 1/4" angle might be better, extend knob away from pole and more are for knob hole, I was right to edges). To set up I marked angle iron matching pole clamp holes. Bottom bolt head is on angle edge, top one sets in a bit-drilled holes. With bolts in clamp-set angle against bolts tack welded thru holes to heads. Removed-finished plug welding and tacked around heads. Ran nuts for more standoff. Then I marked where knob would set, my knob has 5/16-18 thread. Want knob thread pointing at slot in elevation bracket. Drilled hole for tapping. Using drill bit to center nut, tacked it over hole then ran a 5/16-18 tap thru nut threading angle.
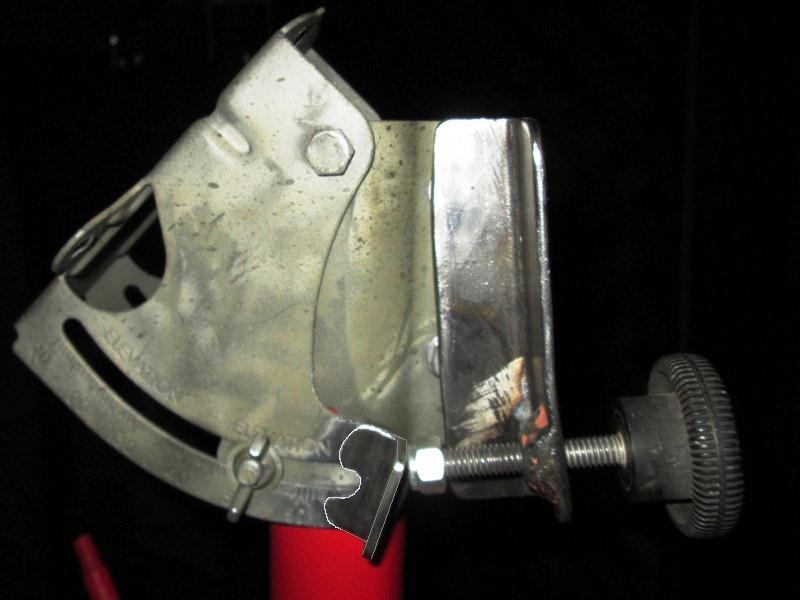
I then 'carved" a piece of angle for push stop to weld on to elev. bracket. Shorten & shape both legs-clearance slot for more travel. And here is stop welded to end of elevation scale. (though I mis-welded with slight over rotation still works). Ground and rounded all corners & edges. Works well from parts on hand. I designed this around knob I had. Due to shortness of knob thread I set up for nominal range of 30░ to 50░. Actually get 23░-61░. Cover most places I might camp. With end nut removed it will go to 23░- If I needed less simply remove the adjust assembly-cant imaging ever needing. I will carry extra bolts & nuts.
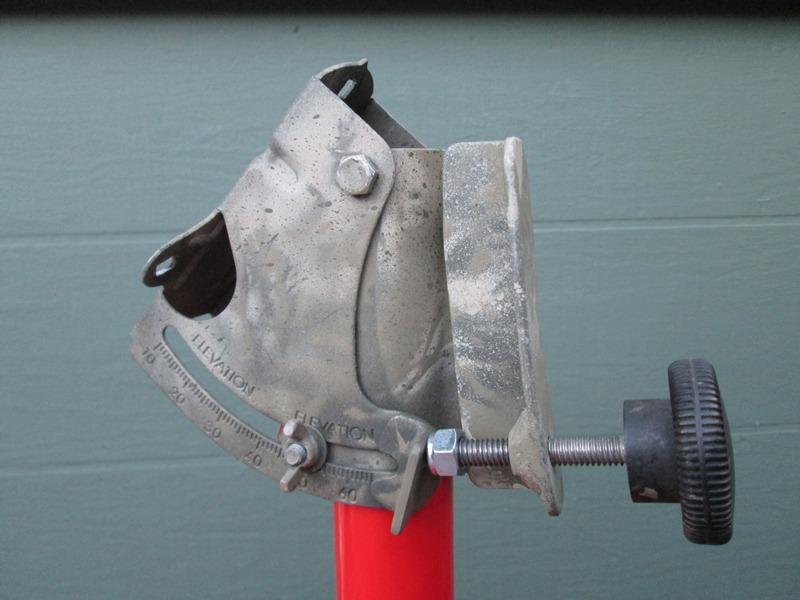
Anyway pics of finished elevation adjuster.
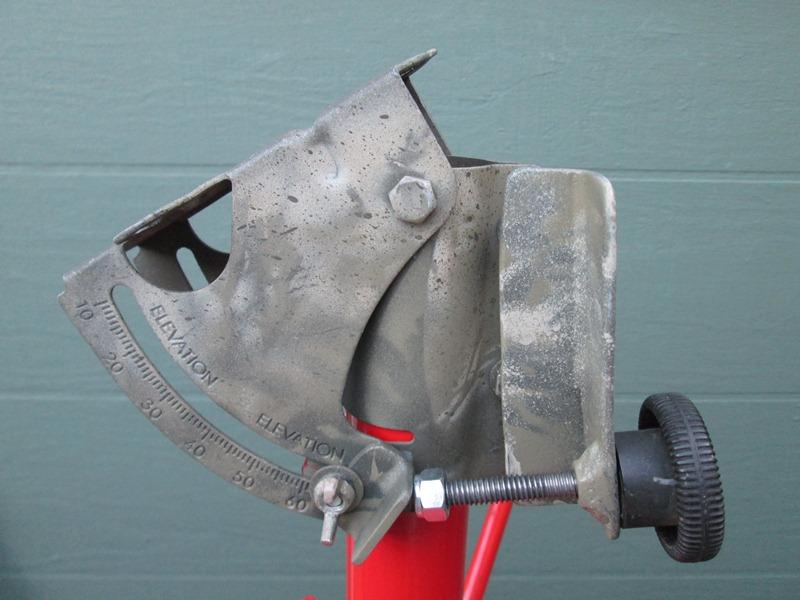
Cleaned up & painted-my normal elevation.
- TILT, add center pivot and micro adjuster
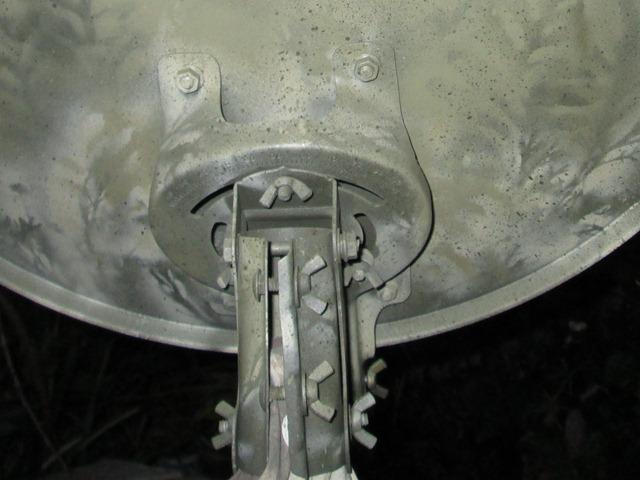
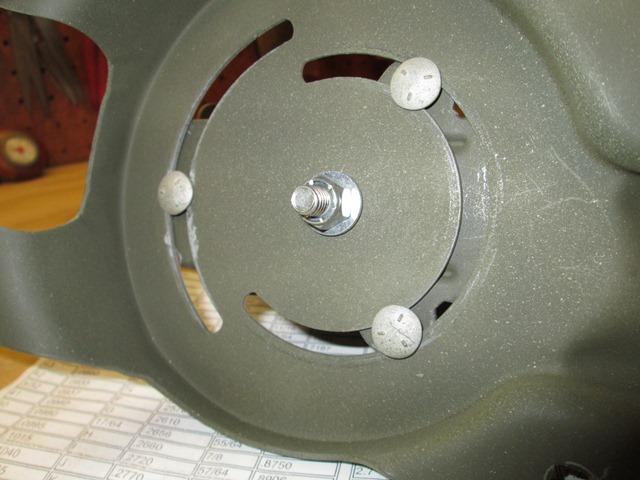
I need to do something similar for tilt adjust as elevation adjuster. ItÆs an easy adjustment but on my dish mount after loosening the 3 bolts for adjustment the dish moves, binds. Near impossible if bolts are loose enough to adjust tilt to maintain smooth rotation.. When I had apart I should have drilled and bolted a center pivot which would help. I noted the bracket on dish had a center hole but the matching elevation bracket didnÆt.Well I stopped this and drilled tilt center pivot bolt. Pulling off the bracket from dish with the elevation bracket still attached, I verified the hole on dish side of mount was centered with the tilt rotation by drawing thru the hole, rotating the halves it stayed on center. Also could see why it was so difficult to adjust. As you rotated with the bolts loose they cocked within the slots because the dish moved off center.
Drill a 5/16 hole thru both halves with 5/16, bolt-with washer on both sides-used nylock and just snugged. WOW what a difference-like ball bearings. no matter how loose dish pivots smoothly. Simply amazing- bolts donÆt cock because itÆs not moving off center. If you have a similar dish and do nothing else I recommend this..
Adding the adjustment knob because its rotational will have a very limited amount of travel-so It needs to be able to be disengaged and reengaged after initial tilt adjustment. Again still thinking on that...Appears for my use need about 30░ of travel. Or I guess if I identify what my expected tilt ranges might be would make adjuster simpler...
So on the back burner...Couple of days later finaly figured it out..see below
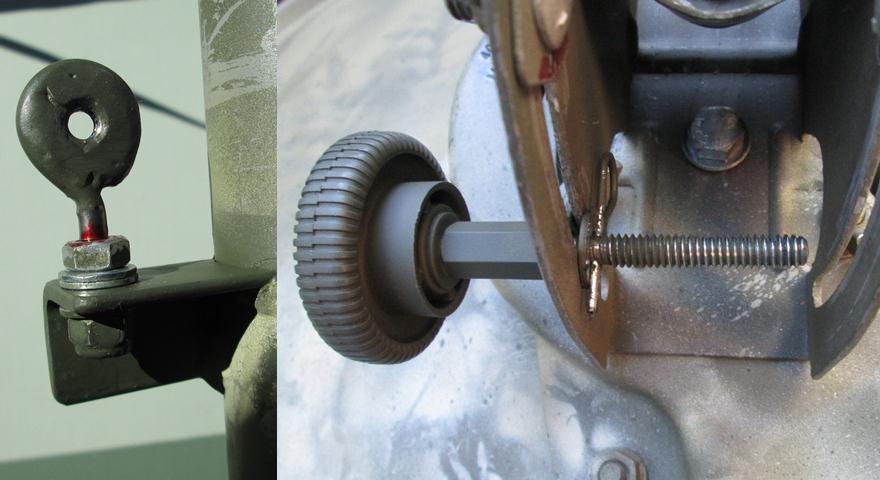
- Added tilt micro adjuster
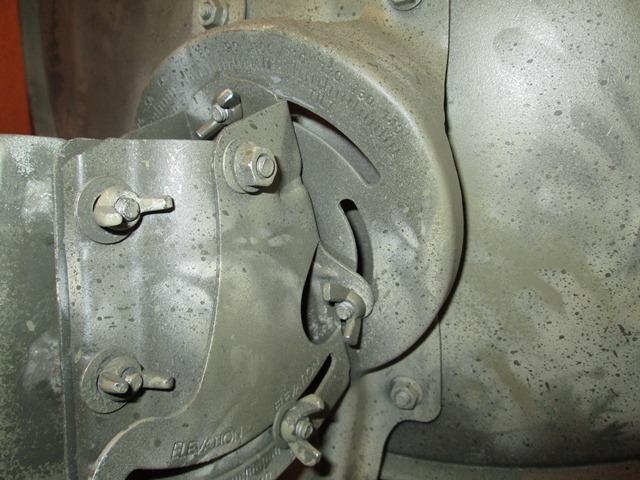
As the tilt mech needs to be attached between rotating dish and fixed elevation/mast bracket it alluded me, as dish bracket rotates the distance to fixed part changes. Just a puzzle. Looking where I could attach to minimize I realized replacing the main elevation pivot bolt with an eye bolt would work. With a washer on either side the adjusting knob could move within the eye-compensating for movement of fixed attachment to dish as it arcs. Welded a nut inside another eyebolt, as I need thread at right angle. Started with a piece of angle but this doesnÆt require welding on dish again, also allows adjusting distance to match other eye bolt. As the distance between the 2 bolts does not stay parallel I double nutted eyebolt on either side of dish bracket so itÆs just snug but can still turn. Allows it to pivot as distance between eye bolt changes and stays parallel. Simple...open eye at top allows side to side, threaded end pivots to keep parallel.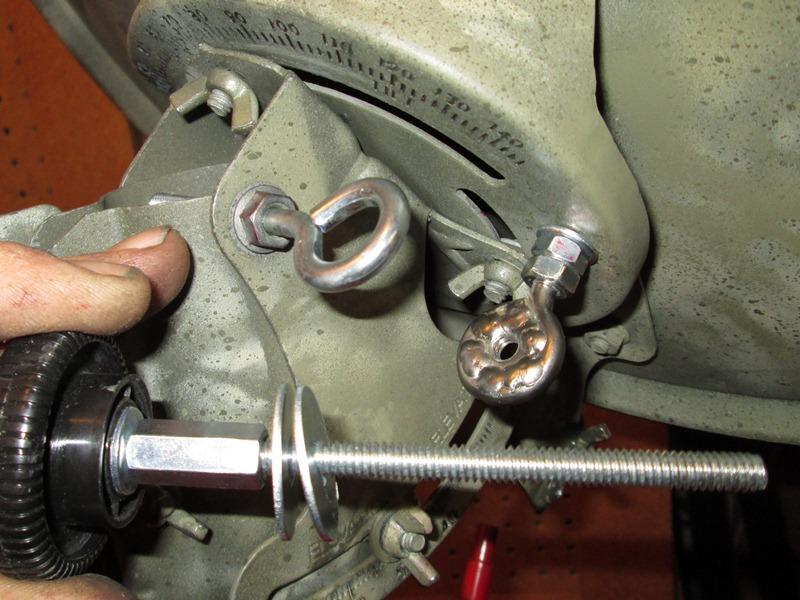
To get enough travel out of awning knob I cut off all but 1/2" of thread, cut 3 1/2" from old bolt, used a coupler nut and red Loctite to join. With an eyebolt and 2 washers on either side clamped to knob thread-drilled thru for a cotter pin. So adjusting knob is captured in eyebolt can spin and slide. Threaded into eyenut, when turned it pulls or pushes the dish. I full turn of knob rotates dish about 1 degree.
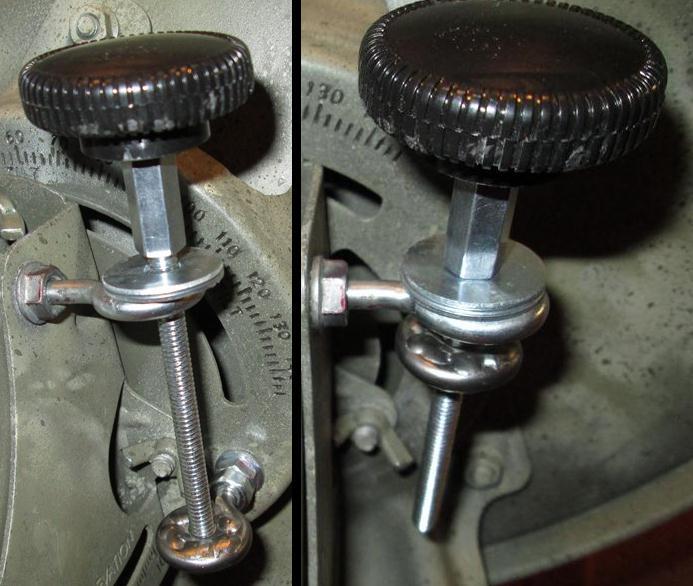
Just showing knob movement in eyebolt-full down moves to right, full up knob moves to left, all the while as dish rotates lower eyebolt pivots so no binding. Stoked. Something so simple so elusive...
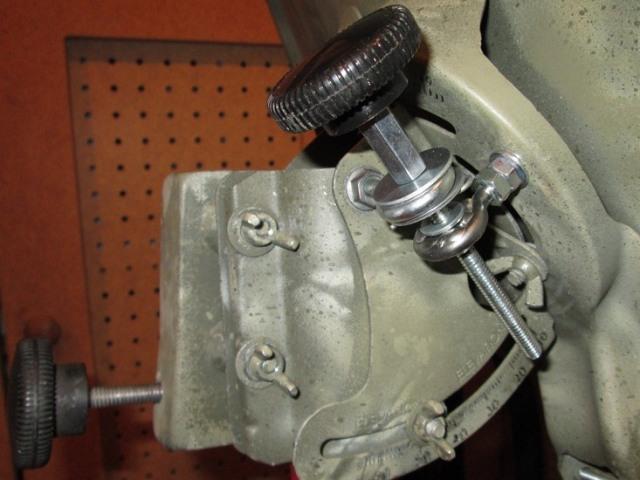
Assembled. Hmm- looks like a 'TV4RV.com 'kit'. Though I was trying for 30 degree spread I got 80░ (30░ to 115░), though at ends of arc the two eye bolts are in line so doesnÆt want to push or pull thru arc so useable is about 50░. So IF you were to do this, depending on your location, adjust placement of dish bolt so your normal tilt number is in middle of arc with knob at half travel. Again depending where youÆre at and expected range. IÆm ON the west coast so +10 is in the ocean, most of my adjustment is moving east or -30░. Added plus on the knob using the coupler nut is it stands the knob away from brackets for hand clearance and not having to pin both sides of eye bolt. I ended up using a hitch (bridge) pin instead of cotter pin so I can still breakdown. Pull pin, unthread the knob to easily separate the dish for transport/storage. Going to change to a large diaper pin so I can find it more easily when I drop...
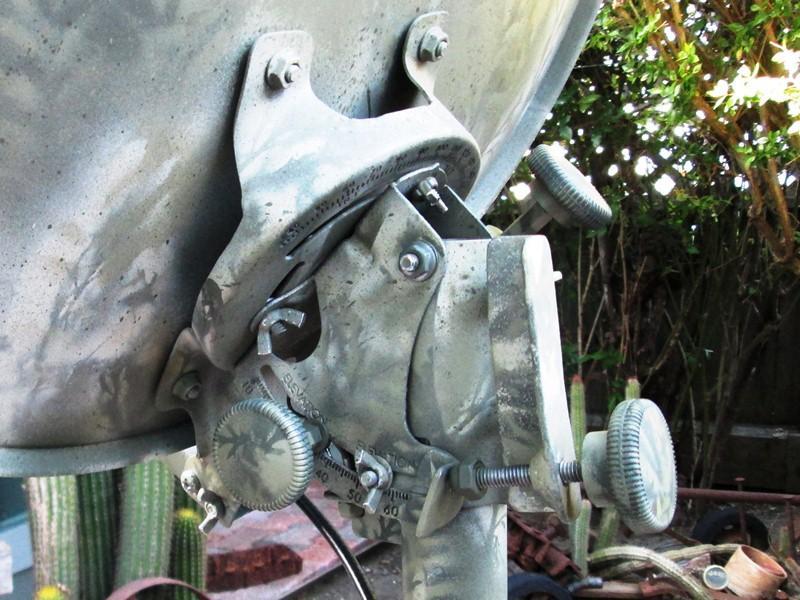
- AZIMUTH adjuster
Kind of stumped on the rotation or 'azimuth' . Though not really needed still would be nice to loosen bolts without dish flopping or moving and micro adjust. Keep thinking worm drive using band clamp--but nothing has gelled. Tripod is on order maybe something will become clear. When it arrives I am also going to add something to legs to make plumb/level adjustable (done). To be DoneAnd done- This one, adjusting azimuth, I thought would be easy-not. Took a couple of tries and several virtual ones before I got it to work. When tripod arrived realized though the degree markings are on base adjust will need to be at dish bracket at top of mast. Several issues. As the mast is inserted into base the hole is a bit tapered, very difficult to turn when seated, -the dish assembly turns very freely at top of mast. Also because attachment between rotating part (mast) and a fixed part (base) is 6" apart adjustment just not easily done. Plus main issue if turning in base, clamp bolt loose, throws it out of level-plus dish is 2' from azimuth markings on dish only guessing where its pointing and how much your moving. However making something at the top-wow Just way too many moving parts and they are going in different directions and arcs.
After doing the tilt adjuster thought a similar adjuster would work, a fixed nut traveling on captured rotating thread. Just finding attachment points a puzzle. Seemed I might utilize the arc elevation slots, run a bolt thru the slots-knob one end and nut on other, this would capture it , weld up another eyebolt nut and mount on a piece of angle to mast. The eyebolt could pivot to match angle of cross bolt as dish rotates, the bolt could travel/slide freely in the slot compensating for the change in angle as dish rotates in relation to fixed nut. So made the another eyebolt nut, welded a piece of angle to mast, made another extended knob. assembled..tested
-FAIL.
Totally. DidnÆt work at all, as the dish rotates one end of adjusting bolt is traveling up the arc slot the other end is traveling down-just completely bound up. I gave up-nuts. Actually though once I figured out why it didnÆt work, fix and what to do became apparent. Finale adjuster assembly attempt and one that works was an attempt to save first FAIL parts and what I should have done in the first place. Though the whole problem solving is why I enjoy this kind of stuff- but this was becoming not. I donÆt like being outsmarted by mechanical contraptions.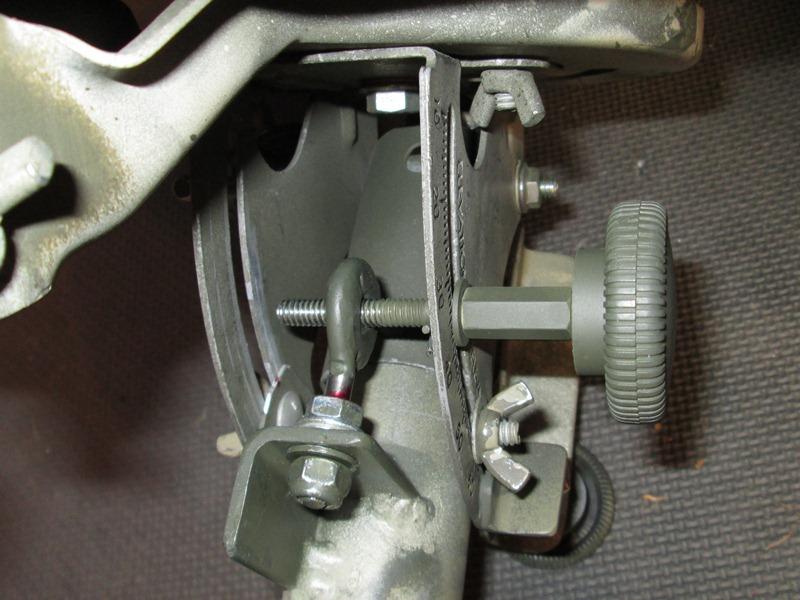
Simple once I figured it out.
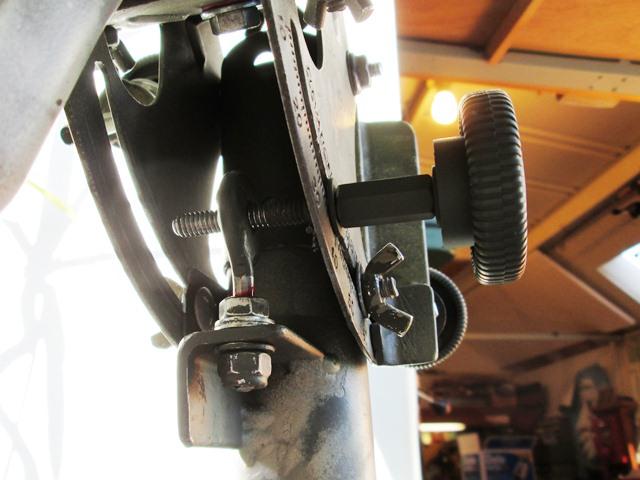
Basic parts
Simply capture adjusting knob on one slot, it could pivot within slot, travel up and down as elevation bracket rotates. So unscrewed nut from eyebolt, removed dish assembly from mast, unscrewed the adjusting knob. Cut adjustment knob shorter so didnÆt reach other slot, drill a cotter pin hole- for clip to capture to one slot. Threaded eyebolt back on. Dropped dish assembly back on mast guiding the eyebolt into hole on angle-kinda hard with only 2 hands, -lightly snug bolt so it can pivot and wiggle a little. Tested,
Cool it works.. SLICK!. I then realized by cutting adjuster knob it a bit shorter when eyebolt all the way to one side it will unscrew from the eyebolt, allowing easy removal of the dish assembly from mast with out unscrewing the eyebolt. So recut, way easier to thread knob into eyebolt than guiding into hole-plus no tools required, NICE. IÆm a bit amazed how well it works-been nice if I had planned it like that. Oh well-happens as often as not when doing this sort of thing-IÆll take it.
However some rework needed-though not mandatory, minor. When I welded on the angle to mast I sat it bout 1/4" too high (was trying to minimize eyebolt extension). Also cut eyebolt too short. The eyebolt I used not enough thread toward eye, the unthreaded shank is smaller than thread so nut will travel off end. Either lowering the angle or different eyebolt would have prevented issue-not enough thread to lock the eyebolt and not enough thread to adjust height to match slot. Works but barley the top nut on eyebolt I staked and Loctite I assume will pop of as its only captured onto couple of threads. Easy fix, as I want to cap the mast anyway to sit bubble on top for leveling IÆll use a pieces of 1/4" steel. That will address both problems, give me more distance between the welded mast angle and dish bracket, giving me room for longer thread on eyebolt.
Note there are a few different dish mounts, mine is a simple 1 piece folded steel, some are 2 piece.
Things yet to do-conclusion
-
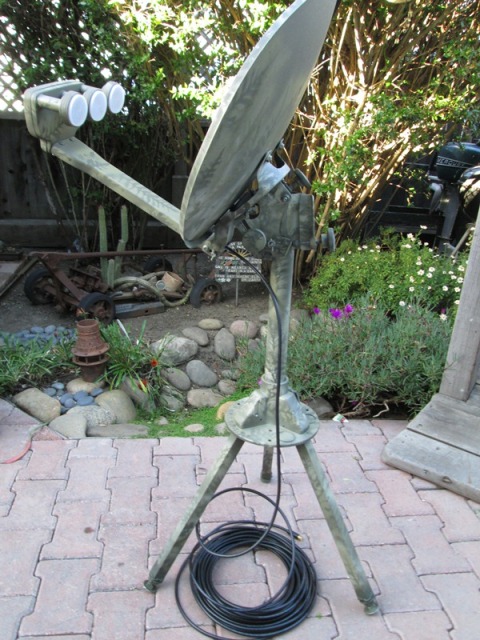
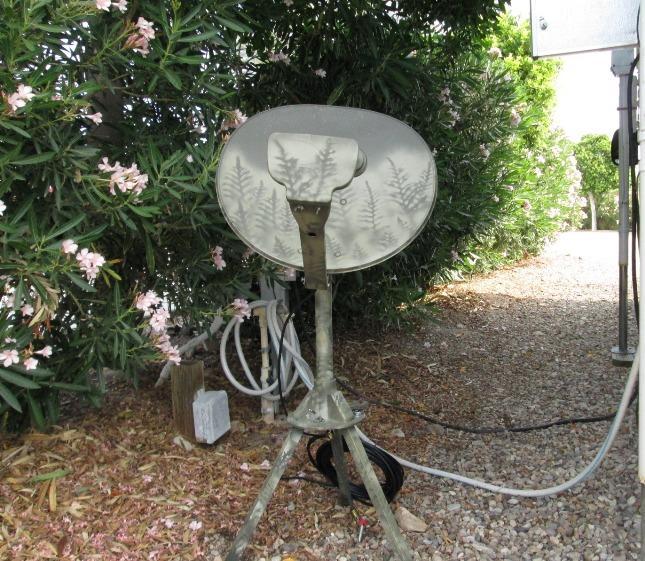
Just pics of finished project

Details: yet to do. Need to pick up some nylon washers to replace the steel washers on azimuth adjust knob. When adjusting elevation the azimuth knob doesnÆt slide smoothly causing elevation to be jumpy, though thatÆs only running thru full travel. When actually setting up dish-dialing in travel would only be a few degrees so really not an issue-but... Might replace the elevation knob thrust washer too. and put under tilt wing nuts so they stop chewing up paint. I didnÆt want to add another cable connection but storing & reinstalling the LNB arm with the 50'cable attached bit of a pain. Which would allow keeping cable in a more open roll -less coiling.
HavenÆt looked at anchoring, have some spike tent stakes I could bungee too. Try the gallon jug of water but thinking maybe a collapsible canvas pail-. Am going to get another mast-this one could be half the length, so unless I need for line of sight IÆll use much shorter mast. Last adding a mount to camper, where I can would be nice than using tripod. fella made one that hangs off roof railing, would give some adjustability to get clear sky. Add a pointer on bottom of mast in line with adjust eyebolt, pointing to azimuth scale I can see. Lastly is a bracket to store dish on ladder. Things that could be done....
Ah Fine tuning... Actually a fun though pretty impractical project. Will make using a bit more simple but like I said unwarranted-but I enjoyed it. Beats watching TV...DonÆt know if any of this could or would be used but itÆs here if it helps, either what you could or shouldnÆt do.
Update:
Well just returned from 2 weeks on the road. The dish setup worked well. Though easier to set up than what I was expecting sometimes finding the sats was frustrating. I think because where I think the arm is pointing (azimuth) isnt. Sometimes Id nail it first try but if not then play with it for 15 minuets before finally finding (and I swear back at where I started). I ended up using spike tent stake which was easiest to tie down tripod. I definantly need to add short piece of cable instead of the direct 50' roll hooked up. Dont expect using all the time but option is nice just to watch TV after a long hike-contact with the outside world when out in the boonies kinda weird. When not using, storing the dish so not having to move around is next project. It either sat on bed when travling or in cab when camped unless using. Not a huge effort but got old. Tripod easily goes back into small box and into cabinent-the dish probably will go outside, if we want it its there to use, otherwise dont want to deal with it.
One of the aspects I was unsure of was powering down reciever. At home box always has power-retaining information but in camper its on inverter so obviously power gets turned off when not in use. What I found is its not an issue IF the satelite dish isnt moved. When repowered the reciever recollects info, takes a minute but dont have to go thru revalidation again or setup.
Couple of pics on the road
Needles...CA
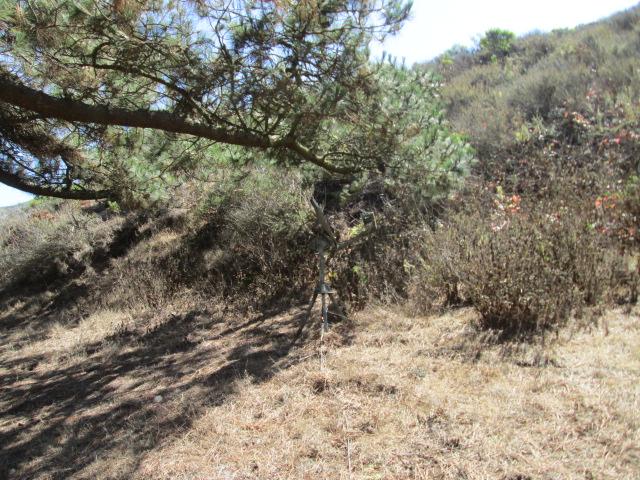
Montana De Oro CA. As in the 1st pic most places dish is pretty close to camper. I was thinking i could half the 50' cable-this trip convinced me otherwise, was stretched fairly tight and could have used more.
Finally got our own reciever & service. Ended up getting an other tv so box could be used in the house-guess where new tv went. More on that, reciever and modded sound system install into camper on TV arm page.
Back to Ourelkhorn Camper Modifications page