Solar panelInstalled a 130watt solar panel w/ 30amp controller, 4 way tilt mounts. Been on the list for a long time. Some places I don't like running the gen-plus this will in optimum conditions, probably keep up with our actual usage.I ordered panel and controller thru Wholesale Solar. Very helpful folks. (Note:the equipment I used and this install was done 15 years ago- still working flawlessly. The company, Wholesale Solar, recently changed their name and is now Unbound Solar. Did a lot of researching on this, a lot of info out there, ignored a lot but learned a lot. Good info on Wholesale Solar (now UnboundSolar) site, also Arizona Sun & Wind (http://www.solar-electric.com/) and a lot of others. I decided I needed at least 100 watt panel for our minimal needs. I wanted a meter in the controller, I also wanted Mppt type controller but leaned toward the Morningstar unit because of other overall features and price. The panel mostly due to size (130 watt in a single) and price. Wholesale Solar at the time had both and at pretty competitive pricing.
As to mounts I had seen some 4-way tilt mounts on the forums that I planned to copy & fabricate. You can gain a lot by angling the panel. 2 way tilt mounts are available and I've seen a couple of nice ones. But these, JimandSues 4 way pivot solar mounts are just cool. (was a link to now defunct picture. site) and I had been planning to copy them. I did and they work great! -however I may be modifying them shortly. The pivot point is one of 2 bolts-depending how mounts are rotated (which way panel is to tilt). I realized after installing that a single pivot point will work and change having to undo 6 bolts to 2. It will be much easier. However it will limit the tilt to about 45 degrees-which is ok for most areas. Plus titled length wise I wouldn't go much more cause the panel would be way to high. But these will work for now, It allows titling the panel in any of 4 directions. I may not get around to modifying, depends how old 10 minutes to tilt becomes. we'll see  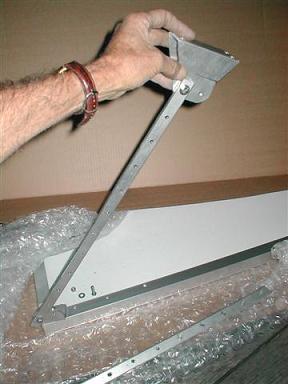 shown upside down
Next was picking mounting locations.
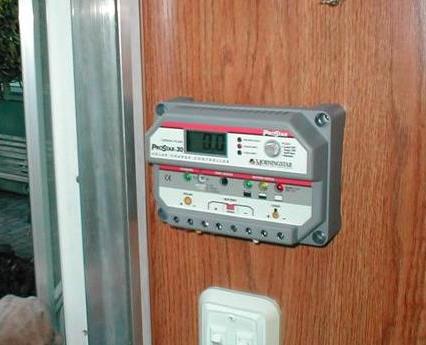
Controller
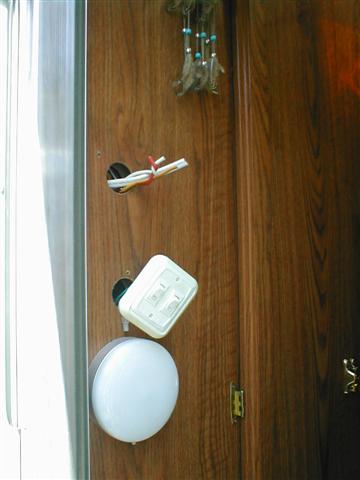
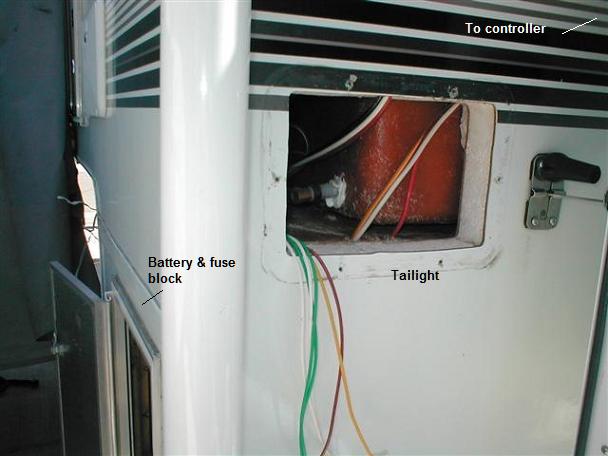 Looking at rear corner of camper, cabinet door [below left] is battery, wires go up to behind shower (red) to controller. Picture on right is looking at door frame on left. Wires from battery and roof. Vent pipe is right beside hole straight up to roof. 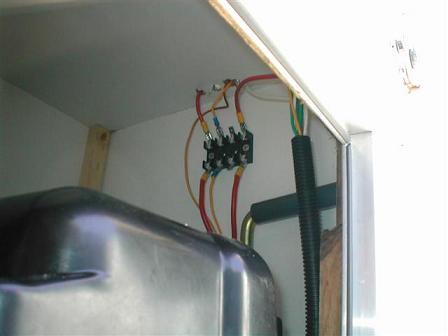 I added a fuse panel, just in case, this is just below taillight/shower. That was easy and lucky- access to the only mounting location for the controller, from the only logical access from the roof, near mounted panel-and access to the battery to run all controller wiring, all in the corner of the camper. Between the roof plumbing vent pipe and solar panel is a roof vent- I can use a couple of the vent screws for cable clamps, wow. I've never had an install just kinda fall into place like this. Mounting the components & getting access to each was what really had me concerned about this install.

 I spent considerable time running wires between batteries, behind cabinets, around stove-well if you've run wires in your camper you know access is not easy. My batteries are in 2 locations. Getting wires between was the hardest part of this install. Positive from controller goes to 1st battery, then on to 2nd battery, negative from controller goes to 2nd battery then back to 1st. This route insures charge goes thru both batteries equally and is independent of existing wiring. My previously installed Perko switch now only acts as on/off to disconnect camper from batteries. (cant select 1, 2 or both) Solar will function with battery power to camper off, controller has its own off switch. Well I've yet to take pictures of solar panel on roof. Were going camping this weekend so Ill get some 'action' photos and update this page. I'm anxious to see how this system works. I'm hoping we'll find we don't have to make sure were back at camp to fire up the gen 'for its too late. On to solar install & conclusions, Page 2 2014: update, Added portable folding 100 watt 'suitcase' solar panel to camper Back to Ourelkhorn Camper Modifications page |