Rebuild camper rear skirt
Been needing this for a few years-only getting worse, couldn't put off any longer. Truck campers are infamous for the rear skirt (or wings) rotting off. Quite common. There are some good threads at RV.NET outlining rebuilding. This again, not a how to, certainly not a recommendation, just what I did to ours. Our drivers side is almost all door so I didn't rebuild as most, duplicating the 1x2 frame, I used solid ply.
Also I had posted this on RV net as I was doing over a few days. I pretty much copied my posts so may be a bit disjointed.
The Teardown
-
Cleaning up our rear skirt..
Literally
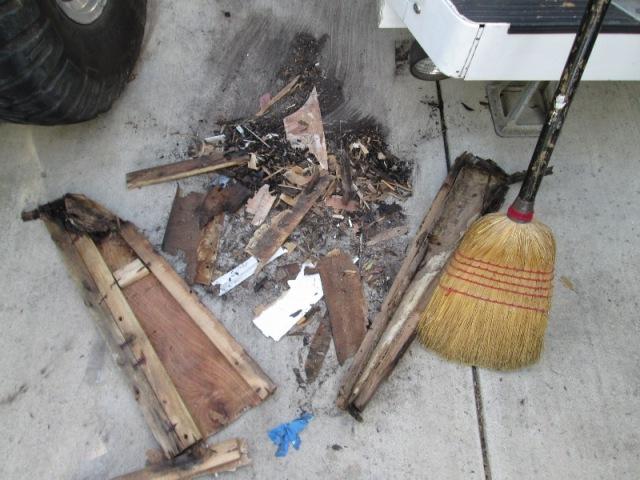
Last thing yesterday, swept up our rear driver side skirt or rear wing.
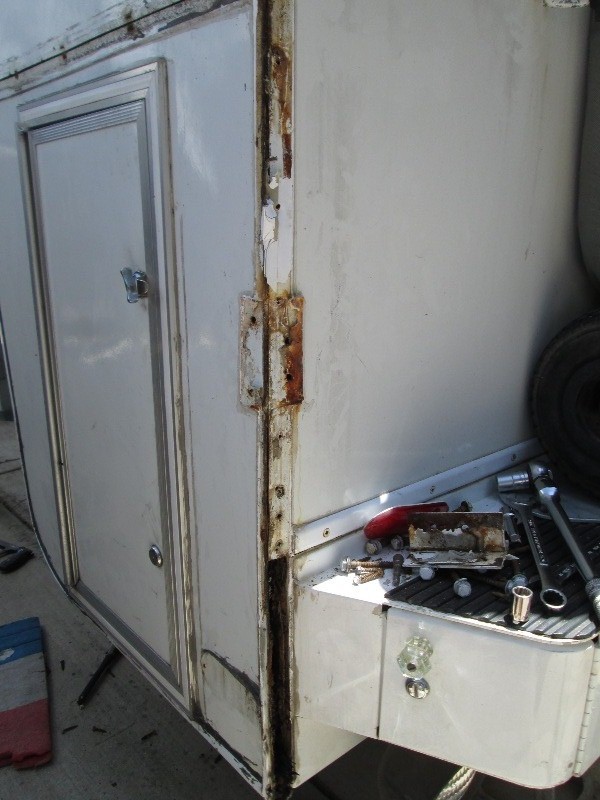
After putting it off for way too long- forced to start the rebuild of skirt. Simply didn't want to address but last trip out, when I opened door the whole frame was moving, trying to come out of the wing (skirt). There are a few good skirt rebuild threads linked in the TCU at RV.NET. I've studied them 'till my eyes are swimming & blue, seems a simple repair. Not sure why it seems such a task...I guess because camper still 'looked' ok. However aux battery is on shelf, plumbing valves etc. are in there- need to fix, before door falls off.
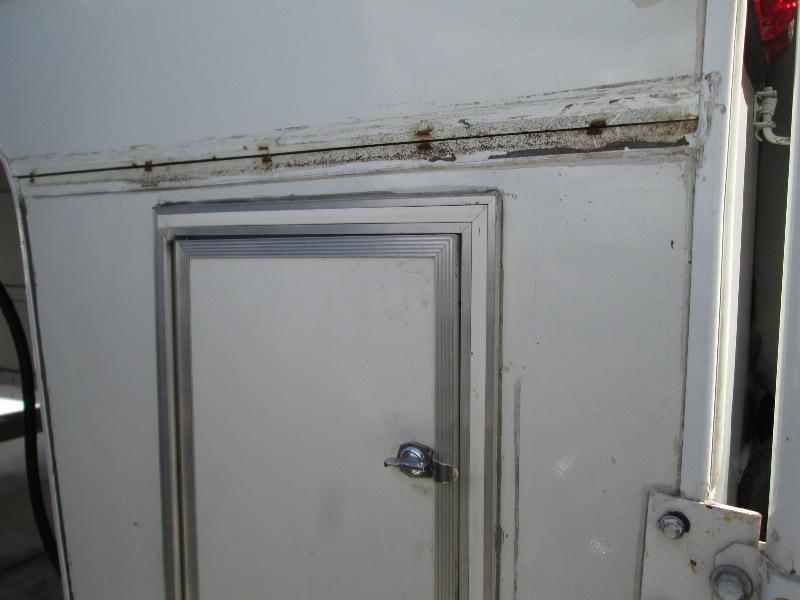
But I have some questions for some that have done this or thoughts. Ill outline with pics where Im at and plans. Same as most, a stapled 1x frame with luan glued to both sides/filon on outer side. Once I removed I realized the skirt really isn't as structural as I had thought to the box and shelf. I have no clue why the wing overhangs the box other than appearance, boxed square would be a better design as far as structure/sealing. But Ill duplicate swept look just 'cause .
When I get around to the generator side skirt (not as bad I think) Ill use same original method to reconstruct. 1x2 frame luan sandwich. But only because it has no doors. And its rather large. The drivers side though is almost all door. I am considering using a single piece of ~7/8" plywood. It would be a lot stronger, simpler to build and reattach. Edge sealing only critical concern? Though no more/less than the luan which I do have a sheet of 1/8". Most of the water intrusion source was the corner wall trim which Im addressing. Second was just the edge trim allowing to wick-but that mostly because what it was attached to rotted.
At any rate where Im at so far.
First clue problem was greater than appeared was pulling off the filon seam trim
When slipping the putty knife under to cut adhesive tape the filon was squishing. Couple of staples completely rusted off. Oh boy... Continuing decided to cut the edge trim.
Allow removing only what's needed to remove filon and subsequent cleaning and resealing. I did carry up a bit. Removed Jack & mounts
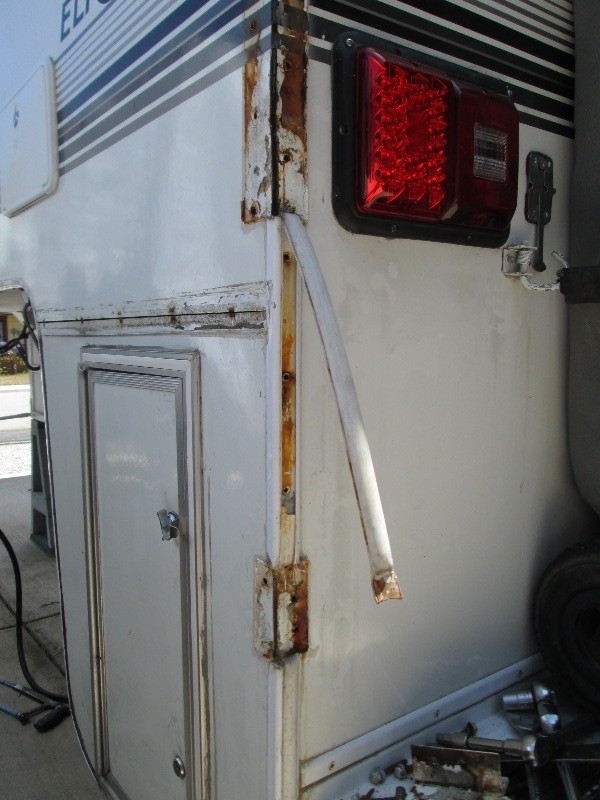
This is where most of the water is coming from. I've dealt with this on front jacks. The edge trim has a vinyl cosmetic screw cover trim. Water gets behind. On ours its tucked under jack mounts, water seeps.. On the front of camper especially on nose bottom the 'trim' literally fills with water. I cut ends before termination under jacks so water could drain out. Underneath nose I also used a hole punch on vinyl added a few holes so water could get out before direct down wall. If its not being channeled to where it shouldn't be its sweating and rusting out screws...
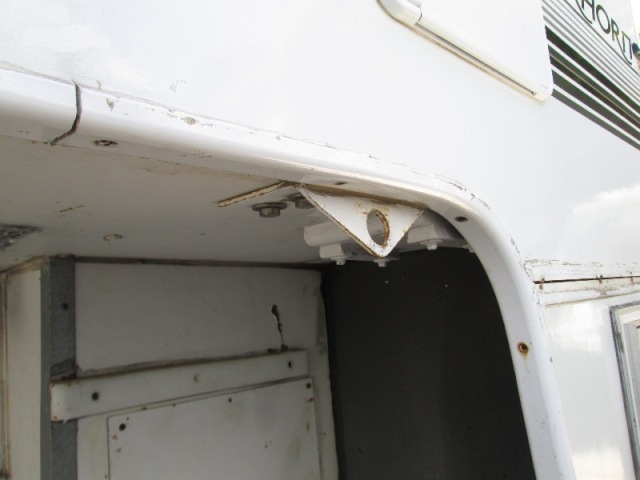
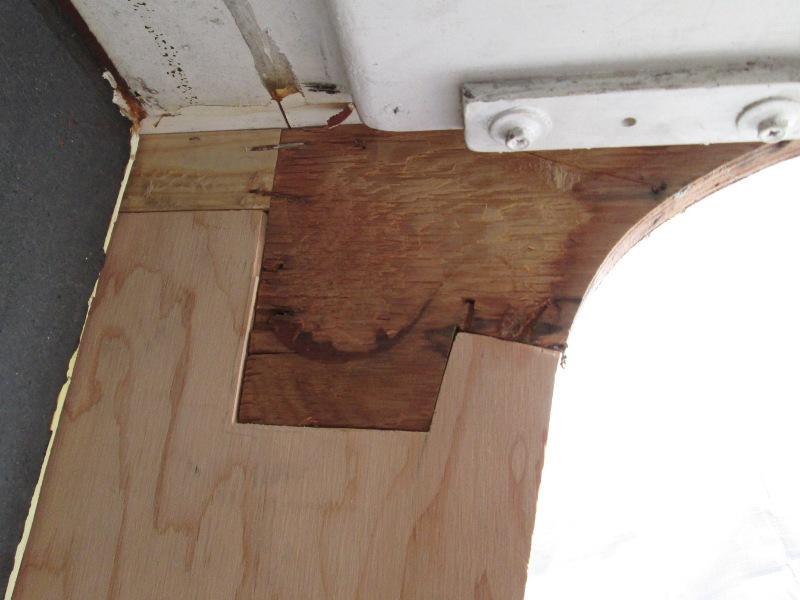
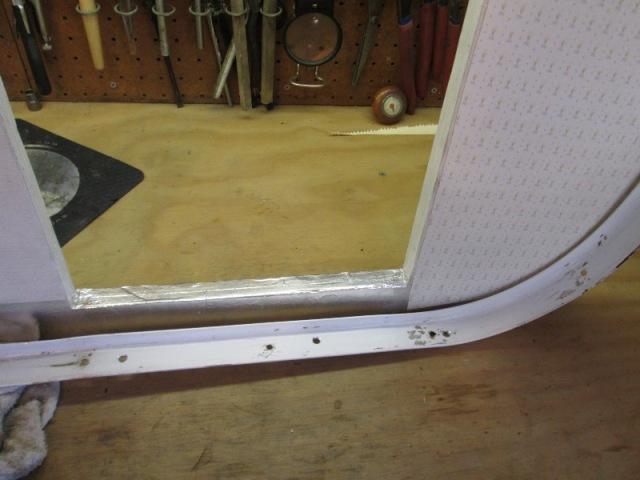
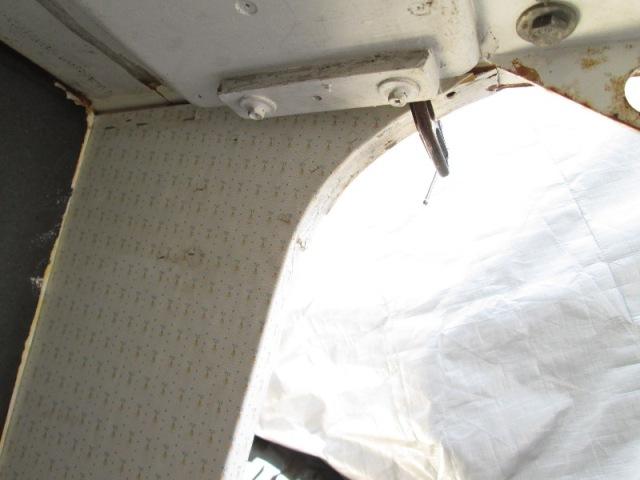
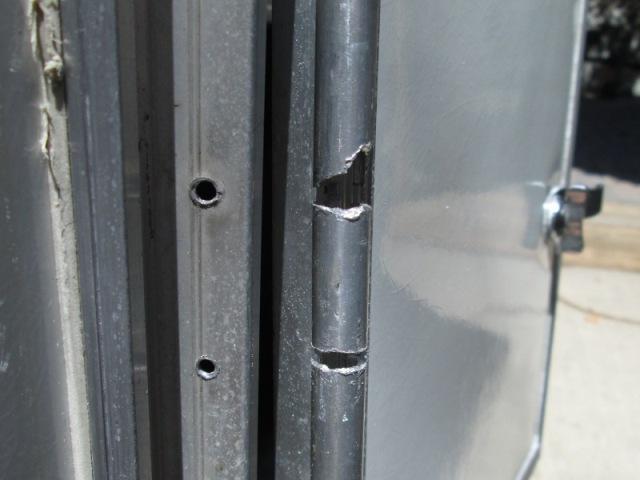
At any rate, once trim removed you can see at lower edge is the notched edge of skirt 1x2, above that is the corner of aluminum frame.
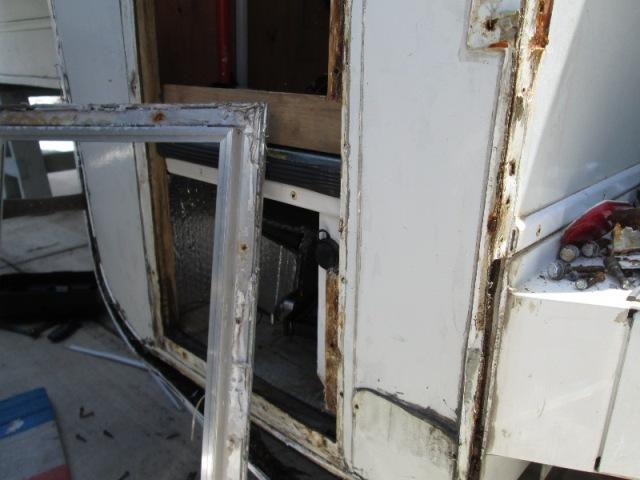
Door removed, getting quite discouraged at this point what I going to find under filon, obvious rot..Margaret actually picked up some photo adds and was looking at replacement campers-ha. In an attempt to save the filon skin I used a sonic (oscillating multi tool) cutter to cut the perimeter staples. The skin fell off.
wow...
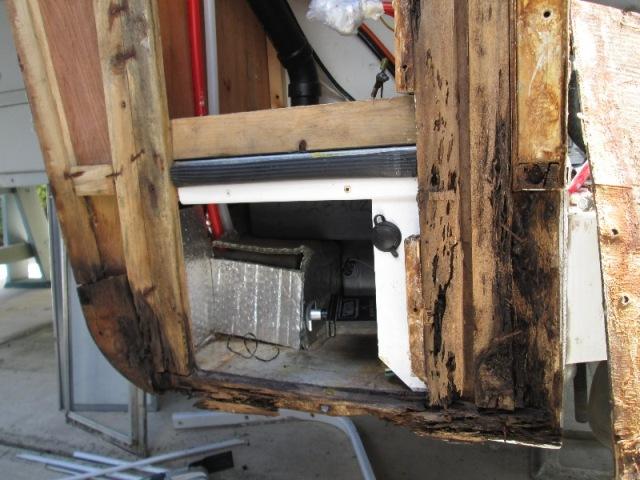
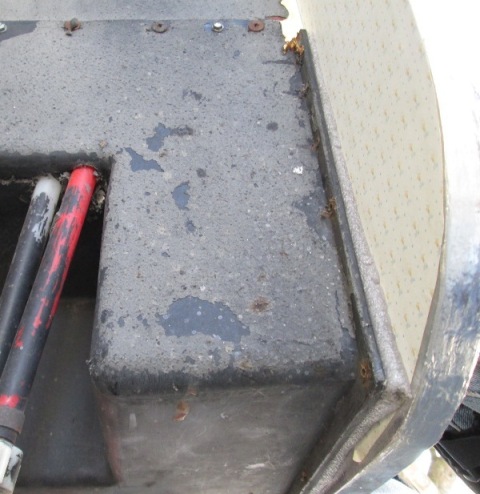
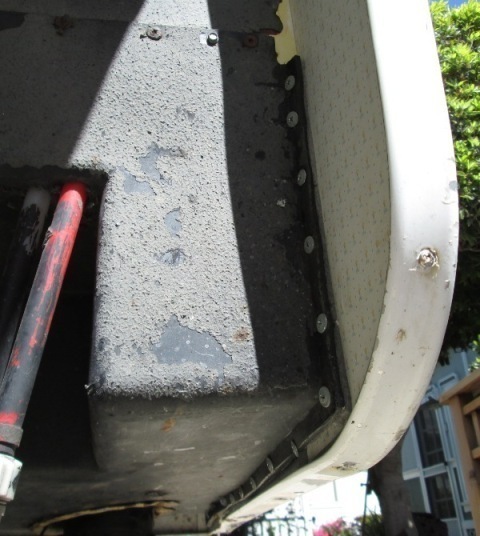
Amazing how something can almost look good and function yet nothing there. Most of the wood visible isn't. Trying to remove just turned to dust.
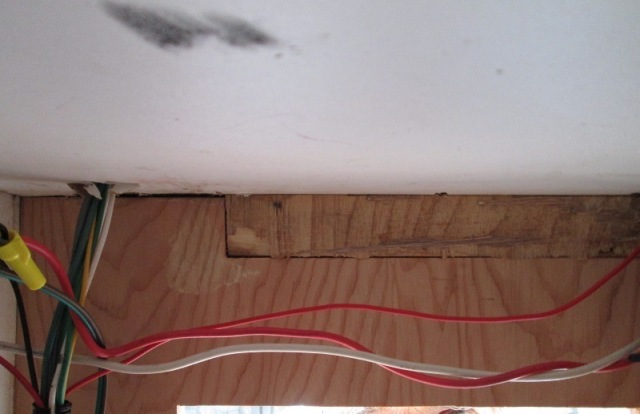
Once all the rot removed looks pretty good. I expected to see rot traveling into camper. But its all sound and was contained to the 1x2s of the skirt. The very bottom right edge was starting to be attacked but mostly discolored.
The top of skirt frame was screwed from above and thru the aluminum wing frame. No way to get to without loosening a LOT of upper filon. Or as I thought I would be doing cut up to the frame. However that would require a replacement sheet of filon or other replacement. But as the top most 1x2 and shaped lead section of ply block attached (hidden behind filon) is still sound I can reattach new skirt frame to the existing wood behind upper filon and from the back side of inside of cabinet. Ill also add some blocking inside. Upper and lower filon panels re-stalled along seam to new wood.
If I were replacing the filon think I would have cut lower section up to aluminum frame.
Spent 2 hours cleaning old putty from filon panel and years of re-caulking ..Because of the limited free area of drivers side skirt/filon panel, though Ill reglue I 'think' a non issue on this side. The purposeless and exposed back side of wing Im unsure. Could glue plastic or vinyl to back side but thinking just cover exposed area with aluminum sheet. Ding ding, use 3/4 ply, laminate luan to back side running long on top to glue/staple to existing blocking. Allow tucking behind cabinet wall, stapling/tying front & upper block piece. Cool-knew there was a reason to documenting this. Then cover-A ways off yet.
Off to the hardware...
Reconstruction
-
Got a flat piece of plywood...3 trips later. First piece I picked up was so warped could not get a flat 2x3' piece out of it. Ran back but they had closed. Next morning took it back. Wasn't going to spring for cost but was given option of a sheet of marine grade, only 3/4" they had that was flat. Better anyway but mostly cause it was flat. Hardware stores entire a stack of 20-30 sheets of 3/4" acx- is twisted, warped and bowed, apparently there rack is racked-every sheet is just about ruined.
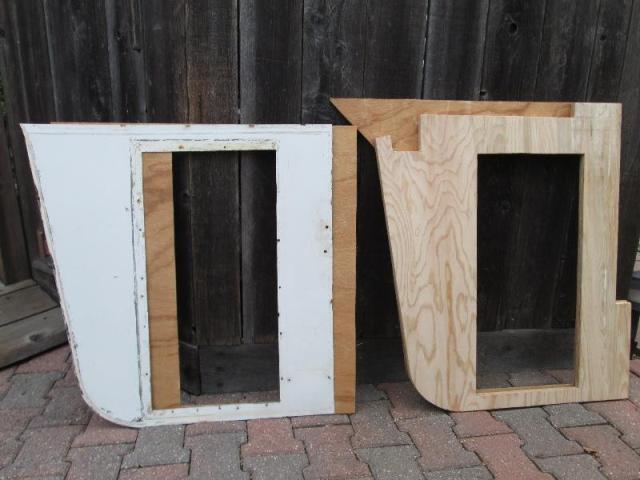
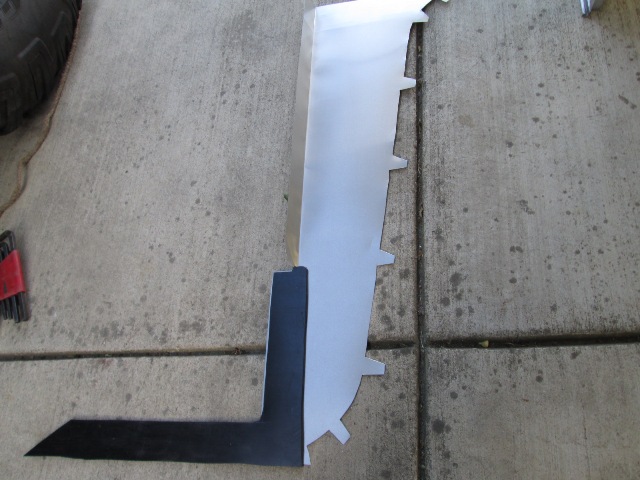
Got it home measured out the "puzzle" piece
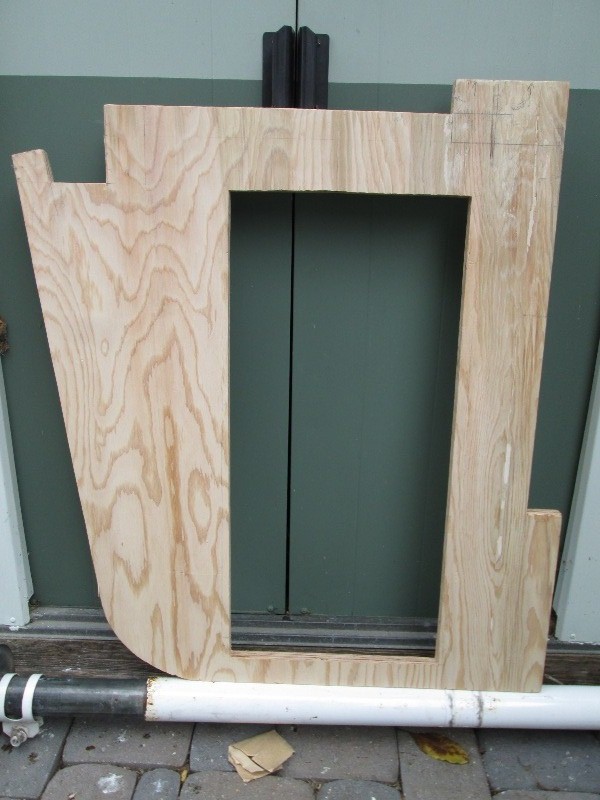
As mentioned the forward curve block and top 1x2 is still attached to the aluminum frame which I left. Cut new ply to match
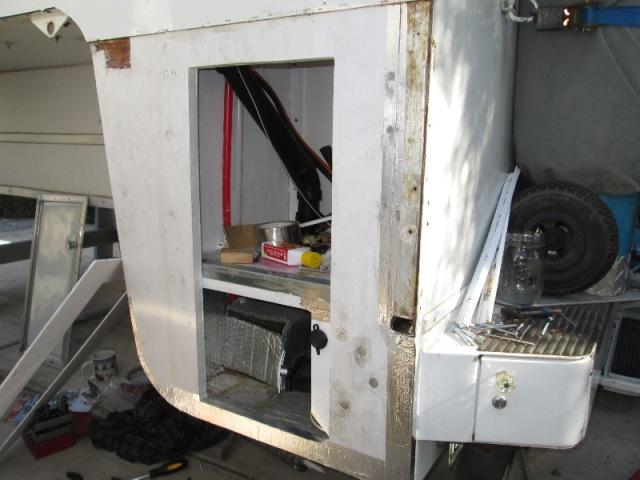
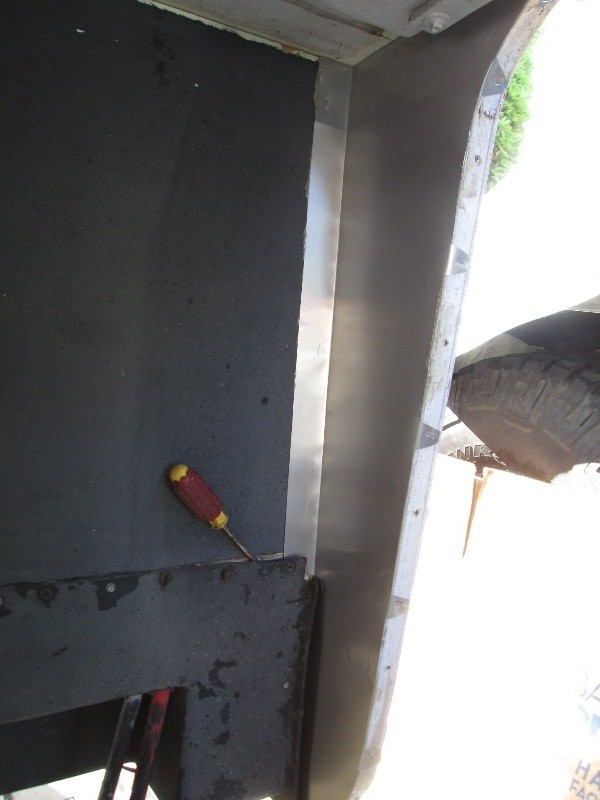
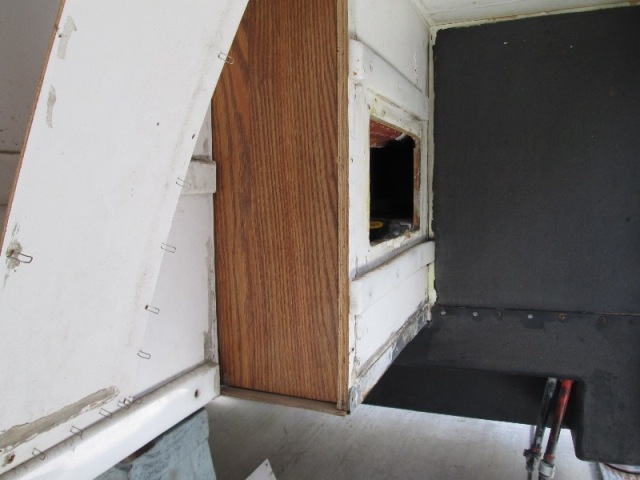
Test fitting new 3/4" skirt. Wow. That it actually fit simply amazed me
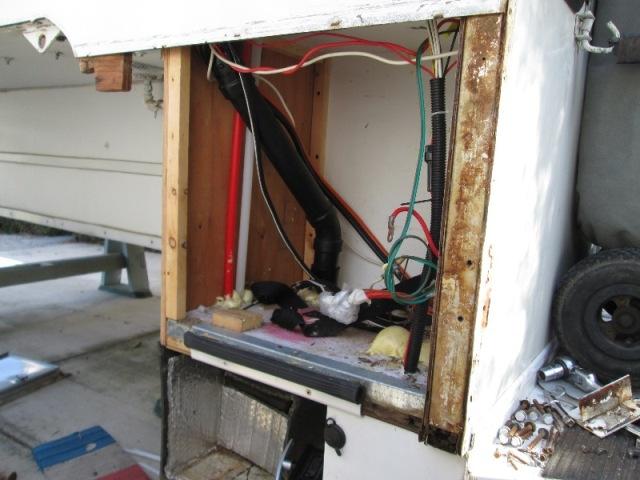
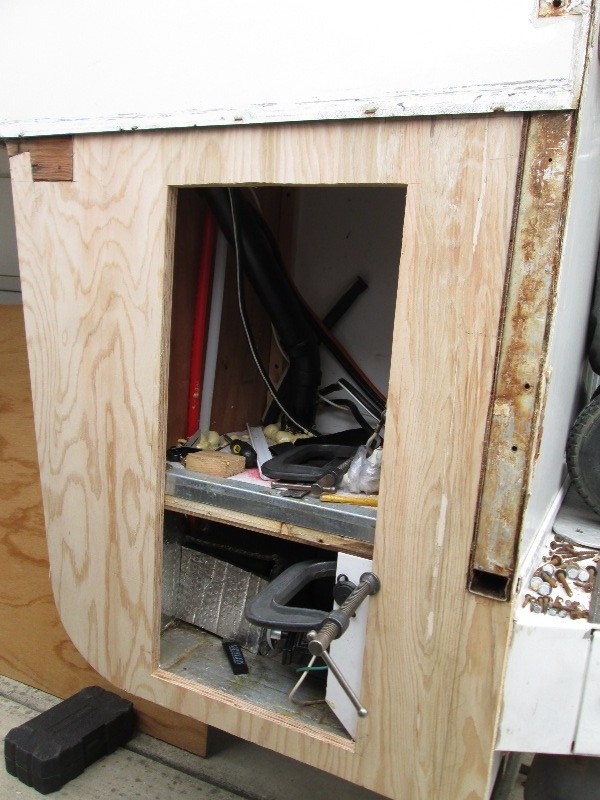
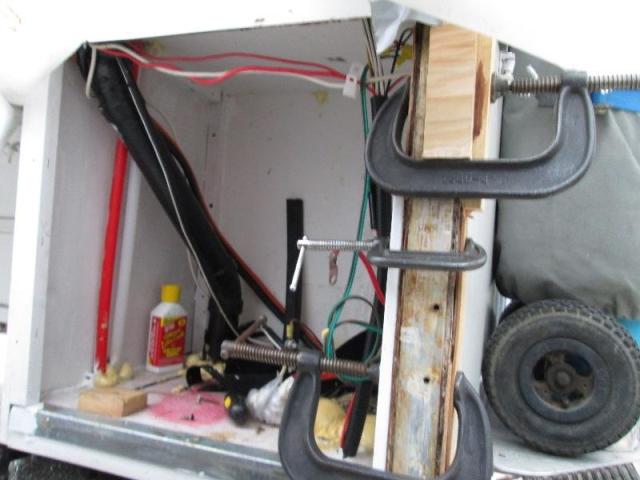
This is camera inside cabinet looking out showing notched to fit against existing 1x2. When I laminate the luan it will run all the way to top & tie new ply to existing 1x2 (once I clean it up). After skirt installed more than likely will go back in and add some 1x1 corner blocking to tie inner box walls to skirt. Think I might tidy up this wiring since I have access.
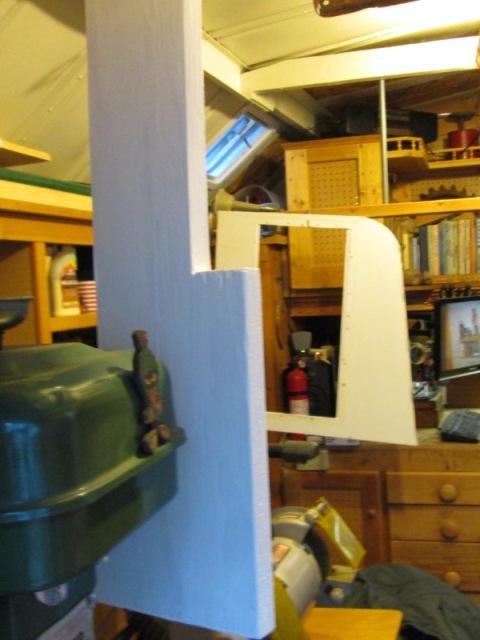
And again camera looking out from under wing and skirt. Shows continued 1x2 and lead ply block. A wide crown stapler sure would be nice here, though on outside before I install filon.
Cut the luan pieces. Sandwiched and test fit everything again. Left the top lead curve long, be easier to cut after glued in place to insure it matches profile of existing block. Tomorrow Ill glue the luan to plywood and the other piece to the filon and let set for a day or so. Once they're dry I'll sand out the edges, then seal all the wood. Still debating material, that and what Im using on back side, details. Hmm I have some extra epdm left over.. But I have at least a days worth of trim & camper wall to de-silicone and clean up.
I should note skirt is reinstalled in 2 stages. The skirt itself, which is primarily mechanically attached, with some glue, then the outer filon which is primarily glued on, with some mechanical aid. Trim holding together is last. For most, skirt will be a 1x frame with 1/8" luan backing. Mine I used 3/4" ply but also attached luan backing to match thickness. Outer filon is glued to 1/8" luan, this is turn is glued to installed frame....
Well fog rolled in last night-
I mean serious coastal fog that we haven't had in several months, all but raining. 'member mentioning how dry the camper was?
Camper uncovered, water was running down the rear corner this morning. The raw edge of luan soaked enough water to swell and pull away from the al tube...had the big fan on it most of the day. Pumped both edges full of gorilla glue and clamped. I had briefly thought about sealing the raw edges yesterday but decided it could wait until I had the new stuff ready...doh! Got out some sealer and painted every piece of raw wood I could find, inside the cabinet, all the edges.
Anyway got the skirts luan/plywood and glued and stapled, glued the filon to its luan backing. Sanded out the edges
Then I completely sealed the filon backing and new skirt. Tomorrow Ill second coat skirt pieces, remove clampage on camper and seal the edges. I had some spar urethane but ended up just using some kilz premium exterior primer. Brighten inside of cabinet, pretty good in damp areas, dries faster and its a just cause thing. Plus glue will stick to it.
Did get the silicone off the camper and skirt filon. I had a bottle of silicone remover that doesn't really work. When I was doing the skirt filon I got out some paint thinner to remove putty. To my surprise the silicone when rubbed would ball up like rubber cement? Still took a bit of elbow grease but it actually made it a lot easier. Never heard of using thinner. Doesn't dissolve but it turns gooey-odd.
The skirt after second coating will just hang out some more tomorrow. Need to finish cleaning the trim pieces. I'm considering drilling some holes where edge trim wraps the bottom of skirt, to allow any water to get out. Also need to get some new trim plastic insert for the door-brittle and just cracked when removing. Too much fun...
To the sealed wing plywood I wrapped all the edges that might see water with aluminum tape. Glued some old vinyl to the back side, just in case or until I get sheathed. Also, other than coming to the conclusion that everything about the way the box & wing/skirt is built is WRONG, The previous vinyl acted as an isolation barrier and stopped the rot from migrating into camper. Drill and chamfered drain holes in trim.
When I reinstall edge trim Im not using butyl or putty tape. One is, previous tape only had about 30% contact, did nothing other than hold water. Being at bottom of wall, Ill seal the edges but intent is any water getting in will drain out. All it takes is an 1/8" failure of the caulk bead in several feet of trim and you've got water standing inside. Ready for reinstall...
Reinstalled
-
Almost got it.
More pics..
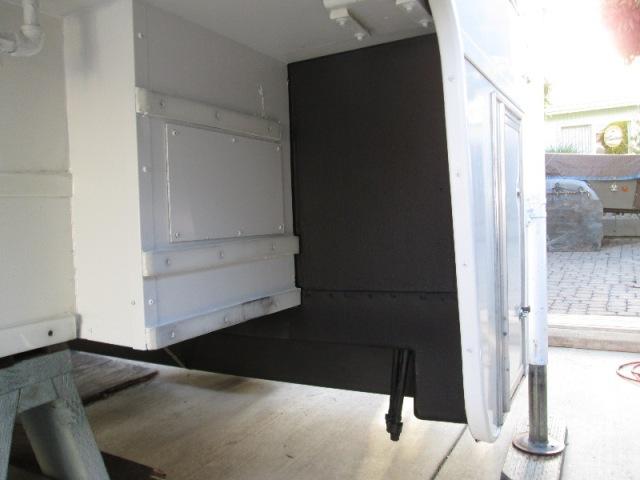
Glued and stapled overlapping luan of new skirt to existing blocking, again this will get covered in some aluminum flashing.
Had to stick my head inside when stapling the inside-my ears only rang for an hour. Row of screws to left of door into 1x2 block inside box. The rear is screwed thru back wall-thru al frame into edge of skirt. As I used plywood which isn't to edge strong added a 1x2 inside to right of door to also face screw/glue the skirt. Also screwed into the shelf and anything else that didn't move.
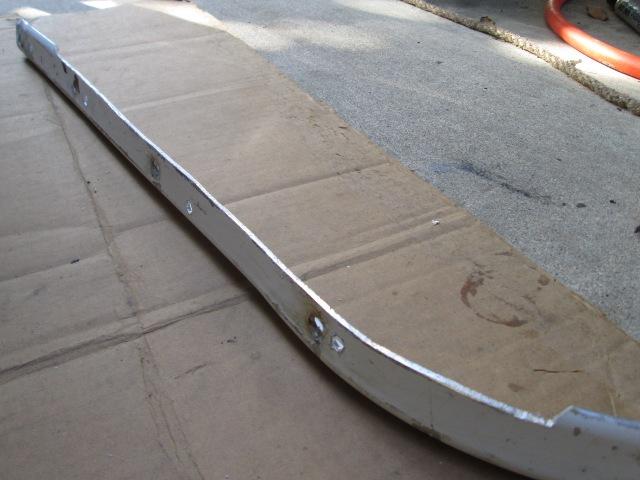
Added 3 flat head bolts thru skirt and bumper wing that protrudes into box. One, there Wasn't anything holding lower half of skirt. Two, bumper flex made keeping the edge sealed impossible. But mostly, third, Im adding some lower brackets from jacks to bumper. I want to add them to lower part of bumper which would move the leverage point on jacks down 16". This will tie the 2 jacks together across the bottom, and lower the leverage point, greatly minimizing the sway when jacks fully extended. Might induce more fore/aft movement between bumper & skirt, hopefully adding the bolts will spread loads. Tying all together Im seeing the bumper stabilizing the jacks, the jacks stabilizing the bumper. But another project-just making the allowance.
That's the plan, for now just secures lower half of skirt and joint to bumper. Ready to attach outer filon.
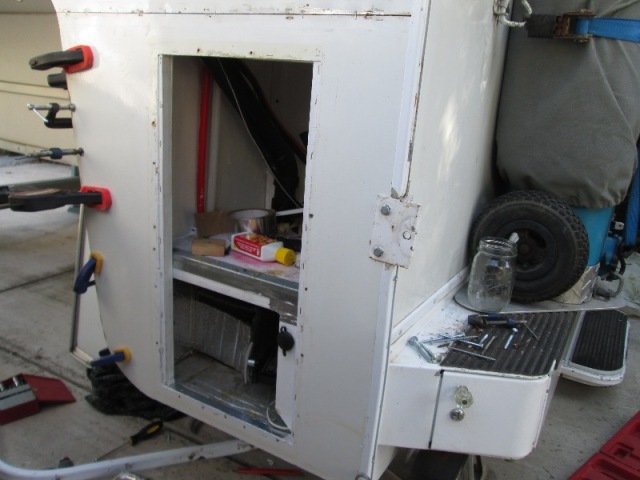
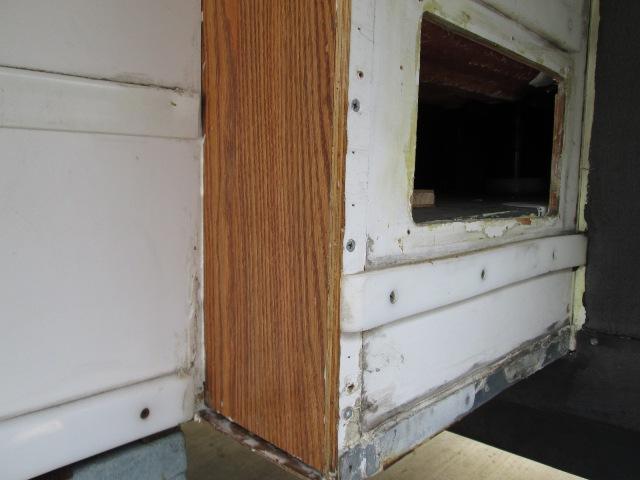
Here im already removing clamps after installing the filon an setting overnight. Basically spread some glue to the back side of luan backed filon. Clamped the filon with its luan back to skirt. Lots of clamps around perimeter, a few staples across the top that will be under the filon seam trim. Also had some blocks going from filon to jeep tire that's 2' beside it. Temporarily screwed on rear corner trim and lower jack bracket to hold rear edge.
My filon hole is about an inch larger than door hole in luan backing. Previously was all to one side and same size, door barely covered edge of filon. (Door had been replaced with taller but 1" narrower) Rebuilding wing allows me to cut hole to correct size, filon though is what it is but now centered). With centered larger hole of filon with hole in luan backing gave me a nice 1/2" stapling edge (and the door flange more likely to seal now).

Poor camper getting a bit shabby but this is looking better already. Off to pick up some auto molding tape to reattach the seam piece, flashing for the back side and miles of caulking...
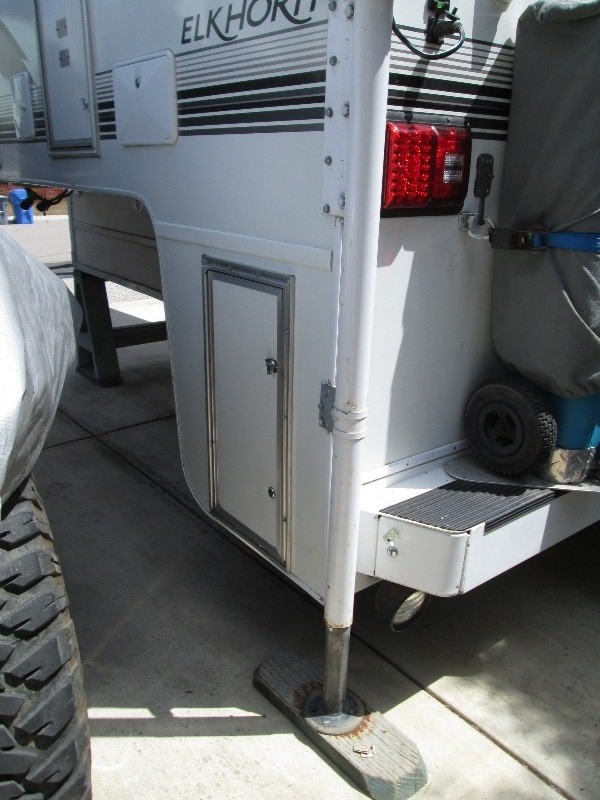
And camper back on its feet.
Details...which is consuming more time than rebuilding the wing.
Reinstalled the jack brackets after prepping for repaint. Waiting a few days-lightly re-snugging all the bolts, letting the putty set. Then paint the jacks brackets & bolts in place. Reset the corner trim. Caulking everything will be last step.
Got the cabinet door back on after fixing. Our door doesn't have hinges-simple interlocking lips on the aluminum. A single screw holds it in place that rides in slot but over the years the slot wallowed and door would drop 1/4".
Simply redrilled, moved screw, snug screw to mark door and cut new slot. Been on the round to it a few years.
Reapplied the vinyl Filon seam trim. Found some real 3M double sided tape hanging on the shelf at Autozone. I had thought I would need to cut upper wall filon higher to remove wing and need to replace the trim piece. One good source for the trim that NRALIFR linked on his skirt rebuild is Brandsport. Ended up not cutting my filon so I could reinstall the original trim piece.
The 3M tape is awesome. Removing the old tape Wasn't...I can see a lot of uses for the 3m tape. One will be to mount new LED marker lights.
One side project since Im here, thought would be nice to add side LEDs, however decided not to. Thinking be just duplicating taillights for side visibility. After reinstalling the jacks though, as seen above, lights are hidden by jack & brackets & cant see truck taillights? -14 years later.. other than the reflectors I have no rear/side marker lights?
( removed pics & led rework to its own page to shrink this page) so adding lights to be done.
Kinda fun-a distraction from finishing the skirt backing, reworking the leds.
What I didn't get done was adding the aluminum sheet to back side of wing. I've put this off for a few days because my original plan wont work. Idea was to add the sheet and fold so inside corner of box and the mating flange of tank cover is covered. Which is why I didn't just add before installing the skirt. Dang-it
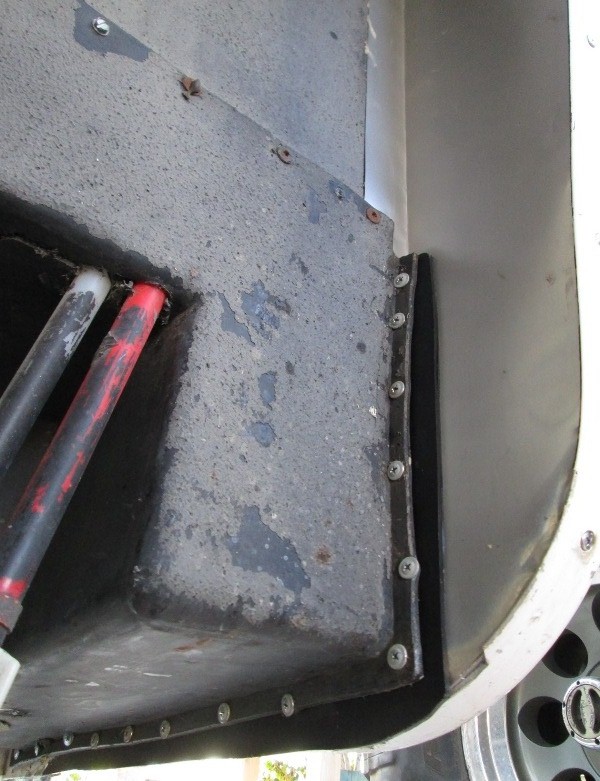
Our tank cover is screwed to skirt back. There is quite a gap between tank cover flange and skirt. Its always been a problem. My thought was, using some closed cell backing would give me better seal and fill the voids when tightening the screws thru the plastic flange. Caulk then cover it & mounting screws with the al.
Though it did work and this caulked would perform better than original, it's the mess I wanted to cover. After 1st screw was installed realized I needed to rethink the backing...as I need to access the screws if I ever change valves again or need to access the tank. Covered would mean getting back into skirt, nope. Went ahead finished installing but I need another plan.....so played with the LEDs rework till a plan to proceed gels.
Skirt reinstalled-jack back on a milestone for me. The remaining trim, caulking, covering the back etc just details.
And the Details become larger than the rebuild
-
Since I cant cover the tank cover mounting flange Im going under it to carry or extend beyond the skirt edge. Removed the tank cover screws and foam. On the tank cover I ended up cutting some 1/8" HDPE or UHMW poly sheet don't remember what I have. Made a L shaped spacer to slip behind the tank flange to run past the bottom skirt trim. On the inside it will over lap the added al sheet that will go behind and extend into cabinet.
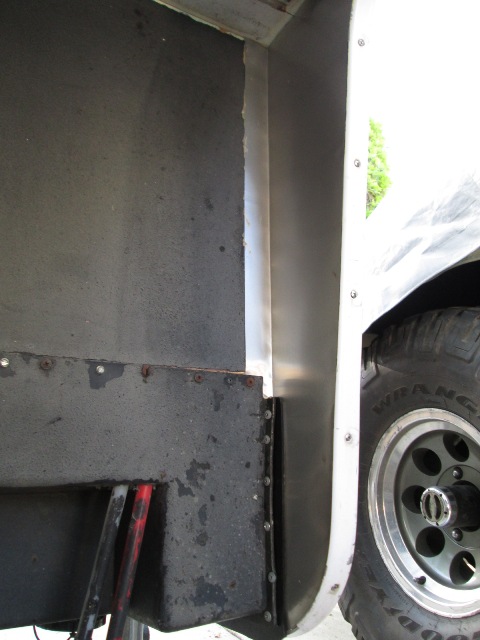
Cut the al sheet to slip behind tank cover flange and into lower cabinet area. The upper inside edge cut long to fold over to cover skirt to wing inside corner. Cut some tabs that will fold over and hold to skirt outside edge. Hopefully all the overlapping should caulking fail divert any water. Screws thru the poly weren't pre drilled, self sealing- water shouldn't get thru screws, (they will get caulked though). Mostly wanted to get past the trim flange on bottom.
Aluminum installed. Used some ProLine adhesive, mostly to fill uneven voids and under staples. Slipping behind tank cover was a challenge. Couple of staples at top and wrapped edges. Inserted the poly spacer and screwed the tank cover flange down.
Secondary is the poly spacer also extends inside between the skirt and inside bottom of cover. Any water that gets inside the cover wont be setting directly against the skirt. The cover is just an oblong box that covers the rear tank, offering some isolation from the elements/weather for the tank, drain lines and valves. It should have been molded with an end instead of using the skirt for end. Or at least an inside lip, which I now sort of have. Cut hole as required to access valves..but what do I know.
Cut the inside lip off of edge trim as it will now butt up against the poly spacer that hangs about 3/8" lower than trim. Extend cut past about an inch so water on inside face running down or moisture collecting at trim edge has a place to run off before going under box.
Once the tank cover screwed on al sheet is pretty taught. I think this bottom edge is where the second most amount of water was entering. Water should run off and any that otherwise gets in trim should run out. Water inside the box (its not water tight, dump drain goes thru bottom) should not end up against shirt at flange joint. So's the plan...At least Im seeing the caulk as not primary defense.
Except intrusion of screws, no direct path to wood. Going to pull the edge trim and reseal the edge due to staples, but wanted it on to hold the al edge until adhesive sets. Pull screws one by one and caulk reinsert. Some areas will get caulked then painted, mostly back side of skirt. Exterior trim edges, jack bracket etc will get painted first, then final caulking.
Almost Done-
-
Wasn't sure-seemed like the closer I got to finishing the further away that actually it got, moving target. But camper drivers side skirt rebuild basically is done.
Yesterday I was cleaning/decaulking to re-caulk behind the skirt getting ready to coat. Wasn't planned but in removing the 1/2" bead of silicone caulking it took off like rubber band. I mean it just went zing- entire length of wing. OK, obviously needs recaulking anyway. Proceeded to clean all of the wing box. When cleaning the end of plumbing bump out box the cover moved in 1/2". Oh great more rot.
But what I discovered...
Unlike everything else that is vinyl covered plywood, end of box has a piece of luan as a cover. I guess supposedly to be stapled to the piece of plywood (oddly with interior paneling attached). In removing however, other than into the edge of outer plywood, the staples were in the air. The inner piece of ply wasn't attached to anything. Its just setting there, well about a 1/2" back, I assume it moved when the staples hit it. The only thing holding the luan otherwise was the caulking.
The bottom of the box is another piece of luan-its access to the shower drain. So I've a piece of 3/8" ply that my rub rails are attached to, thats just kinda hanging there. I've been against this pretty hard getting past the tailgate. No wonder I couldn't keep caulked...the only reason hadn't caved in outer box wall is it would push the inner ply against the floor. (Or against my black tank?)
I tried to fathom a reason for this other than oversight. Between the outer and floor access panels I could replace the shower p trap or about anything that might be needed. Who knows-Regardless Im tying together.
With a block inside, used pipe clamp & pulled panel into place with profuse amount of glue applied. Screwed to wing edge and outer box edge. Working thru access panel after attaching to wing wall ran a corner block that's against the floor frame and attached to the end ply. Re stapled the luan cover. Cleaned up the corner edge tin, reattached.
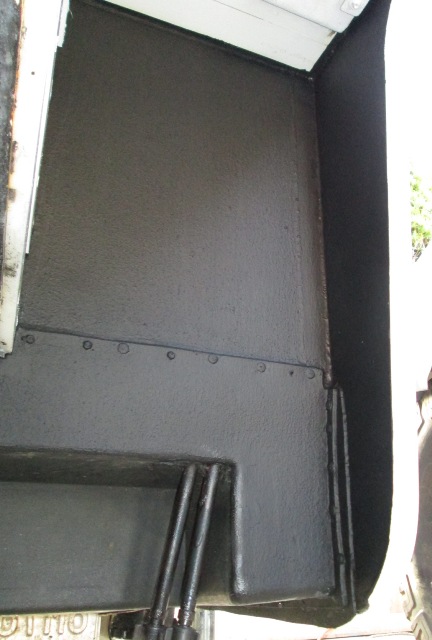
Finished removing caulk & cleaning remainder of wing box walls, lid and behind the skirt. Recaulked out entire lower box wing walls. Painted jack brackets. Then caulked out all the filon edge & corner trim. Caulked out the backside of skirt and entire wing. Painted the wing box tin.
Another all day spent for what I thought would be a couple of hours.
Have to admit, though certainly not on the list, pretty happy with the results. The wing box was looking pretty sad.
Let it set overnight. Allowing the painted areas that will get caulked, and caulked areas that will get painted time to dry.
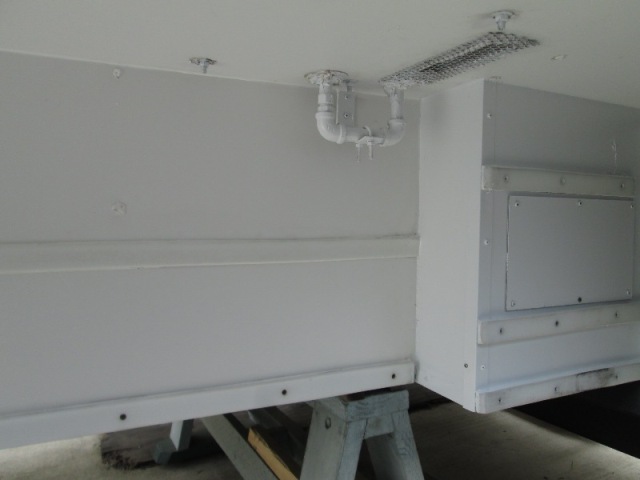
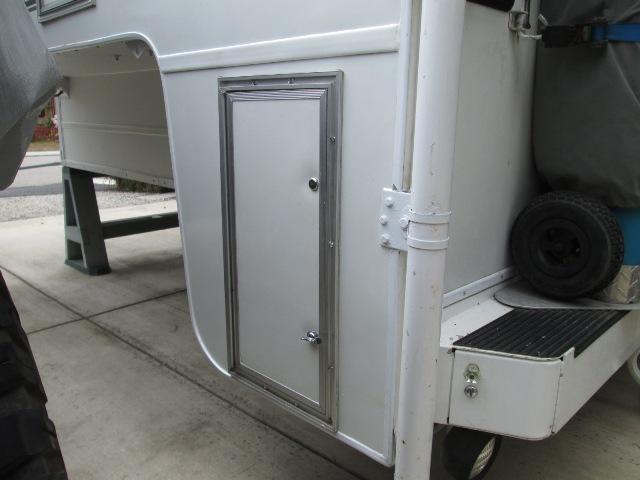
Next day, got the backside of skirt coated & sealed up. Finally. Did some detail & touch up painting between coats on skirt back. Also painted the stove vent cover as I had the stuff out. Though used Krylon fusion paint.
Had no idea that this would look so much nicer (to me) all clean & shiny as my concern & motivation to rebuild the skirt was purely structural. But not seeing 14 years of old caulk & grime-stuff you know is rotten, just amazed it looks half decent again. Some gratification in actually 'seeing' some results. Kinda cool because this was a project needed, but once done, it would be simply what it was.
Not having this task hanging though actually nice to have done , rebuilt & sealed up. Been dreading it & putting off. Though now done it was a lot simpler than expected, took longer but got some other stuff addressed.
Almost motivates me to start the other side..almost, well maybe after next trip, but sooner.
Load er on the truck tomorrow to get placement for the LED rear marker light. Stick on reflector -done.
Rebuilding the Passenger Side Skirt page
The related LED side marker light addition if interested Here
Back to Ourelkhorn Camper Modifications page