Building a simple cross cut sled for table saw
Cross cutting material on my table saw is not very accurate or safe. Relies on small miter gage that can move, both in the rail that runs in slot and the miter head itself flexing. Cuts can vary by a lot. Second is size- either material is so long it overpowers ability to hold straight or material to short to reach blade and securely hold against the miter gage.
Not a how to- just what I did but not really documented. There are many videos and plans on YouTube that cover building a cross cut sled from the most basic to the most versital with added features. From using scrap to buying components to build a mufti function sled. Really suggest researching, determine what you need/want and how much effort you are willing to make. Obviously the more time you spend using table saw the more effort building a sled worthwhile. Can greatly simplify cutting needs.
There a lot of great ideas to build sleds but my needs are the most basic. Just to easily cross cut material to length, whether long or really short, consistently, safely and square.
I am not a carpenter-cabinet maker or artist, just a DYI'er. Up 'till couple of years ago everything I built was with hand power/manual tools. A step above a circular saw, table saw has increased my ability to accomplish what I want but it is severely limited in cross cutting material. My want is to increase the table saws ability to cross cut and match its ability to rip. While there is no limit to Jigs that can be built to make a table saw perform any desired task, table saw should be able to cut material to length as easily as it can cut its width.
To that end-cross cut sled. Basically a large panel with 2 rails that ride in both table saws slots. Material is supported by fence that spans both rails.
Using scrap material on hand my cross cut sled...
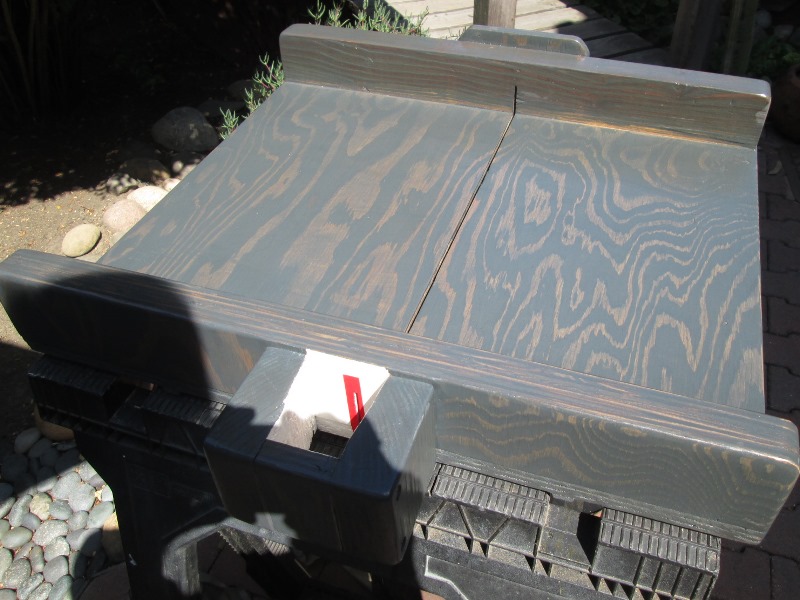
Hadn't planned on documenting, so no details in construction. Here it is finished, stained and drying. A piece of 3/4" plywood. At the back or top fence is piece of 2x4 that holds to halves together once panel split on saw. Its only function is that.
At the front is the fence that material is cut against. It also holds 2 halves of panel together once cut but its function is critical, holding materials square to saw blade.
The procedure is building sled but the front fence is not permanently attached until panel is run the saw and verify it is square to cut. Simply adding screw to both ends, cut. check square. If needed remove 1 end screw, pivot fence needed amount. Replace screw in new hole and check again. Note once panel is cut the slot will not change, your only pivoting the fence until it is square to it and blade Many very good videos outlining how to verify material cut is square. No- it is not a single cut and checking with framing square. The more time you spend here the more accurate your sled will be. Once you believe its square fully screw fence. You can add as many features, stops, clamps etc as you want.
My build
Plywood I had was longer in one direction so I cut off 2 4" strips from one end to make front fence, keeping its widest length to maximize the width for fence. My sled will only cut 18" wide material-24" would have been nice but... For back I cut a length of 2x4 for non critical back fence, At the middle where saw cut passes I added a scrap of plywood for more height to ensure 2x4 doesn't split. (plywood would have been better)The 2 strips cut I glued and screwed together to make front fence. (no screws near center). Once dry I ran thru saw to ensure flat then cut a 1/4" bevel on bottom face. This is to help with sawdust that might keep material to be cut from setting flush to fence. Attached with 2 screws at end to base, this is NOT permanent at this stage.

For the runners I cut an oak 1x2 close to saws table slot width. Then I cut 2 pieces thinner than depth of slots. You don't want the runners ridding in bottom of slots. When attaching base to rails you place washers or what ever in slot, then lay rails on top. Then glue the panel to rails. Once glued and washers removed the rails only contain side to side but don't contact bottom of slots. So thickness of rails is depth of slot minus what you use to space rails up while attaching.
Most also use screws to attach rails, I didn't. Sat several small washers in slots, place rails in slots on washers, applied glue to rails then sat the plywood on rails. Weighted down and let set for bout half an hour until glue set. Removed, flipped over and used several tiny wire brads to 'nail' rails to plywood.
Once sled built and sliding on table time to cut.
I set blade height at 2" assuming that would be max thru fence and back. (If cutting taller with sled I can raise blade inside of sled). On the first cut It is not necessary (nor should you) to cut completely thru front fence but you need to cut thru back. So feed sled slowly into blade, cutting just up to front fence. Once base cut then cut some material and check for square. Spend as much time as needed until happy. Once adjusted and is cutting square fully attached the front fence.
I then cut thru the front fence. This is not needed but sooner or later will so went ahead and did. It also allows 'seeing' when blade has cut thru material instead of looking over fence to see material cut. To the front where blade exits I made a small box using 2x4 for self protection. Painted inside of white to more easily see. Likely put a piece of plexi over at some point.
Conclusion
This thing is a dream to use. Just cant express how easy, accurate & simple. Cut some long boards, cut short pieces without jury rigging. Can clamp, clamp stop blocks for repeatability...should have done this from day one. Now that's its working sanded it all down, stained and varnished. I didn't spend any energy initially to make nice as I didn't really know if i could successfully build. Only thing I will add is face the back 2x4 with a piece of plywood. I see that as likely warping.The only reason I added this page, [other than recommending if you have table saw-build a cross cut sled] is with 90° such a piece of cake it made me want to build a miter attachment so I could just as easily cut 45°s. And I did. Simple triangle that sets in this sled. Building a separate miter sled would be more versatile but already have working sled so just adding to it. It got a little more involved as I added some features to it, stop blocks, clamp, etc though all out of wood. Wow, it makes cutting 45° soooo nice..
Few YouTube videos-literaly hundreds- no particular order or recomendation. Just watch as many as you want/need to get an idea how you'd like yours to end up.
https://www.youtube.com/watch?v=l25HBSqewj0
https://www.youtube.com/watch?v=UbG-n--LFgQ
https://www.youtube.com/watch?v=njsD5W6fcI0
https://www.youtube.com/watch?v=AgVthkUE4AU
Back to work...
My other table saw stuff
Link to 45° miter jig made used with this sled
Link to vertical miter jig used to cut steeper angles. (also called tenon or raised panel jig)
Back to Our shops tool mods section