Replace drill press handle turn repaint.
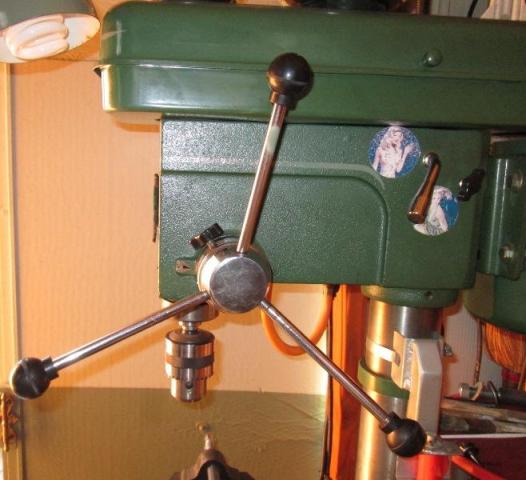
Simple rods that screw into hub, over the years they have wallowed to the point you cant keep tight. Looked at a lot of options. But simplest was adding more thread to the rod and add a lock nut. Once fairly snug again, roll a ring out of flat bar to tie all the handles rods together.
Well the threads are formed, larger than rod OD so cant just add more thread, plus they are metric. Next option since they are just a tad under 1/2" is to remake rods with 1/2" bar, retap the drill hub and ball handles to 1/2-13. Then revisit making a support ring.
Note: The drill hub on mine I discovered is cast iron, Fortunately I decided to retap, as welding rods to hub was a consideration. . If your thinking about welding better check material. Tapping you can feel if its cast iron, tap crunches, material will be granular and black. My drill is a Central Machinery made in Taiwan, but same style drill was sold by everyone and their brother, including Sears, Grizzly, Rockford,etc pretty sure there is even a Milwaukee.

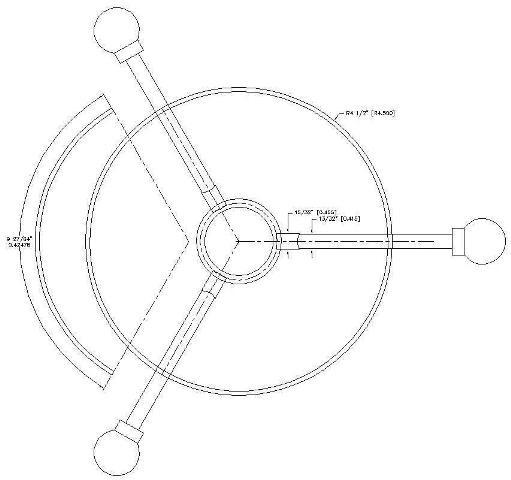
Looking around for material I came across old VW ring gear, perfect diameter. Wheel would be nice, played with different ways I could cut it up. Really liking the reverse arcs but bottom line though is I want the handles removable, more than once I've need to remove to drill something and they were in the way. So back to replacing handles and simple flat bar ring. Not sure, if your handles can be snugged making the ring might not need to remake the handle replacements. But mine was toast.
Back on track I cut some 1/2" rod and threaded ends, on end that threads into hub I allowed enough thread to use lock nut.
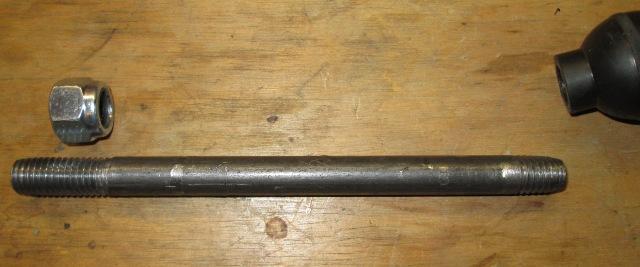
Tapped the drill hub (when I discovered its cast iron) and re tapped the ball ends.

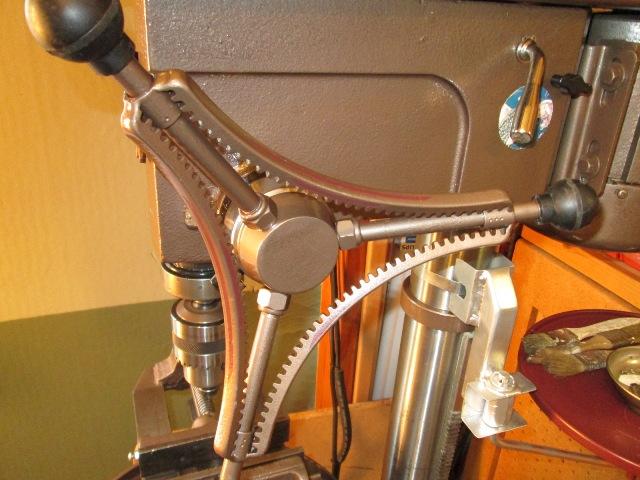
Threaded one onto hub. Knowing its cast iron I didn't reef on them. Surprised I hadn't split the hub in the past. But its nice and tight.

Got the rest installed then started looking at ring. Here, lower left is an old shock bushing, its a 1/2" dia sleeve. was thinking I could place between the flat bar ring and handle knobs. Then it occurred to me I could just weld ring to sleeves, simple, still would be removable-then it occurred to me I could do the ring gear...
And without any further thought laid it out cut 3 equal arcs. Spent a great deal of time on the wire wheel cleaning up the ring gear pieces.

Jigged it up, not so fun. I'm not really sure if this, once welded out, will allow handle removal. But form overrode function so proceeded. I laid the arcs parallel to the handle rods. Covered the cross shaft with some foil and a wet towel. Welded back side an tops leaving the teeth open on front.
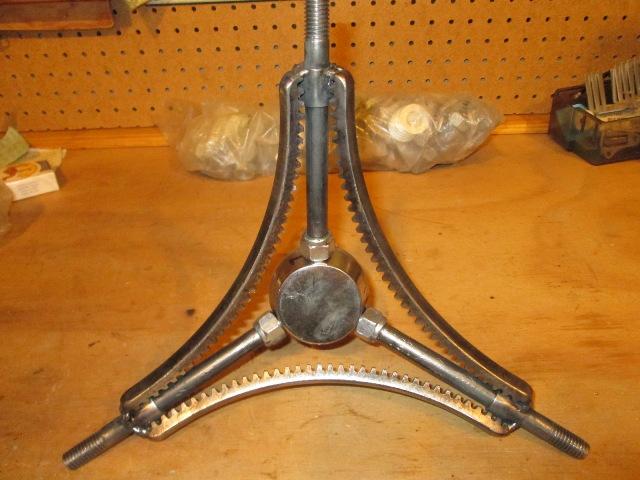
I'm really liking this...

Wish I could leave unfinished-just looks cool. The patina and worked raw metal..is half of what's so nice. briefly thought about clear coating...but I'm a block from the ocean-that ain't gonna work.

YES! And the 'test'. Surprisingly it actually works! I really didn't think they would unscrew. Its loose enough that I can paint after some serious clean up of welds. I couldn't do this again to save my life-just plain luck. Other wise...

I'd be cutting apart. Laid on its front, the back side with the arcs coned out exposes the teeth outward- is just bitchen I mean really. Sucks, wished Id seen this before welding, I'm not redoing because it works and it looks awesome, but danger-i look more awesome reversed. .

And painted. This isn't the color, Ill paint the lighter green to more match the drill-but used some left over rustoleum hammered brown to coat first. Its good over rust and I'm sure between the teeth rust got burnished as much as removed. Not knowing if it made a difference I marked all the pieces just in case so they can go back as its working so well as far as removal of handles.
And then the simple handle fix became something completely different. Mistake one was using the hammered brown as primer, it just looked too nice. I simply couldn't repaint the funky green that sort a matches the drill press muddy green. I looked and looked, trying to justify painting green-I mean its a tool, tried to tell myself leaving it brown on green drill would still look better. I went round and round with this when I made the light. If I had paint that matched the ugly green that's on the drill, which I cant stand, it be a done deal and a non issue. The different greens looks stupid but practical. But the brown though looks good even dumber on the drill- the quandary-

The FIx. Disassemble the drill, drag it out side and paint it to match my 'new' handle support.
What can I say. My drill -hated it the color even though its a work horse. Washed it with Jasco TSP substitute, Painted it. Sprayed all corners tight areas, so finale coats are full wet passes. Hammered paint is odd. Then washed the cross slide which lives permanently on press, did require a lot of masking due to all the slides.
Just got drill back in the shop, bolted down. Start putting stuff back together. Mostly wiring, while its apart though Ill finally look at the table mount. Has a set pin to lock when tilting. Its been stripped for years.

Did mix up some dark maroon to detail. unsure why it looks so red in picture.
Some finished pics...Fixing motor & add hanger for oil drain can

Well done, sort of. Handles secure, can be removed.


Think i got a bit carried away with the maroon-though looks much better than shown in picture, still looks a tad dorky. Oh well easily remedied, at minimum the handles on cross slide which would be a 5 minute fix :). But overall, for starting out just fixing the loose handles really liking the 'new' brown hammered paint. Column all shiny again, the auxiliary orange tool. table painted. Need to get er oily & make some chips..
- Removed motor.. :(

Motor almost back together, getting ready to put the motor back in- Pulled it cause after I put drill back together motor was really loud. Cant fathom what I did in repaint that might have caused it. In taking apart everything looks fine. Separating to its own page but I'm changing out the motor bearings.
See Drill press motor bearing replacement if interested.

In the meantime waiting on new bearings...
Made a 'lil bracket to hang the oil drain can from. Had a piece of pipe wedged on top of table arm for 20 years. Amazing if you spend a few what you can do to replace something that has functioned for ever. Just bent a piece of flat bar, drilled to use hose fitting to hold. Its an old gallon paint can, inside I have half a plastic milk carton to easily empty if flooding something with oil.
UPDATE

Got the motor fixed. Purrs like a , ah- well its quite. Then came back repainted the handle yet again. The maroon looks good on my old post drill but not so much on the press?
Bugged me. Repainted handle supports, most of cross slide handles same as body. Looks better. Next time I have some paint out I'll either repaint the remaining maroon cross slide handles brown, or strip and polish them as they are aluminum. Rainy day projects...
Back to top of page
Back to shop tool mods
Back to Our shops home page