
|
Hi... Numerous other pages on the Internet provide great journels of peoples' travels in their campers, so rather than do that I decided to put together this page documenting various modifications I have made to my truck and camper which make it more useable to me. Hopefully you will find some information and ideas here which you can use on your own camper. Scroll down a couple of screens for the Table of Contents.
There are lots of pictures here, so if you are using a dial-up modem, run get a quick snack while this
page loads!
|

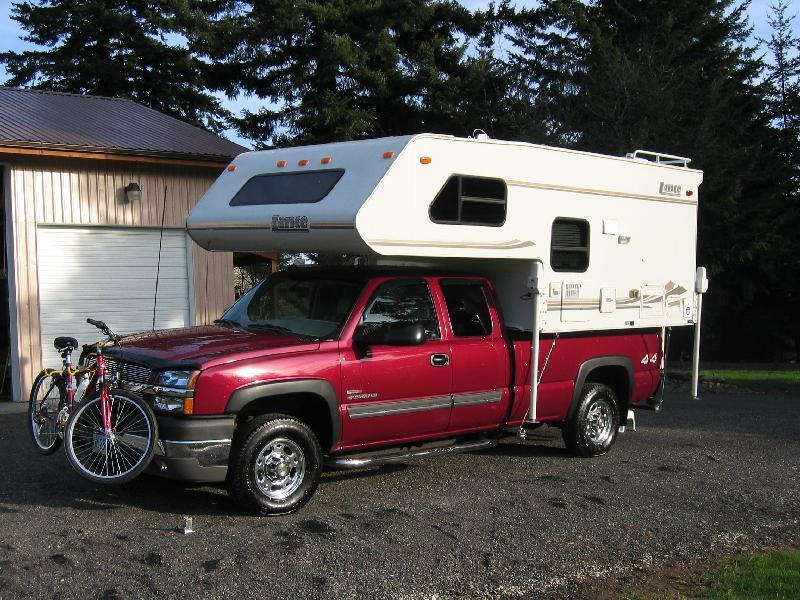
My Rig: 2000 year Lance 810 on 2004 a Chevy Silverado LT 2500HD 4WD w/ Duramax Diesel
and Allison tranny, Tork Lift frame-mounted tie-downs with Happijac spring-loaded turnbuckles,
Hellwig rear anti-sway bar, Edelbrock IAS Performer shocks, Firestone Ride-Rite air springs. I
got the camper in Nov03 and the truck Dec03. . . Here it is, all washed up and ready to go:
Camper Projects -- Contents:
• Add extra camper interior storage.
• Create new cabinet in wasted space.
• Bathroom Storage.
• Add built-in electric heat.
• Install Stereo System with Subwoofer.
• Add a nice analog wall clock.
• Install weather instruments.
• Add LED Christmas lights.
• Add a widescreen LCD TV/DVD combo.
• Modify Dinette Bed to improve camper egress and bathroom access.
• Fabricate custom rear steps.
• Build Platform for Honda EU2000i Generator.
• Fabricate front bike rack.
• Cool new toy -- a super compact step ladder.
• Replace Magnetek with Inteli-Power converter.
• Upgrade camper house battery.
• Add halogen backup lights.
• Extend camper roof gutters forward of truck cab.
• Built a "Ladder Table".
• Repair damaged camper jack mounting.
• Install a water tank inspection port.
• Install Accumulator Tank in water system.
• Replace Incandescent Light Bulbs with LED Bulbs.
• Miscellaneous: Assist Strap, Outside Bottle Opener.
• Relocate XM satellite radio antenna.
• Completed but undocumented projects.
• Camper Checklist.
...(opens in a new window/tab -- when done, close it to return here)
• Truck and camper weight information.
...(opens in a new window/tab -- when done, close it to return here)
PROJECT: Add extra camper interior storage:
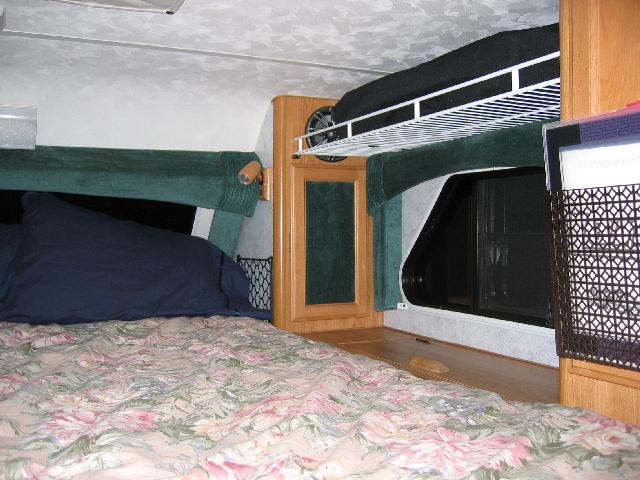
Extra storage added over bed side windows using Home Depot wire shelving (installed upside down
so the lip is up). Those are 2 lawn chairs you see on this shelf. The shelf is secured to the wall
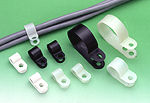
using little plastic cable clamps (I got them at Home Depot electrical department), each secured with
a single large-head 1/2" long screw into the wall panneling:
Here is the other over-window shelf -- you can see that the shelf is wider than the cabinet at
the nearest end, so I made a little cantilevered support for the front edge of the shelf out of a
small piece of aluminum. By the way, those things at the far end of the wire shelves are stereo
speakers (the grills make them look a bit like fans or heater outlets). Note the Sterilite plastic
drawers I added (a Lance 810 only has one small built-in kitchen drawer). I rigged Velcro behind
the Sterilite drawers to keep them shut while traveling. The blue you see here and there is rubber
non-slip shelf liner -- it is glued down on all surfaces where I don't want things moving.
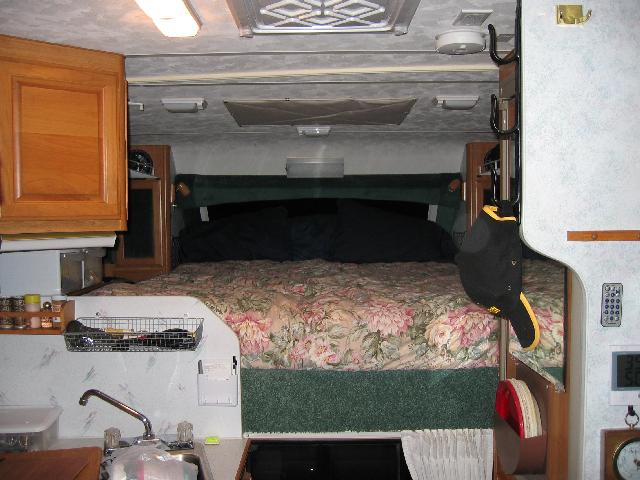
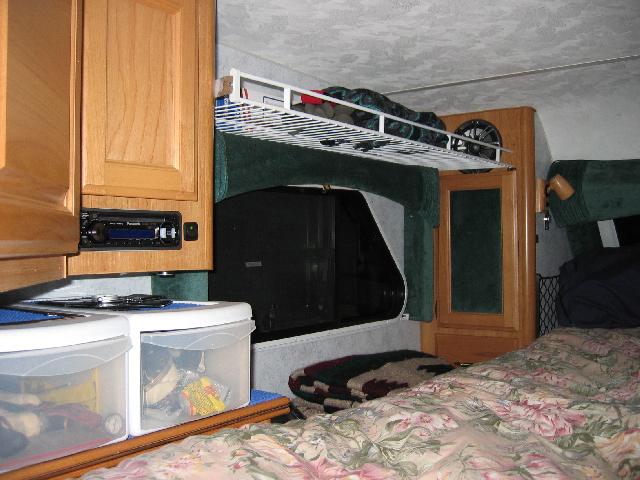
The over-window wire racks are not visible as you enter the camper. Notice the half gun rack I
added to the wall edge on the right (a hat is hanging on it) -- makes a perfect cloths hanger.
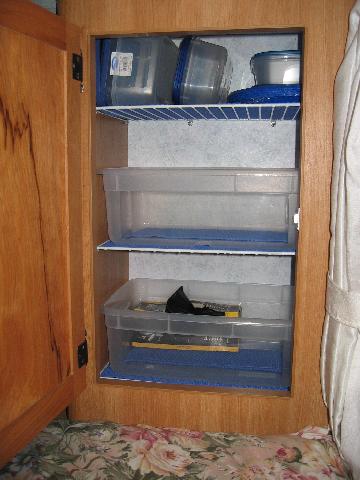
Former wardrobe closet (just forward of refrigerator) converted to pantry with wire shelving.
Rubber shelf liner glued to wire shelving to make it non-slip. I got this shelving at Camping World
(it was a $10 3-shelf hanging unit) and trimmed each shelf's width to fit.

Bottom Shelf hinges up for access to storage below. The back edge of the shelf is attached to the
wall with more of those 1/4" diameter plastic cable clamps shown above. To allow the shelves to
hinge upward, the front of the shelves is supported on screws into the sidewalls near the front
edge of the shelves (the screws stick out from the wall about 1/4" to provide a "stop").
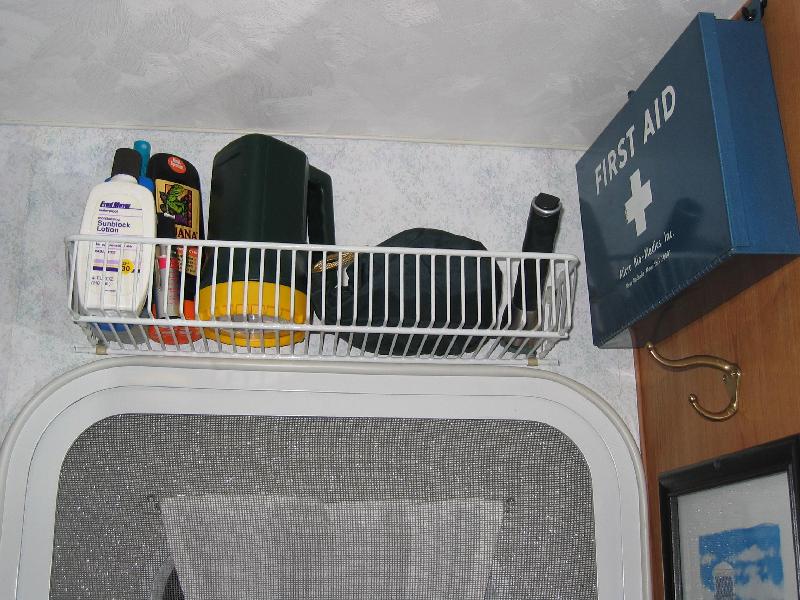
I also put a little storage over the door for things you often need when you go out (flashlight,
sun lotion, etc). This wire rack is again attached using those 1/4" cable clamps shown above. The
end of this rack had big opening that things could fall through, so I just made some extra "bars"
by using white nylon cable ties wrapped between the top and bottom rails.
Patching Holes: This is probably a good place to discuss how to patch screw holes. By now you are aware that I have screwed dozens of screws into the wall paneling of my camper. Of course I made a few mistakes such a getting a screw in the wrong place, or realizing that I had to move or remove something that I had screwed to the wall. You may be wondering how those screw holes can be made invisible.
Here is how: After removing a screw, take a smooth blunt object (such as a rounded ball-point pen
cap), and gently work any wood fibers back into the hole and smooth the hole so nothing is protruding.
Then on white walls, fill the hole with a drop of white caulking, and smooth it with your moistened
finger. On colored wood paneling, fill the hole with a wax "putty stick" that matches the wall color
(you can get these at paint stores or Home Depot). Or you can borrow one of your kids' color crayons
of a matching color and use that. If you do it right, you will never see where the abandoned screw
hole was.
![]() Return to Contents
Return to Contents
PROJECT: New Storage Area:
This is a new project that fits into the catagory of extra
storage. I recently cut a hole and installed a new cabinet door in the base cabinet next to the stove.
This area, while not huge, was not easily accessible before, and was therefore wasted space. Here is a
picture:
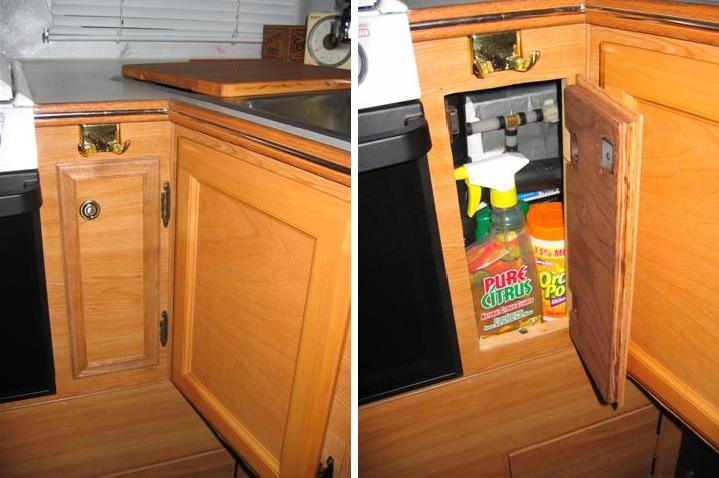
The door is covered with the piece of paneling I cut out when I made the hole, and a magnetic
catch holds it closed. This is a handly little cabinet for cleaning supplies, plus it provides convenient access to my plumbing and water heater winterizing bypass valve.
![]() Return to Contents
Return to Contents
PROJECT: Improve Bathroom Storage:
Nothing too fancy here. I bought some small marine stainless steel "pad eyes" and fastened a number of them to various places in the bathroom. These can be used with bungi cords to secure various types of gear while traveling. For example, I often carry my golf bag in there, secured to the wall with bungi cords. In this picture, there are two items stored for travel. One is an American flag, and the other is a rolled up 3' x 5' outside door mat. Both of these items are inside black ballastic nylon tubes that I sewed up to store them in. Items like this may get soaking wet from being used outside, so the bathroom with it's floor drain is a good place for them on the return trip.

PROJECT: Add built-in electric heat:
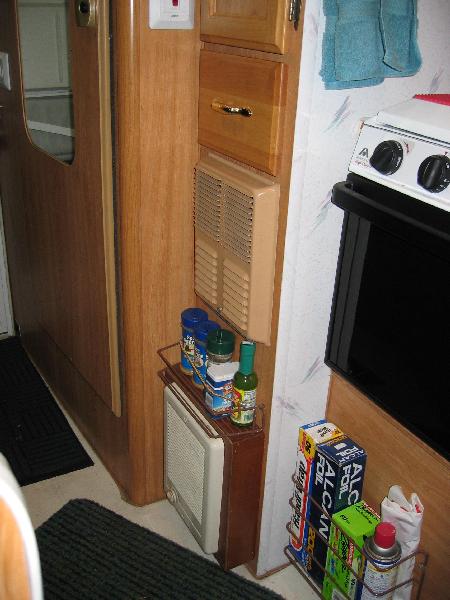
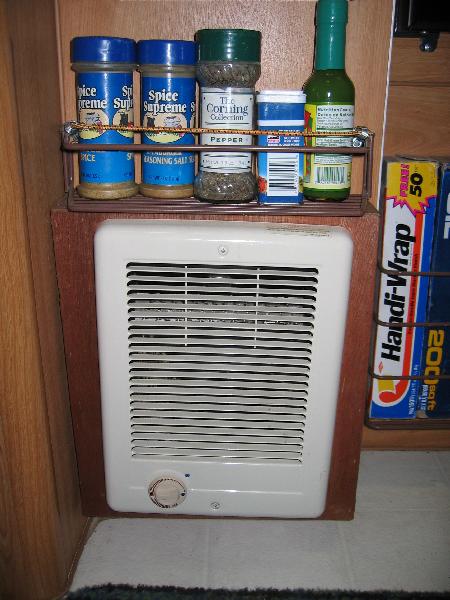
I added a Cadet 120 volt 1000 watt electric heater below the propane furnace. Recessed in wall,
but boxed out about 2.5" due to camper vent plumbing behind. There was an access panel there, so I
could see behind before I started cutting! I stuck a spice rack on top of the boxed-out section.
The heater works GREAT when on shore power -- it is wisper quiet (you can hardly hear it), and there is no tripping or tipping hazard. Cadets have a thermostat on the front panel. I was able to fish the power supply wire (Romex 14-2 w/ ground) behind the oven and get it over to the main power center, where I put it on an unused 15a 120v breaker.
This project really worked out super. I have camped a number of days when there was snow on the
ground (temp in low 30's) and that little 1000w Cadet heats the camper to 70 degrees with no problem.
If the Cadet couldn't keep up in colder weather, the main furnace could be set to kick in for a backup.
![]() Return to Contents
Return to Contents
PROJECT: Install New Stereo System with Subwoofer:
Here is one of my newest camper projects.... err, perhaps I should say camper toys! It is a new stereo system with a Subwoofer!
A couple years ago I installed a decent car-type stereo and four good 6" speakers (2 at the head of the bed, 2 over the dinette), and that system worked fine. However, I decided I wanted to be able to plug my flat screen TV into the stereo so we could hear it better (the volume on the TV is really weak). I also wanted to be able to play CDs containing MP3's (compressed music, about 120 songs per CD), and to be able to play an IPOD or other external audio device through the camper stereo system. I discovered that new car radio-receivers (ie, head units) are available at very reasonable prices online that will do all that, so I bought one. While I was at it, I decided to add a external amp and subwoofer to fill out the bass (yeah, I got a little crazy, but I had the amp and got the subwoofer cheap from a friend). Here are the pictures:
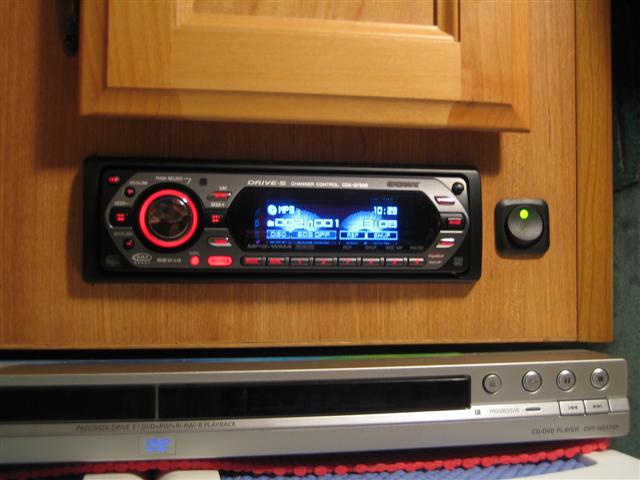
This is the new head unit -- it's a $150 Sony CTX-GT500 model that has auxilliary-in connection on the back (so you can play your IPOD or TV through the stereo system), has a subwoofer pre-amp output on the back and subwoofer volume control on the front, has 4 speaker channels (2 front, 2 rear) of 17 watts RMS/50 watts peak each, plays CDs containing songs in the MP3 and WMA formats, is satellite radio ready, and has a nice dot-matrix fluorescent display with lots of cool graphics. Note: Sitting below the head unit is my DVD player (for the TV).
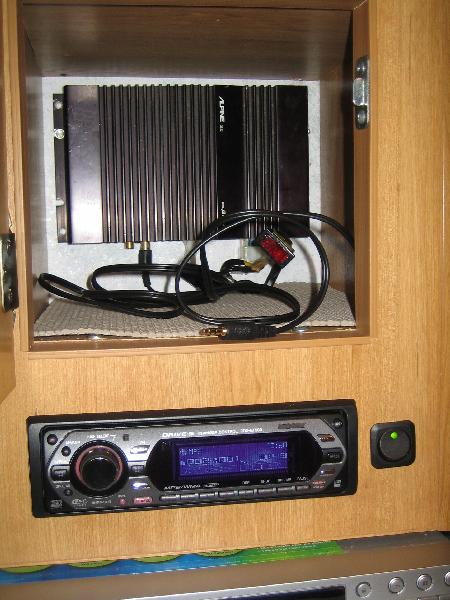
In the cabinet above the stereo I mounted a little Alpine subwoofer amp (it puts out about 70 watts RMS). You can also see the auxillary-in cable laying in the cabinet -- one end is plugged into the back of the stereo head unit, and the other end is ready to plug into my TV.
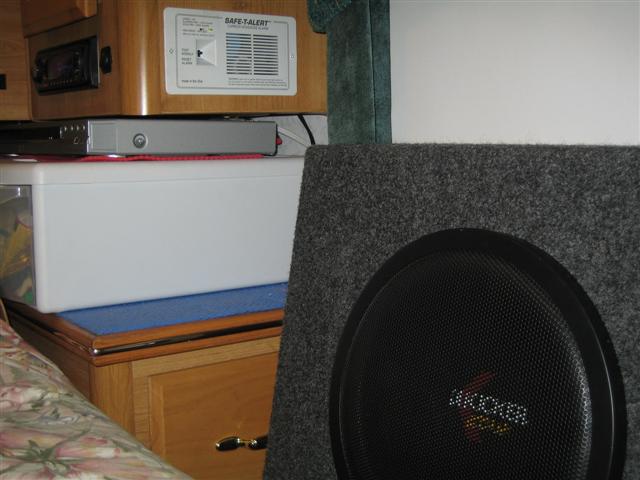
I stuck a 10" Kicker Competition subwoofer in a wedge-shaped pickup truck enclosure box in the space beside the bed -- it is hooked to the little Alpine amp.
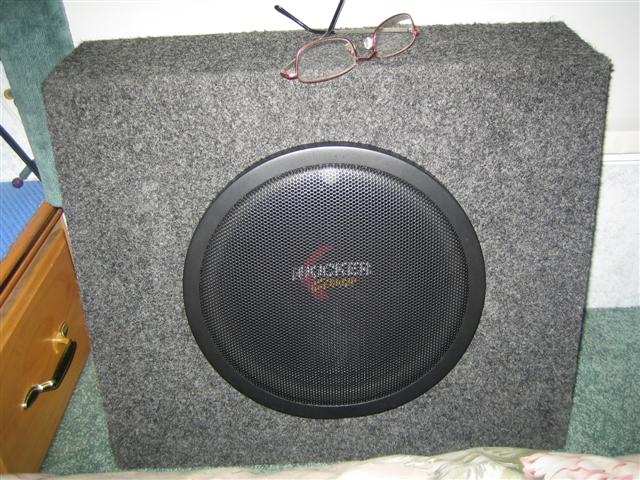
Close-up of the 10" Kicker subwoofer -- as you can see the box is quite compact.
So how is the new system working out? Great! The sound is really good -- adding that little amp and 10" subwoofer filled in the bass nicely. And now I can finally hear the TV (as I said above, my flat screen LCD TV is hard to hear even at full volume) -- I just plug the cord coming from the back of the radio into the TV's earphone plug and now I have stereo sound like a movie theather (well, almost). Total cost of this project was about $200 for the new head unit, a used subwoofer in box, and a small amp which I already had but wasn't using. I did not replace the existing 6" front and rear speakers as they are of decent quality.
I know that this project is not one for camping purists that like to leave the comforts of home behind when camping, but it works for me!
![]() Return to Contents
Return to Contents
PROJECT: Add a nice clock:
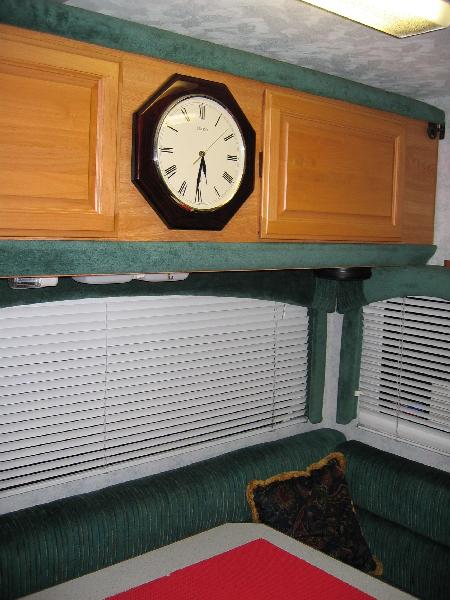
Not much to say, except I like to have a good clock around. This quality Seiko wall clock is silent
(no Tick Tick Tick keeping us awake at night). It is hung on a screw, and Velcro'ed so it won't
swing around when driving. When sitting in the dinette you can see it in the bathroom door mirror,
so as soon as I learn to read backwards I'll know what time it is!
Regarding Velcro: You can buy some excellent 2" wide industrial quality adhesive-backed Velcro at
Camping World that is handy for all kinds of things. For example, you can use little pieces of it
to stick remote controls to the TV or to the wall next to the head of your bed (no more lost remotes).
It's quite handy to keep a few spare pieces of that stick-on Velcro in the camper.
![]() Return to Contents
Return to Contents
PROJECT: Install Weather Instruments:
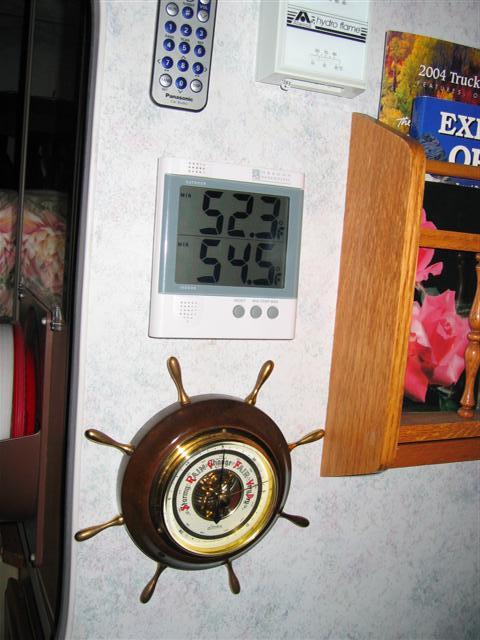
I installed two weather instruments in the dinette area -- an indoor/outdoor thermometer, and
a barometer. Above the thermometer is the remote control for the stereo, stuck to the wall with
velcro. Here the camper is in storage, so the indoor temperature is nearly as cool as the
outside. The sensor bulb for the outdoor temperature is right behind and at the very bottom of the
exterior refrigerator air intake louver (that is a good spot because it is shaded by the louver and
also by my awning, and it is low enough to not be affected by the refrigerator). I was able to route
the wire through the wall, into the refrigerator housing, and out into the air intake area without
too much trouble.
The barometer is an antique one I got on eBay. When I was a kid we had a barometer that looked
just like this one, and I remember my father showing me how to tap the glass to see which way the
needle would move (ie, which way the weather was changing). A barometer is a handy thing in the NW
where summer weather can vary greatly from day-to-day, and often does better than the weatherman at
forcasting the near-term weather.
![]() Return to Contents
Return to Contents
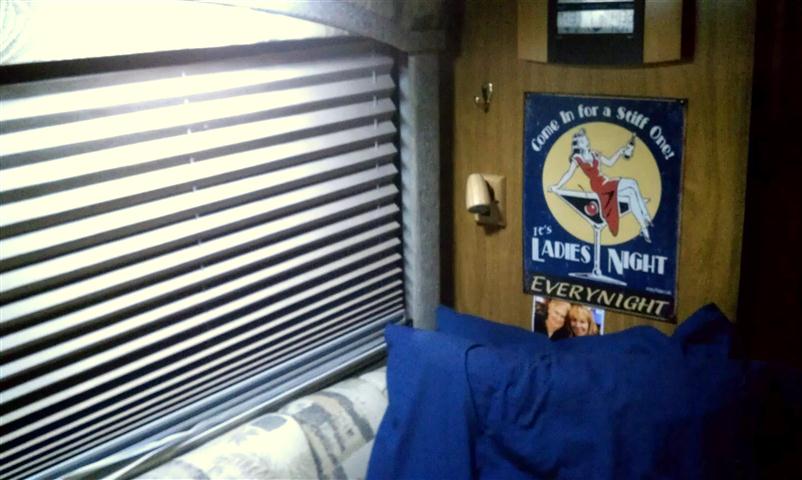
SILLY PROJECT: Add "LED" Christmas Lights.
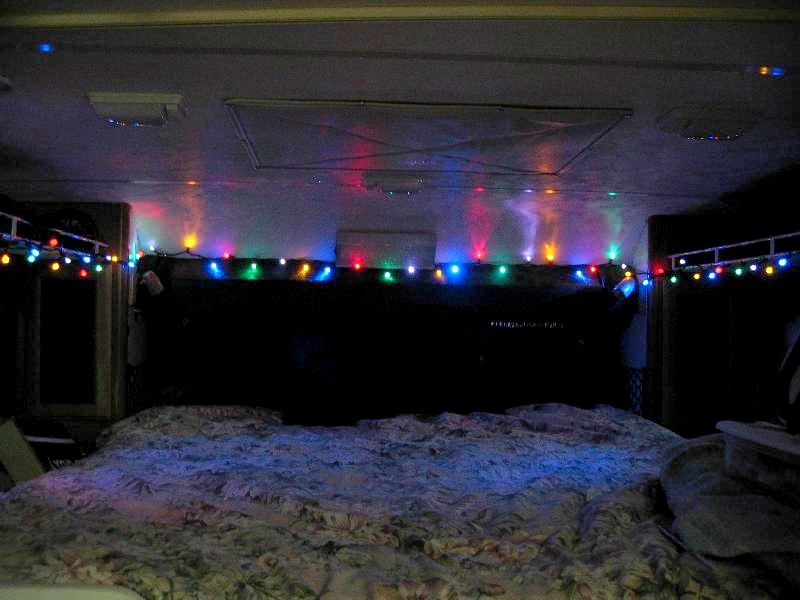
I got a wild hair, and bought a string of 70 "LED" Christmas lights for about $20 and strung them
up in the cab-over part of the camper. Made by "Forever Bright", these are the wave of the future
for Christmas decorations because they have low fire hazard and low power consumption. This whole
string only uses 3 watts total (my single house battery would run them for 500 hours!), and they are
totally cool to the touch. The bulbs are supposed to last for a lot more hours than I will ever use
them (they could outlast most of us!). Anyway, they are pretty nifty, and create a relaxing soft
light while using next to no power, so I plan to just leave them installed.
![]() Return to Contents
Return to Contents
PROJECT: Add a LCD TV:
|
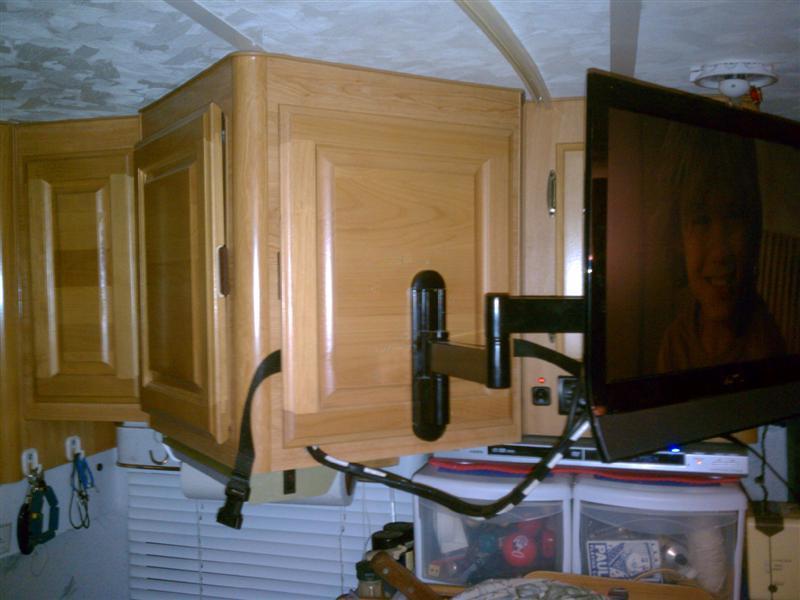
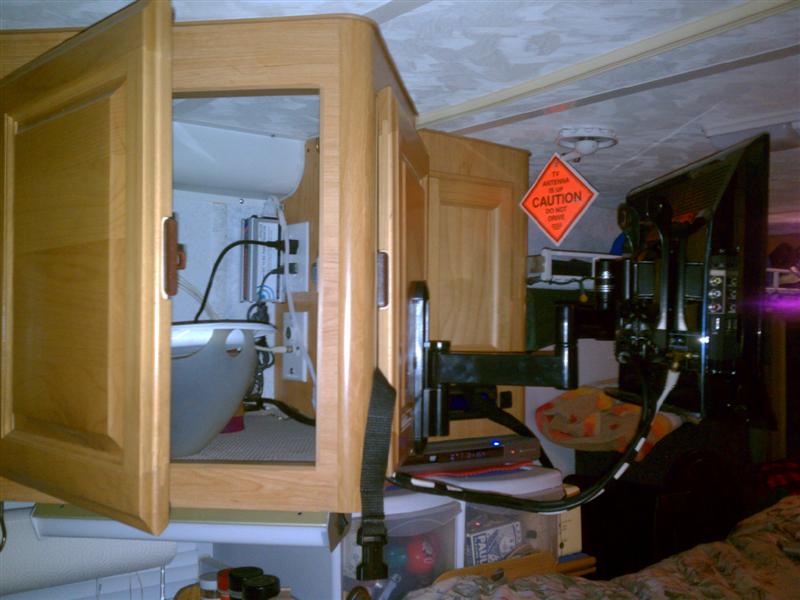
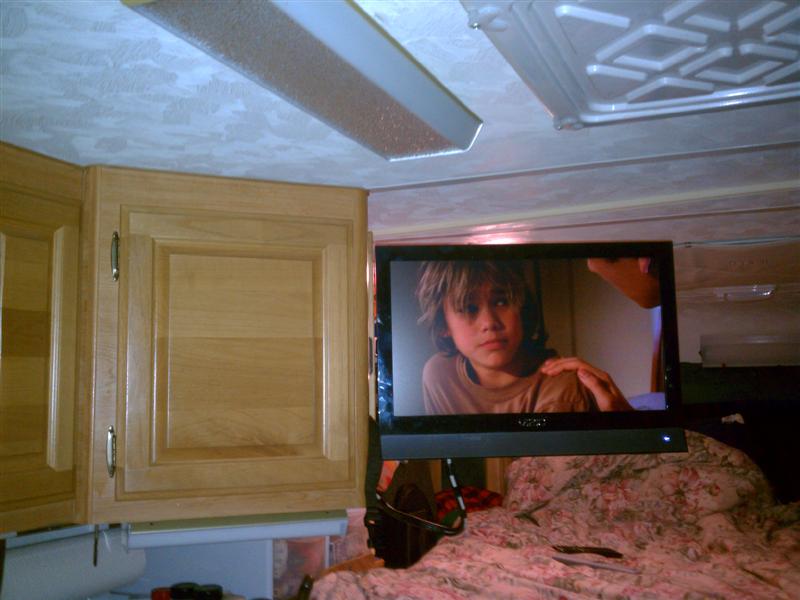
UPDATE November 2010: I recently installed a new TV. The 15" Panasonic LCD discussed below was Analog only, so it didn't get many of the current channels. I temporarily installed a digital tuner box and it worked OK, but it added more wires to what was already a bit of a wiring mess. Plus I was storing the Panasonic in one of the camper wall cabinets, and while that worked fine I decided I would like to use that cabinet for food storage and other things. So when I was at Costco recently I bought a Vizio 19 inch LED edgelit LCD digital TV for $179, and also an articulated wall bracket. The cabinet where I wanted to mount the TV has two doors (one angled toward the salon, and one angled toward the bed). I really only need one door for access to that cabinet, so I screwed the other door shut (from the inside) so it would be a structural part of the cabinet frame, and mounted the TV on that door. The bracket lets the TV easily swing toward either the bed or the salon.
I am really liking the new TV! This 19" set weighs almost nothing (I think the articulated bracket I bought is heavier than the TV). The old TV was a lot heavier, making it awkward to get it out of the storage cabinet and hang it on a wall bracket. Plus I had to remove all the junk from the cabinet to get to the stored TV, and then put it all back after I got the TV out. Then when done using the TV, I once again had to take everything out the cabinet, put the TV back, and put everything back. This new setup is sooooooo nice! |
ORIGINAL PROJECT: Add a LCD TV
I originally had been using a 9" AC/DC Toshiba CRT color TV/DVD combo -- a nice little unit with flat glass screen, and it fit nicely in my Lance TV cabinet. But I recently got the bug for a bigger screen, and I ended up with a 15" Panasonic Widescreen LCD TV and DVD combo unit -- it weighs about 8 pounds with stand.
Here is a stock photo of the new Panasonic set:

My Lance has a TV cabinet with 2 doors -- one that opens toward the dinette, and one that opens
toward the bed:

The brown bracket you see on the bed-facing door is a wall mount I bought for the new LCD TV
(the mating half is mounted to the back of the TV).

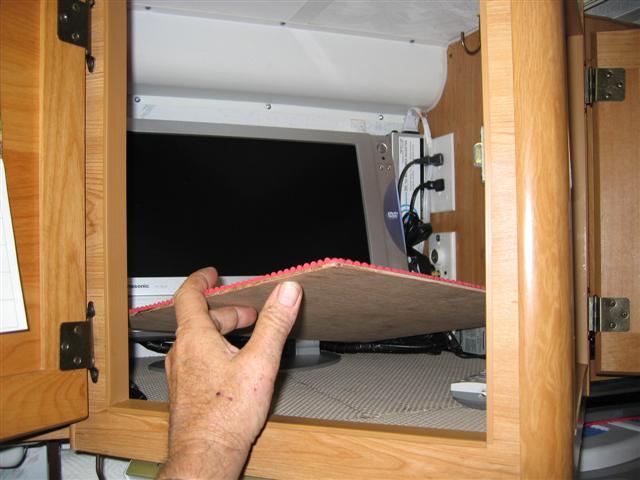
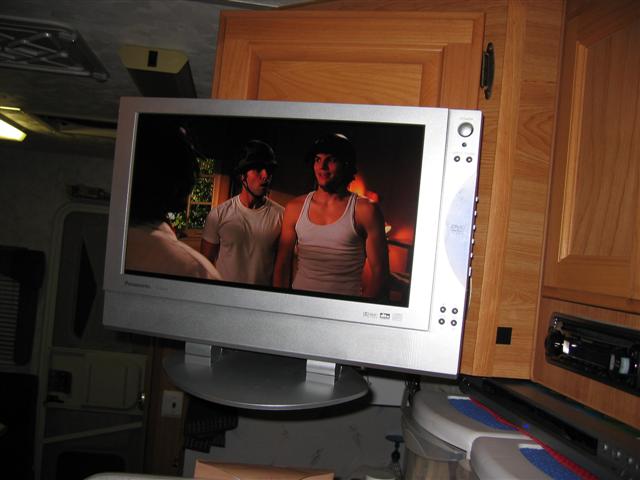
Here both doors on the TV cabinet are open. Yes, the TV is in there - can you spot it?
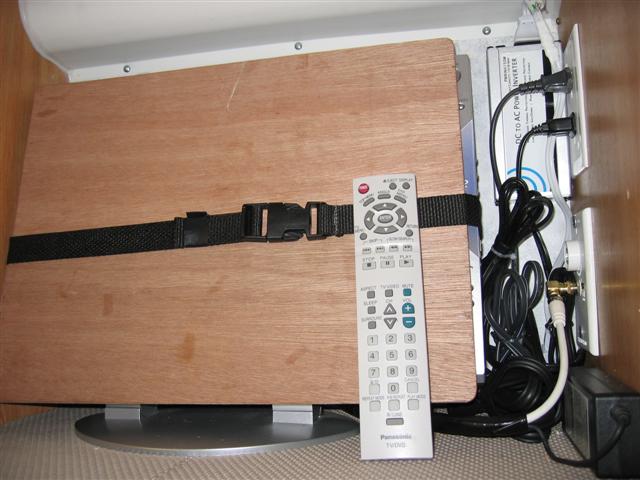
The TV is protected by a thin piece of wood paneling, which is padded on the back side. The TV
and screen protection board are secured with a wall-mounted nylon strap. In this pic you can also
see a 12VDC to 120VAC inverter mounted on the back wall of the TV cabinet (top right).
When running on 12V, I plug the TV into the inverter; when running on shore power, I move the TV
plug over to the 120VAC wall outlet.
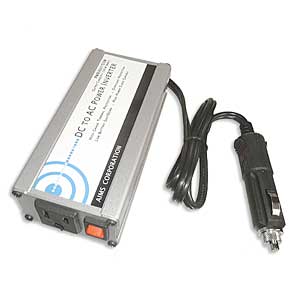
This is a closeup of the inverter I'm using -- its an "Aims" 150 watt continuous (450 watts peak) unit
with no fan (ie, its quiet). This inverter is 90% efficient at full load, and 95% efficient at 1/3 load.
It's available for about $20 (plus or minus) from eBay and other places (do a Google search).
Nylon strap released, and padded screen protection board being removed.
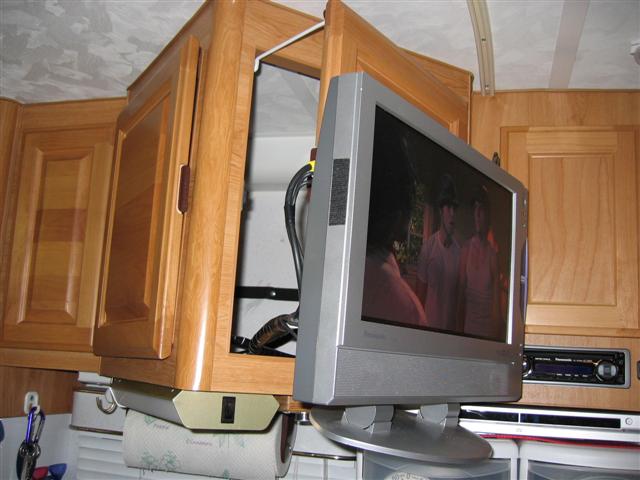
TV hanging on the wall bracket facing the bed. Note the large "screen door hook" (white, at top
of door) I made to hold the door open to the best viewing angle. The black strip on the edge of the
TV is Velcro for holding the TV remote.
Here is how the TV looks from the bed.
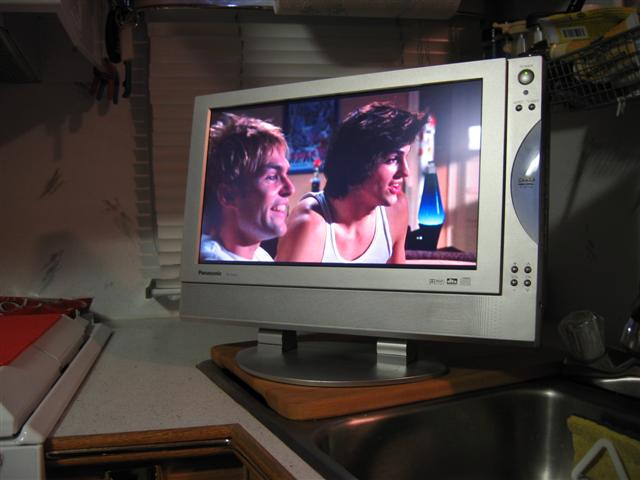
For dinette viewing, I just sit the TV on the kitchen counter.
![]() Return to Contents
Return to Contents
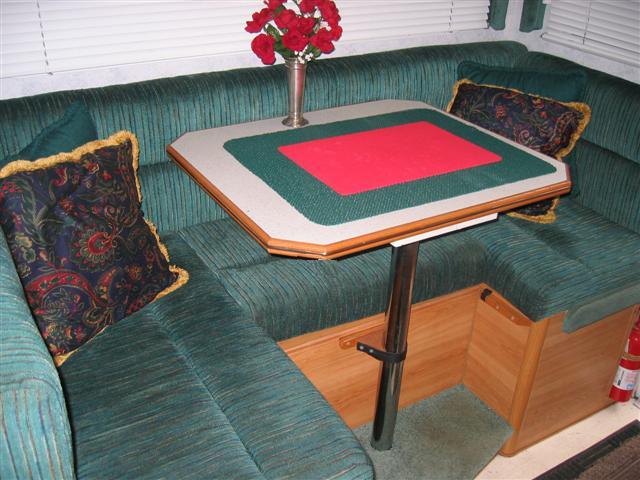
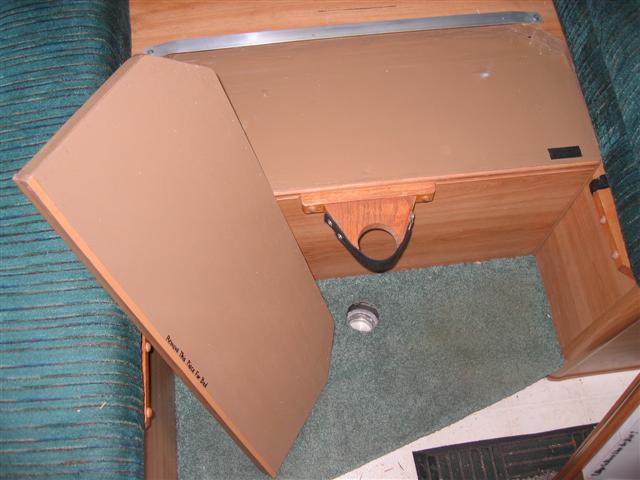
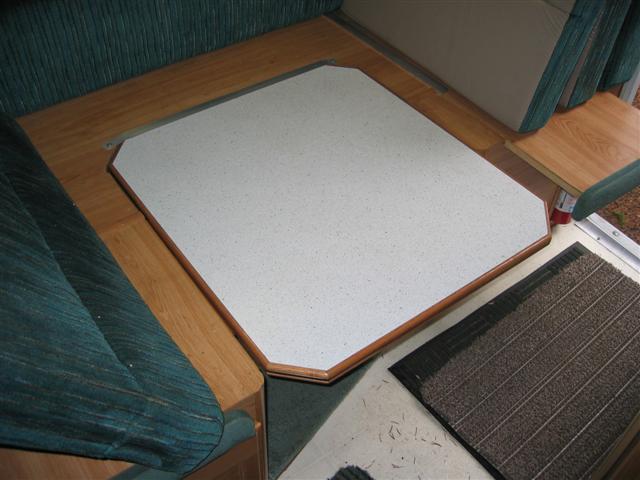
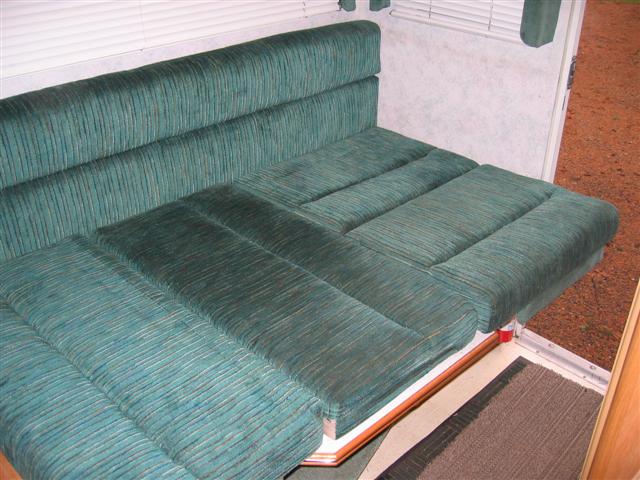
PROJECT: Modify Dinette Bed to Improve Camper Egress and Access to Bathroom:
The design of the dinette bed in my camper was a bad one. When it was set up in the bed configuration, it stuck so far out into the isle that it was impossible to get into the bathroom or get out the rear camper door. So when anyone was using that bed, everyone was trapped in the camper with no bathroom access. Not a good design at all -- I have no clue what the Lance designers were smoking when they designed the dinette bed.
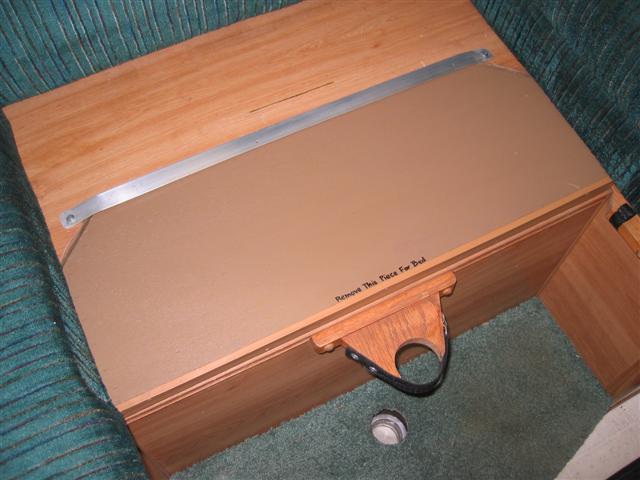
I won't go into great detail of everything I did to fix this problem, but in a nutshell I modified the structure of the dinette base and table top (which is used as part of the bed) such that the bed is now 6" narrower. I did not make the table top smaller. The bed is still plenty big for one adult or two kids, but now there is room to get into the bathroom and/or out the rear door. The mod included routing out the area where the table-top fit when making up the bed to allow it to be installed 6" closer to the passenger side of the camper. The cushions did not need modification -- there is one 6" wide by 6 foot long cushion that is part of the dinette back support that is now left in place rather than laying it down and using it as part of the mattress for the bed.
This mod was quite a bit of work. Not only did I change the dinette base unit, but I also had to modify the underside of the table top. The table is a hollow structure with limited internal support, and the mods I had to make required partially rebuilding the table structure to add additional internal supports. It is hard to explain everything I did, but the bottom line is it now works the way Lance should have designed it. There would have been easier ways of making this fix by either cutting down the size of the table top, or making a plywood piece to use in the bed setup in lieu of the table top. But those solutions involved loss of table surface and/or extra parts to deal with -- they just were not the best solution.
Here are some pictures of the final product, which is working great. While modifying the bed, I also increased the strength and stability of the underlying structure considerably.
PROJECT: Add rear steps:
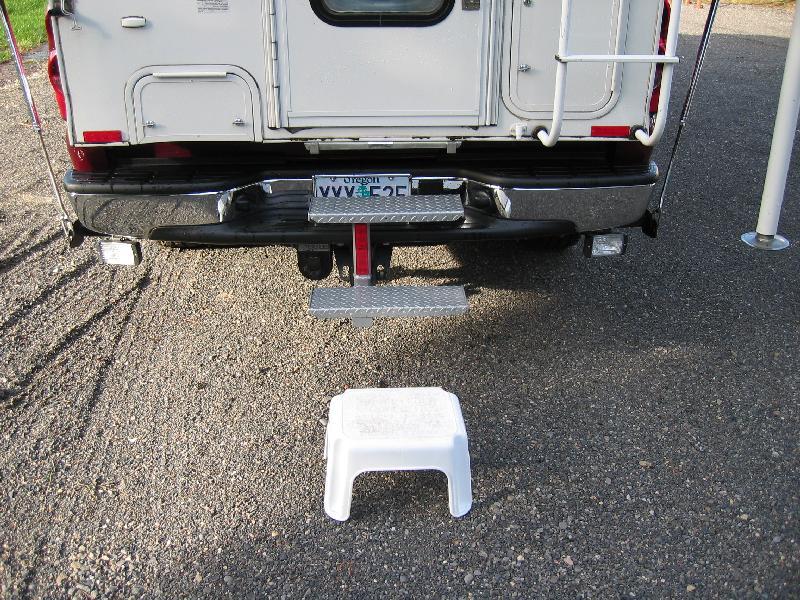
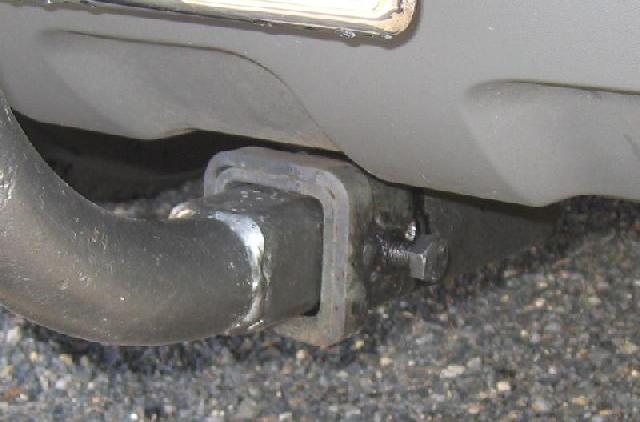
My camper has no step bumper, so I fabricated some steps to fit in the rear receiver hitch. I
just leave them in place when driving as they don't stick back too far. Of course I'll remove them
when towing a trailer.
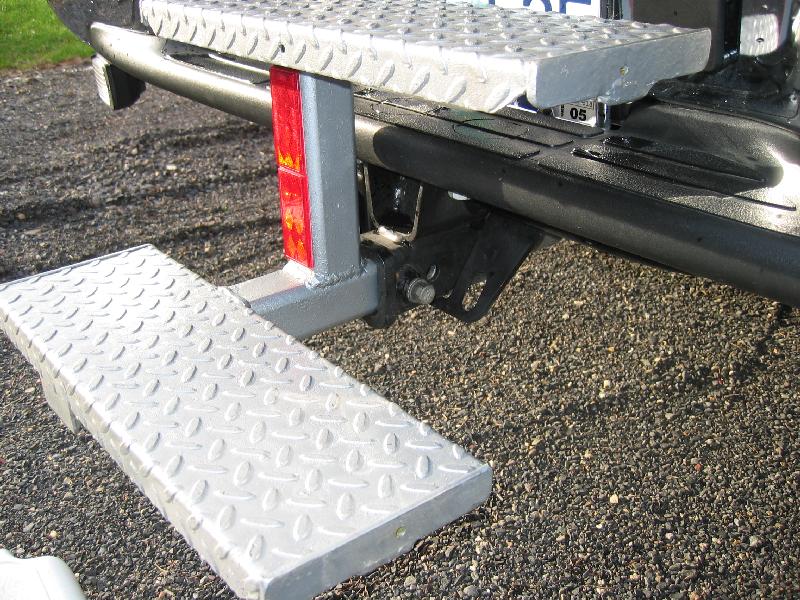
I got the treads from an old set of steel scissor steps. To keep the steps from wiggling when
you step on them, I made a "set screw" out of a 1/2" bolt, which is screwed into a nut welded to the
hitch receiver tube. The nut is welded over a 9/16" hole I drilled on one side of the receiver tube,
and does not interfer with the normal pin used to secure a stinger when towing.
![]() Return to Contents
Return to Contents
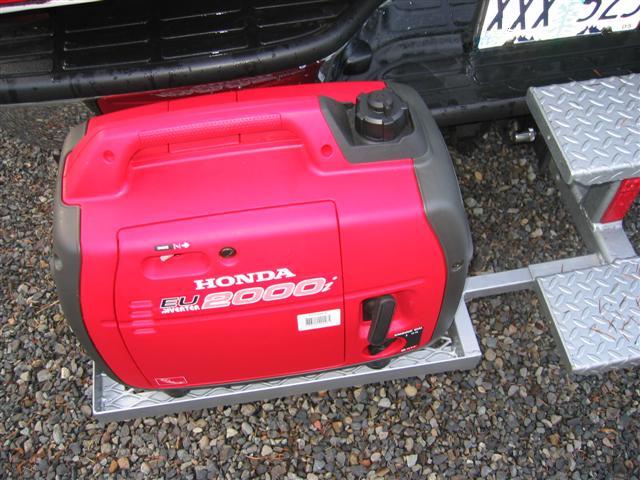
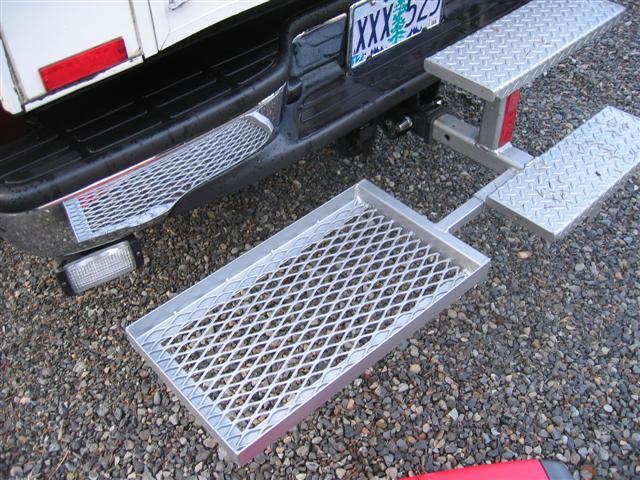
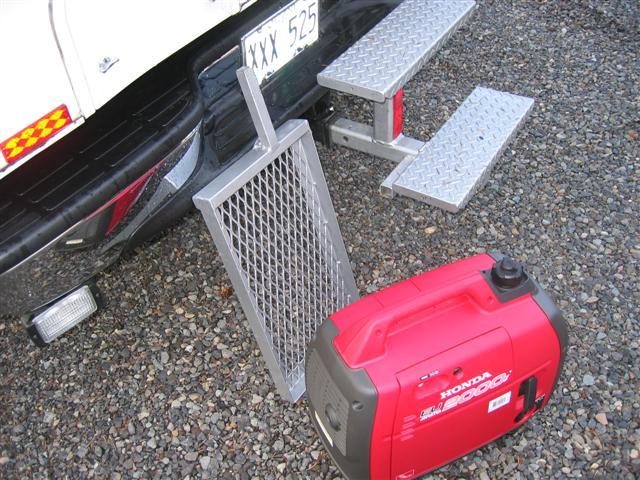
PROJECT: Build Platform for Honda EU2000i Generator:
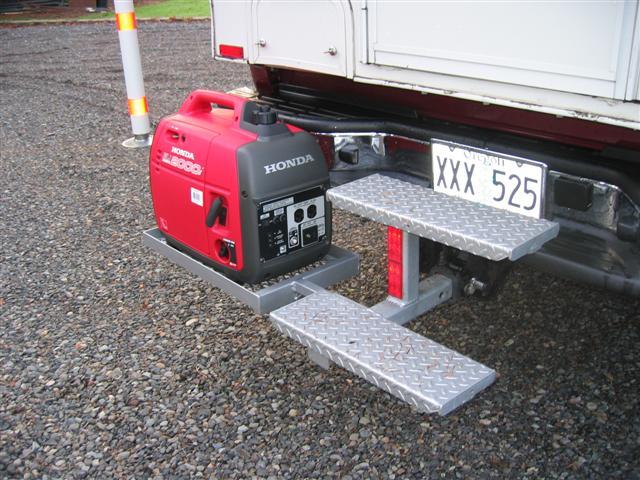
I recently bought this new Honda generator, and when in use I wanted to locate it at the back
of my camper and up off the ground. This location is good because it is handy to the camper door
for ease of starting and stopping, plus that location also allows me to easily secure the
generator to my trailer hitch using a bicycle cable lock. So I fabricated a little platform that
slides into a small receiver which I welded to the side of my hitch-mounted rear steps. This
location has another plus as it is sheltered from the elements by my rear awning.
I will only use this platform while camping -- for traveling, the platform and generator goes inside the camper. The generator fits like a glove on the floor in the alcove just below the refrigerator, and when there it is out of the way, plus the dinette totally hides it from view when anyone looks in the open camper door.
This is a pretty slick setup, but I did notice that when the generator is running I can feel a little vibration in the camper floor. I'll test this setup out better this coming camping season, and if the vibration proves bothersome, I may just sit an upside-down plastic milk crate on the ground at the same location, and put the generator on that. Not as elegant, but it would still get the generator up off the ground, and would isolate all vibration.
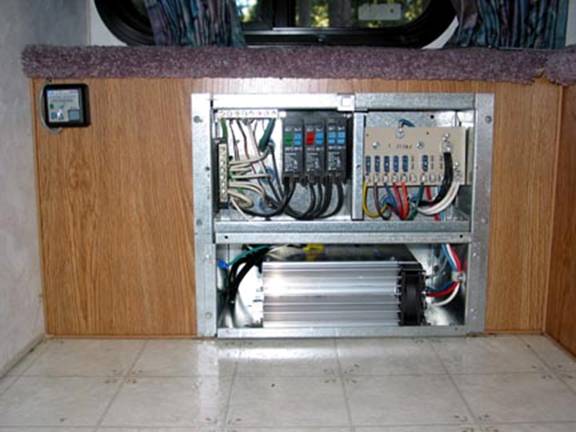
This is probably as good a place as any to mention a little generator-related project I did. When
I first got the Honda generator, I didn't stop to think how much 120v power my 60 amp converter draws
when charging my house battery. What happens is that when my house battery is down a little and the
converter is slugging a charge to it, the generator will immediately kick offline if I turn on the
microwave (even for a few seconds) -- that happens because the combined wattage of the converter while
charging and the microwave exceeds the 2000 watt capacity of the Honda. I soon learned that in order to
run the microwave from the generator, I first had to take the converter offline. Since there was no
factory provided switch to do that, I added one. Here is a
picture:
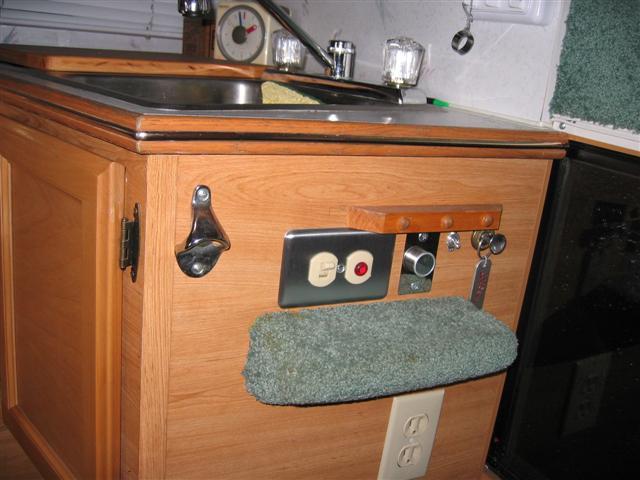
In this picture, the switch adjacent to the red neon pilot light controls the AC power to the
converter -- flip that switch off and the power to the converter is off (and the red neon light also goes
out). So now when I need to run the microwave from the generator, I just flip that switch off until I'm
done using the microwave. Also in the picture is a number of other electrical mods I did. One is a
small toggle switch that kills power to the CO and Propane detectors -- that eliminates those parasitic
loads when the camper is in storage. Another is a 30 amp push/pull switch (far right) that bypasses the
battery isolator between my truck and camper. This is handy for emergencies, like when my DVD player goes
dead in the middle of a movie! I just pull the bypass on to temporarily draw power from the truck's
batteries. I have a tag hanging on that switch which I can relocate to a visible spot to remind me to turn
the bypass back off before I kill the truck batteries. In addition, you can see an extra 12vDC and a
120vAC outlet that I installed -- very handy.
And last but certainly not least mod is the bottle opener
mounted on that same wall -- also very handy!
![]() Return to Contents
Return to Contents
PROJECT: Add a front bike rack:

Home-fabricated bike rack on front "Hidden Hitch" receiver. Here you can also see the after-
market "billet" bar grill I installed.
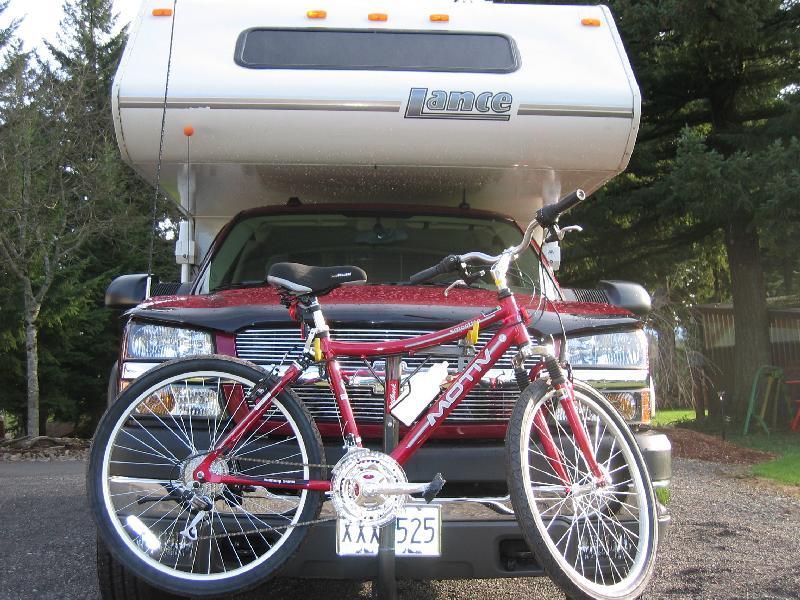
Bike hanging on the rack. I designed the rack so the bike wouldn't block the headlights.
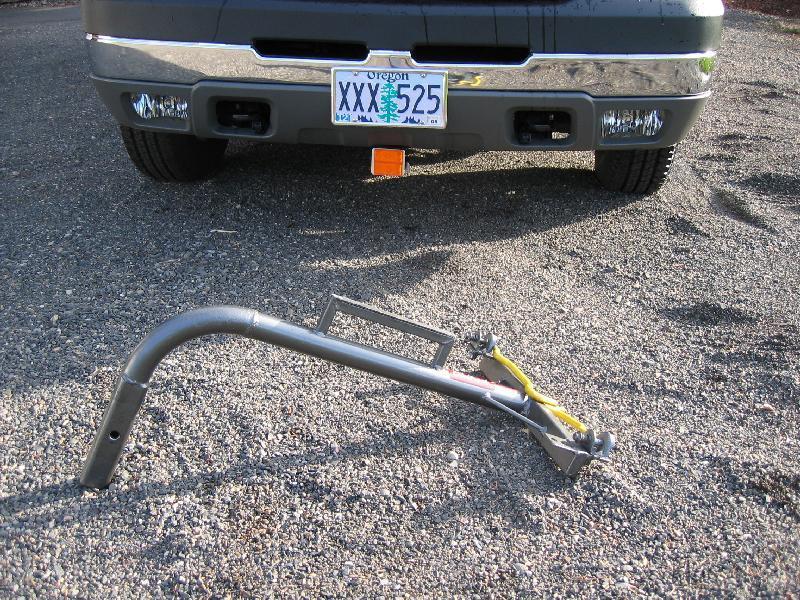
I made the rack from scrap tubing, and parts from a garage sale 1970's style rack.
To keep the rack from wiggling when on the truck, I put a "set-screw" made from a 1/2" bolt on
the front receiver, just like the one I used for the rear steps project. I don't know why hitch
manufacturers don't install a "set screw" like that from the factory -- it is sure handy.
By the way, several folks have asked where I got my front "Hidden Hitch" receiver -- it came from
Hitches OnLine,
and was about $135 including shipping. It was an easy install on the Chevy (30 minutes), but read
the online install notes as installation may be more challenging on other rigs as some require drilling,
or relocating some components (for example, driving lights must be relocated on new Fords).
![]() Return to Contents
Return to Contents
PROJECT: Add a stepladder that doesn't take much room:
I recently bought a nifty new toy -- here are pictures:
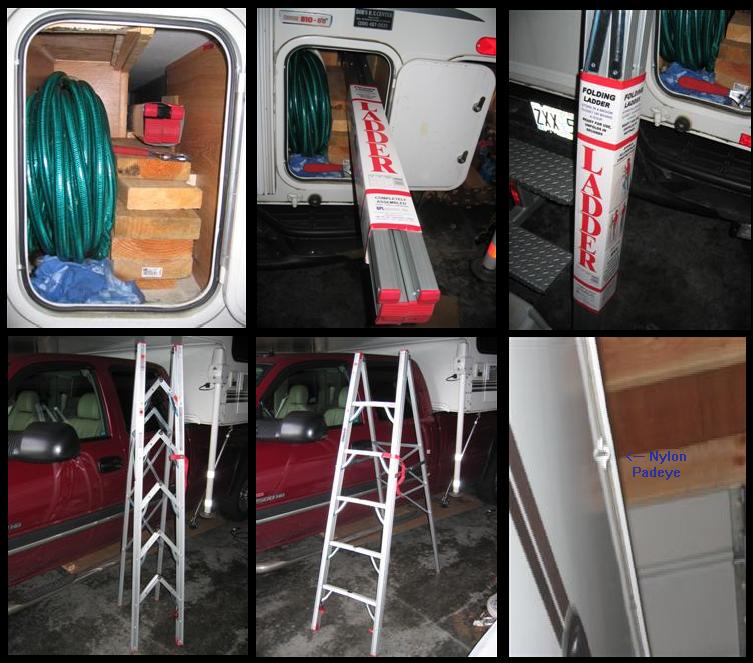
The ladder folds up to a 6 foot long "tube" 3.5 inches square. Turns out my Lance has a long storage tube factory-built in under the passenger side wing that is accessible from the rear storage compartment door, and this ladder slides right in there. But a ladder like this could be carried in numerous different places. For example, it could be lashed to the side of your permanent roof access ladder, tied to the roof rack, strapped up under the side of your camper, carried in the bathroom, or stashed along the side of the mattress.
The last picture shows one of several small nylon pad eyes I mounted along the passenger side wall of my camper just below the roofline. The spacing of these padeyes matches the grommet spacing of a 9'x12' silver tarp I have. Using my new folding ladder, I can reach those padeyes to tie the tarp there, and create a huge awning when needed during drizzly weather. I have telescoping extension poles for the outer edge of the tarp, but usually will just tie off to trees if available.This folding ladder was about $80 at Camping World. It is quite sturdy (it has a 225 pound capacity) and I'm liking it. Mine is a 6' model and I estimate it weighs about 15 pounds. They make 5', 6', and 7' models. For a non-basement camper, 6' works great; for a basement camper I'd recommend a 7' model.
I end up using my ladder about every other camping trip for stringing up cloths lines, tieing tarps up
in trees to create awnings, trimming limbs, as so on. Get one -- you will like it!
![]() Return to Contents
Return to Contents
PROJECT: Replace camper's outdated Magnetek power converter with a 3-stage smart converter.
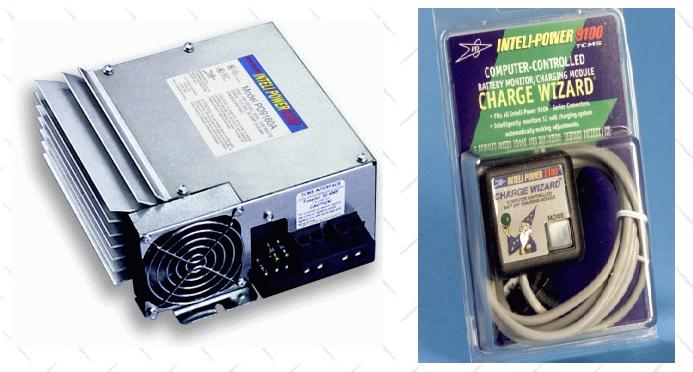
I replaced the Lance camper Magnetek 7000 series converter with a bigger better one - an Inteli- Power PD9160V 60 amp converter with computer controlled "Charge Wizard" PD9105V. The 35 amp Magnetek that was in the Lance is not a bad converter (MUCH better than the earlier 6300 series Magneteks), but it did not have a "smart" battery charging feature. It just charged the camper battery at a constant 13.8 volts. When the camper is in extended storage, this voltage will eventually boil the battery electrolyte off, causing a loss of electrolyte fluid and battery damage if you don't keep refilling the battery cells with distilled water.
The new Inteli-Power converter slips right into the bottom half of the Magnetek power center after removing the old Magnetek converter guts.
The Inteli-Power optional Charge Wizard (a microprocessor controlled module) makes the Inteli- Power converter into an intelligent battery charger with different charging curves based on the condition of the battery. This reduces charging times, as well as removing the potential of battery damage when the camper is in storage. The Charge Wizard also provides battery Desulfation mode, which periodically increases charge voltage for 15 minutes to mix up the battery electrolyte, which prevents electrolyte stratification and reduces battery sulfation.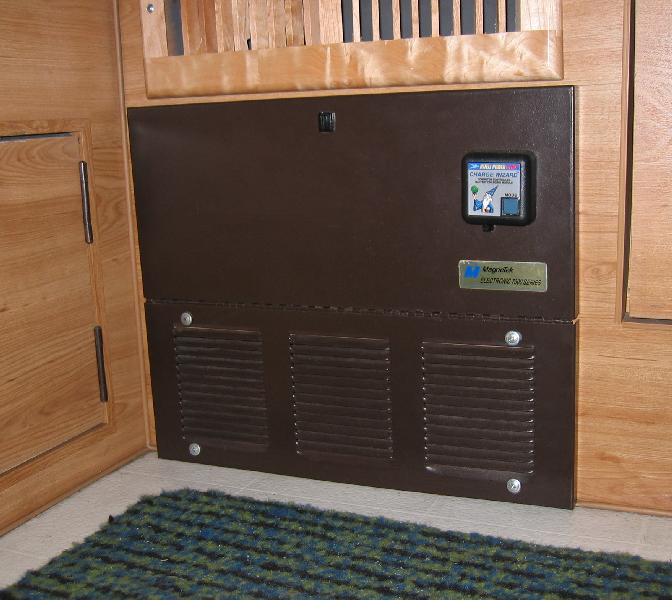
I didn't take pictures inside the power center cabinet, but my completed converter upgrade looks just like this one:
This photo came from an excellent site that has good instructions and pictures:
Rick's Magnetek to Inteli-Power converter project (site closed /link removed)
An excellent place to buy an Inteli-Power converter is at Best Converter (www.bestconverter.com). They include the optional Charge Wizard free when you order from them. The owner Randy is a great guy to work with. The total cost of the 60 amp unit I got, including the Charge Wizard module and shipping, was less than $175. If you want to give then a call with any questions, here is their phone number: Toll Free (888) 828-1893.
Comment: I got the 60 amp converter, but I probably should have only purchased the 45 amp size. This is
because I just have room for a single 130 AH battery in my camper, so 60 amps is a bit too much charging
current. The 60 amp model was only $10 more than the 45 amp model, and I just couldn't resist the bargain.
I recommend that folks with a single battery get the 45 amp size, and folks with 2 or more batteries get the
60 amp size.
![]() Return to Contents
Return to Contents
PROJECT: Upgrade Camper House Battery:
I bought the camper when it was 4-1/2 years old, and I assumed that the camper's Group 27 deep cycle house battery was the original. Since RV batteries often don't last more than about 5 years, and I had no historical knowledge of that battery, I decided to replace it. I measured the camper's battery compartment -- it is too small to fit two batteries, and the biggest single battery I could fit in is a Group 31 battery. I researched batteries fairly extensively, and decided on a Trojan SCS225 Deep Cycle RV/Marine Battery. This battery has the same dimensions as a Group 31 battery, weighs 66 pounds, and has a 130 amp-hour capacity rating. This high quality battery was available locally for about $100. NOTE: After 7 years of use, I had to replace this battery in 2011, and the cost of the new Trojan was over $200... YIKES!
While researching batteries, I learned that the Trojan Battery Company pioneered deep cycle battery
technology, and produced the first golf car battery back in 1952. They are still a highly-respected
maker of deep cycle batteries, and you can instantly recognize their batteries by their distinctive
color. There are several other manufacturers of quality deep cycle batteries. I learned that with
deep cycle batteries the good ones will not be bargain-priced -- you are paying for lead and quality
internal construction. So if you find a "deep cycle" battery at a really cheap price, you would be
well-advised to be suspicious of the quality or construction. Many cheap batteries labled "deep cycle"
are really just starting service batteries with highly porus thin lead plates that will not hold up
under RV deep cycle service.
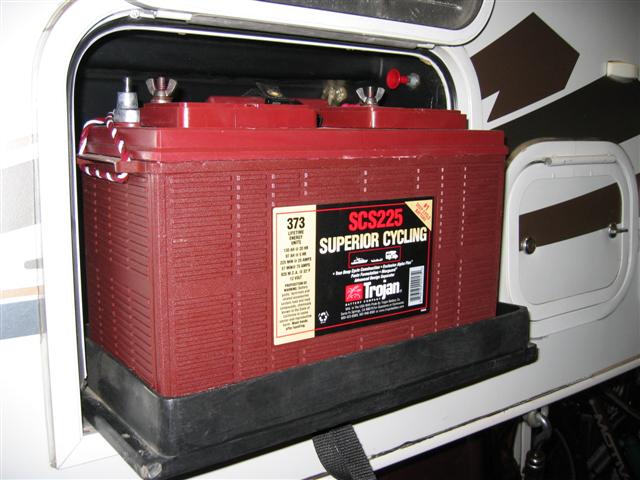
Here is my new battery sitting in its pull-out battery tray. At the top right of the battery
compartment you can see Lance's factory-installed battery isolator switch -- pushing it in
disconnects the house battery from the camper.
Here is some interesting battery information -- it really isn't directly rated to the camper projects I have documented on this page, but I thought I would include it here since batteries are so important to campers and other RVs, and since so many people have questions about battery selection and use:
Good quality deep cycle lead acid batteries can be cycled to any percentage of their rated capacity and then be recharged. However, the deeper they are routinely discharged, the fewer number of charging cycles they will stand before wearing out. You should routinely not discharge below the 50% charge level for longest battery life, but it is occasionally OK to draw down to the 20% remaining charge level in emergencies before recharging. Lead acid batteries do not develop any type of memory like NiCad batteries do, so you do NOT need to draw lead acid batteries down before recharging -- it is best to recharge them whenever possible no matter how little they have been drawn down. Note that all batteries, regardless of their chemistry, self-discharge over time. The rate of self-discharge depends both on the type of battery and the storage temperature the batteries are exposed to. However, for a good estimate, lead-acid batteries self-discharge approximately 4% per week at 80 degrees F.
Here is a simple battery management rule of thumb: Recharge when your deep cycle battery is 50% discharged. You can tell the state of charge of your battery by measuring it's voltage when at rest (when not being charged and when not under load): 100% charged = 12.70 volts; 75% charged = 12.37 volts; 50% charged = 12.06 volts; 25% charged = 11.67 volts; 0% charged (ie, dead) = 10.5 volts. So whenever your battery voltage drops to near 12.0 volts, it is time to recharge. You will need a digital volt meter to get accurate enough readings -- decent digital volt meters can be purchased from $10 to $20 (or even cheaper at places like Harbor Freight). You could make up a set of leads for your meter hooked to a cigarette lighter style plug so it is easy to check voltages.
Deep cycle batteries are usually rated in "Amp Hours" for a 20 hour discharge -- for example, a battery rated at 100 Amp Hours will provide 5 amps per hour for 20 hours. It is important to note that discharging at a faster rate reduces capacity. Here are some typical numbers comparing "Hours To Discharge" to "Percent of Rated Capacity": 20 hours = 100% of rated capacity; 10 hours = 84%; 5 hours = 67%; 3 hours = 56%; 1 hour = 47%. What this means is your battery capacity may be cut in half if you draw heavy loads on it. For example if you have a 100 Amp Hour rated battery, it will be totally dead in only one hour if you draw 50 amps (such as would be the case if running a 600 watt hair dryer) on it.
Note that in RV and Marine systems where you are often trying to minimize the charge time when charging from gensets or your engine's alternator, your battery will normally only get charged to about the 85% level. This means that only 35% of it's capacity is available for normal use (85% - 50% = 35%). You need to take this into account when selecting batteries for your camper. When you are hooked to shore power and your battery is being charged for longer periods, the battery will charge the remaining 15% up to the 100% level.
Here is some good info about battery charging: An automatic charger offers the greatest convenience. A properly sized charger takes into account battery capacity and the time interval between charges. In applications where cycling is infrequent, such as weekend RV users, or infrequent or seasonal trolling motor usage, a charger with an output current rating between 10 and 13% of the battery's rated 20-hour capacity is usually sufficient. In applications where battery recharge must be accomplished within 8 to 10 hours, a three stage, automatic charger, rated at least at 20% of the battery capacity, is recommended. Note that in the case of my 130 Amp-H battery, that would be a charger with an output of at least 26 amps. My camper's new Inteli-Power 60 amp converter can supply up to 60 amps of charging current (so it is actually adequate for two batteries the size of the one I have), so as mentioned in the section above, I probably should have purchased the 45 amp Inteli-Power rather than the 60 amp model.
And here is a link to an excellent battery FAQ page that discusses care of lead acid batteries during
storage of your rig: Deep
Cycle Battery Storage Page -- this page is a subpage of this one, which has an amazing amount of
great information about deep cycle batteries:
Deep Cycle Battery Frequently Asked Questions Page. Entire site and its information is a good one to bookmark http://jgdarden.com/batteryfaq/index.htm
Here is one more useful page that will help
you decide between 12v batteries in parallel, or 6 volt batteries in series:
Battery
Configuration: Parallel or Series?. These links open in new pages, so just close them when
done to return here.
At the same time as I upgraded the house battery, I also installed a solenoid battery isolation
switch which disconnects my truck's two batteries from the camper whenever the truck is not running.
You can read the details in the Undocumented Projects section of this page.
![]() Return to Contents
Return to Contents
PROJECT: Add brighter backup lights to truck:
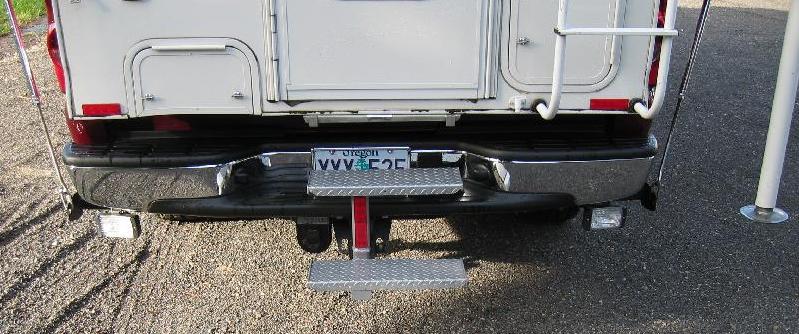
Here you can see the pair of 55w halogen backup lights I added under the ends of the bumper. These
are serious backup lights!!! REALLY GREAT! They were an easy install - I just drilled a 3/8" hole
on the bottom of the bumper on each side, mounted the lights, and spliced them into the trailer plug
wiring harness (which on Chevy includes a separately fused backup light wire). The lights are
actually "Tractor Utility Flood Lights", which I got at Knetchs Auto for about $14 each including
mounting brackets.
![]() Return to Contents
Return to Contents
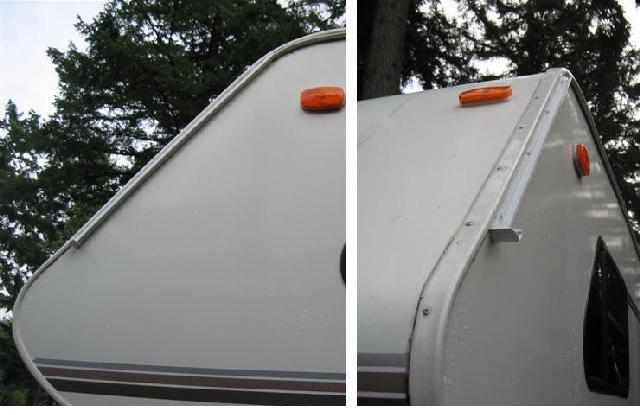
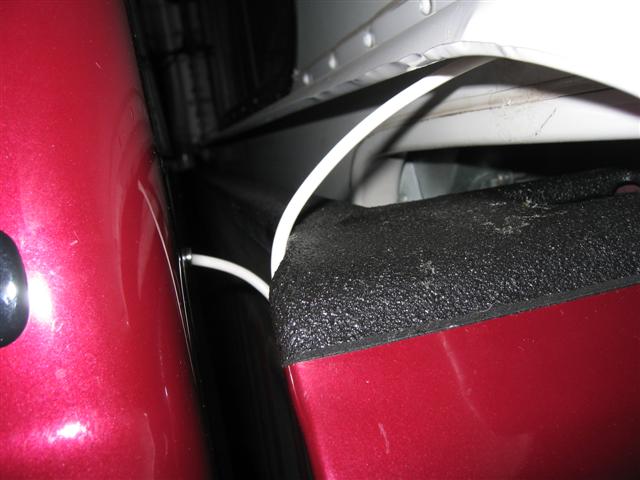
PROJECT: Extend camper roof gutters forward of truck cab:
My camper's roof has small "gutters" (aluminum "J" shaped molding) running along each side of the roof.
These gutters, at their forward ends, stopped right over the area where the truck doors open. When it is
raining, these gutters collect water from the entire roof, and as you can imagine a flood of
water cascades off the front edge of those gutters. So when it was raining and you opened the truck door
to get in or out you were guaranteed to get soaked. But even worse, water poured onto the door-mounted
switches for the power windows, door locks, power mirrors, and heated seat controls. Not a satisfactory
situation!
The fix turned out to be fairly simple. I found a couple of 3 foot pieces of extruded aluminum "J"
molding similar but a little bigger than what Lance had used, and attached these to the camper with screws
and sealant such that they carried the water further forward. Now the water pours off the camper forward
of the truck doors, missing occupants and controls. I also put a little "flip lip" on the forward end of
the gutter extensions to shoot the water clear of the camper to minimize black streaks down the side. These
gutter extensions really perform great -- no more getting soaked! Here is a picture - the extensions start
right above the leading edge of the side clearance light, and go forward down the sloping front of the
camper:

![]() Return to Contents
Return to Contents
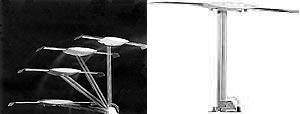
PROJECT: Build a "Ladder Table":
What is a "Ladder Table" you ask? Check it out......
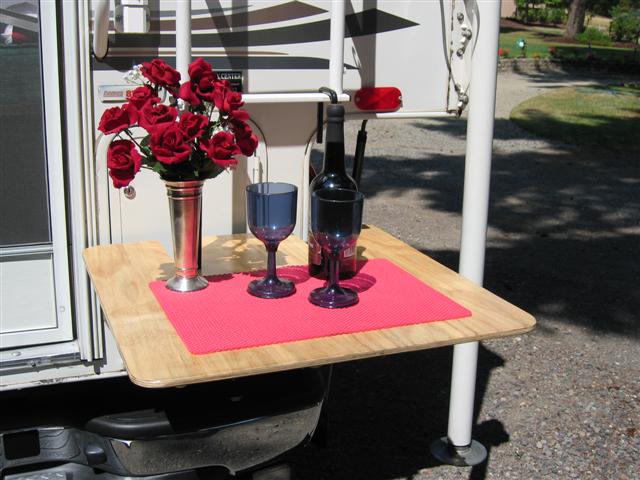
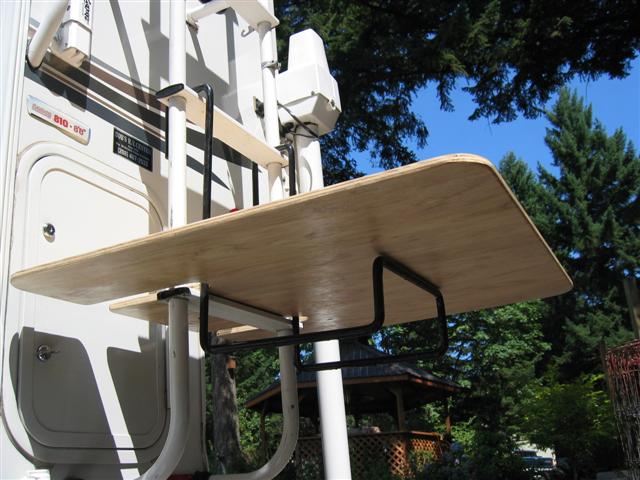
While camping this summer, I found it was nice to have a little table near the camper entrance door to sit
things on when going in and out of the camper. I was originally just sitting a flat-top cooler on the
ground near the door, but got to thinking it would be neat to have a higher table. I didn't want to
carry another whole table, so I came up with this. It is just a piece of 1/2" plywood slotted out to
fit through the camper ladder verticals. I rounded the corners, sanded the edges, and slapped a coat
of Varithane on it. The plywood top is supported by a Camping World $11 lawn chair carrier that
hangs on an RV ladder. I will normally throw a bungi cord around the part of the plywood sticking through
the ladder to make sure it doesn't tip, but I didn't do that for this picture. When traveling, I'll stow
the table top under the mattress, and the chair carrier gets moved to a higher ladder rung where it carries
my folding lawn chairs.
![]() Return to Contents
Return to Contents
PROJECT: Repair Damaged Mount for Electric Camper Jack:
I recently noticed that the driver's side rear camper jack was at an angle, and upon closer inspection I saw that all of the nine mounting screws were ripped out of the corner of the camper, and the jack was literally swinging in the breeze. I can't imagine what happened -- I am very careful to stay clear of obstacles that could hit the jacks. I'm thinking that I probably was the victim of a parking-lot hit-and-run. At any rate, I had just mounted the camper on the truck that morning, so I'm very lucky the jack didn't come totally off while the camper was sitting on the ground -- the camper would have tipped over had that happened.
>The jack was mounted through the fiberglass siding into the camper corner wood framing with 9 small (1/4" diameter) lag-screws -- 5 in from the side of the camper and 4 in from the back. When the jack got hit, the screws ripped right out of the wood framing in the corner of the camper, splintering the wood.
I injected Polyurthane wood glue into all of the holes, and installed slightly larger screws (5/16"
diameter, and longer than the stock screws) into the 5 side holes. I then drilled 4 additional holes
between the existing side holes, and installed more lag screws. I also added matching extra screws
to the mount for the passenger side rear jack.
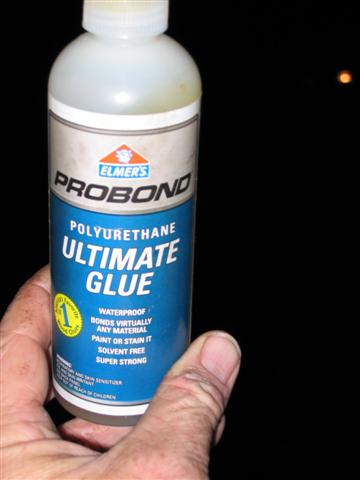
Polyurthane wood glue is amazing stuff -- it swells significantly as it drys, which lets it
fill voids (such as my splintered wood). It is totally water proof, extremely strong, and very
hard to get off of anything you get it on by accident (such as your hands -- you basically have to
wear it off, which takes days).
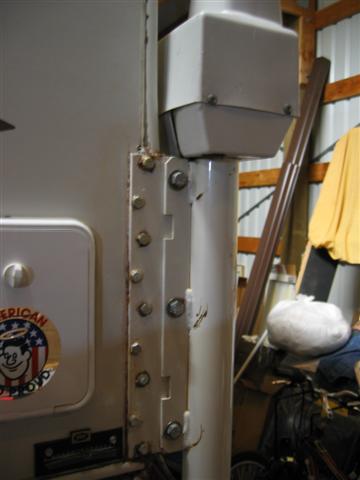
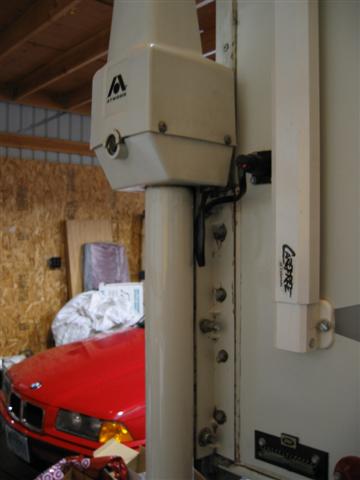
The jack mounting is very solid now!
![]() Return to Contents
Return to Contents
PROJECT: Install an Inspection Port in the Fresh Water Tank.
Check it out -- a picture of the inside of my fresh water tank!
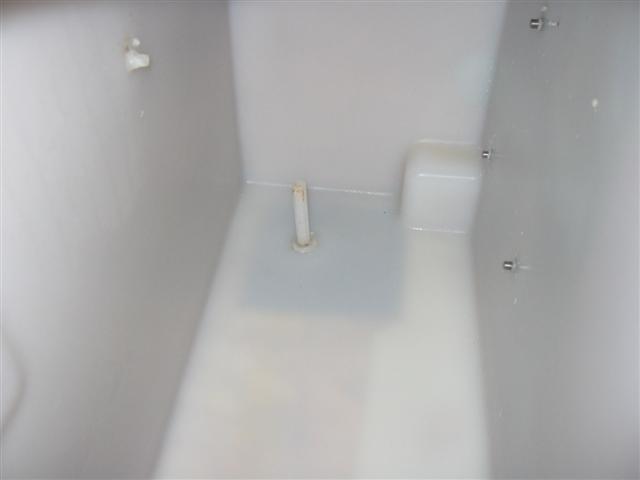
How did I take the picture? Read on.
I always wondered what could be growing on the inside of my water tank, so I decided to put an
inspection port in it. I bought a marine "deck plate" (a round access port with a water-tight lid) and
installed it in the top of my water tank. The following pictures tell the story:
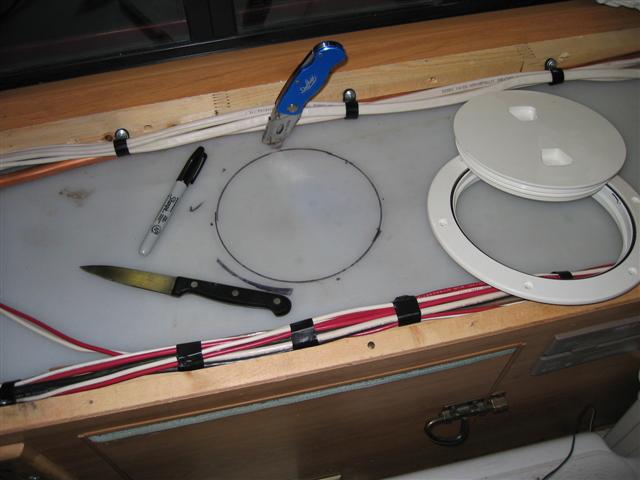
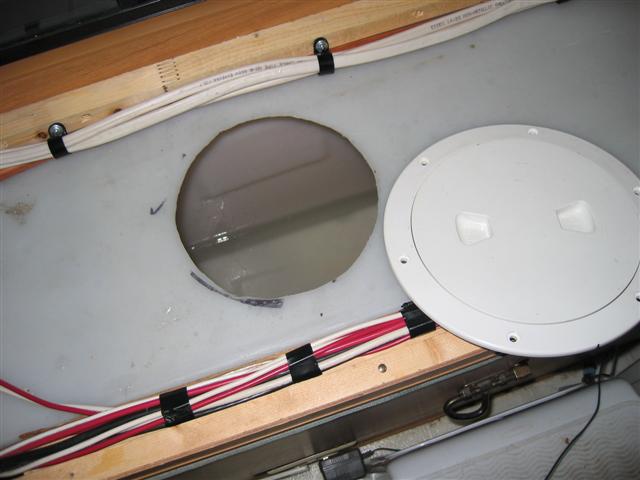
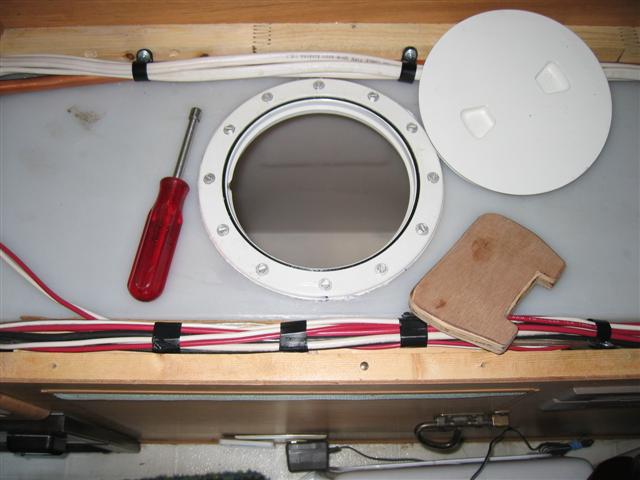
In summary, I cut a hole to fit the deck plate in the top of my tank with a razor-type utility knife, and mounted the deck plate over the hole. I reinforced the inside of the tank where the deck plate screws go through with a flange I cut from one of those white plastic cutting boards -- I split this home-made flange on one side in order to be able to get it inside the tank. I gooped everything up with silicone sealant, drilled 1/16" pilot holes, and installed aluminum screws through the deck plate flange and tank top surface, and into the cutting board flange. The deck plate originally only had holes for 6 screws, but I added an additional 6 just to make sure nothing warps.
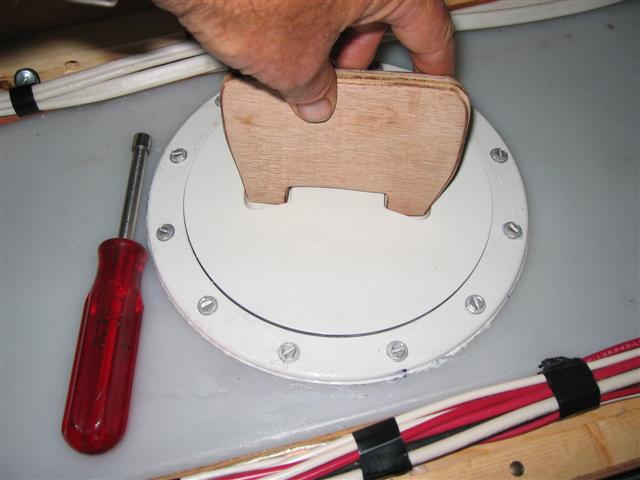
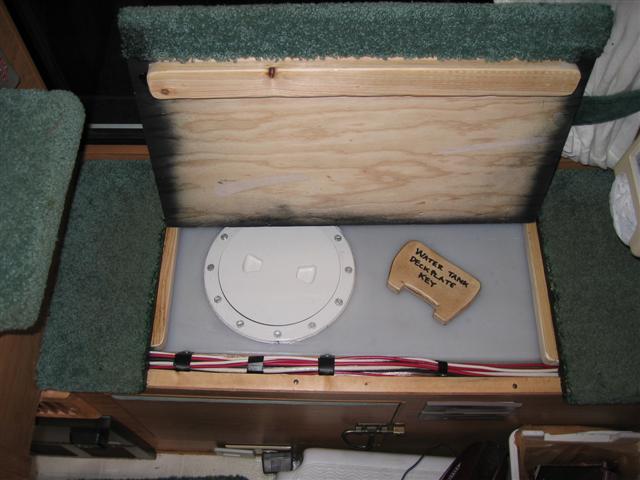
The deck plate, which is a 6" Beckson brand (plastic body and lid, O-Ring seal), works great and doesn't
leak a drop when driving. In some of the photos you can see the wood "spanner wrench" I made to tighten
and loosen the deck plate lid.
![]() Return to Contents
Return to Contents
PROJECT: Add an Accumulator Tank to the water system.
Most RV water pumps are the "demand" type. Whenever you turn on a faucet, the pressure switch on the pump senses the drop in pressure and turns on the pump. As soon as you turn off the faucet, the pump's pressure switch senses the rise in pressure and shuts off the pump.
This type of system works fine, but the pump is often irritatingly noisy, and the pump gets turned on and off many times (each time a faucet is turned on or off) which can shorten the pump life.
Adding a small water storage tank to the system, called an accumulator, reduces noise and pump cycling. An RV water system accumulator tank typically has a water inlet at one end, an air-fill valve at the other end, and a flexible rubber or vinyl bladder separating the air and water. The tank is installed by tee'ing it into the piping on the discharge side of the pump. In use, the tank provides a pressurized air cushion over stored water.
The idea is that once your pump comes on (say at 30 psi), it will pump water into the accumulator tank, and that water compresses the air on the other side of the tank's bladder. When enough water gets in the tank to pressurize the air to the shutoff pressure of the pump (say 45 psi), the pump stops. Next time you open a faucet, the compressed air in the tank pushes water out, and through your piping to the faucet. The pump will not come on until enough water has been pushed out of the accumulator to drop the pressure back to the pump's startup pressure (30 psi).
Thus the accumulator reduces wear and tear on the pump by reducing the number of times it must start and stop. Plus it provides an air cushion in your piping system which reduces water hammer (pipe banging and rattling), which normally reduces pump-caused noise.
With that background, here is what I did:
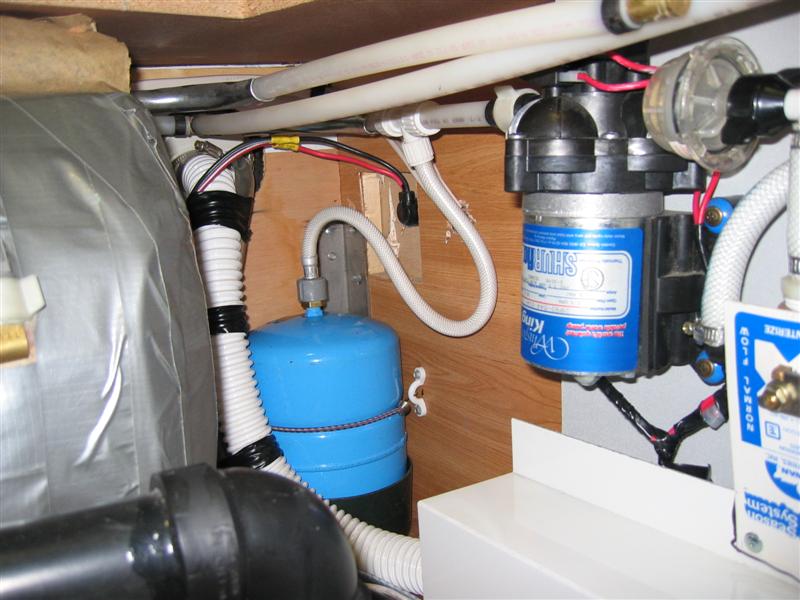
This picture shows my under-sink area (I pulled the sink out to gain easier access). You can see my SurFlo water pump with it's intake screen, and the bright blue 1/2 gallon accumulator tee'ed into the pump's discharge side. The tee is designed for rigid PE tubing, but for the line feeding the tank I used a regular home-type flexible faucet supply line instead. I cut the factory fitting off one end, and with a little work got it hooked into the 3/8" side of the 1/2"x1/2"x3/8" tee fitting.
The accumulator tank is sitting air-valve side down inside the bottom half of a plastic flower pot, with some foam cushioning in the bottom. You can see the miniature bungi I used to secure it. I can just pop the bungi and drag the tank out for air filling or service. For winterizing I'll blow my piping down with air, but since the flex line supplying the tank is essentially a dead end, I'll have to unhook the flex line from the tank to drain the line (the tank will already be empty once I turn the pump off and open a faucet).
After the picture was taken, I replaced the short piece of rigid tubing you can see between the pump outlet and accumulator tee with a loop of braided flex tubing in order to get a bit more noise reduction.
How well does it work? Now when I open a faucet, the pump does not come on until I have drawn 2 or 3 cups of water. And it stays on after the faucet is turned off for 4 or 5 seconds. It runs considerably quieter now, but is by no means silent -- I would estimate that I cut pump generated noise by more than half. Now with the water running into the stainless steel kitchen sink, you can barely hear the pump. If a person wants to decrease pump noise further, there are now microprocessor controlled variable speed pumps available that you can barely hear run. They are spendy, but will be worth the cost to many folks.
Note that the bigger the accumulator tank, the more stored water it will hold and the bigger its "working volume" will be. So for larger RVs where there is more room available, a 2 to 5 gallon accumulator would be desirable. Small accumulator tanks (say 3 to 6 gallon size) that are used in some home water systems will work fine in your RV, and those may cost less than ones sold at RV places.
While I had the sink out, I removed the cheezy faucet with plastic guts that Lance used, and installed an all metal two-handled faucet that feels a lot better to use.
On the left side of the photo you can see a bunch of duct tape -- that is covering part of my water
heater. The water heater had a factory applied molded styrofoam insulating jacket, and it is apparent
that the Lance sink installer used something like a claw hammer (you could see the marks) to break
off some insulation that he felt would inteferring with the sink install, and pieces of styrofoam
were all over in the hard-to-reach areas under there. I put the bigger pieces of foam back, used
some fiberglass insulation where needed, and covered the area with duct tape.
![]() Return to Contents
Return to Contents
PROJECT: Replace Incandescent Light Bulbs with LED Bulbs.
|
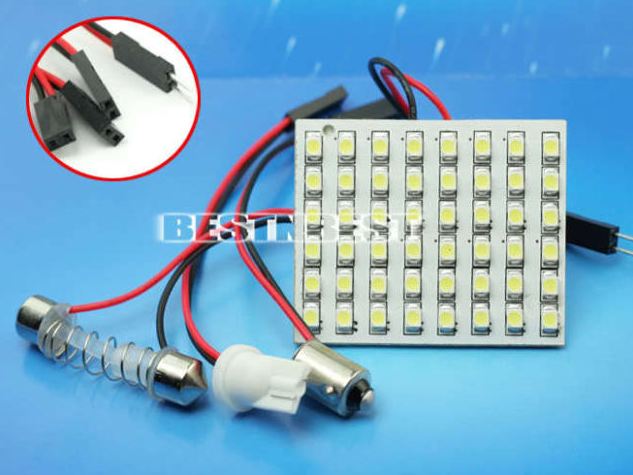
UPDATE May 2012: LED lighting has progressed to an amazing level in the last couple of years. Now LED replacements for 12v light bulbs are readily available, cheap to buy, and brighter than the incandescent bulbs they replace. For RV ceiling lights, typically you would replace the incandescent bulb with a 36 or 48 LED light panel that puts out a beautiful and bright white light, and uses only about 1/6th the power of the old incandescent bulb! These things are totally GREAT! Here is a typical eBay Chinese LED light panel, with adapters for various incandescent bulb types, which you can buy for less than $3 with free shipping:
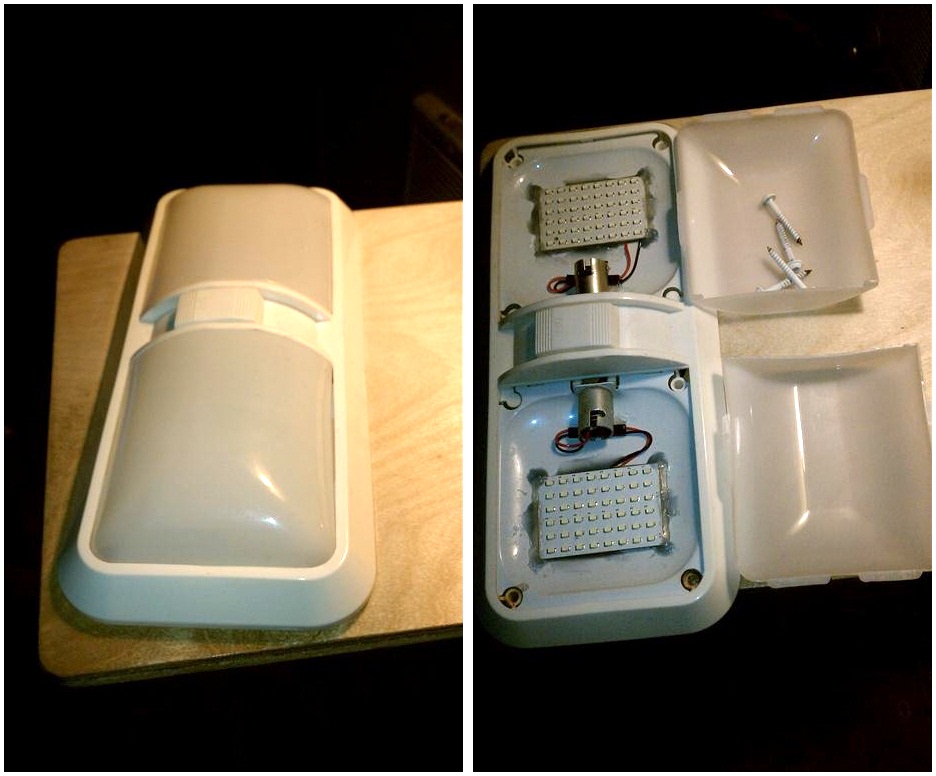
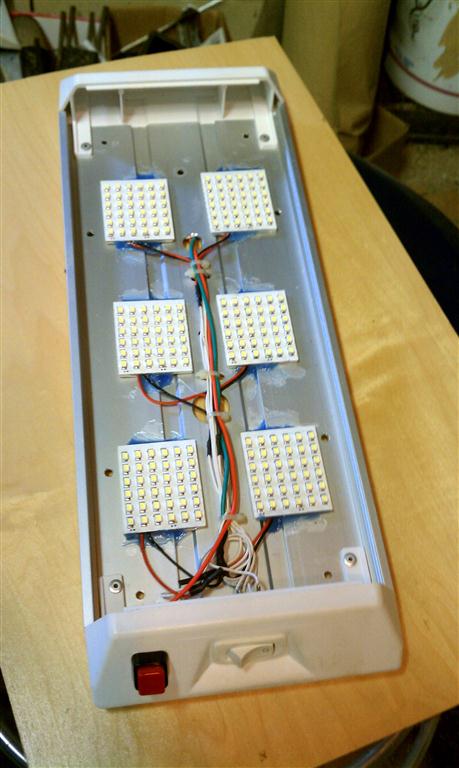
Here are pictures of a couple of fixtures that I converted. I used 48 LED panels (6x8 array)in the incandescent fixture, and 36 LED panels (6x6 array)in the florescent fixture I converted (shown in the last picture - Note that I have it wired so I can use either 3 or all 6 panels):
The LED light panels come with double sided foam tape on the back for mounting, but I found that with warm weather and small amount of heat that the panels generate, the tape did not hold.... so I added some blue silicone adhesive which you can see in the photos above. Here is the quality of light these panels put out - this photo was taken using the light from just one side of a
double fixture:
These LED lights are totally awesome! I bought the panels on eBay for between $2.49 and $2.79 each with free shipping from Hong Kong (price as of fall, 2011). I have purchased dozens of these panels for my own rigs, and friends' RVs, at various times from various Chinese eBay dealers, and have been totally satisfied with every order. Give some of these panels a try - using them will greatly extend your battery life when boondocking. To find them on eBay, search for: led panel smd (36,48) and then use the "Sort By" dialog box to sort by Price + Shipping: Lowest First. That search should find all 36 and 48 SMD (Surface Mounted Device) LED light panels. The panels are typically available in bright white, warm white, cool white (slightly bluish in color), occasionally in red or blue... I bought mostly warm white. NOTE: LEDs are polarity sensitive, meaning they will only work when positive voltage is applied to the proper wire or pin. Installing them with the wrong polarity won't hurt them... so if they don't work when you first install them, simply reverse the polarity. |
ORIGINAL LED BULB UPGRADE (done about 2005):
NOTE: I have left the following for your information, but the LED bulbs I
bought and discuss below have not worked out well. They started having failures of the individual LEDs
within the bulbs after only a few hours of operation. I returned one that had totally quite working
and received a replacement bulb, but it too soon started to have individual LEDs fail. These bulbs
were advertised to have a life in the thousands of hours, but they didn't even last thousands of
minutes. So between these LED bulbs offering less light than incandescents, and having quality
problems, I just can't recommend them. Hopefully the technology will be better in a year or two.
LED lights use very little power compared to an incandescent light. 12v LED bulbs are now available
in various configurations that will fit RV light fixtures from online sources such as Superbright LEDs. I have a standard dual-bulb
incandescent fixture on the cabinet bottom above my dinette, and I replaced the incandescent bulb on
one side with a 12V 12-LED tail-light style bulb (style 1156, which fits most RV light fixtures) that
I got off of eBay for about $8. It worked great, but was not very bright, so I decided I would buy
some brighter LED bulbs. I found some 30 LED (yes, 30 individual LEDs in a single bulb) in a right-
angle bulbs with a style 1156 base for about $12 each (I noticed the price has recently gone up to
about $15 each). These bulbs put out a decent amount of light, and just fit in most RV light
fixtures.
Here's what these 30 LED right angle bulbs look like:
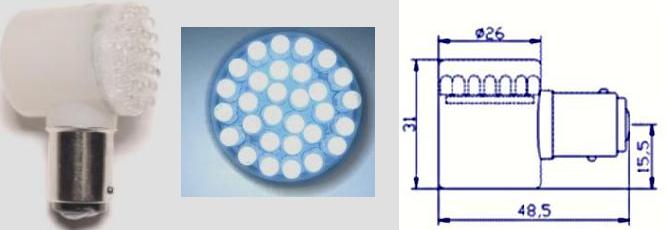
It is hard to estimate how much light they put out compared to a regular incandescent bulb because the light is a different color (bluish white). After using them for awhile, I estimate that they put out about 1/2 the amount of light as a regular 25 watt 1156-style incandescent light, but they seem totally adequate for normal functions (reading, cooking, dressing, etc). Each bulb draws 0.185 amps (about 2/10's of an amp), so one bulb running for 5 hours uses about 1 amp-hour of your battery's capacity. Compare that to regular 25 watt 1156 incandescent bulbs, which draw about 2 amps each (10 times the power usage). You can see that you could run the LED bulbs for dozens of hours without drawing down a typical RV battery very much.
I ended up buying 7 of these 30-LED right angle bulbs. I put them in my 3 outside lights, and in a couple of my inside double-bulb ceiling lights. They worked great for a while, but within a few hours of use they began to have failures of individual LEDs (some went out, some flickered on and off). I think the failures are the result of heat... too many LEDs packed into too small of an area. I eventually switched most of the fixtures back to incandescent bulbs, and in a couple of places replaced standard fixtures with 12v florescent fixtures.
I also bought three 120V photo-cell controlled LED night lights, and have them plugged into 120V
outlets in the camper (one over sink, one at floor at front of camper, and one in dinette). When
on shore power, those provide plenty of light for coming into the camper, and also to see by when
getting up at night.
![]() Return to Contents
Return to Contents
PROJECT: Miscellaneous Small Projects.
1. I noticed that the new Lance campers include an assist strap that hangs from the ceiling near the foot
of the bed -- it is just there to provide something to grab onto when getting in and out of the bed area.
Seemed like a good idea so I bought a strap and hooked it to a small marine grade stainless steel pad eye
screwed to the roof framing:

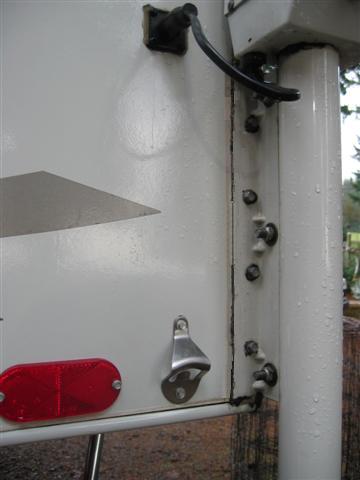
2. I had always wanted to mount a bottle opener on the outside of my camper somewhere, but could never find
one made of stainless. A while back I finally ran across one so here it is, mounted with non-corroding screws and sealant:
3. More miscellaneous projects to come.....
![]() Return to Contents
Return to Contents
PROJECT: Improve XM Satellite Radio reception when the camper is on the truck.
XM radio is line-of-sight -- the antenna must be able to "see" the southern sky.

The truck's factory XM satellite radio antenna is on the passenger side truck roof (it looks like
a computer mouse). Because it is in the shadow of the camper, XM reception is spotty. By the way,
the antenna you can see on the driver's side roof is for OnStar.
On Chevy trucks, the XM receiver is mounted behind the glove compartment, and is easy to get at -- you just open the glove box a few inches, push the right side in to release a locking tab, and the whole glove box hinges down
and out of the way. Here is a picture of the factory receiver behind the glove box:
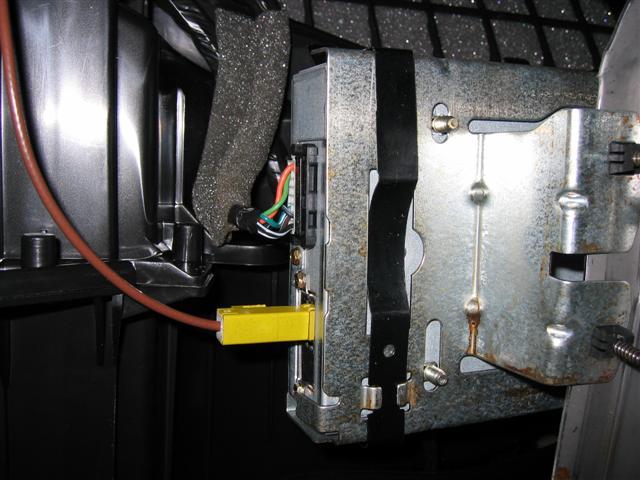
That is the factory XM antenna wire with the "curry yellow" plug on it. Note that GM just went to a
single-plug antenna in 2004. In 2003 they used a dual plug antenna (curry yellow plug for satellite,
green for terrestial). The two types of antennas are not interchangable, except that there is a
splitter available for single plug antennas allowing them to be used on a dual-plug XM receiver.
I bought a Terk single-plug Marine XM5 antenna with a 30 foot white single
cable as a replacement to the GM factory roof-top antenna. The XM5 comes packaged with a splitter
(as mentioned above) so you can hook it up to XM receivers that require dual-plug antennas (ie, 2003
GM factory installs), but without the splitter it turns out it works fine on my 2004 single plug XM
receiver.
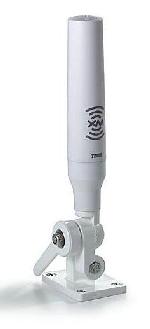
You can find the XM5 with marine base (as shown above) at Buy.com and other places for less than $55.
I wanted to get the new antenna up nice and high so it could "see" above semi-trucks and many other obstacles, so I decided to mount the antenna on the camper roof (the antenna is white, like the camper).
I installed the new antenna on the driver's side roof of the camper because that side has better clearance
from roadside trees. After mounting, I drilled a 1/4" hole in the roof and fed the cable into a hole down into the utility space
behind the coat closet, routed it behind the oven and out through a hole in the front driver's side of the camper.
It comes out near the camper power pigtail -- I wanted it there so I would be more likely to see and
thus not forget to disconnect it when removing the camper from the truck. From there it goes into
a hole under the truck rear window, under the floor mats and to the antenna plug-in on the XM receiver.
A short piece of 3/8" diameter aluminum tubing with flared ends leads the cable through the hole below
the rear window to the cab, which eliminated any sharp edges.

When I take the camper off the truck, I'll reconnect the GM cab roof XM antenna to the XM receiver unit --
it just takes a few seconds to do that.
![]() Return to Contents
Return to Contents
UNDOCUMENTED PROJECTS:
I've completed numerous minor projects that I haven't yet photographed or previously documented --
here are some of them:
Winegard Roof-Top "Bat-Wing" TV Antenna with amplifier: My Lance was prewired for satellite
and for land-line TV cable, but it had no TV antenna. I bought a Winegard RV3090 antenna, which mounts
on the roof, and has a crank on the inside of the camper which raises the antenna, and rotates it to
get the best signal. I mounted it near where the satellite cable outlet is on the roof, and
connected it to the existing coax. This antenna is amplified, and works very well. The amp is on
the back of an outlet-sized plate, and the plate contains a 12V outlet, a coax outlet for your TV,
and a push button to turn on the amp (green LED shows when on). I replaced the existing plate-mounted
12v outlet in my TV cabinet with the Winegard unit. Also, I added a splitter, and spliced the AM/FM
stereo radio antenna in to the TV antenna coax -- surprisingly, it also works great. NOTE: I bought
a fluorescent orange "Antenna UP" tag that I hang on the camper door or the truck steering wheel when
the antenna is up so I don't forget and drive off without retracting the antenna.
Solenoid Truck Battery Isolator Switch: The Chevy 2500HD Diesel powered trucks do not come with a built-in isolator for a camper or trailer -- from the factory the Chevy trailer battery charge wire is hot all the time (once you install the loose fuse they provide). So to prevent the camper from sucking the truck's two batteries dry, I installed a heavy duty solenoid isolator switch which disconnects the truck batteries from the camper whenever the truck key is off. Normally battery isolator solenoids would be installed under the truck's hood, but I decided to install the solenoid inside of the camper. I did this so I could wire a manually-switched bypass around the isolator solenoid which allows me to temporarily bypass the isolator switch from within the camper -- this would allow "emergency power" to be drawn from the truck's batteries if the camper battery gets too low. Putting the isolator solenoid inside the camper required that I do extra wiring -- I had to bring back an ignition-switched power source to run the solenoid. I ran this into the camper through an unused conductor in the camper's umbilical cord. I haven't had to use this manual bypass feature yet, but sometime if my DVD player goes dead in the middle of a movie on a rainy night, I'll be ready! I have a warning tag hanging on the isolator bypass switch which I will move to the camper entrance door when I use the bypass -- that will remind me to re-isolate the truck batteries before leaving the camper.
External Propane Outlet: I tee'ed in an external propane outlet in my propane tank compartment. The parts I used are similar to those you would get in a kit such as is available at Camping World, but I used individual parts so I could get the outlet just where I wanted it. The outlet is exactly the same as the threads on the top of a disposable propane bottle. You screw a special extension hose to it (available at camping stores), and then hook your portable propane device to the far end of the hose (which also has the same "disposable bottle" threads on it). Now I can run an external propane camp stove under my awning area -- handy for cooking things like a big pot of Dungeness crabs!
Add Side and Rear Awnings:The camper had no awnings on it when I bought it. I researched awnings quite extensively, and ended up installing an 8 foot A&E "Horizon" box awning on the curb- side, and a 5 foot Carefree "Truck-n-Awn" roll-up awning over the rear door. The installs are certainly not for the faint-of-heart as numerous holes must be drilled into and/or through the camper walls. However, the task is not too difficult for someone with good mechanical skills who can read between-the-lines of the almost adequate manufacturer's instructions. The Horizon is called a "box" awning because the whole thing rolls up into an aluminum box or can when stowed.
Fluorescent Lights: 12 Volt fluorescent lights are very energy efficient compared to incandescent lights, so are great for conserving battery life. Also, they put out a nice bright but even light. My Lance had one fluorescent light (the main cabin light), but I added three more. I replaced the incandescent ceiling light in the galley area with a twin tube 30 watt fluorescent fixture (18" long), and the under-cabinet incandescent over the sink with a twin tube 16 watt fixture (12" long). I also added a new 16 watt fluorescent fixture at the very front of the cabover at the head of the bed -- a great reading light. These fixtures are available at Camping World (about $37) and other RV supply houses.
Additional 12V and 120V Outlets: It seems to me that there is never enough outlets provided by the manufacturers. I added 12V outlets to these locations: Dinette (for laptop PC or TV), cabinet bottom over sink (for all kinds of things, like TV, razor, cell phone, camera batteries, etc), head of bed (cell phone and more), adjacent to entrance door (spotlight), and outside under awning (TV, boombox, etc). I also added an extra 120V outlet near the floor at the front of the cabin area (near the fresh water tank) which I use for a LED 120v night light, and for plugging in my Dustbuster. Regarding the 12V outlets, I have a couple of very small inverters (a 70 watt Victor no-fan inverter that has the inverter and cigarette lighter style plug all in one unit, and a small brick-type 150 watt inverter with no fan) which are handy to use with any of the 12V outlets to power a TV, camera battery charger, etc. I located the 12V outlets where I could easily tap into existing light-circuit or other 12V wiring. For example, the 12V outlet at the head of the bed is located just a few inches from one of Lance's bedside reading lamps.
Water Heater Anode: I bought a sacrificial anode that replaces the drain plug on my Atwood water heater. These anodes provide "cathodic" corrosion protection to the aluminum water heater tanks. They are available at Camping world for 1/2" and 3/4" IPS fittings for about $8.
Darkened Front Camper Window: I wanted less light coming in the front cab-over window while sleeping, but did not like using the window shade which always got bunched-up by the pillows. My Lance has an inside storm glass on this window -- so I pulled that glass and covered it with dark smoke colored plastic film available at automotive parts stores. I also hot-melt glued some bamboo curtain material to the glass. When I reinstalled the storm glass, the film and bamboo are now sandwiched between the storm glass and main window glass, and are thus protected from the pillows. We can still see out, but no one can see in, and lots less light gets in.
Truck Projects: I did a number of things to the truck including adding a Hellwig rear
anti-sway bar, Edelbrock IAS Performer self-adjusting shocks, Firestone Ride-Rite rear air springs,
front receiver hitch, CB radio with hood-mounted antenna and underhood PA speaker, stainless steel
nerf step bars, window vent shades, hood wind deflector, extra 12v power outlets under the dash area,
and a few other things. I won't say much about these projects, except that the truck suspension
mods really made a big difference. The truck is very stable now -- semi trucks don't bother
it, and it corners like a BMW (hee hee, well, almost).
![]() Return to Contents
Return to Contents
-More to come.
Back to our home page ourelkhorn.itgo.com Back
![]()