Convert a quad winch for multi mount truck use.
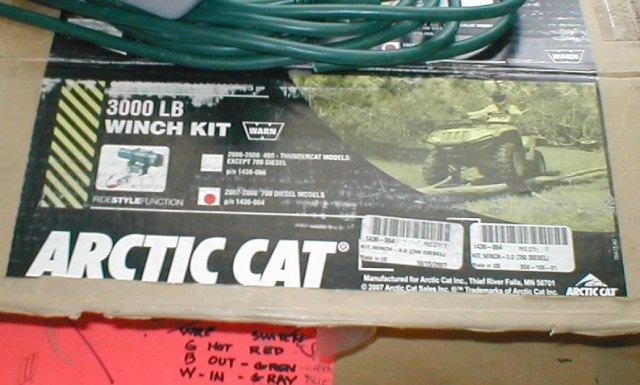
- As title says- Converting a small 3000# quad winch to a self-contained winch for use as a multi mount on truck. New in a box for quite some time, just didn't have time to set up for initial purpose so it has been setting. Originally acquired to load a small trailer into truck bed. I have a small jeep trailer that I hand winch into truck bed when flat towing jeep. Not too difficult, as the hand winch worked just never got around to adding the winch. Recently had the opportunity to drive 250 miles to rescue friends' truck with blown trans. We used come-alongs to get it on trailer- realized the 'lil winch would be perfect for this. So motivation to revisit-.
- Intro Part 1 What am I getting into
- Part 2 Fab winch plate and receiver adapter
- Part 3 Add solenoid box & bracket/wire winch and make remote
- Part 4 Design & fab in bed winch receiver
- Part 5 Mount in the truck
- Part 6 Wire truck, add fuse/solenoid from battery, dash switch. Quick connectors at winch
- Section links on this page:
Trying to see what's in store
-
Back to top of page
Though original intent was too somehow mount in truck bed to get jeep trailer into truck-if I'm going to the effort to set up winch seems like setting up so it can be used as multi mount would be more versatile and useful. I have an aftermarket rear (dual stacked) receiver a front receiver and want to use in truck bed for pulling stuff in. Making receiver mounts will be fairly straight forward. The in bed mount will take some thought and be last.
Looking at the project and breaking it down into separate tasks. The winch is supplied to mount to a quad and presents some issues.
- 1. Wiring the winch: The solenoid pack is a separate assembly but needs to be mounted on winch like a standard self-recovery winch. Requires finding a box that will accept solenoid pack and wiring and making a bracket to mount the new box on winch. Also needs a remote plug in box. Supplied remote was intended to be hard mounted on handle bars. It's wired with a plug half way in its length for switch power. Rewiring so remote gets power and ground from solenoid pack. Ill utilize the supplied switch but will need to make a handle, rewire so it plugs into solenoid box.
2. Wiring the truck: I'll need to add quick connect plugs at winch mount locations, also add a plug to winch input battery cables. This will be the real and only expense and will the last thing done. Also I 'may' add a pigtail from camper to access this power for quick recharge or on road use. Also would be nice since I'll have power is to use at rear bumper for jumping.
3. Winch mount: It has no mount plate, again intended to mount directly to quad chassis. Though pretty straight forward. Make a plate to bolt winch onto, though not needed as it came with fairlead I might as well use so plate will accept it.
4. Multi mount to truck: The bed mount will be involved- size and configuration will probably be different than the straight in hitch receivers. TO make easier and smaller for in bed use making the winch mount plate with a short 1 1/2" tube (instead of 2" that would plug directly into hitch receivers). For the hitch receivers I'll make a 2" to 1 1/2" adapter. Allows more flexibility and minimizes what I may do in bed. Won't have to match the hitch receiver lengths for in bed use. Also allows raising so winch mount will still work in rear with trailer hooked up.
5. Complicating my install is that I carry a slide in camper. Whatever I do in the bed will be designed (limited) around that.
Back to top of page
On to the project...
Winch plate and receiver adapter
-
Well trying to see all the variables- not paint myself into corner. But think I've a loose plan. I'll start with easy parts-fab some metal parts. 1st make the winch plate, mount it and fairlead. Then I can use it to figure out required receiver adapter length, checking fit at both front and rear bumpers. That will set tube to be welded to winch plate. Once I have the adapter and winch plate done I'll get a box, make a bracket, install/wire solenoid pack and remote wiring. Then make remote cord. Once winch completed and mountable to bumpers Ill tackle in bed mount
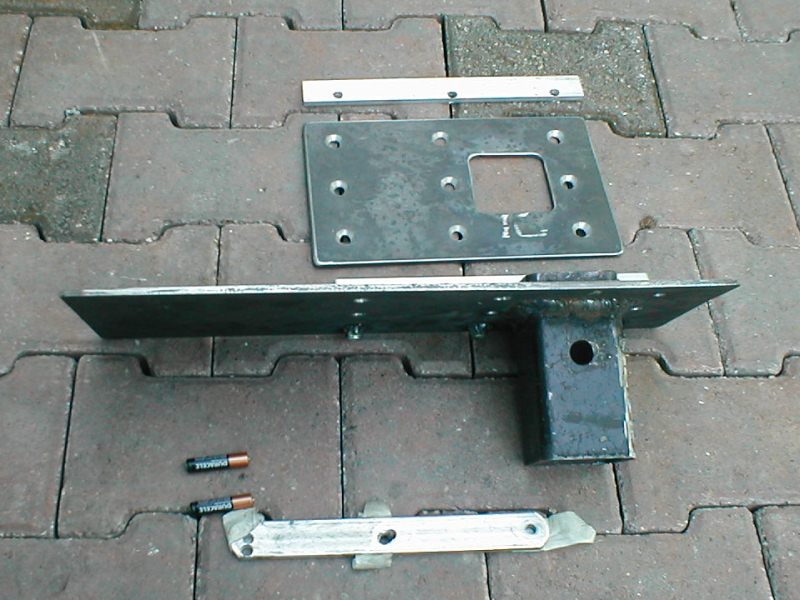
Ok-, hadn't planned on documenting this. So didn't take pics until I finished so pics are not in sequence, using what I have to show what I did...
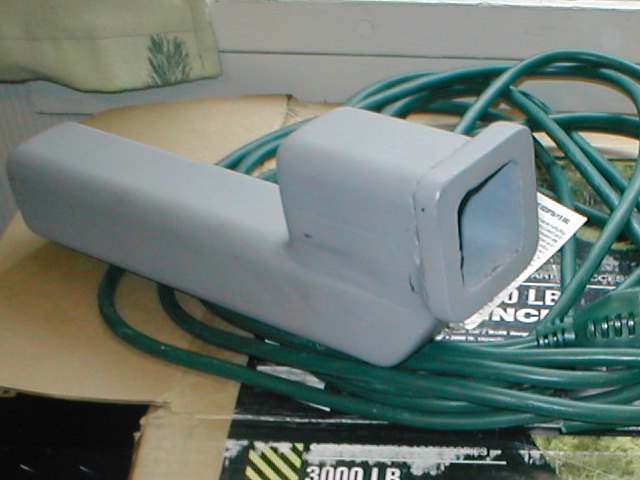
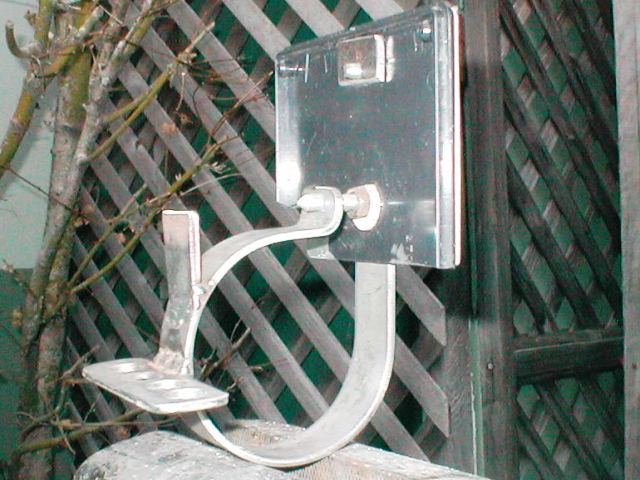
Fairly well into it-this is to show the plate. Basically a small piece of flat bar, bent to accept the roller fairlead. Drilled 4 holes & cut slot for cable pass thru, drilled to match winch base and fair lead.
The tube is 1 1/2", length was determined after making the receiver adapter.
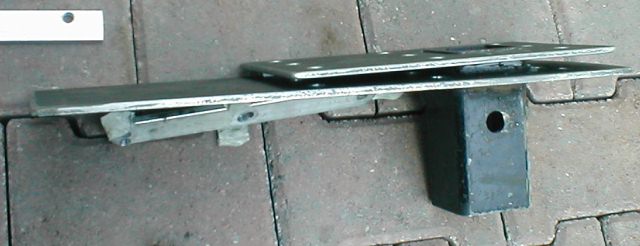
Here's my hitch mount. Stacked for clearance at rear bumper for trailer hitch clearance. Allows winch use when flatbed trailer hitched. Holes to be drilled matching front hidden hitch receiver which is further back under bumper than rear. The upper adapter tube Ill insert winch plate tube and match drill thru both.
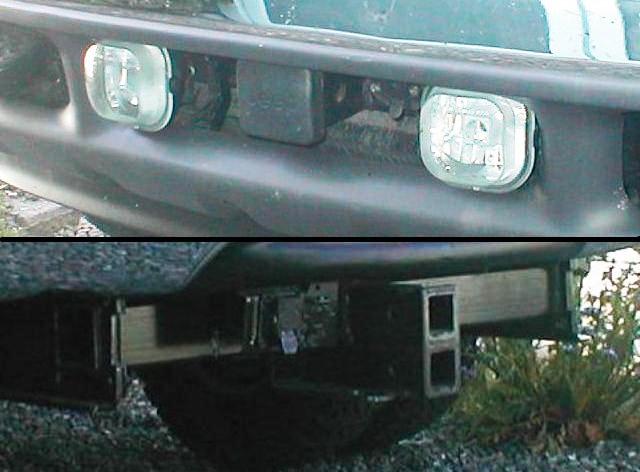
Just FYI, receiver hitches. Rear is Torklift dual receiver hitch, for towing with extended dual tube extension when camper on, and the front Hidden hitch which is used primarily used to haul a small scooter.
So mount plate and hitch adapter done...
Back to top of page
Adding solenoid box/wiring
- Though a good idea-not practical on multi mount winch is the solenoid being separate & remote from winch. As setup battery cables go to solenoid pack-outgoing battery leads are polarity switched (cable in/out) power leads to winch motor terminals. Would work but that would mean the quick connects leads on truck couldn't be used for anything else. The remote switch using external power is also a good idea. I may do this on the jeep-run a separate key on (not ignition on-I've had to winch laying on my side) power source for remote instead of from main positive terminal in solenoid box. But for this install the power for winch will go thru a 200 amp solenoid activated by ignition on powered manual switch. I want this only able to draw if engine is running and only when needed. Otherwise will be installed like on most vehicle self-recovery winches.
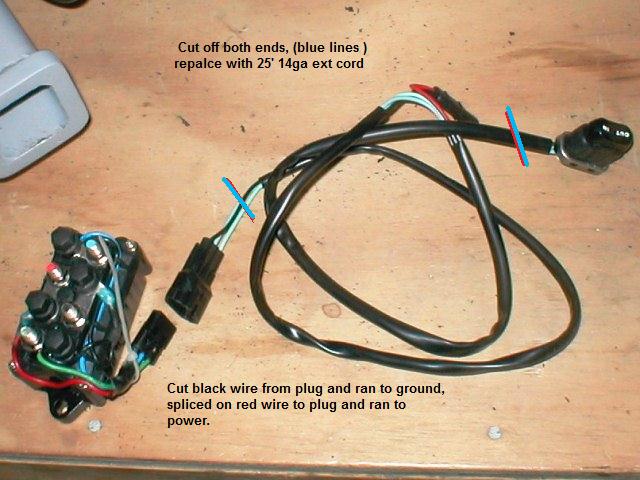
Here's the supplied remote harness & solenoid pack. Note the 2pin plug in middle, red wire supplies power to switch, switch sends power to selected solenoid (in/out). Ground for solenoid switch is sent back thru 2pin. I'm changing this to power and ground for switching onto the solenoid terminals. Here I've changed the black wire from plug to red, the cut off black wire and ran to ground, Note the small length of black (now 12v power) on female side of plug.
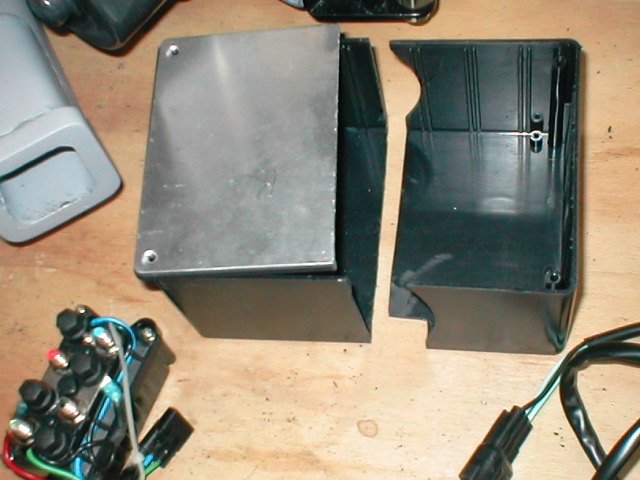
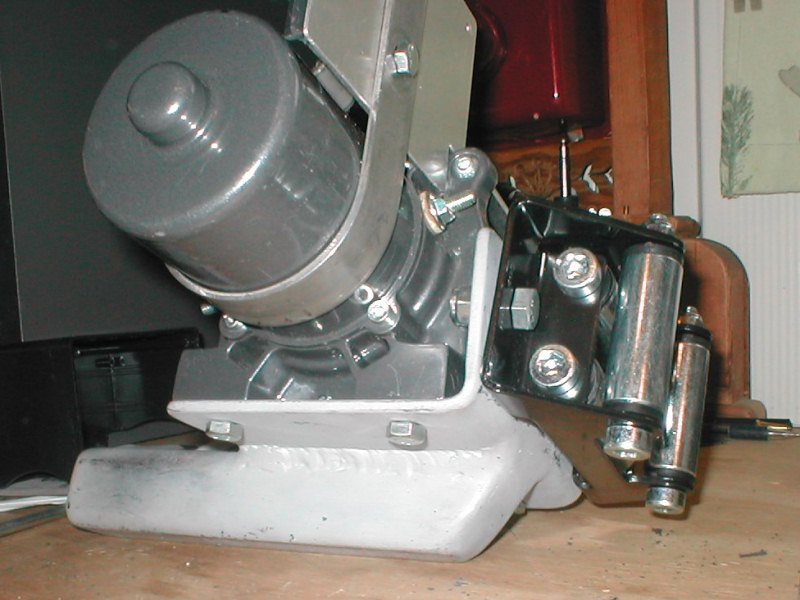
Only box I could find wide & deep enough was twice as long as needed so sliced it in half. I've started shaping box to sit closer to motor & clear spool drum flange when mounted. Box has a plastic lid and an aluminum lid. Making a bracket that lids will bolt to. Bolt the solenoid to lids. Box will simply cover solenoids.
Started box bracket. It is simply a piece of flat bar wrapped around motor with 2 vertical legs. Lid sets inside, lower bolt goes thru into tapped smaller leg clamping strap to motor. A nut between legs secures the lid, adding another bolt at top of lid to hold lid.
In case your trying to figure this out. As the box lid has both the plastic and aluminum covers-decided just stronger to mount lids on winch-mount solenoid to lids, the box will act as cover. Removing the box will completely expose solenoid and wiring. Below you can see the 2 bolts that hold solenoid to lid.
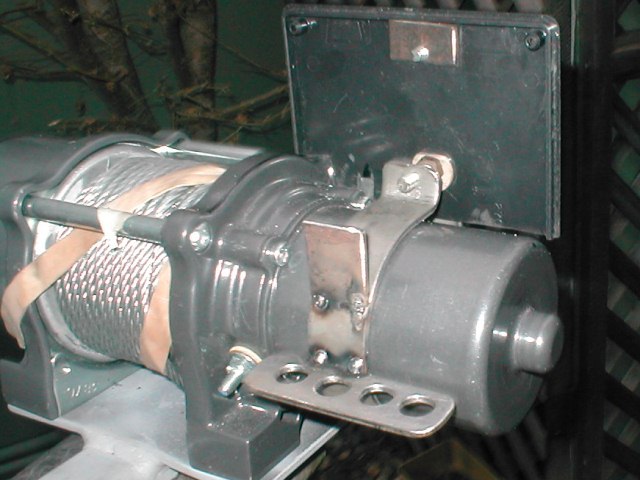
Tacked on a small bracket to be drilled & tapped to secure the box. Also tacked on cable stay. Got top lid bolt attached. I threaded a piece of bar, solenoid is really tight between bolts, not enough room for nut .
Welded up. Kinda fun but spent way too much time on it.
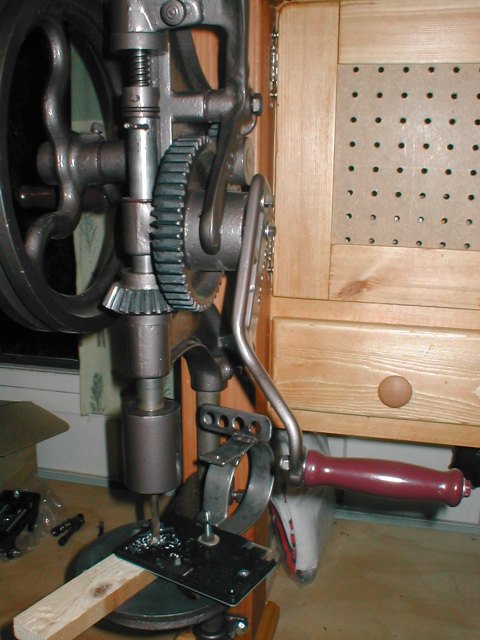
Had to show using my restored turn off the century Champion post drill match drilling the plastic and aluminum lids. Rarely used but fun

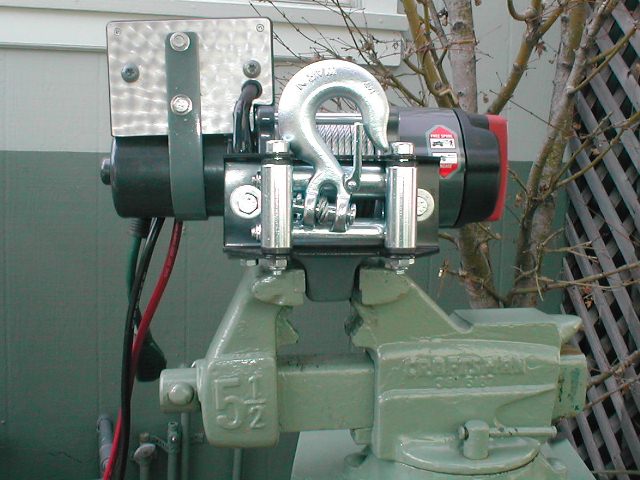
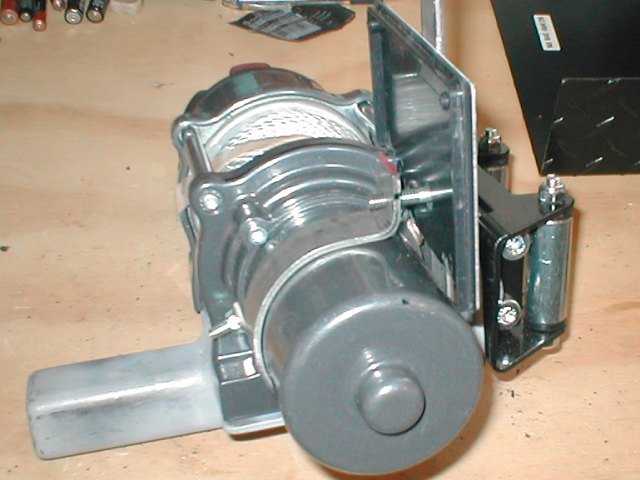
Finished wiring winch. Rather difficult getting 6ga to fit and run to terminals.
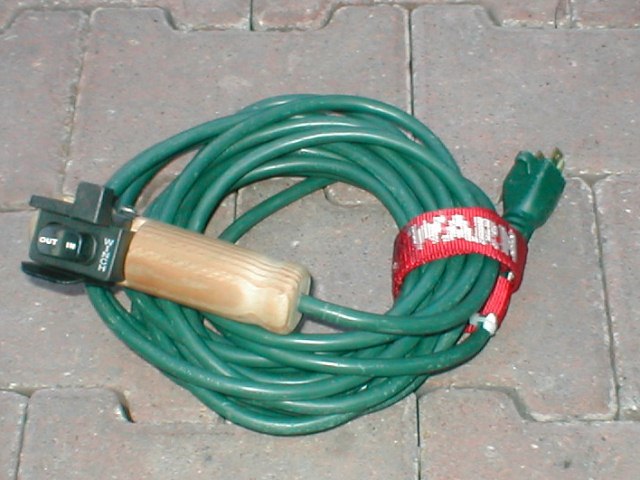
For the remote I am using 3 wire extension cord, 25' of remote lead, be handy for sighting something up flat bed. Cut both ends of supplied switch harness. Cut female end off extension cord and spliced to the female side of supplied plug on solenoid pack because wires are embedded. Spliced switch onto cut off end of cord. Made a handle to use switch and handle bar bracket. $6 for heavy 25' remote!. I could use std. extension if I want to make longer.
Set winch on front receiver with jumper cables to unspool and spool winch line under load. Freewheeled the line out, Hit IN on switch nothing nada?. I had tested in shop? Un plugged the remote jumper terminals-jumped still no go, goes in out but not in. ....crap 50' of unspooled wire & winch not working. Pulled of took to shop. Had mapped everything out, wire colors, where wires change, terminal locations, functions everything? even tested to verify before soldering. Pulling the cover off 1st thing I see is colors matching on the transition from factory plug to extension.-uh Well when I soldered the leads in solenoid plug to extension cord I soldered (I guess) totally ignoring my map and soldered like colors together. (remember earlier I noted the small piece of black power lead? Crap 2 wires switched, unsoldered reconnected. Eureka, remounted winch-spooled the line in. Nice, got lined tight and spooled. So winch mod & hitch mounting done. Now to the bed mount
Back to top of page
Building an in bed winch mount.
-
Well I've had several days to ponder the imbed mount. I actually came up with a design for mounting at top of bed rail height, where it should be because Of pull angles. Took a lot of measuring between spaces available, camper allowances and winch. But now that I'm ready I abandoned. It was close, the camper moves-just wasn't comfortable with it. So going to do the in bed floor mount. As the only real reason for bed mount winch is jeep trailer, can't justify the upper mount. Trailer weighs only 600# and previously was winched from spreader chain between bed tie down points. Also that was after trailer was pulled up onto flatbed so angle of winch line never even close to tailgate. If I mount winch at that height floor mount will work. It will be much easier, & less material, no camper interference possible and nothing visible. So plan changed.
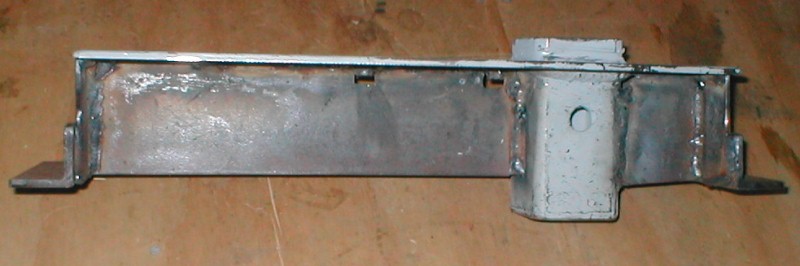
I'm putting a vertical receiver in floor. Plan is to sandwich 2 plates with welded receiver tube. Bolt thru sandwiching whole thing thru floor. then go underneath and add structure to capture to floor cross members. Here's what I came up with
Basically a piece of flat bar underneath truck spanning from underside of floor between bed floor cross members. Broached with receiver tube protruding thru the floor. Another plate on top but not as long so no scissor action possible. Counter drilled holes thru top so it ends up flush, bolting to under plate. To address floor ribs using simple aluminum bar. It will all be coated with zinc then bed liner coated minimizing rust and insulating different materials. Top of receiver tube will be flush to top of top plate. I have a rubber mat in floor which Ill cut out, camper bottom will clear. Not shown but part of the plan is the substructure I need to box the receiver tube-transfer any loads to cross members. But I need to get this in to see what I need and to fit.

The above is what I pictured though executing was a little more trial and fit. 1st I cut the lower piece to length, after some measuring to locate receiver placement I broached receiver hole. The I propped it underneath truck with some 2x4s and marked floor for receiver hole. Drilled holes in corners from below then went up top and cut out floor with jig saw. Verifying match with lower plate. I then cut and laid top plate on floor, marked hole from underneath. Broached receiver hole in top plate. Remounted in truck verify 3 receiver holes lined up took back down and welded receiver tube to lower plate. Once this was done, remount parts on truck, mark plates for bolt holes. Used drill press for upper plate, drilled and counter sunk for (9) 5/16 bolts. Placed back in truck with aluminum spacer bars underneath, using top plate as template drilled thru al bars and floor and just dimpling the lower plate (easier to do on drill press). As each hole drilled I dropped a screw into, finally removed the lower plate drilled on drill press. With all pieces drilled I installed once more onto truck. 3 of the nuts are over fuel tank so I had welded them to lower plate, the rest I wedged wrench on top against a piece of tube, doing this on my own was 6 trip under/back on top till I got all the bolts installed. Cool it works.
Now to the real work-making substructure to capture other end of tube-transferring any pull loads and lean to bed cross members.
End of the receiver tube, I was going to cut and weld another full plate spanning cross members and bolt, then weld end of receiver thru another broached hole. However it became clear with the lower plate and receiver installed and being able to look at it, pretty sure if I did the full lower plate don't think it would come back out after welding (just too big) its tight now..
As I laid on my back a new structure became apparent. As the bed cross members are tapered boxes, if I lay plates against sides, then weld spreaders between receiver tube and ends against cross member any upward pull would make it tighter, any leverage forces would be again sides of cross member, also Ill add some angle to set against bottom of cross members. It can't pull up but will easily drop out to be removable.
Spent most of the day cutting and fitting little pieces and tacking in place till I got it. Now that it's done a single folded piece of steel would be perfect-beyond me. Took tacked up lower assembly over to weld out.
Note the rear has 2 gussets, I removed the single one. I'm seeing this is where most of the loads are going to be resisting the leverage of vertical receiver and second is to allow a drop pin to fit between. When installing the mount tube I think I'm going to drill holes at an angle to drop hitch pin in. This will be finalized but made the allowance if nothing better comes up. Else I could crawl under truck to pin...
Almost finished welding out-several feet of fillet. Unfortunately I primed some of the pieces thinking this would help with hidden areas rusting- 1st real error. Zinc primer just spit and sputtered-its fully welded but pretty ugly. Oh well-what was I thinking. Could be I had the gas down too low on the mig--almost out trying to stretch its & finish.
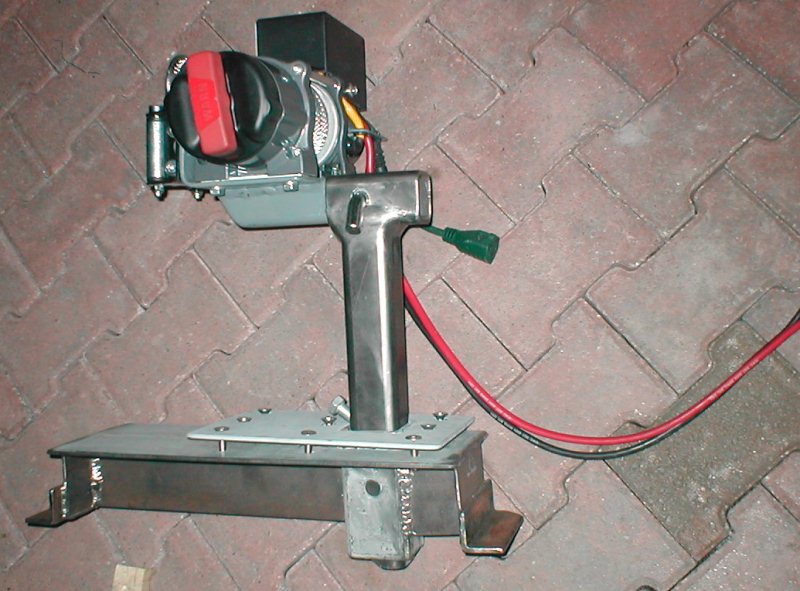
Got the receiver riser made. For pinning I used a single 1/2" X 8" bolt, set at 40�. Not wanting another open hole thru floor pin hole only goes thru one side of receiver, enter from riser. Not getting under truck to pin which was original plan. Painted it and then install. Due to 8" length when winch is in lowest hole pin cannot be removed, so one lock pin will secure it. Can really see the leverage this is going to apply -fortunately the only use this will see is pulling up a 600# trailer.
Back to top of page
Install the in bed receiver & substructure in truck bed
-
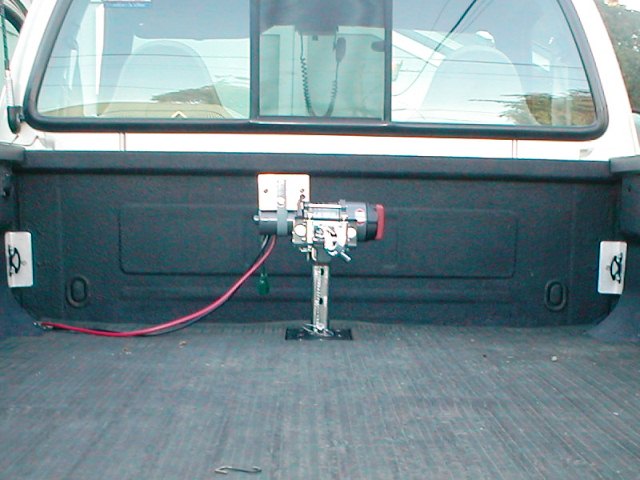
Well its installed (less wiring).
after cleaning I baked in oven to dry, while still warm I shot the zinc primer. Next day top coated the top plate with bedliner black. The sub structure I coated with rubberized undercoating. Hoping to inhibit rust but also thinking it will give more uniform contact. Also it will make a better isolation barrier between the new steel and the sheet metal bed.
Not much to show as far as the install. Underneath I liberally siliconized caulked around the bolts, receiver tube and the flanges that set against bed cross member and floor. On top of the floor I again caulked around the bolt holes and receiver tube. Not sure the caulk was a good idea- I'd rather have not used but rust is a real concern. With the substructure held up with 2x4, ran the bolts thru top plate into it. Uniformly and gradually tightened them. I'll probably go around the all again tomorrow, maybe. I'm sure the original bed coating will yield. Not sure what's going to happen with the caulk if I try to retighten. I may wait until winch has been use, camper has been in the bed-check the bolts to see if I'm getting some play, compression of the mount plates. I would expect with the ribbed bed, even with the spacers, to have some yield.
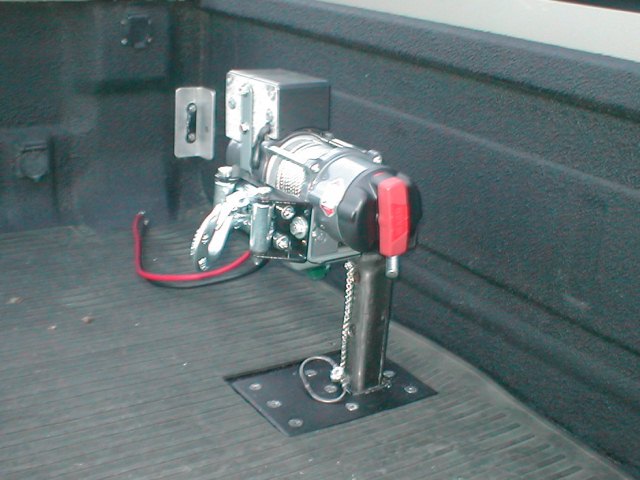
Looks nice. Its slightly higher than the bed tie down hooks I used to hand winch the trailer and a few inches back, so should be no issues with the cable angle. I did add some extra holes on the riser so when I can I could drop the winch closer to bed. If it were setting down on floor I wouldn't hesitate to run winch to 3000# capacity, At extended height on the riser-sketchy. First use Ill set up some markers so I can watch to see how much flex I get. With the load I'll be applying, few 100# at most for in bed mount pulling up 500# trailer, I doubt any real flex and probably overkill but the leverage factor can add up fast.
My original intent was and it should be, is welding the top plate to receiver tube. I'm still hee-hawing on this because once welded its semi-permanent...but it would be much stronger. Also I want option to be able to remove this. Though even if I weld top plate, cutting top around receiver, lower assembly would drop out. Also the caulk oozed up more than I anticipate so will be an issue to weld, plus If I weld I cannot re-tighten bolts if I get some compression between plates-quandary....
On final tightening of the "sandwich" the receiver tube did come thru more than planned so I've got to grind it down a bit too be flush or It'll punch my camper floor. Looks good though I was surprised. Got the bed mat cut. Had an old receiver hitch plug that had metal tube and backing plate. Cut hole in removed piece of bed mat so it slides snugly onto receiver plug tube. Done-on to wiring
Back to top of page
Wiring the truck...plan changed and simplified
Ok...after a LOT of thought and a week later, wiring of truck changed. As this will see seldom usage, justification for the cost for how I wanted to wire just didn't make sense which was - Add a large fuse from battery, then to high amp (+200) constant duty solenoid, controlled by in dash manual switch that is only hot with ignition on (truck should be running to winch), hard wire 4ga to rear bumper, 4ga to bed and front bumper with quick connects at bumpers and bed- add quick coupler to winch. Also modify a set of jumper cables that could be plugged into outlets. Probably cost more than the winch but would have been slick nice to use but again-the more I thought about it became less practical and expensive. Other thought was using for camper. Though plugging into camper for quick recharging (after adding 2ga quick couple to camper) or on road use, decided jumper cables would be better option as the only time I've killed batteries in camper and had to recharge (to start gen or raise jacks) it was when it was off loaded. On road use current power supply for camper is more than adequate. At any rate just using jumper cables became the more practical solution. Having a nice set of cables will come in a lot more handy than the winch will be used. However if I had a quad or was going to use winch regularly I would go with original plan, just a clean efficient setup.
Also part of the confusion on wiring was wanting to utilize added power at rear bumper for winch connection to use as the ability to jumper a vehicle behind me-ie not having to turn around facing traffic to jump etc. But I removed this from equation. Though later I am going to hard wire a 2ga power outlet (welder machine plug) at rear bumper. This will not be part of winch wiring so a lot simpler/ direct. And no longer part of this project. When done I'll be able to jump 20' in front of me or 20' behind-but another project.
How I actually wired truck-I didn't.
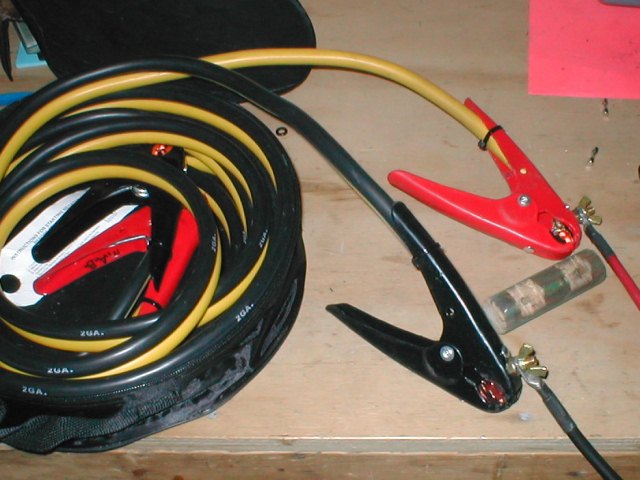
Picked up jumper cables long enough to reach back bumper. Auto zone had some 2ga x 20' cables for $30. 25' would have been better but adequate.
Next, modify them so I can hook up winch. To modify I was going to cut off ends of cables leaving about 18" leads on clamps and install quick connects on cable ends and clamp ends. Add quick connects to winch. This way I could easily use cables to either plug in winch or jumper clamps to end of jumper cable. A very simple and good idea. That I nixed. Looking at cables just seemed since all I need is a way to connect to winch (rarely used) must be easier/cheaper way.
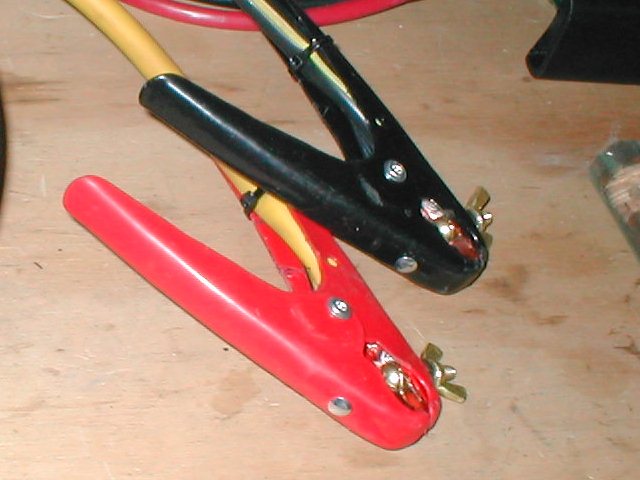
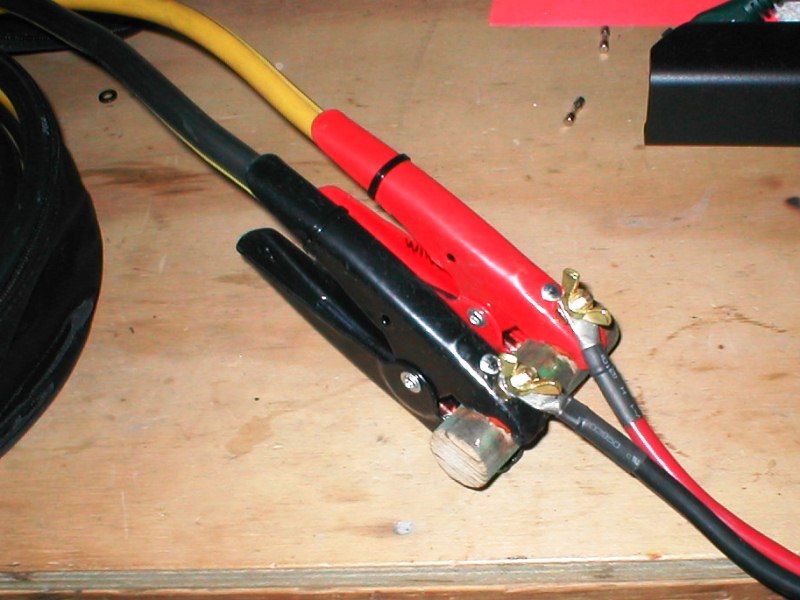
1st all I need is to attach winch leads, could just clamp but might come loose or not positive connection, bolting leads would be nice. So I drilled the jumper cable clamps thru clamp and cable attaching lug, ran a brass stove bolt with a nut & lock washer inside thru inside of clamp-nutted outside clamp and cinched it down. Now I have a permanent bolt sticking out end of clamps. Done.
Now how to insure leads don't short...hmmm
With a star washer to help from turning attach winch leads with brass wing nut. Took a piece of wooden dowel, cut 2 flats to keep clamps positioned. Clamping both leads to dowel, they can't touch each other. done
Now how to insure positive clamp doesn't arc or short to negative if laid on metal...
That'll work, 2ga power leads, little hokey but functional-$30-40. Not as slick as hard wiring-onboard switching-quick connects etc. and a bit wistful not proceeding with original wiring plan but certainly less expensive-for something that won't see much use. If you search the web several folks have placed winch on top of front bed rail. Optimal-gives you required height (for loading a quad etc). This would work but building an upper mount to see possible loads will be 'lil more work. Plus I have a slide in camper so would need to allow for it or be removable so this is where it led me. If you purchase a winch getting one with solenoid box on winch would be simpler. Also some come with receiver mounts and plate, remote, wiring, quick connects the whole 9 yards for half of warn price. Look http://runvacanada.com/usa/index.htm Runva cheap winches but complete. My jeep will always have a Warn, Full size I'll stick with Warn, Ramsey maybe for truck, but for atv? cheap complete options are out there.
Back to top of page
Back to our F250 truck page
Back to Ourelkhorn Camper Modifications page