Install double din sized radio in our 01 Ford Super duty F 250
IN PROGRESS...2/19/17Preface-this is what I did and it works. Had I realized what it would take I wouldn't have done. I really do not recommend this just due to the amount of effort. The difference between import and domestic double din size is the source of grief. For a early 99-2000ish SuperDuty only ones I found that 'fit' are the units that have flip out screen. That said now that its done happy-just FYI, its a bit of work and luck...Very long/convoluted mostly for my own documentation.
Also 2 projects installing the radio and camers AND install camera on camper
Several 'wants' led to this. Perfectly happy with the stock radio. Really like the simplicity of older radios. However other electronic gizmos like cell phone & hands free use, desire for GPS & map, back up camera led me to thinking about replacing with a single unit that would do all-and still listen to radio. Also, due to camper, a big want is adding a backup camera to it. It will be a separate project, just need to allow for it when wiring.
First part Install radio
Second part Installing the trucks backup camera
Third part A Running cables, pre wire for camper backup camera
Third part B Installing backup camera and wireless between truck and camper
Forth part Adding a front camera, but to the reverse input of radio so it auto switches between front/back
First the truck. What I found is how expensive this stuff is...Second , these units are actually more a computer than simple deck. What I decided is taking the gamble on less expensive in dash head unit to get wired in. If it works great, if it fails well half the work done. I should state, 2017 and I just entered into the mobile 'smart' world. Our phone service forced my hand in no longer supporting my cell phone- ya know the ones you dial someone and talk to them, or answer when it rings and talk to them. Sent me a new 'smart' phone. Kicking and screaming- didn't take long though to start using some of the features. And now new 'radio' can tap into that world.
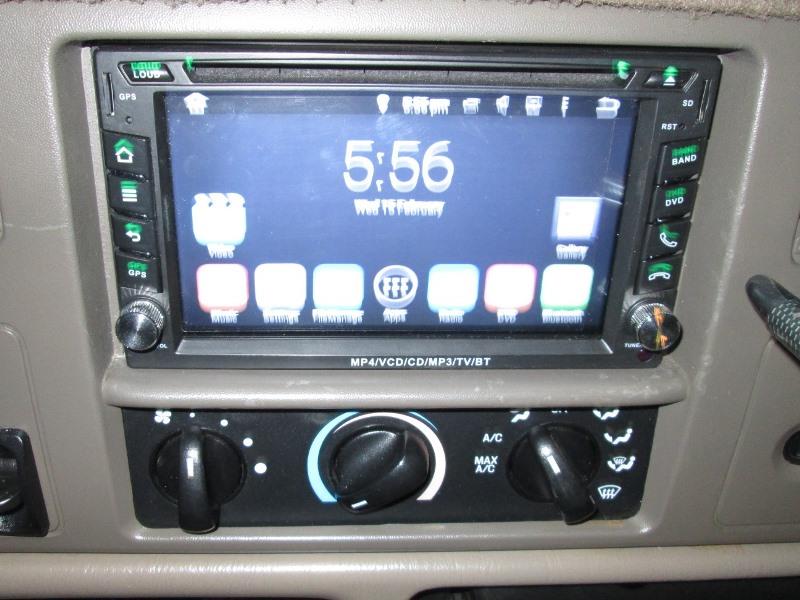
Radio I ended up with less than half cost of brand name yet features just amazing. Of course radio AmFm, CD, DVD yup movies, phone access, WiFi, GPS, Bluetooth, USB, backup camera, just to name a few 'basics'. One of the primary features (other than cost) was the manual on/off and tune knobs for radio.
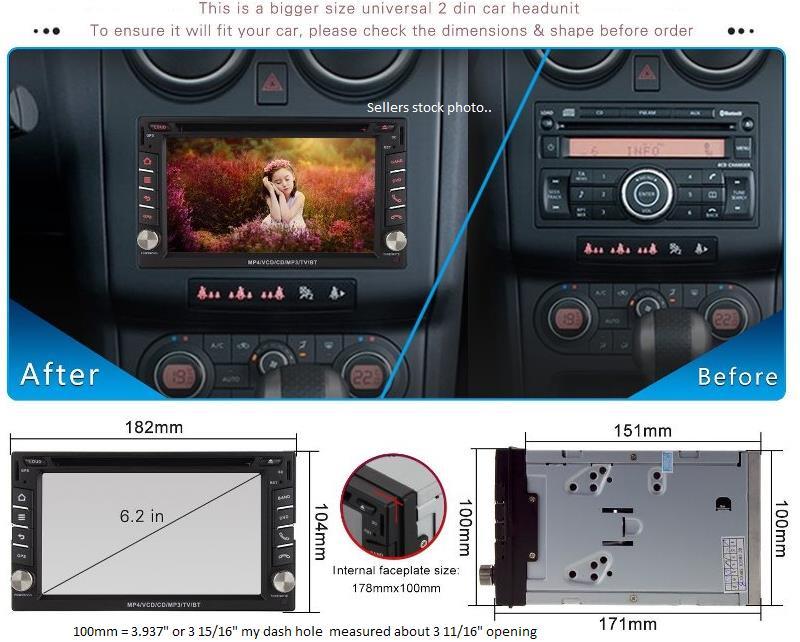
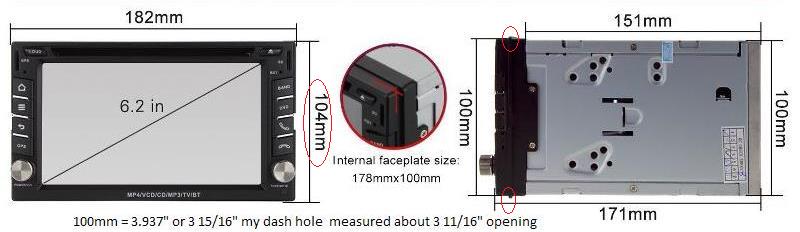
But to the task. Installing Double Din size into older Ford. Din size refers to box radio size that slides into hole in dash, (verses even older units that post mounted from behind). Single din is your standard height radio, about 2". Double din is about 4" tall. Ford double din hole is about 1/4" shorter than what most (import) sell as double din. So some trimming of the dash required.
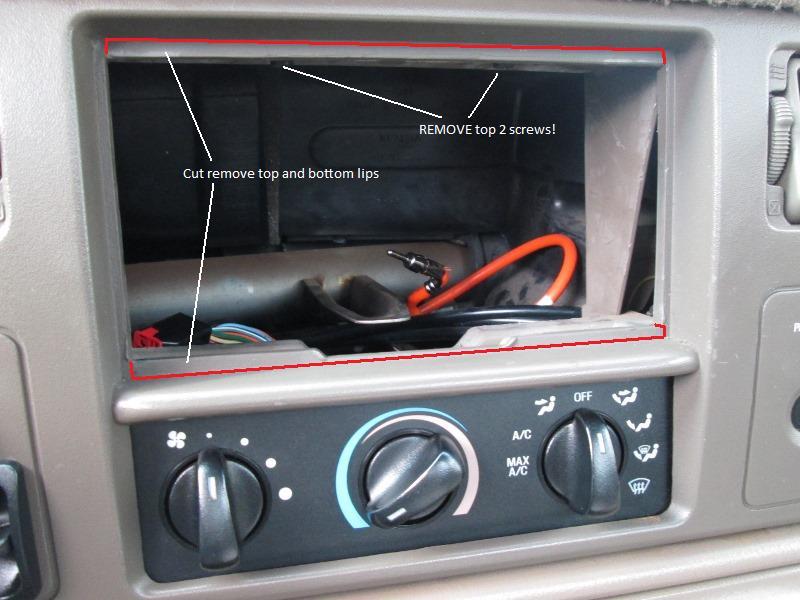
IE radio is 100mm=3 15/16", my hole is 3 11/16". New radio is not as wide so its only trimming top and bottom lips of dash. Not trimming the side lips, stock radio would still clip in. I was going to leave about 3/8" at each end (difference between new and old radio width) when trimming bottom, so if stock radio reinstalled it would still set on bottom lip. Shown above is what I ended up trimming -ALL of top and bottom lips flush. Measuring led me to think I could leave about an 1/8" on bottom lip as shown below.
Anxious to start, even though I don't have radio yet, decided to remove stock radio and trim some material. As you can see, one is I forgot I wasn't going all the way to edge, second is once I started trimming I was totally focused on trying not to scratch/mar the dash. Used an oscillating saw, worked pretty slick as far as cutting. Only marred plastic one place. As far as I can go until radio arrives..
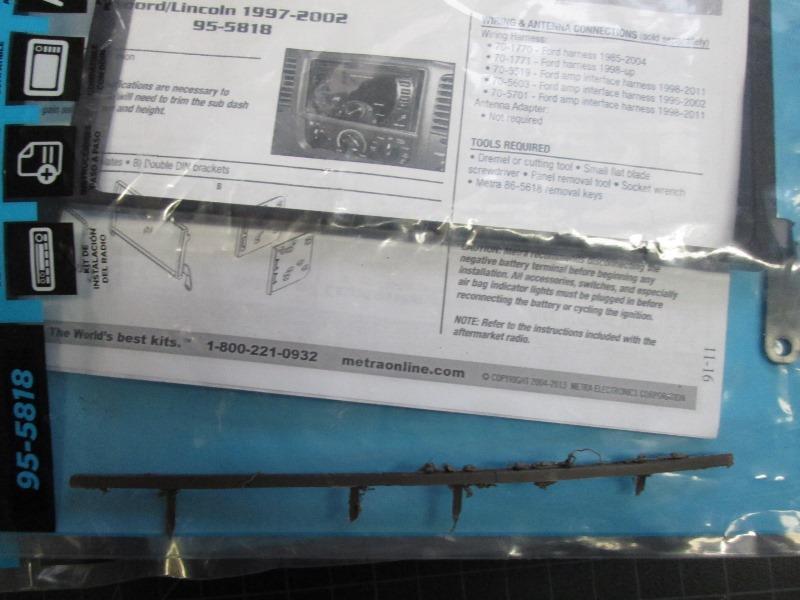
I ordered 2 different trim kits, as 50% of folks recommend one kit over the other because the 'other', didn't work. I guess variables in radios /dash so getting both, hopefully one works. A bazzilion how to videos etc out there, check out as many as you can to see what's involved.Pretty simple-just cutting to size and fitting trim kit till your happy.
One thing I know I'll address is the trim kit, least one of the kits, once snapped in, dash panel MUST be removed to get radio out. Normally very simple to pull dash panel, just not an option for me, want an easy way to get radio in/out. Also though they need to be removed to get radio in, there are 2 screws at top of radio opening that go into upper dash. IF somehow you get radio in without removing screws- your screwed. Dash panel can not be removed. Radio can not be removed.
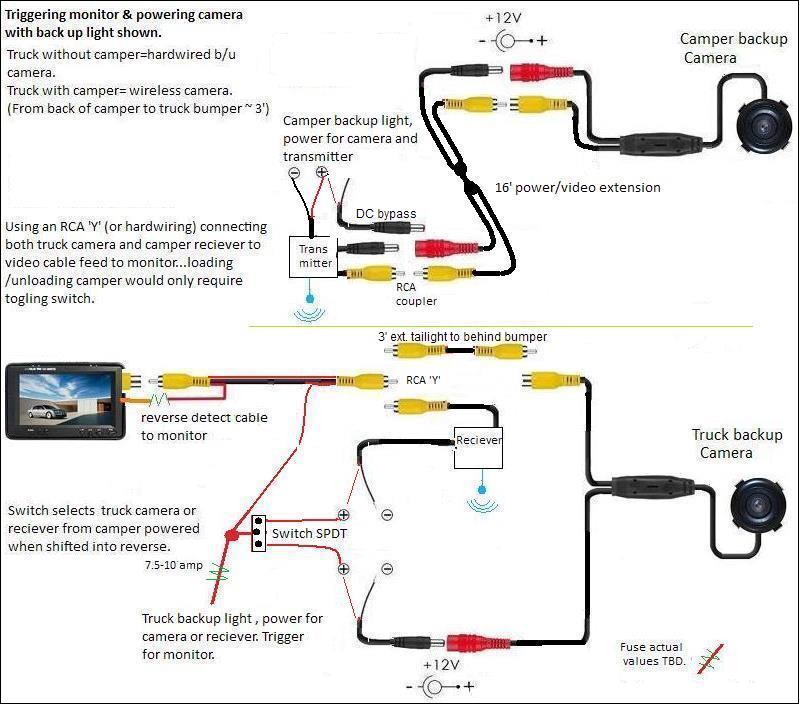
Trying to figure out how I'm wiring in a second camera. Some units have multiple camera inputs, this one doesn't. Wiring utilizes reverse signal to switch on camera and change screen to its input. So my thought is run 12v wire from rear backup light to a SPDT switch, from switch to cameras. This will allow selecting which camera is powered sending signal to monitor.
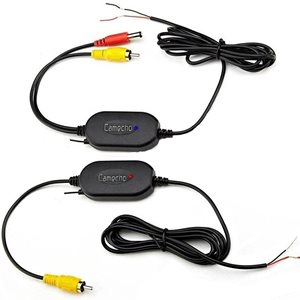
Second and primary issue is camper camera. (Well really what the issue is, is that this is on a truck, connections etc are in the air under/ behind rear bumper, not say in an enclosed area like a car trunk.) I don't want to have to be unplugging and plugging stuff in when loading/ unloading camper. Went round and round, there are options but what I'm doing is adding a wireless transmitter to camper. Camera and transmitter will be powered and triggered by the campers wiring when mounted in truck. The receiver will be mounted in truck at the rear.
So toggling the power switch is all I need to do, hopefully, when camper loaded/ unloaded. The transmitter./receiver should be close enough to each other so as not to be problem, not broadcasting length of truck.
Crude cartoon
If this works I actually will be amazed. Pretty simple, cost for second camera and wireless kit about $30. What I don't know even un powered if cameras will 'see' each other, somehow degrading video. Its the connection of video cables together I see potential for interference, back feeding-just unknown. For what it will cost worth trying. If any issues Ill dump the wireless. Ill have an extra video cable, just run it somewhere from camper camera where I can manually swap video feed to monitor. Other options might become more viable. Right now all I need is the power switch to install the radio and truck camera.
Radio arrived!
Fitting new radio obvious more material needs to be removed than I thought.
More cutting. The bottom lip needs to be cut flush, completely off. Top lip also needs to be cut flush. On top there are ribs going from lip rearward. They also need to be removed. With the oscillating saw not to difficult, cut off most then sanded.
This shows, laying on bag, the top dash lip with ribs cut off. Also shows the kit 95-5818 that I cut up. Neither of the 2 kits I ordered fits, neither can be used intact. 95-5818 is a frame, smaller than radio plus no room in hole for top and bottom frame lips. The other kit 95-5817 is just side pieces, but attached to radio, makes it to wide to fit hole, even if side dash lips trimmed off. So....as the radio completely fills dash top to bottom, but leaves 1/4" gap either side, all I need are some side trim pieces. I cannibalized to make spacers to fill side gaps-more later.
Continuing to fit radio and trimming all I could to dash, radio still will only go in as far as the rib on bezel. Circled in red there is a small rib that goes all the way around radio bezel. It is what stops radio from going thru dash hole, but it also keeps radio from fully going into hole flush to dash lips. I cut and sanded of the bottom rib of radio. Now it goes in- tight but it fits!.
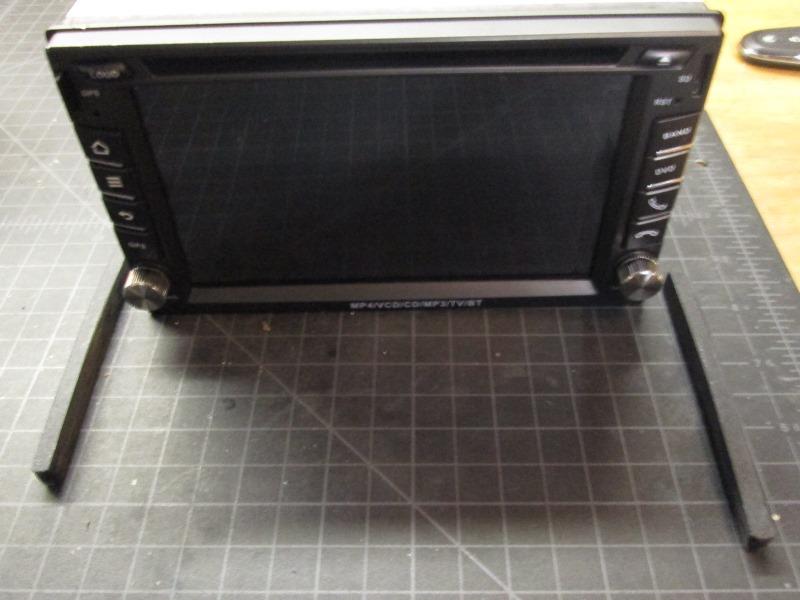
Radio pretty snug, just showing the gaps at side. Doesn't look bad, and actually held in but it can be slid out.
Cut the sides off trim kit to make filler pieces.
Lot of in and out-sanding the filler pieces to fit between radio and dash
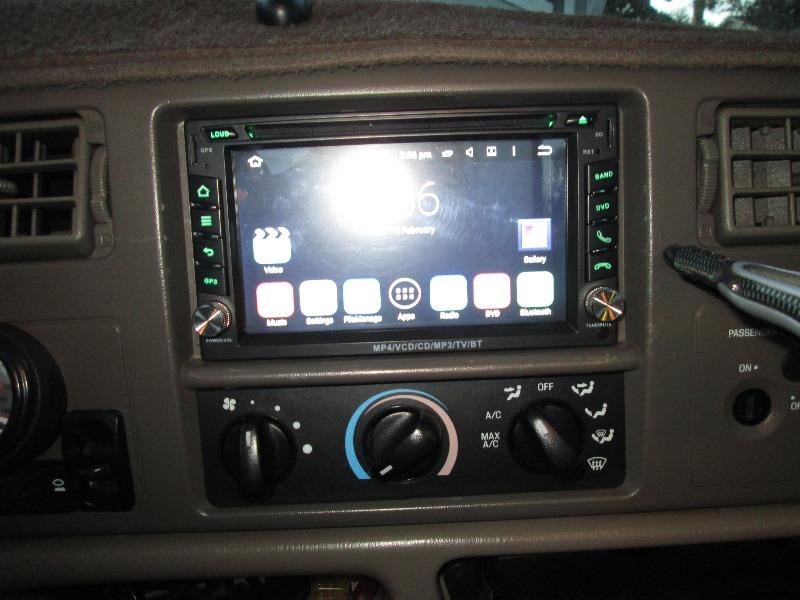
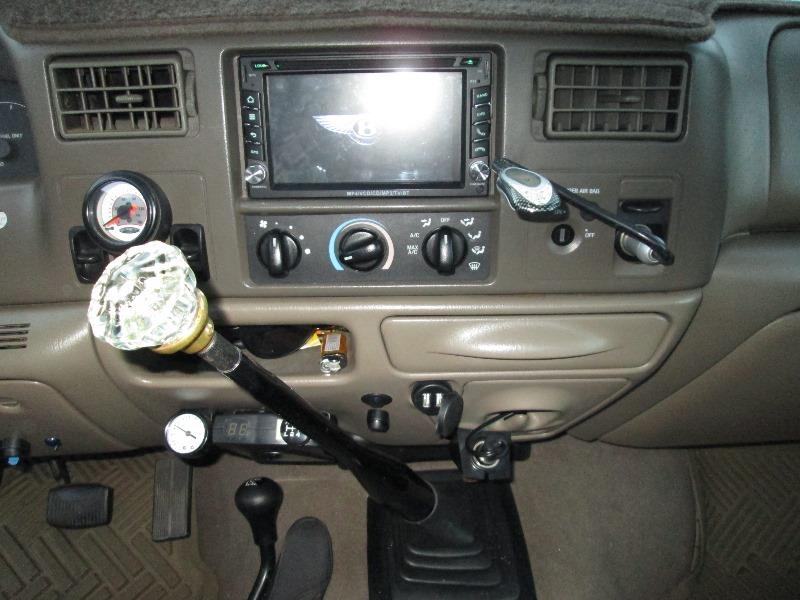
And trim just pushed in, screen is very reflective... Plan was to use 4 small screws to hold trim pieces & radio in place.
However I'm going to look at other means to hold radio in. I think it looks better without trim. Possibly pop dash loose, remove the heater/ac control panel for access, reinstall dash to see what I can do. Also look at rear support as this radio doesn't have any. To be done, right now its finishing wiring and install back up camera.
Much later but last thing done inside truck. Replaced loose USB extension cables connected to back of radio with an in dash panel mount that plugs into radio. The USB ports (2) can be used for flash drive, connecting phone etc. Mounted in existing cigarette lighter hole. Used USB ports included surface mount to relocate cigarette lighter. It is used to plug in solar trickle charger or USB charger. Likely revisit & remove the surface mount cigarette lighter but for now it works. UPDATE 2021: Radio USB charging output failed, removed USB extension ports and installed direct DC USB port
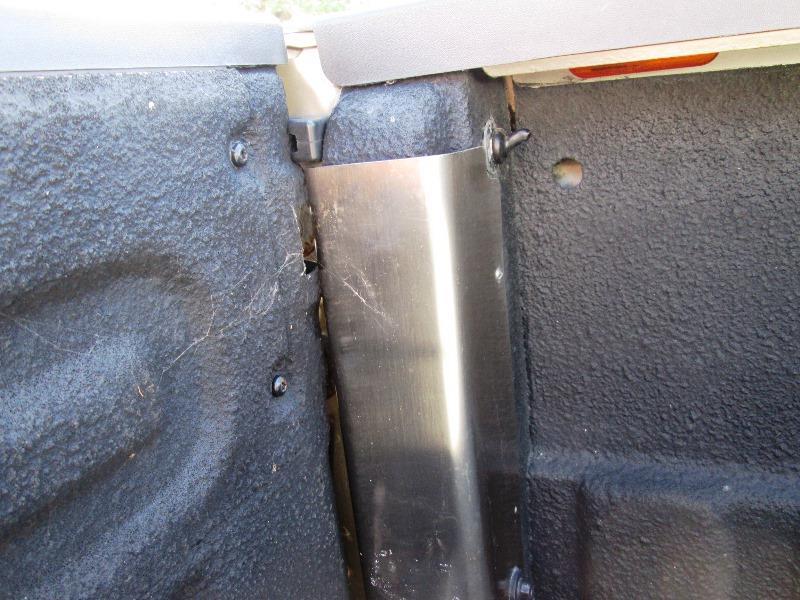
Ran the 20' video cable, with backup light trigger wire, from radio down to floor along transmission hump, over to door sill and thru floor. Drilled 1/2" hole to poke cable thru. Cable is routed along frame to rear and up inside behind left taillight. Cables from camera will route behind bumper and also up into tail light. All my connections will be behind tail light. Cable barely reached, on a standard cab 8' bed.
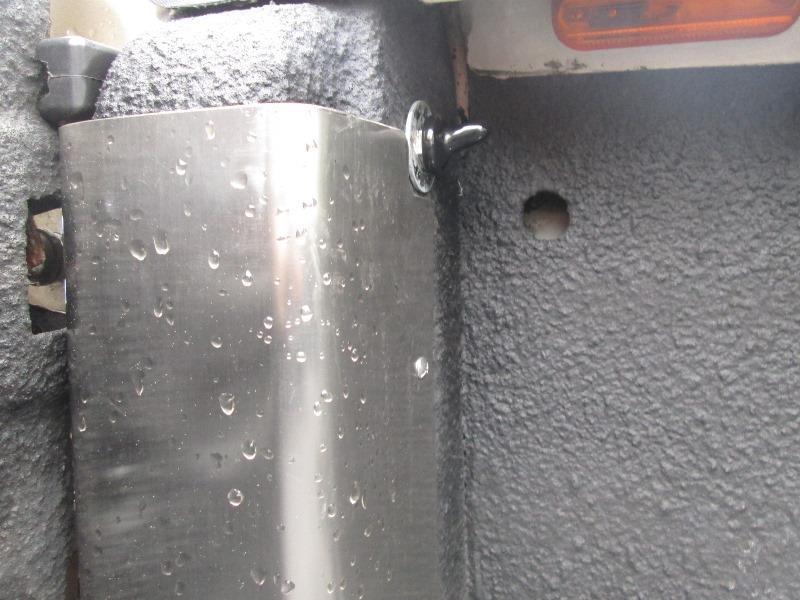
No pics of wiring, but heres one of switch access.
The switch inline between BU light and camera wired for choosing which camera gets powered, truck or camper. On back side of tailgate pillar under bed rail. Access is from removed taillight and thru stake pocket hole. Once wire sealed stake pocket hole with aluminum tape. Semi protected even though water proof switch. Installed a Y for plugging in both cameras that feeds dash. Hopefully that works, just switching which camera gets power and the signal gets sent. Otherwise its digging out video feed to switch. Cameras hooked together even though one will be off may interfere with each other. We'll find out.
Tapped the truck back up light connecting wire to turn on monitor and another wire that feeds 2 way switch that will power camera(s). Again I'm running 2 cameras, switch determines which one gets powered, either the bumper camera or receiver for camper camera. Normal install both the trigger wire for monitor and the camera power would be directly connected to backup light. Video cable also normally would go directly to camera. I'm using a Y, cable from monitor is plugged into that.
From the Y is a short video cable that goes behind bumper to plug in bumper cameras pigtail. Also the cameras power cable runs from taillight to behind bumper to plug in camera. I really don't like the 2 plugs exposed behind bumper but on a truck not a lot of options. I coated with water proof grease and then covered with shrink tube. Should give some protection and also keep plugs from coming loose. Connected bumper cameras power wire to switch. All grounds are wired to backup light ground wire. When I get there, the receiver video feed for camper will be plugged into other leg of Y and its 12v lead to the added backup light switch.
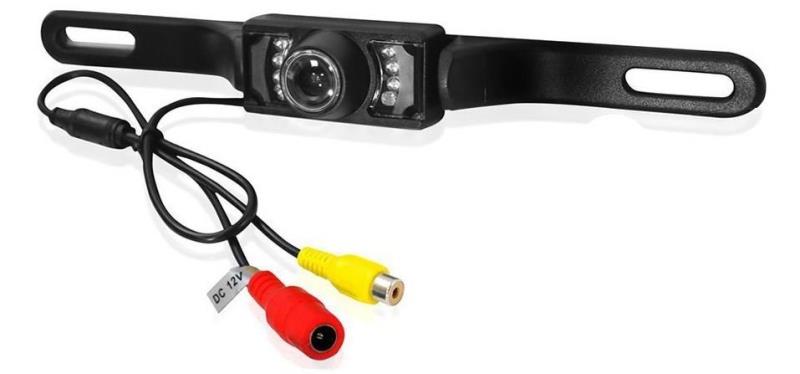
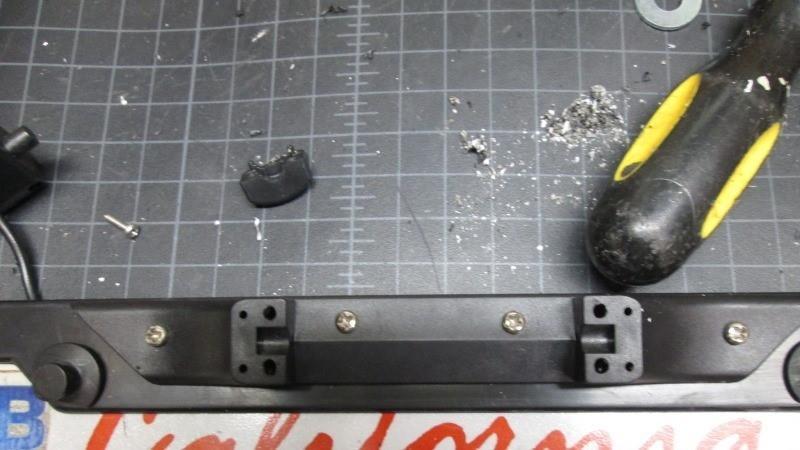
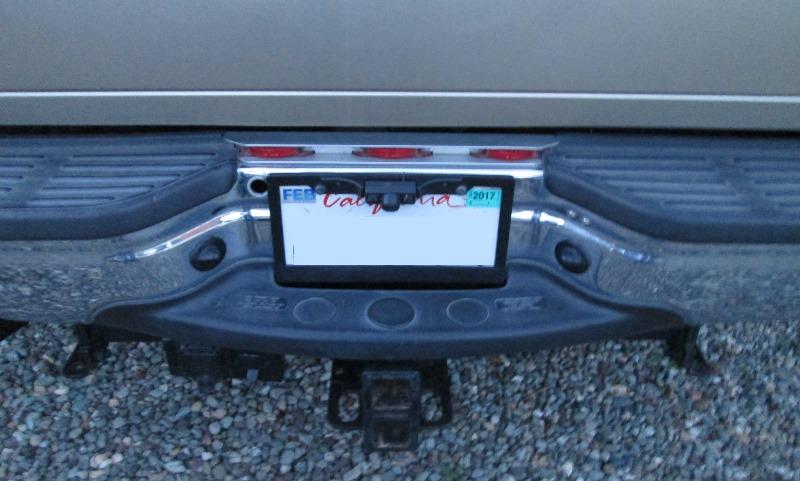
The backup camera itself that came with radio uses top license bolts to mount. As I take tailgate on/off, for the time being I'm using it. Better would be a nice camera that mounted higher on tailgate, maybe later. It works, just kinda low. The cameras mount wouldn't fit with frame I had so mounted to plate without it. Well my opinion it covered too much of the state name and a just looked dumb. The black camera mounted on white plate without frame just very conspicuous. Mostly for appearance reworked.
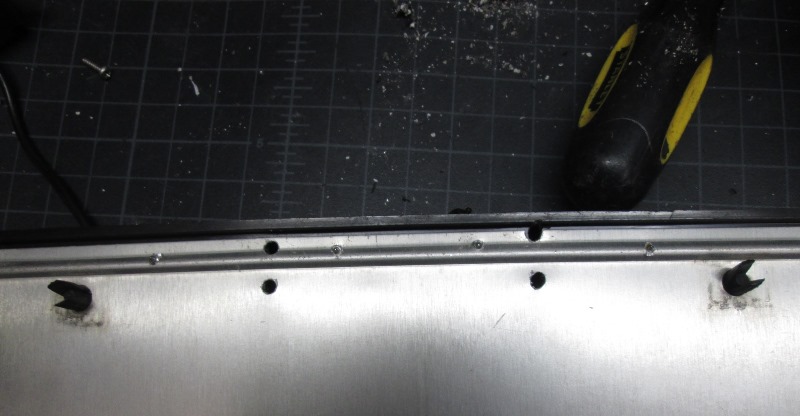
Had an old flat plastic frame, allows mounting the camera about 1/2" higher. Cut off cameras mount flange and used small screws mounting it to frame.
Drilled thru plate to access the cameras pivot screws. Pulling plate loose I can remove camera from mount. Though state is exposed 1/4" more than it was, I may still 'thin' out frame up to camera mount.
These cameras are infamous for moisture leaking in. Carefully used super glue on ALL seams, where wire passes thru back, camera lens and LED lenses. Painted black once dry.
Filed a small half round so cable could pass over top of frame & behind it thru hole in bumper that's behind plate. Bad enough seeing the camera, didn't want to see the cables. Kind of cheezy, clunky looking but it works. Very low end camera, functional but also likely revisit, round toit list seems to be growing.
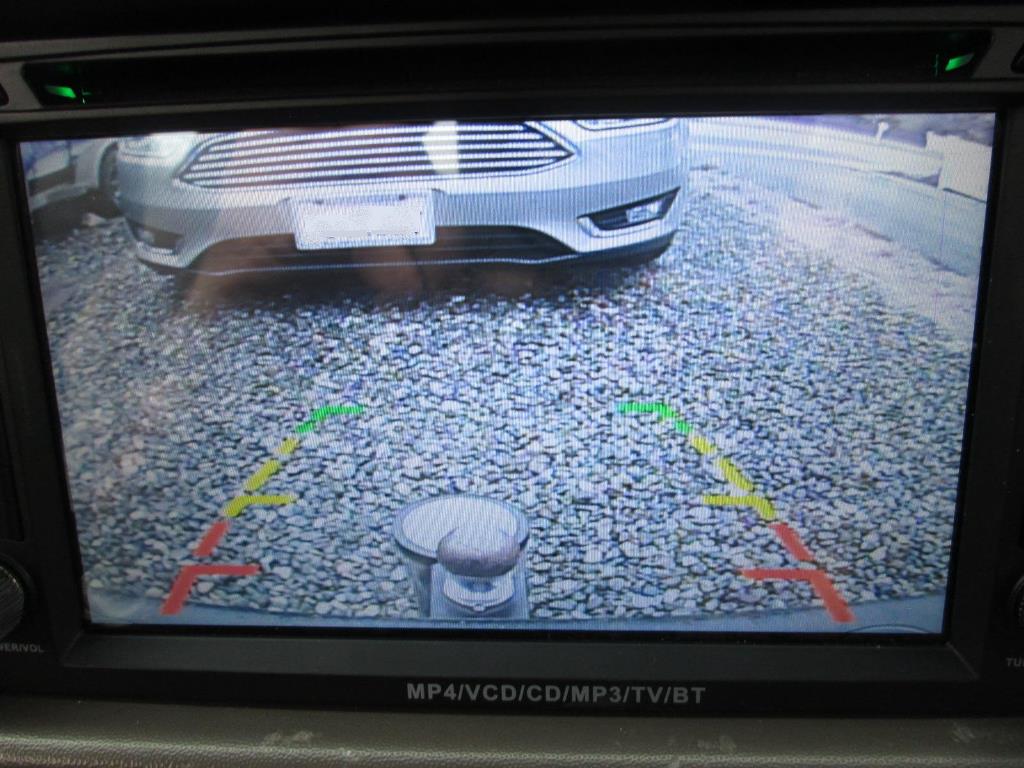
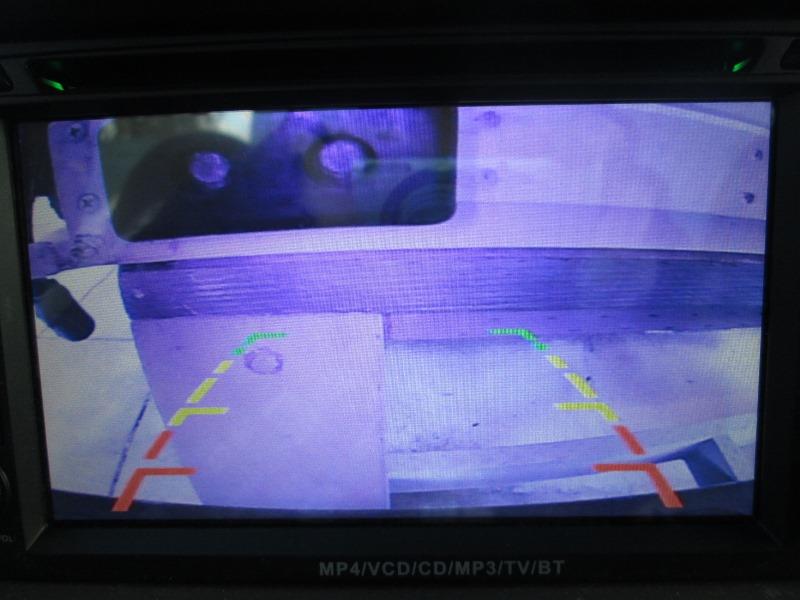
Testing. Surprised, I wasn't expecting much.
Screen is pretty clear, gravel driveway and its raining. (lines are from reducing large picture)
Lowness of backup camera throws distance off but it works. Car is about 4 1/2' away, ball on hitch protrudes about 10" from bumper, the jug setting on ground is about 16" tall and about 12" away from bumper. Though the backup camera option primarily was for use with camper, I'm pretty stoked. I readjusted camera to see edge of bumper as shown, gives a better prospective on distance. Can still see quite a ways back.
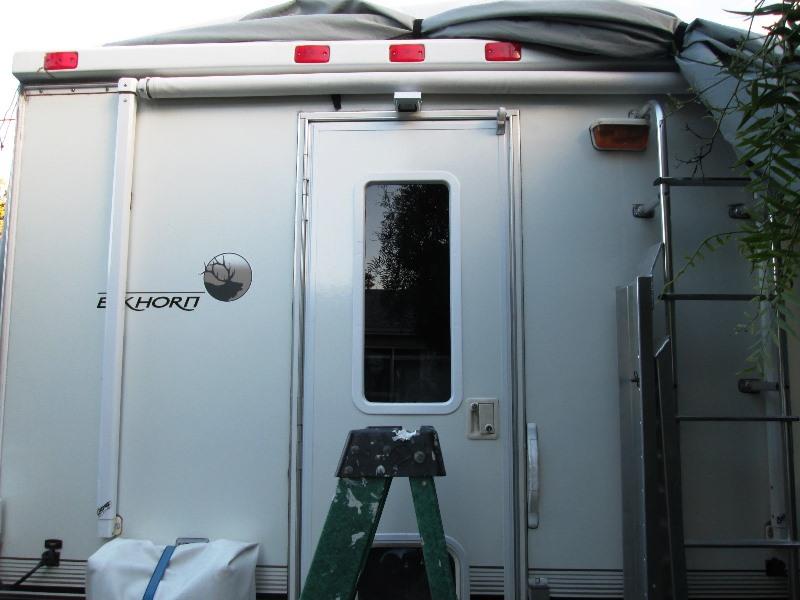
One of the main reasons this entire project was started- adding backup camera to camper.
Placing camera centered over door under the awning. From camera thru wall to bottom of camper will be hardwired to a wireless transmitter and the 12v tied to campers backup light to trigger camera. Receiver will be behind truck taillight, it will be feed by the switch I added that's tied to trucks backup light. Broadcast length will be about 3' between truck 7 camper. If the switching of power doesn't work, I can try putting the receiver in cab. If that doesn't work there is enough video cable I can manually unplug truck camera and plug in camper dispensing with wireless. Really don't want to do that so hope my plan works
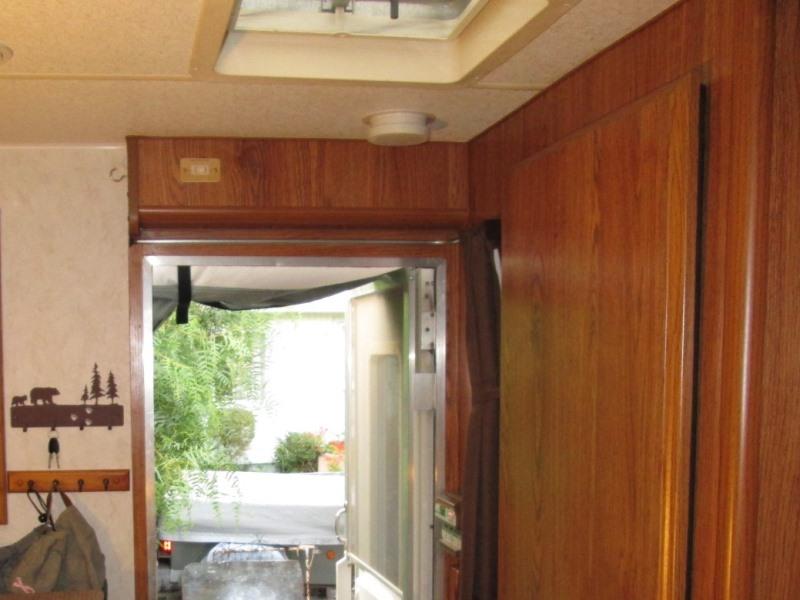
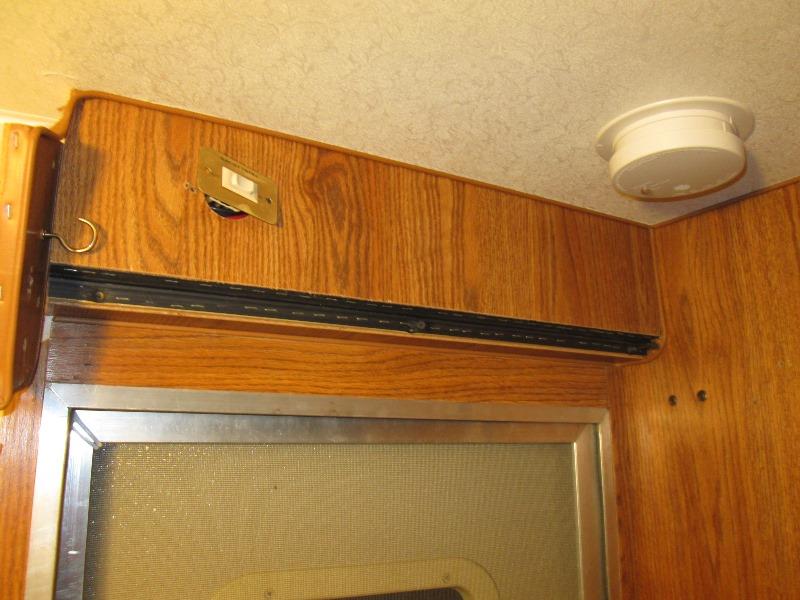
Inside camper over door is a box. The wiring for slideout is in it. To the right is shower. The corner of the shower in that corner is concave so there's quite a bit of room behind walls. Going thru wall from outside camera with wires into the box I can plug in the cables. From there is routing cables over, thru to space behind shower. Straight down & over a bit is outside cabinet. Seemed pretty straight forward. I have a fish wire still in place behind solar controller from previous install that leads to outside cabinet. So it should only be trying to fish wire down from box over door to solar controller access hole. Once there it 'should' be a simple pull.
Thinking I'm lucky as I have an easy way to route wires where they wont be seen compared to some campers I started preliminary work.
My precursory glance at what might be done was grossly oversimplified...
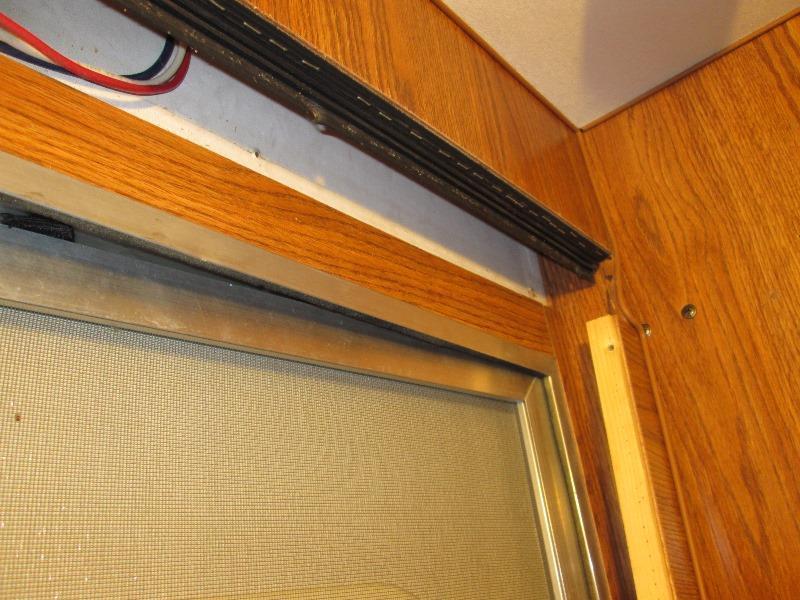
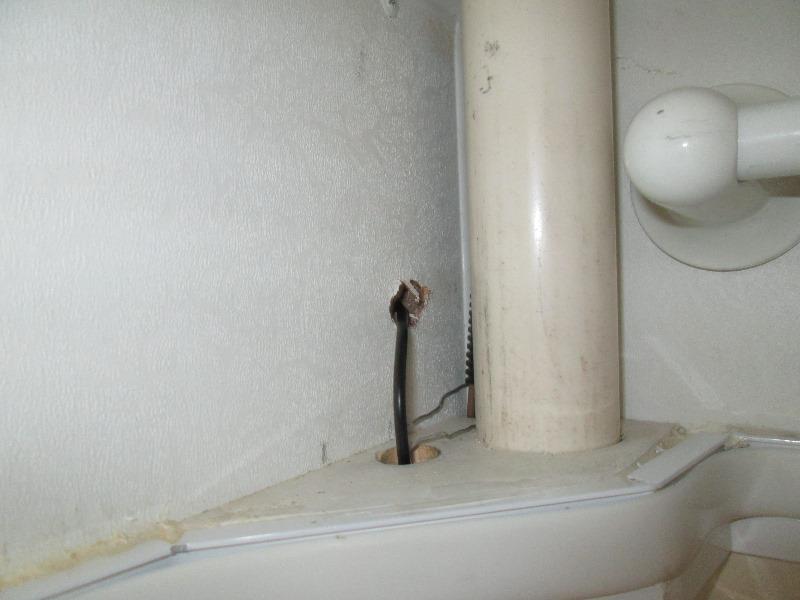
Opposite side of box in shower. The hollow space in wall stops about 6" from ceiling, shower doesn't go all the way to ceiling. No way to easily drill thru. Short bit in right angle drill?...I really don't want to see the cables but its the only way to get into the hollow space is surface mounting....Thinking this project may be done before starting I noted the black wire loom in picture...Stuck camera back up there
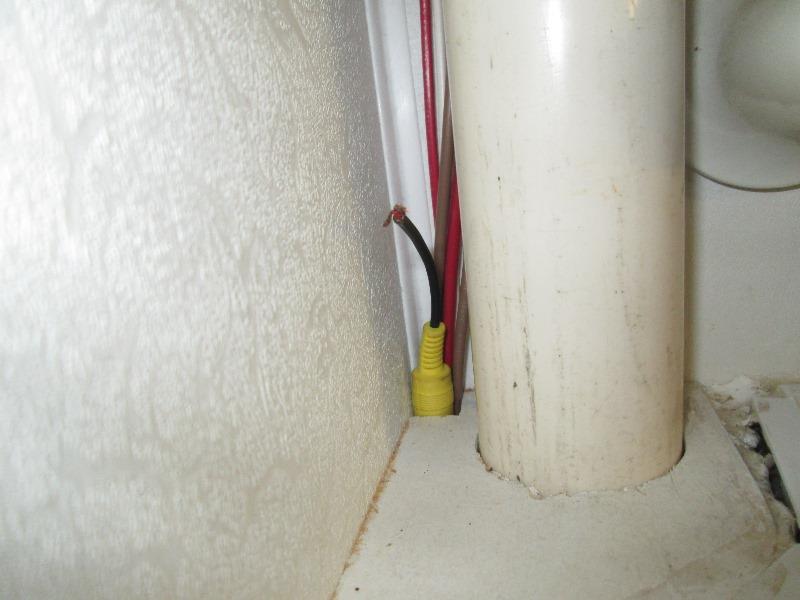
Pulled the loom off wire, whoo WHoo. There's a pretty good size hole! Got an old RCA end to see if it would fit. YES!
Easily slide into hole so were back in business. Just need to get access in the box-drill thru about where old RCA cable ends. NOTE to self, once this project done is seriously caulk out this cap- never noted before. Direct path from vent pipe, corners and wire hole into wall from shower water..
So back to the box. If I cant get access behind still might be done..
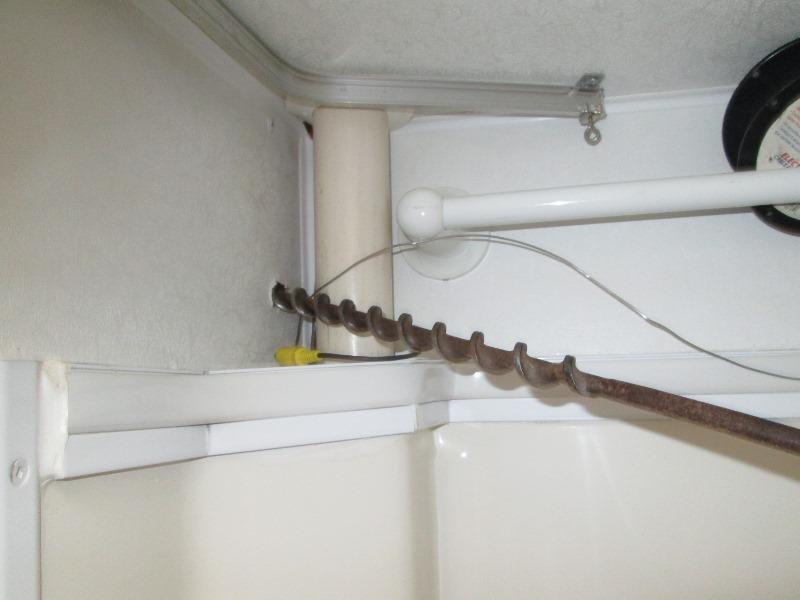
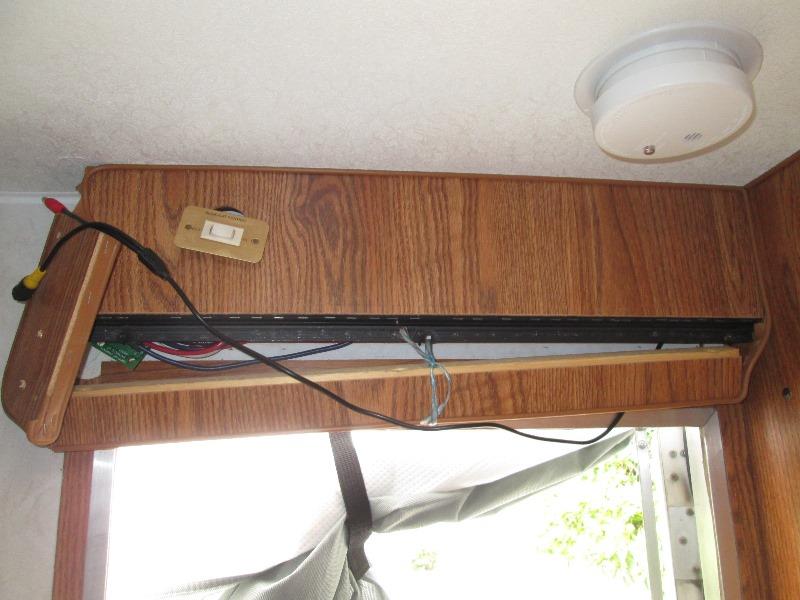
Pulled recently added curtain rod, pulled off end of box. Saw that the corner trim between face and bottom of box slides on a track. Wedge a small flat pry bar and slid the corner trim off. With track exposed revealed 3 large screws that go thru the bottom attaching it to wall. So the only connection between bottom and face of box is the 30 some staples?
Pulled the staples then remove the 3" long screws, bottom is hanging by attached welting. Access! Camera mount will be a bit lower than box but drilling from outside thru wall at an upward angle should get cable inside box, if I don't hit a aluminum stud. Ill start with 1/8" bit to ensure I can hide if error.
Just trying to see the elevation difference between box and cap in shower corner.
Drilling between shower and box will also be tricky. From the shower side vent pipe would put drill angle pretty severe, point at outside wall.... however I need to ensure hole is above the 'cap' so may still go from shower side, some thought required. Note the 2 screws on the wall beside door-those go into the plywood cap inside shower so its about 3" lower than box. But were a go.
Drilled. Came across old boring bit, 5/8"x16" long. Made it simple to get at the compound angle needed and still be close to pipe. Couldn't get the drill head up there. Pulled solar controller loose from wall and exposed the existing pull string. If it weren't raining Id pull rear tail light and run fish wire all the way down. But it is and I've like 3 fish strings between solar cabinet and outside cabinet. Every time I pull a wire I usually also pull an extra fish string. So once camera arrives I pull one of the existing strings up into shower, then pull from outside cabinet new cable (with spare fish string) down.
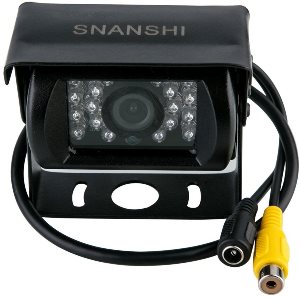
Awaiting arrival of camera before I go much further. One is I want to test my wiring plan. Second is the camera ordered has IR leds, rather larger housing. I may need to get one of the smaller 'cube' cameras to fit space between top of door and awning...That and I'm mounting as shown, on vertical wall. Either way, need the camera to place cable thru outside wall. As mentioned there's is one already left in place between controller and outside cabinet. I'll also need to remove the tail light, it gives me access to space between shower and the lower cabinet to help pull the cable down. Also attach a lead from back up light to cabinet to trigger camera...too much fun
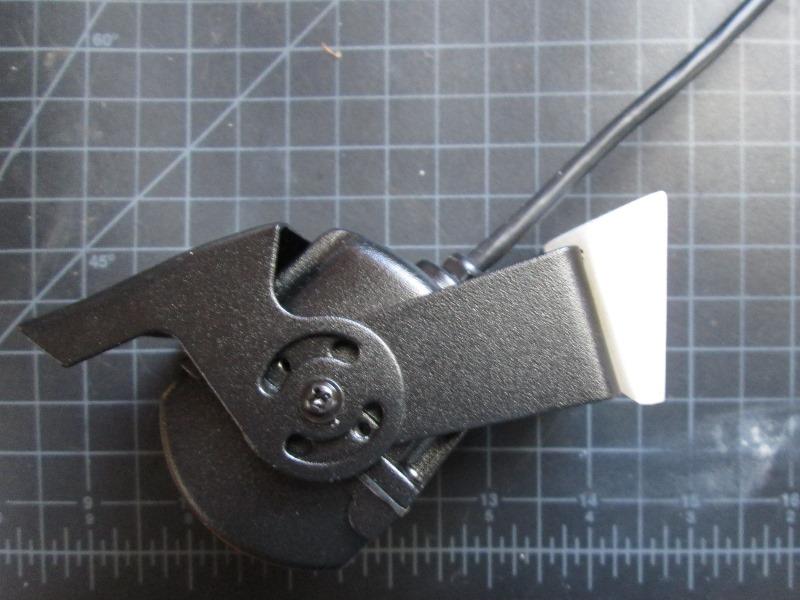
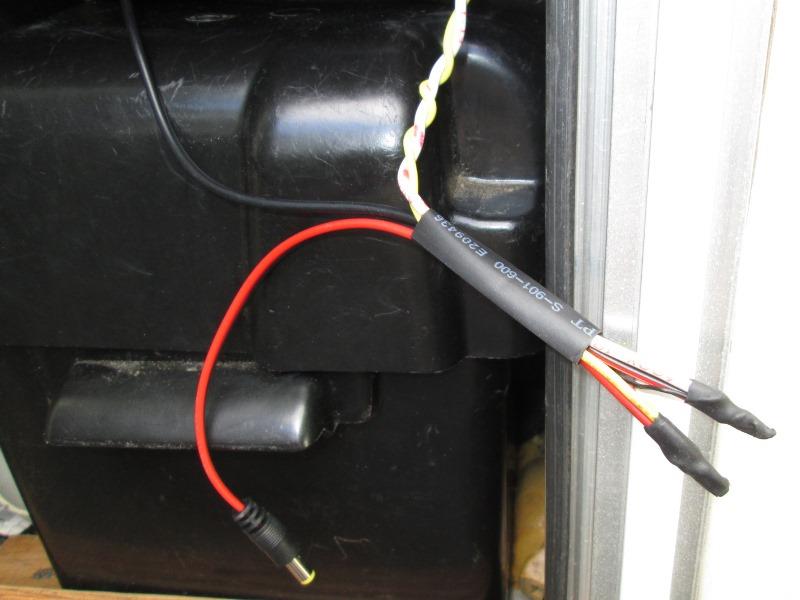
Camera, wireless transmitter/receiver, and a video/DC power extension cable.
REMOVE THE 2 SCREWS that go thru dash panel into upper dash after trimming hole and before sliding radio in.
Meantime waiting on UPS...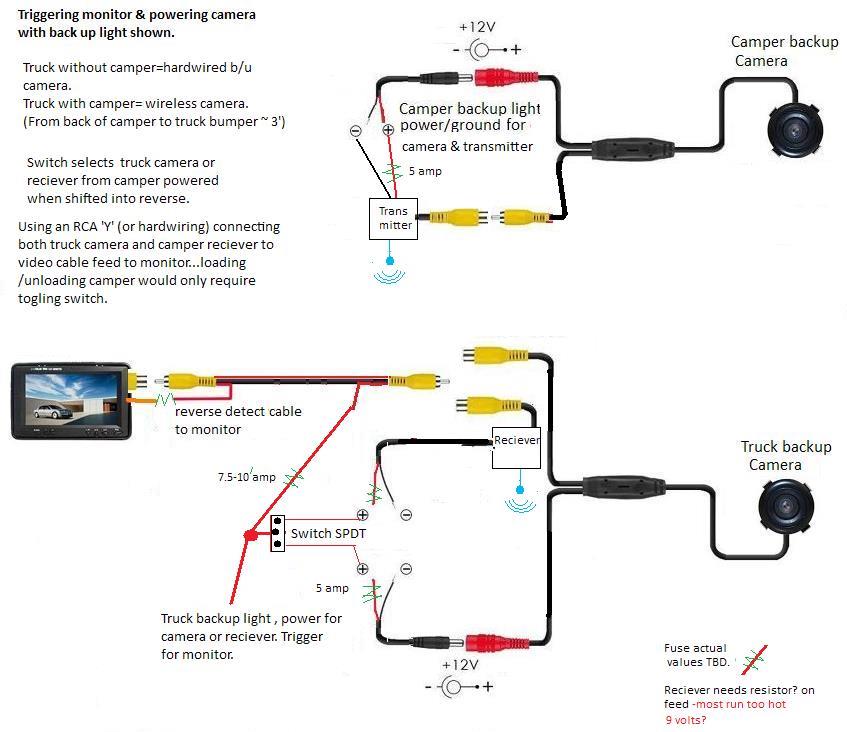


Back to the top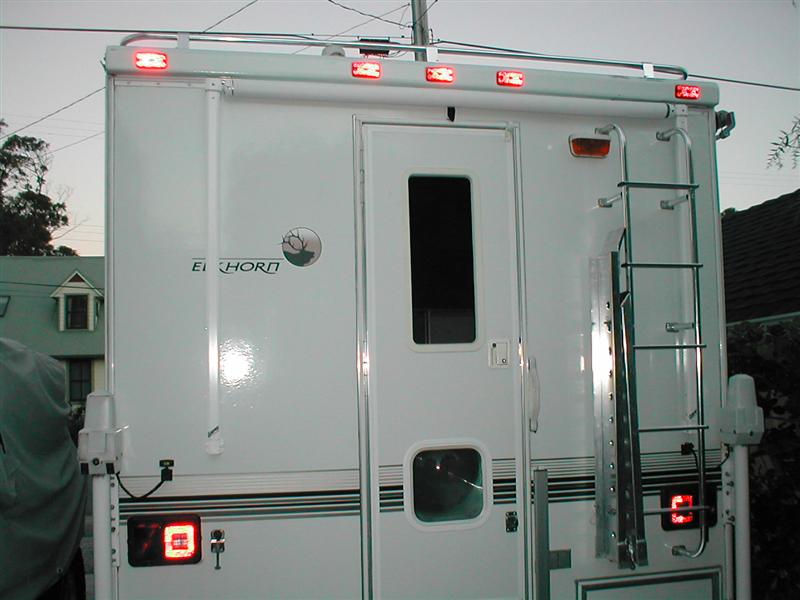
First the box inside isn't removable, it is screwed in from above on top of ceiling.
Second over to right where I was going to poke thru and drop cables down is solid plywood.
Third once inside shower room is another top plate capping the hollow space
Well suffice to say my 2 hour easy wiring may take 2 days..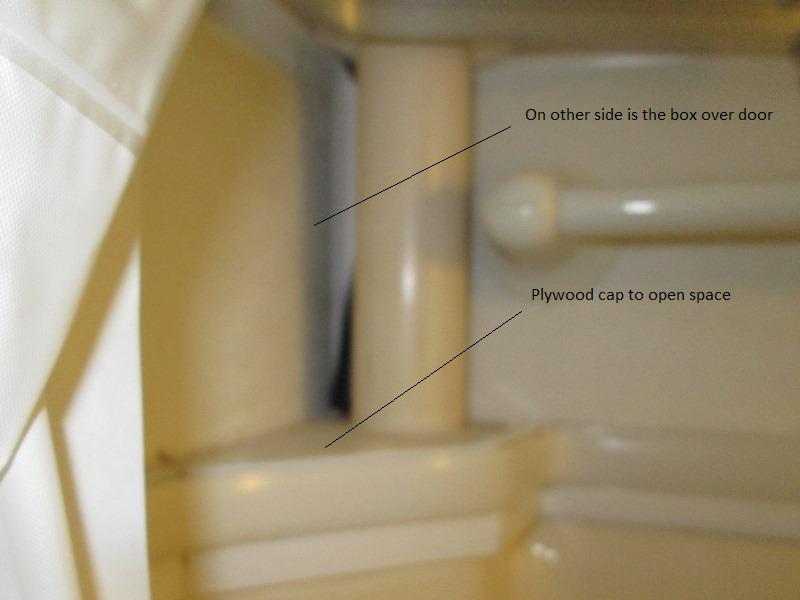

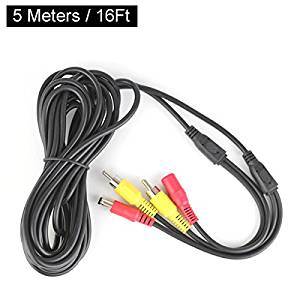
As I needed to run power & ground wires along with the video cable down to tap backup light, I had decided to use a premade extension cable. Plus cameras included video cord is 30' long. Simplifies, I can plug in camera power & video above, and below plug in transmitter and make power connections. However the extension cable ends Y with RCA and DC tip. Cable itself a bit larger diameter, meaning one end along with cable diameter wouldn't fit thru the existing hole. Grabbed an old 11/16" butterfly bit,, cut off 2" from shank to insert in right angle die grinder. Bored new hole.
Using aluminum wire fished from top down about 24" to the 1 1/2" hole behind solar controller. Only took an hour...once finally thru tied off to one of the existing pull string that leads to out side cabinet. Removed taillight, it gives access behind shower and directly to wall into lower cabinet. From inside the cabinet, tugging verified which pull string I was tied to. Pulled it out of cabinet to taillight hole. Drilled 3/4" hole from taillight hole thru wall into cabinet. I'll be pulling cable to taillight then just poke it thru to inside of cabinet.
Pull the string up into shower. Tied string to the RCA end of cable, folded over DC plug and profusely masking taped into this big lumpy mess. Poked it down thru hole in shower,. Pushed the other end of cable thru wall toward door then went out side and pulled. Needless to say took several attempts pulling back and forth. Catching something behind but finally it came free. Poked it thru into cabinet, pulled couple of feet inside. Inside I pulled couple of feet over door. Milestone
So I have cable, video and DC power, running between top of door where camera will be, and lower outside cabinet where power and transmitter will be. All that's left is to install camera, install the transmitter and wire power. Tomorrow. I want to verify camera works before drilling camper. Meantime re-seal and reinstall the taillight, button up shower.
Took camera to truck and plugged video into Y that feeds monitor. Half expecting issue, turn on truck, put into reverse. No difference in monitor quality from bumper camera with second camera plugged in! Then wired new camera to switch, still no difference from trucks camera output on monitor. Flick switch to power new camera and de energize trucks. WOW, #one it works, Switching power between cameras. Video quality is not degraded or interference by having 2 cameras connected together (even though one always un powered). Stoked as I really did not know if this was going to work. Biggest surprise though was the quality of the new camera. Its crystal clear. If this would fit on license plate I'd get another. Amazing.
I'm sure adding the wireless may add some unknown to system-wait and see. I've allowed and prepared if issue with the wireless to run a short cable that's accessible from trucks Y, and manually plug in camper if needed-just dispensing with the wireless .As transmitter and receiver will be fairly close-fingers crossed.
Meantime its placing and drill a hole thru camper wall...then seal & paint the camera before installing.
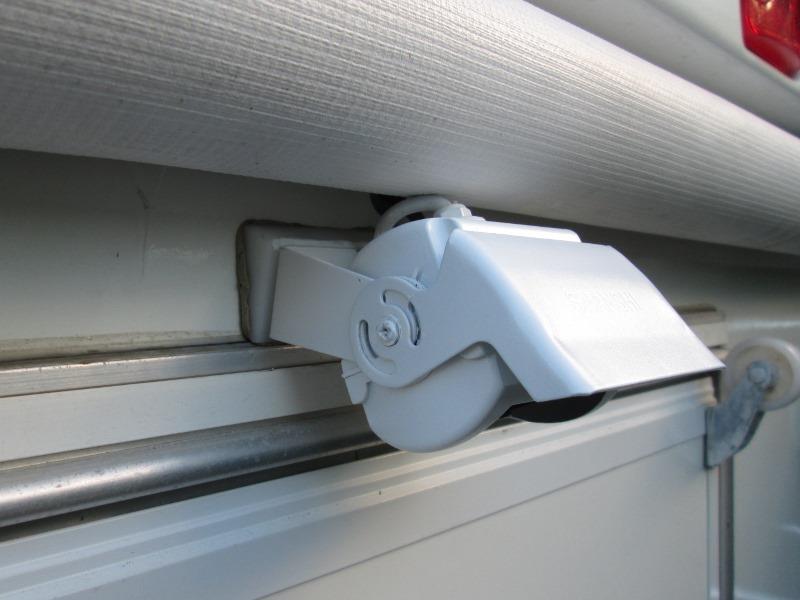
That didn't work. Held up new camera on camper between door and awning. Doesn't fit. Good grief. Door frame places camera to high and hits the awning. Hee hawed around-decided to make a wedge tilting camera down.
Sliced a 1/2" piece of PTF plastic making wedge. That would work. Also give me a flat surface against the campers wall. Held up to camper, angles camera down enough to clear awning. Cool, marked where cable will go thru. Took camera part and painted. While paint drying drill a 5/8" hole thru camper wall angling up inside. Cut a 2" length of 5/8" foam caulk backing rope. Partially sliced to fit around cable once inserted thru wall. Give me a backing for caulk so I don't pump it full of caulk making replacement easier.
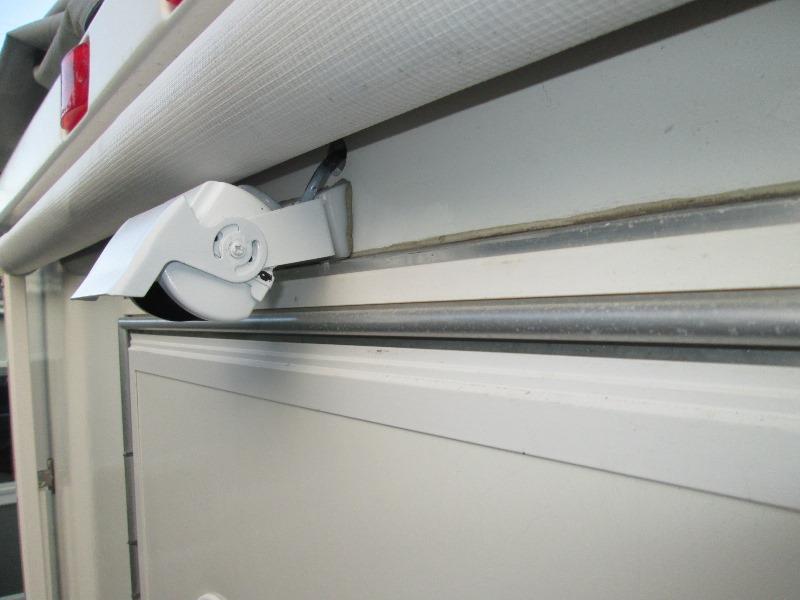
Paint dry enough used some putty tape and mounted camera bracket. Used 4 small screws placing at top and bottom of slots. Then mounted camera. ummm...
Not a clue...rotating camera to where I think it needs to be, the cable is touching awning. Not really against roller, the material billows down in middle-but likely wear thru. It could be I've over rotated the camera, so I wont do anything till its hooked up to verify view. I want to just see edge of campers bumper.
Well non issue- Later but I had camera way over rotated.
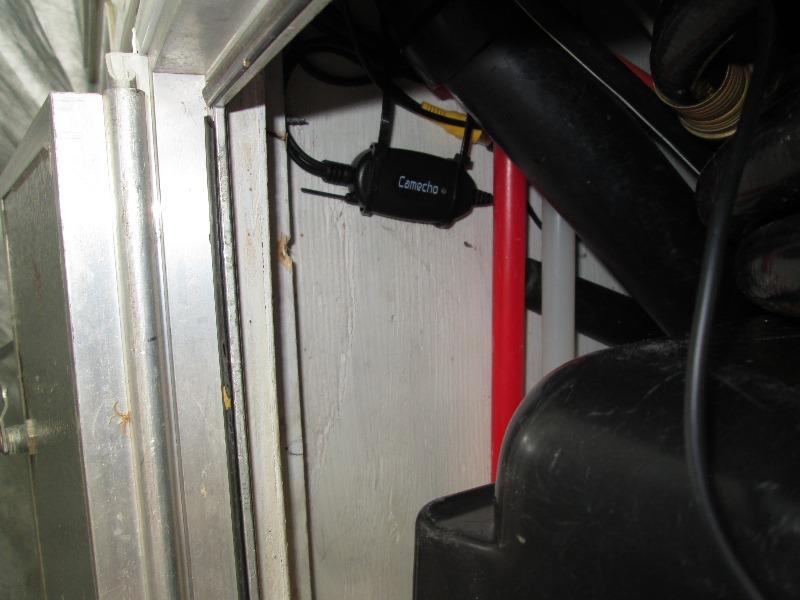
Installed the transmitter inside lower left out side cabinet. Its in the wing. Once camper loaded on truck it will be about 1' away from the receiver which is mounted behind trucks left taillight. I stapled a couple of zip ties to cabinet wall and secured the transmitter after plugging in extension cables from camera.
Wire from transmitter to added length of wires from campers backup & ground. As power goes thru transmitter I added an extra DC plug. If issue with transmitter I can unplug and power camera in directly from the DC plug. Using spare video cable, plug it into the trucks camera input bypassing the wireless all together. Cant imagine ever doing but made the allowance.
Secondary is all the very fine wires on transmitter, receiver and trucks camera power leads. I added short lengths of 16ga wire to make hard connections. Shrink wrapped to insulate but also so no strain on the little wires where they exit sheaths. Tucked up and zipped tie to cabinets roof.
No pics but installed the receiver behind trucks taillight. There's a metal strip on hole opening and zip tied to that. Now that Im writing this I remember I want to reopen and add some foam tape between receiver and the metal-just to minimize direct vibration...
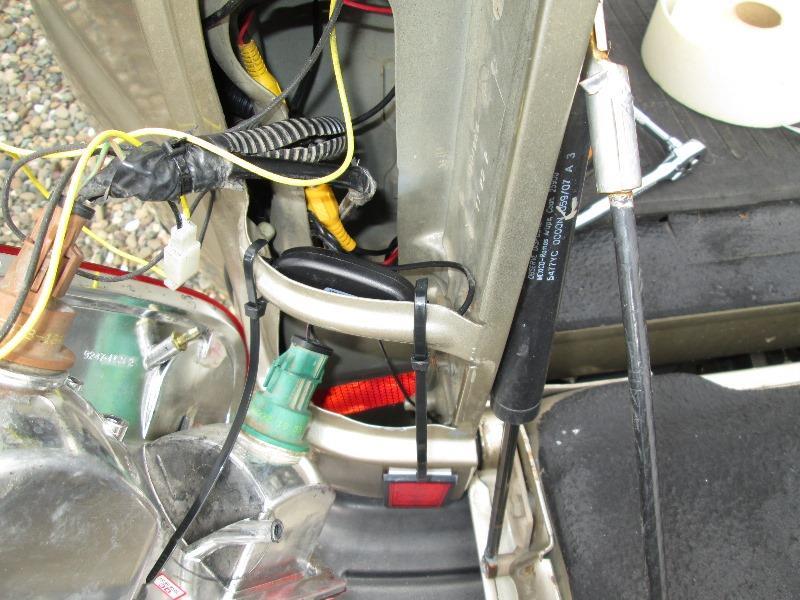
update: Later, but pulled taillight to place foam between receiver and metal, just pics showing where its mounted
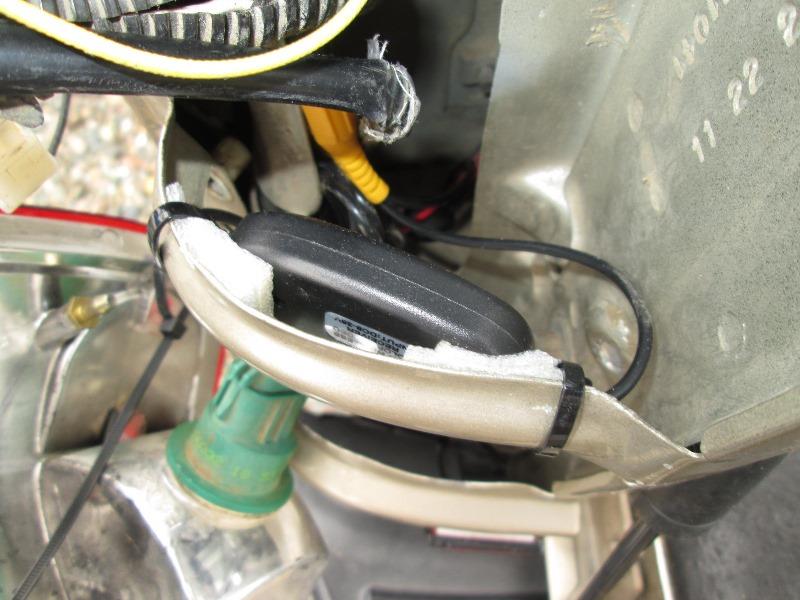
As antenna is supposed to be horizontal only place it would fit. Antenna is pointing at tail gate.
Wired to the selector switch....
All that's left is seeing if it works. Being that the receiver is inside a metal box, transmitter is inside cabinet, I honestly still don't know if this will work. There's also a ton of other wiring, Truck and camper LED taillights, just multiple sources of possible interference...
Backed up truck to within 6" of camper so I can plug into bumper receptacle powering campers backup lights. Too lazy to raise camper and load. I'll have about 12' between wireless box so a real test of the wireless. If it works should work once loaded, at least Im thinking the closer the better the signal will be. Ya that some assuming...
The pink glow I've heard others mention, 1st I've ever noted but Im sooooo close to camper the only light is from cameras IR Leds and its reflecting. Trying to think of something else to do besides flip the switch toggling campers transmitter and receiver.

Flip the switch to camper, went to truck nada, little triangle with exclamation point on the monitor-dang. Went thru all the wires didn't see anything, Receivers power light is not on nor on the transmitter. Noted campers right back up light not on?. Turn it all off, pulled camper taillight lens, removed the LED bulb, 12v power wire burnt. Traced back inside cabinet-duh..I had wired the backup light 12v hot to receiver ground...Soldered the 24 ga wire back together. Resolder the connection inside swapping the12v hot and ground leads from monitor.
Turn on truck, put in reverse and flick the toggle switch...still nothing. Flick the switch to truck, its backup camera comes on. Flick back to camper, monitor goes black. Checked the campers transmitter-its power light is now being powered. Check truck receiver and its LED still isn't on. I could see miss wiring camper burning something on camper side but truck & receiver is separate?
About to give up- reached over flip switch from camper to truck one last time. Monitor comes on. Flip back to camper, nothing. Cant figure why receiver isn't coming on- maybe a bad unit...doh!
Oh good grief! After jumping up & down, throwing some stuff and a few explanitives, reach over and turn the switch to camper ON. Its an SPDT on/off/on. I was turning it on/off. Time to quit for the day.
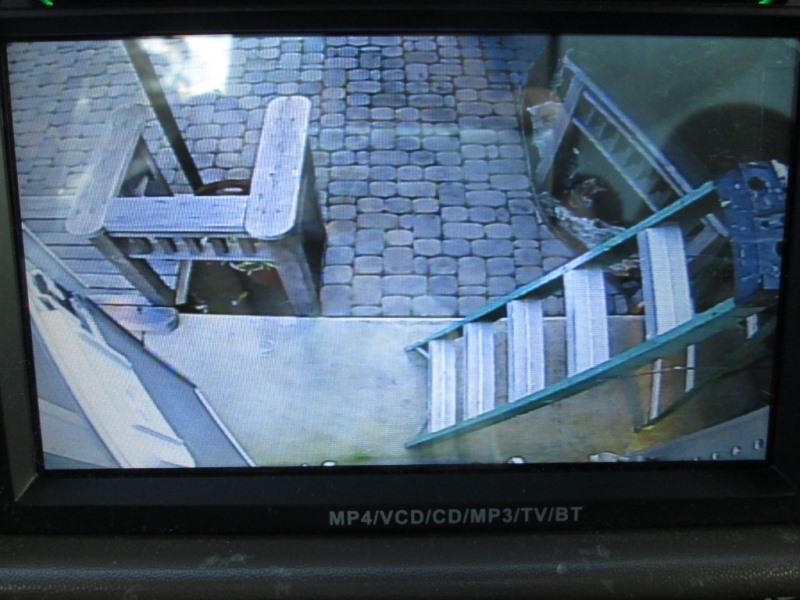
Success-just had to take the long way around...picture is crystal clear (re sizing a picture of screen introduces the lines) Alls well that ends well? Simply reach into bed-flip switch to camper and load. Easy peezy. Replacing the screws on campers camera with SST, caulk the hole for cable. Done.
Bottom line is seeing directly behind camper. I could back up within 6" of a fire hydrant and not hit bumper.
But directional for some reason, even though what is on left/ right of screen is what left/right of truck, looking at the monitor image is a bit confusing. Not any different than looking at center review mirror or the door mirrors but Im not seeing as a mirror? Take some getting use to. IE: If I wanted to see the ladder in door mirror my first impulse would be to look at the right mirror-which is correct but if moving backwards & I start turning it would be to the left. If Margaret were standing behind camper-pointing to turn right toward ladder I would see it as her left hand I guess its the picture in my head what I should be seeing. Standing in the campers doorway looking out or taking a picture, ladder would be on my left. Odd 45 years later get to relearn backing up.
Final wiring
Lastly, comment about placement. I placed high over door, where most mount. View, to not back into something, is perfect. However If I had to do over I would look at mounting lower. Being so high, to see bumper edge, which is what I want to see in relation to what is directly in back of camper, it does limit how far back I can see. If camera were lower I could still see bumper but have more rearward view. Campers door is centered so would not be easy unless camera were below door, which would be too low to see bumper and accurate distance. Ideally I would think midway on door. Not happening now.
Another round toit. Probably wont pursue but radio unit has a second unused video input. I could easily add a front camera to truck. Not so much for truck but when we carry the scooter on its rack that would be really nice. Rather involved making camera where it could live on truck or extended to scooter/rack lead edge. But a project if I get a wild hair or simple idea that someone else has come up with could be used.
Except for a few roundtoits when motivated and time allows, done.
Back up camera installed on truck, switchable to backup camera on camper. Front camera on truck, with allowance if pursued, switchable to scooter cam.
Adding front camera, parking aid
Details moved to its own page
What I want is the monitor to switch/show rear or front camera when jockeying the truck around in direction moving. Especially when the scooter and rack are up front. I want this to be automatic when shifting into reverse or forward, regardless of radio on or off, no monitor interface. If im trying to walk truck sides ways between 2 objects and only have a few feet, don't want to be playing with monitor or switches. So not using the aux inputs of radio. Many ways to do this, manual switching, auto switcher boxes, monitor AV source, etc. But, this is what I'm doing, assuming it will work (not sure).
And done...front camera installed, auto switching works. Reverse overides
continued Front camera Adding a front/parking aid camera to truck
Update added ability to manually turn on rear camera Radio bypass page
Back to our F250 truck page
Back to Ourelkhorn Camper Modifications page