Mics wiring on our 01 Ford Super duty F 250
- update 2019: added AC inverter, add dash remote switch w/ign relay, change position of aux charge switch
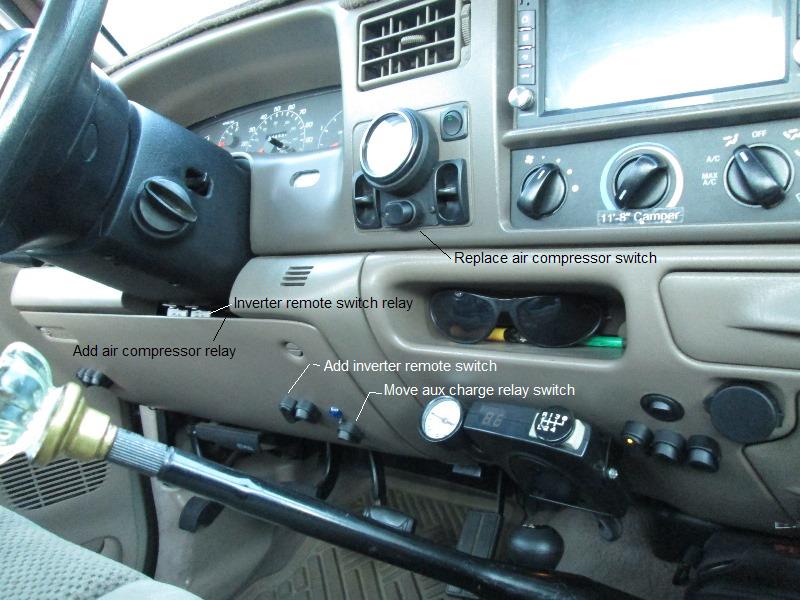
Had to replace compressor switch, currently power goes thru switch-changing/adding relay
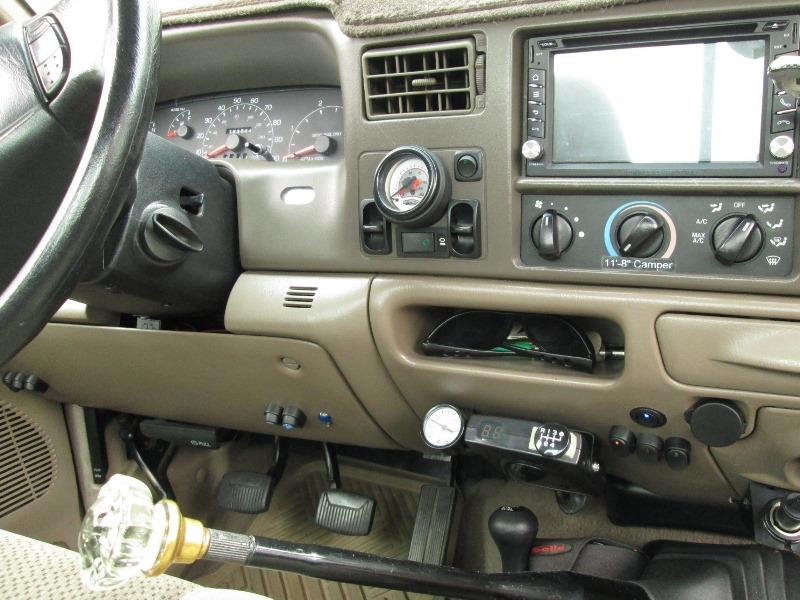
Under steering wheel dash panel
Engine bay added fuses
Wires exiting cab
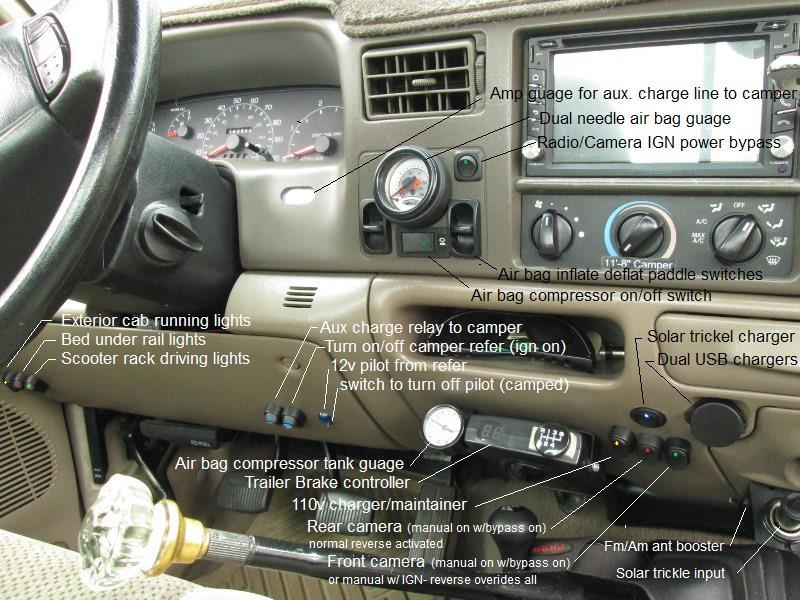
Radio/cameras
Solar charger
110v battery maintainer
Dash mount air bag compressor controls
Switches on panel under steering wheel
Behind panel
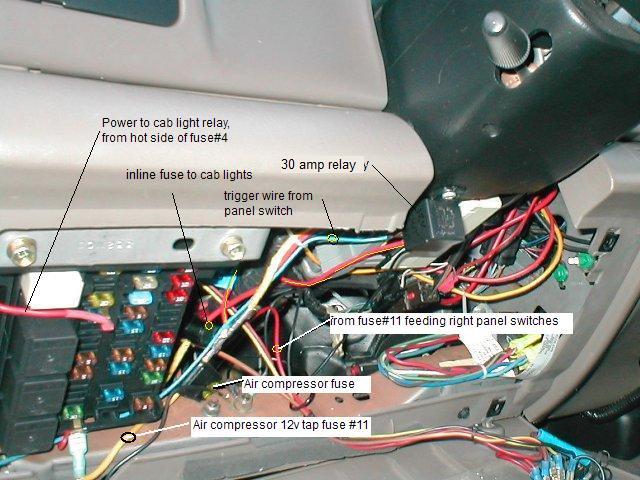
CAB ID lights, relay mounted under wheel, power from fuse #4, trigger from panel switch. Power out from relay goes thru inline fuse to lights
Air compressor power tapped from fuse #11 (yellow) goes to fuse then on to dash mounted switch then to compressor.
Related pages /f250/dashair.htm, /f250/cabl.htm
Right side panel switches also fed by tap (small red) at fuse #11.
- update 2019: added AC inverter remote switch w/ign relay,
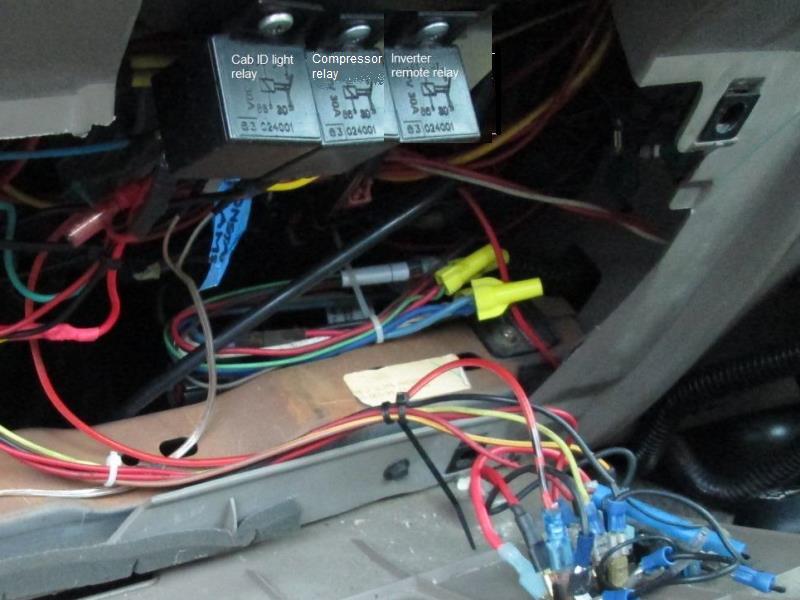
To be done add 3rd relay for air compressor
Left side
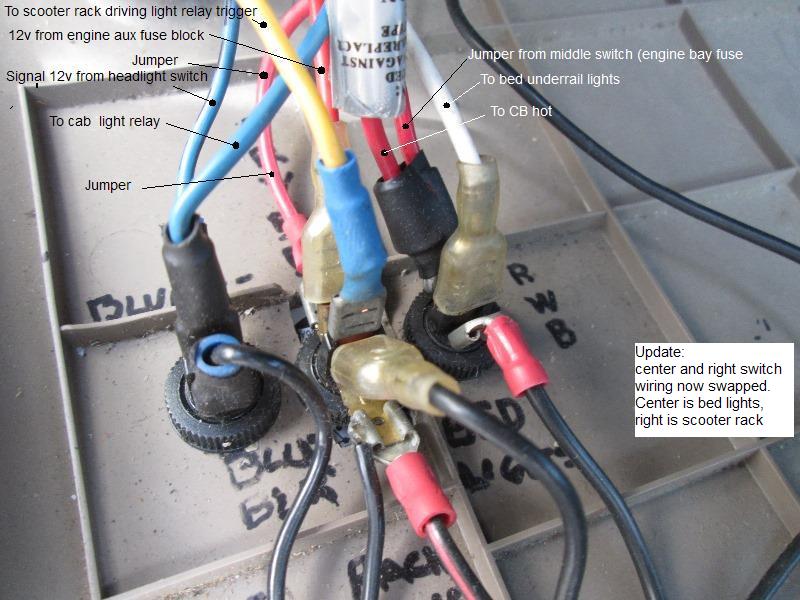
Left to right-Top of cab clearance/ID lights switch [mirror running lights now tied to signal source from headlight switch, not shown red wire] , Under rail bed lights switch, scooter rack driving lights switch (when mounted)
Related pages: /f250/cabl.htm, /f250/slides.htm, (scooter rack) /scoot.htm, /scrkdetail.htm
NOTE:In case I don't get back and fix page. The above center and right switch functions changed/swapped. Center switch is bed lights & the right will be front lights.This was done to match the other switches at center of dash, matching position & colors to truck location. Just easier to remember. IE so whether lights or camera- center position/red pilot is rear, right position/green pilot is front. Blue switches refer/ charging
Right side
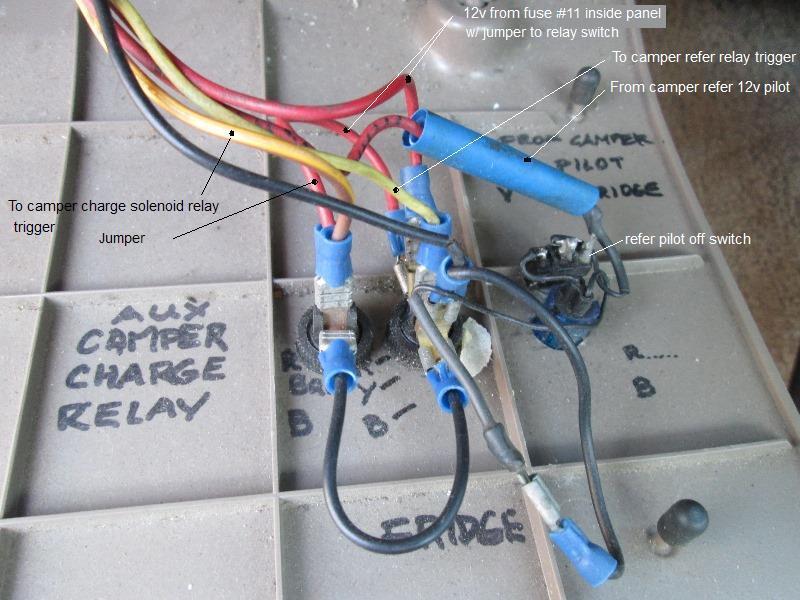
Aux constant duty charge solenoid trigger, yellow/brown stripe.When solenoid engaged sends power to camper (thru dash amp gage)via 10ga red wires. Exits at door wrap shown below then to solenoid.
Camper refrigerator on/off to switch control from cab. Pilot from refer when its relay is on (to verify power being sent, fridge 'should' be on. Also can be seen as draw on amp gauge when refer cycling. Small red & yellow refer wires go down to floor and thru floor under sill.
- update 2019: added AC inverter remote switch w/ign relay, change position of aux charge switch
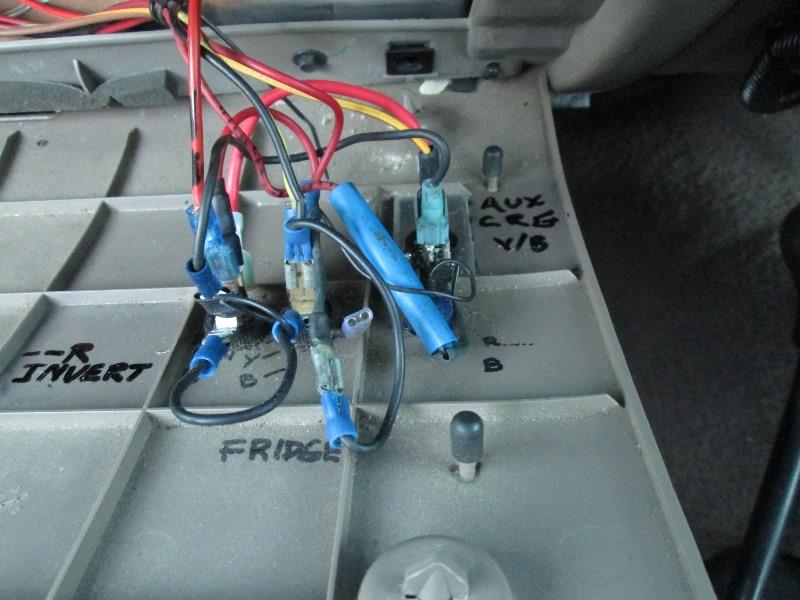
Wiring unchanged except addition of inverter remote relay switch, moved the aux charge relay switch. New inverter Ign. switch only triggers added relay that remote switch power goes thru. To turn inverter off with Ign.
/f250/relay.htm, /f250/solnoid.htm, /f250/acinvert.htm
Engine bay:
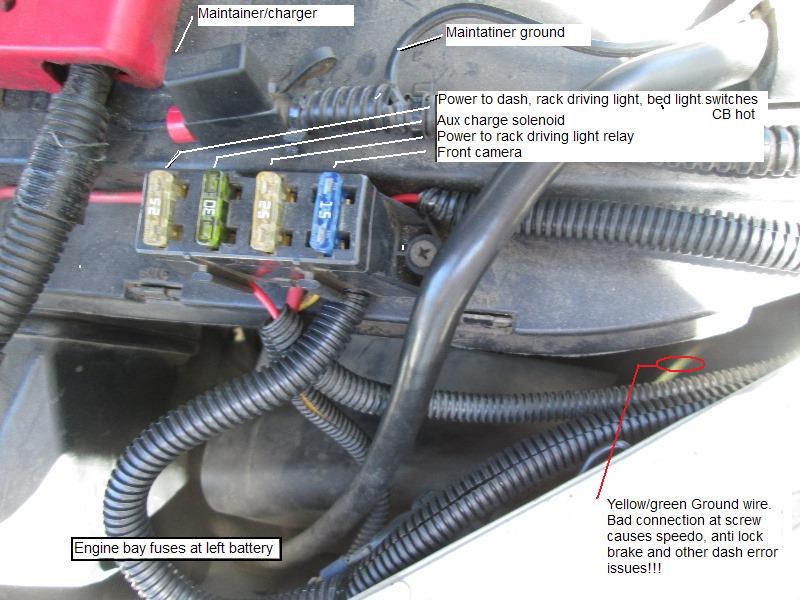
Fuse box at left battery
Related pages: /scoot.htm, /scrkdetail.htm, /f250/solnoid.htm, /f250/truckfcam.htm, /f250/slides.htm
No-pic
To the right battery a fuse for the auto deploy/ retracting running boards controller is attached.
Related page /f250/ampstep.htm
Beside column 5 wires. Aux charge line- 2 10ga red wires, to/from dash amp gauge. From charge solenoid to gauge then back out & down firewall to under floor to camper aux plug. Black 2 wire cable for 110v maintainer, from dash mounted switch to on board maintainer (turns on/off maintainer, separates from truck charge). The small red wire I 'think' is the trigger wire for front camera from dash switch. Goes to front camera (thru another fuse), from camera power and video come back into truck thru floor left sill up behind dash and then to relay. The relay feeds radio but is turned off if truck is shifted into reverse.
Door wrap..
This one of the first additions was simply wrapped around under door seal. 3 wires. Red from engine bay added fuse block feeding left side of panel switches (bed light and front rack lights). A yellow/brown wire that triggers aux charge solenoid and a yellow wire that triggers front scooter rack driving light relay. [ 09/21 add green wire to feed grill ID lights, but since abandoned, grill lights tap park light circuit at grill. added green wire not connected to anything)]
No pic but under drivers side door sill, all wires going to camper (refer 18ga red and yellow) or rear of truck (video/cameras ) and bed lights (white) exit thru floor under plastic sill. Also purple trigger wire for steps.
Nothing to add so just locating pages related to dash.
- Radio involved but wiring utilized mostly stock wiring. Rear camera included. The dual USB charger were part of radio install. FM/AM ant booster added, powered by radio, though added a switch to turn off.
Related pages: /f250/truckradio.htm,
- Front camera added-utilized relay that turns off when truck shifted into reverse so it auto switches between front and rear cameras when needed. Most of its wiring behind bag hook panel. Related page /f250/truckradio.htm,.
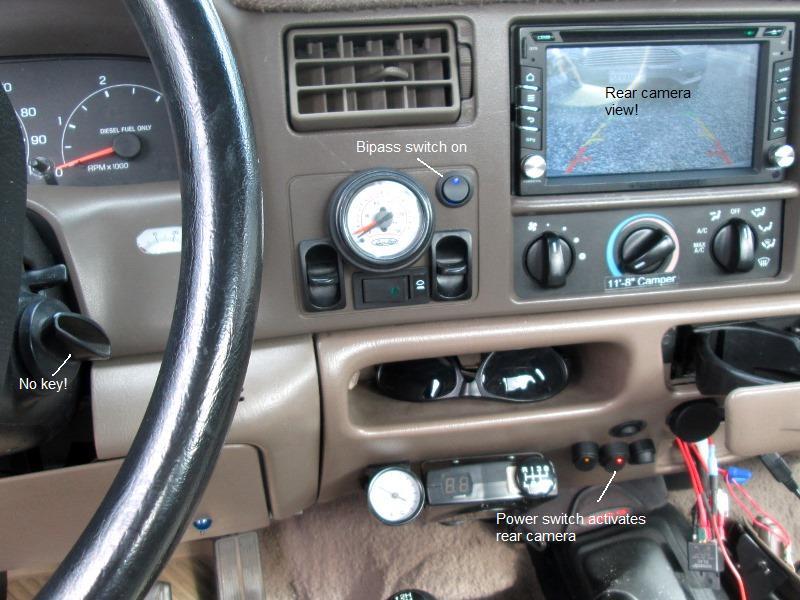
- Added IGN bypass switch to power radio with out key. Mostly to be able to use when parked but also to keep it shutting off before fully booting. IE if radio left on when truck turned off, next time key inserted radio comes on but shuts off before fully coming on when starting engine. If radio comes on when key inserted I flick the bypass switch so it doesn't cycle related page /f250/radbypas.htm.
- The keyless use of radio allowed powering cameras manually (truck not running) also. With some minor wiring changes allows use of rear campers camera. Related page /f250/radbypas2.htm
- Option to use radio without key or truck on kinda nice, yes I could kill the battery but I can listen without powering other stuff or listening to the door chime id door open. Camera access when truck off camper on. Regard;less there are several pages covering different aspects of the radio/cameras & camper wiring.
Related pages: /f250/truckradio.htm, /f250/truckfcam.htm, /f250/radbypas.htm, /f250/radbypas2.htm
Grill ID lights
Add (3) ID lights to grill after replacement rood no longer has them Related page /f250/rooflite.htm
Roof CAB ID lights
Add solar/wireless cab lights to roof related page /f250/coalite.htm
Blinking fender lights 10/2021
Converting dually fender marker lights to flash with signals. Removed running light and ground wires that were attached to taillights.
To front of truck adding a 3 to 2 wire adapter to feed signal and running light power to fender marker lights. Outlined on its own page (if successful).
Signal and running light power to be tapped from front 4 pin hitch receptacle for scooter rack. This takes brake light out of loop. Related page /f250/fendlite.htm
Solar trickle
Don't use much any more since adding On board battery maintainer but camping, little bit helps if setting for couple of days. Switched it plugs into cigarette lighter.
Related page /f250/solartrickle.htm
110v battery maintainer
Hardwired into truck with receptacle for chore power. Plugs in at house or where power available.
Related page /f250/f250crg.htm
Air bag controls
Hardwired onto dash. Tank power switch, inflate/deflate switches, dual needle gage/ air bag monitor, Tank psi gauge
Related pages: /f250/dashair.htm, /f250/bagswfix.htm (dash switch replacement), /f250/airbag.htm(air bag replacement), /f250/ampstep.htm (reroute lines. add tank gauge)
Back to our F250 truck page
Back to Ourelkhorn Camper Modifications page