Adding inverter to run camper refrigerator
Always wanted an inverter in truck just never motivated. Using it to power camper refer as justification its back on the want to list.
Recent thread on RV net asking about running fridge on trucks inverter caused me to look. Issue is when truck shut off and fridge in AC mode. Lack of AC causes fridge to switch to propane. If propane unavailable fridge goes to check mode. Once 'check' light comes on, even when AC restored, fridge will not restart until 'check' light cleared turning off fridge and turning back on.
Simple remedy is to turn off the 12v to refer, (NOT turning fridge to off but disconnecting it's 12v power source). Disconnecting power to control board, fridge doesn't auto switch looking for alternate source. When 12v restored to fridge controls it comes back on connecting to last source selected (AC). Requires a manual switch on the 12v source to the fridge or a relay to control from truck.
That's when I realized I already have this switching control of refer from truck. I use DC on the road- but if I added an AC source I could run the refer on 120v instead of OR on 12v as modified. Existing wiring would work.
- Split into sections, This page done while doing the install-mostly for my own reference-really messy.
- Thinking out loud, plotting planning justification Intro this section
- Bed receptacle
- MODs to refer temporary extension cord
- Inverter install mount brackets, wire in dash remote, bed receptacle cable.
- Battery cables & fuse connection
- Battery cable routing
- Camper split receptacle/ hardwire fridge cord/umbilical
- Round toits Move Fridge receptacle, add power strip in truck, tidy up Inverter wiring inside.
Update: This project completed and works-however it is the farthest away from how you should do as you can get. Mostly cheap-cutting every corner I could with a lot of round-toits. Inverter was cheapest I found, 4ga jumper cables etc. That said I can now run campers refrigerator on AC on the road.
The option would be really nice as refer works better on the AC. Previous modifications to DC system I have zero issue with batteries and enough power to run refer on 12v, its just the refer would run cooler on 110v on the road. Extended road time 6-8 hours is when the DC powered refer will gradually start to warm. Strictly due to the DC heater is 215 watts, the AC heater is 325 watts-just more cooling power. The other plus is main power would be provided entirely from truck, camper batteries wouldn't be in the loop or not running fridge on camper batteries and charging thru truck. Just more direct...maybe, though truck was recharging camper batteries it will now recharge its own batteries, however its also supply the 5-7 amps solar was providing which now will be out of loop. It may have been more practical to run on camper installed inverter-however I wanted an inverter in the truck for other use.- regardless I would have the option to run either AC or DC.
Justification to add inverter to truck. Few issues to resolve, thinking out loud.
Still researching inverters. From camper simplest is to add separate receptacle at back of fridge, run a cord to opposite side of camper coming out where other umbilical cords are. Plug fridge into new receptacle. When mounting camper plug in to truck. At fridge select source (AC or DC). for on road. If we happen to be somewhere with shore power would need to plug fridge into old receptacle other wise it would stay in new one
1st is mounting inverter. It needs to be few feet from battery. That's a big one. The further away the bigger the battery cables need to be. Cant do much about that, closet I could mount is under seat, so cables will be at least 6' long.
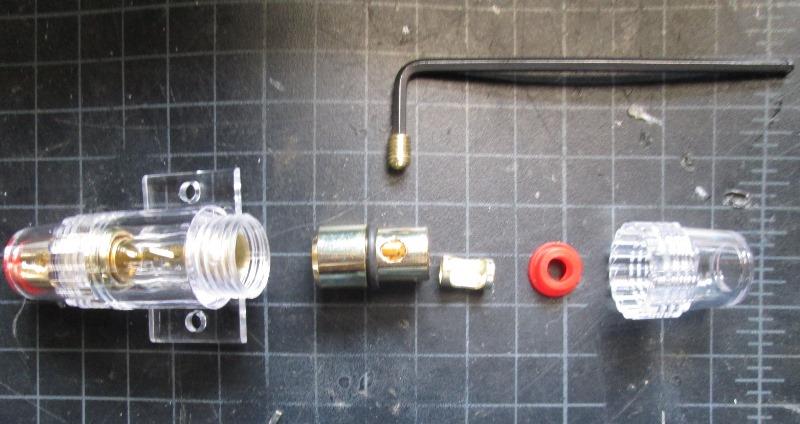
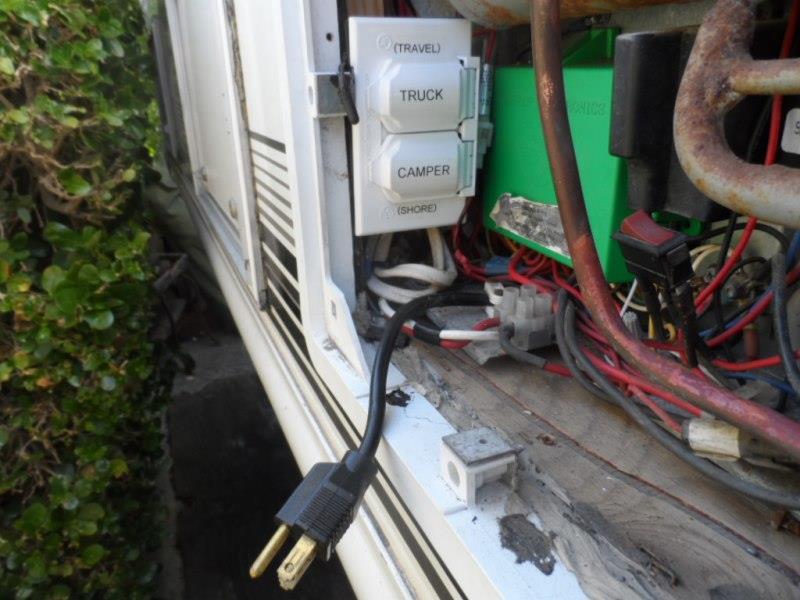
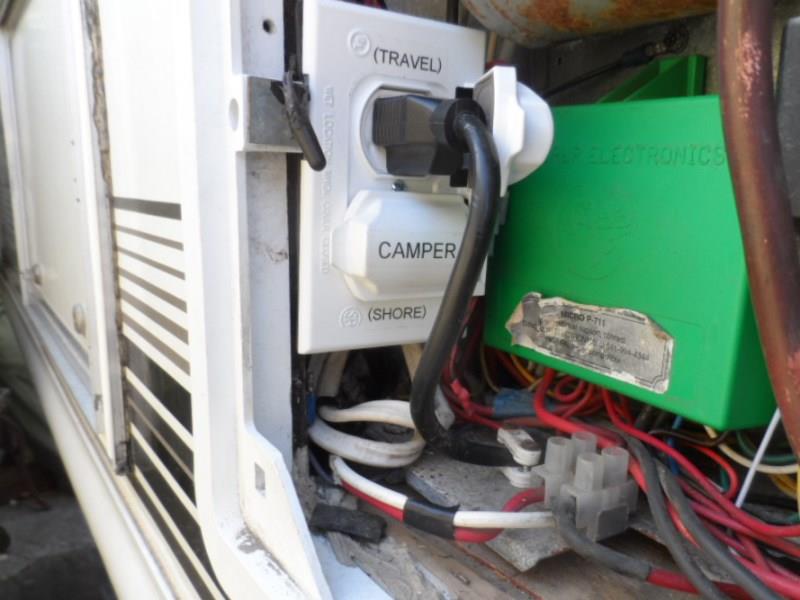
2nd is connection between truck and camper, several obstacles. Short of draping an extension cord is a plug. As camper will be plugging into truck most off the shelf connectors power direction is wrong. Receptacle on truck which is hot side needs to be female. Most twist lock type receptacles intended for RVs the mounted receptacle has male prongs-just too easy if inverter on to touch the 110volt live prongs. Though still attractive due to cost, pre-made bolt on, good for weather resistant 'in-use' protection. If inverter not turned on not an issue but really a bad idea-end up dead kind of wrong bad idea.
Bed Receptacle
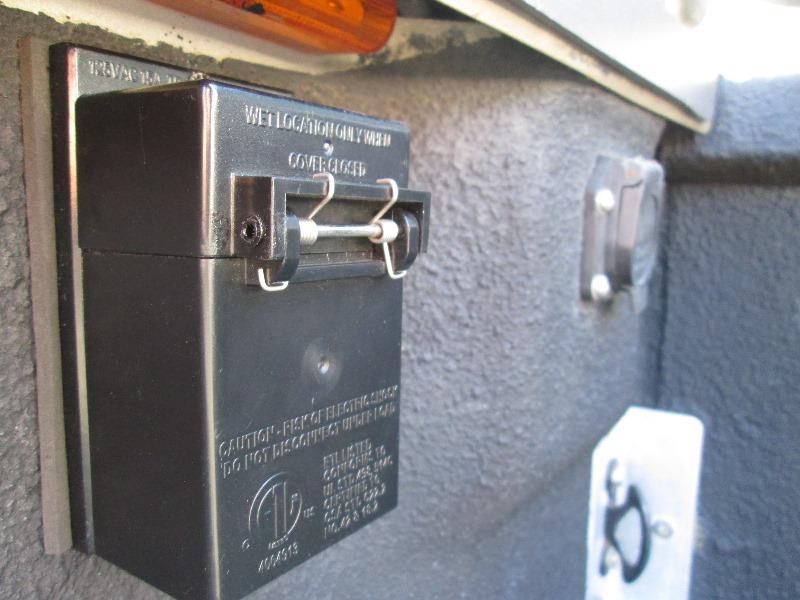
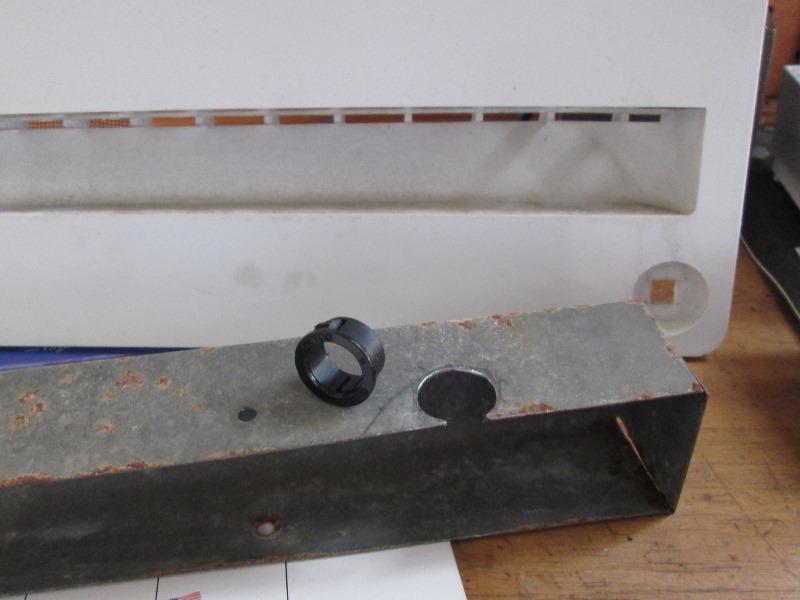
As only using bed plug for refer, could use simple wet location box. Semi protected when camper on it wouldn't be water proof 'in-use' though. An in-use cover would work but be sticking out into bed-sooner or later get broke. Rummaging thru stuff on hand stumbled on a wet location box from an outdoor pole lamp.
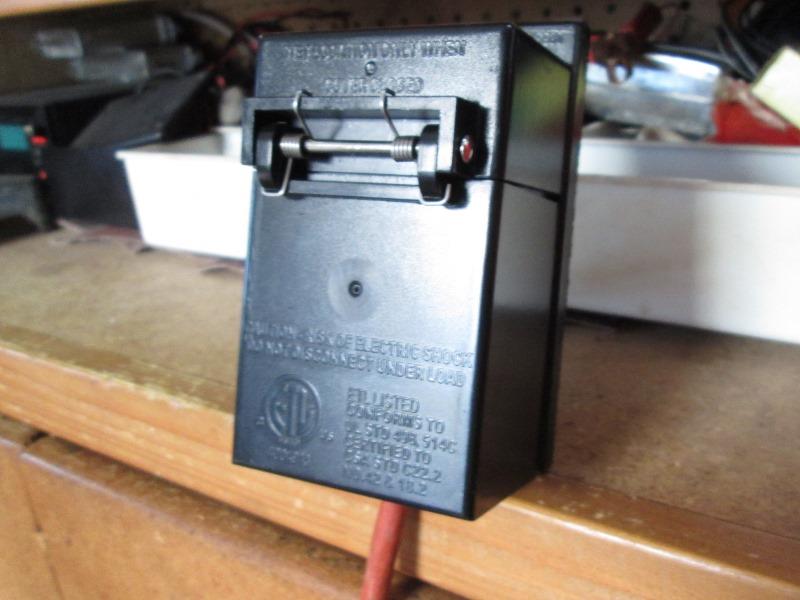
To plug in cover is lifted, once plugged in cover protects, virtually weather proof. Springs and pin are stainless. Its only about 2 1/2" deep, built in 'in-use' so I'm using. Single 15 amp standard receptacle.
As I don't want to purchase any thing yet proceeding with stuff on hand and add bed plug. We are also getting ready to hit the road so there will be a lot of short cuts as far as mounting and routing just to get functional. When we get back I'll have couple of months to redo/sanitize and pick up any round to its.
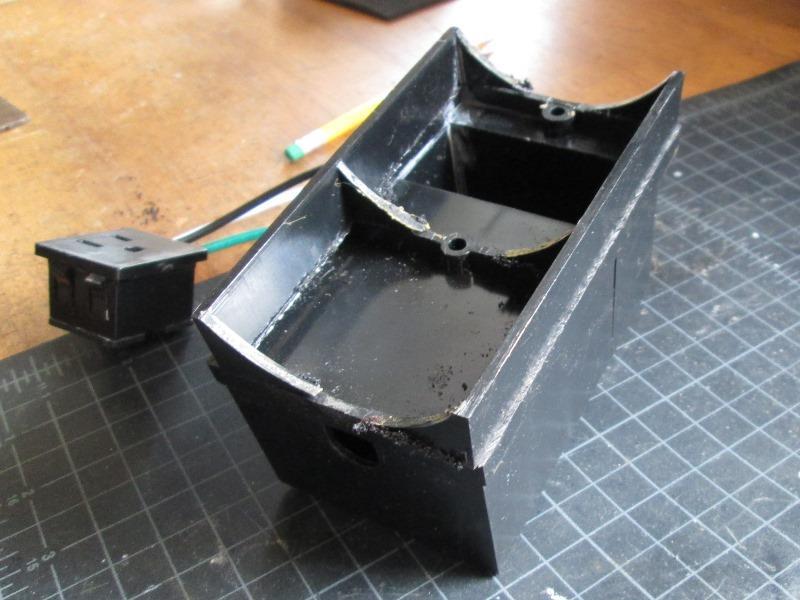
Did have to modify as its designed to mount on 3" pole. Scribed and cut to base of screw bosses.
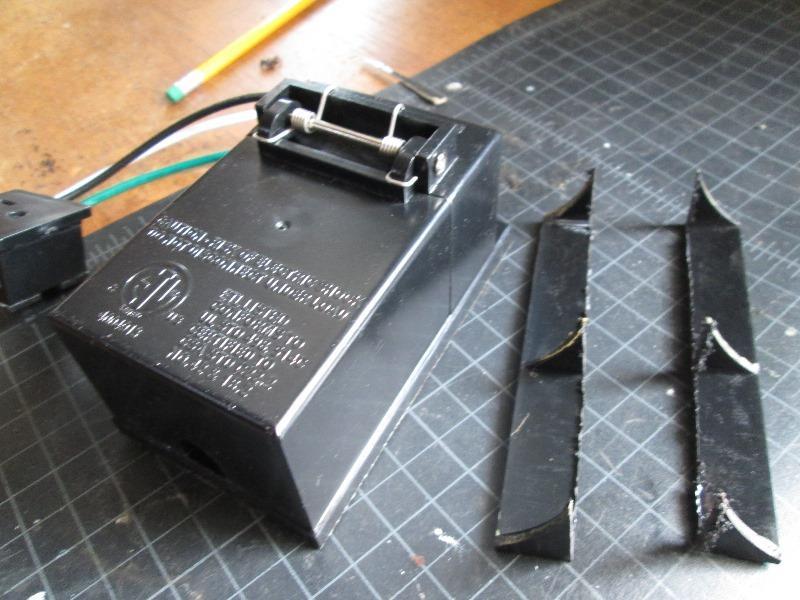
And cut/flat. As I was cutting the plastic realized how well this will work for what I'm doing. Got on line to see if it could be purchased separately. Searched for quite a while under electrical post lamps etc and could not find anything even similar? Good thing I didn't break it. If that happens in the future Ill change to standard box with snap lid.
UPDATE 05/2020- stumbled across source-Solus SCO-930BK 120V Grounded Convenience Electrical Outlet w/Rain Shield for Outdoor Lamp Post and Poles, Energy Saving and Weather Resistant, ETL Listed amazon link https://www.amazon.com/dp/B07XTNRM5H
Also noted price doubled-shop around, fortunately I already ordered second unit.
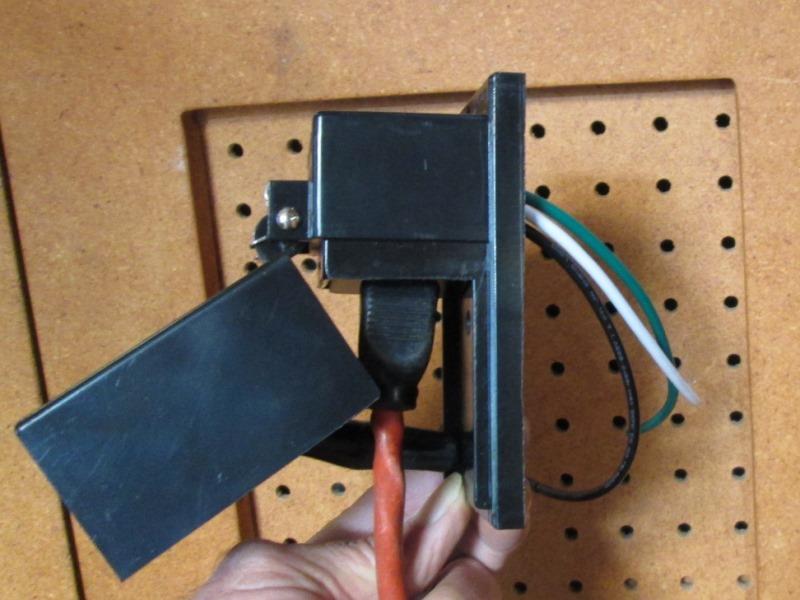
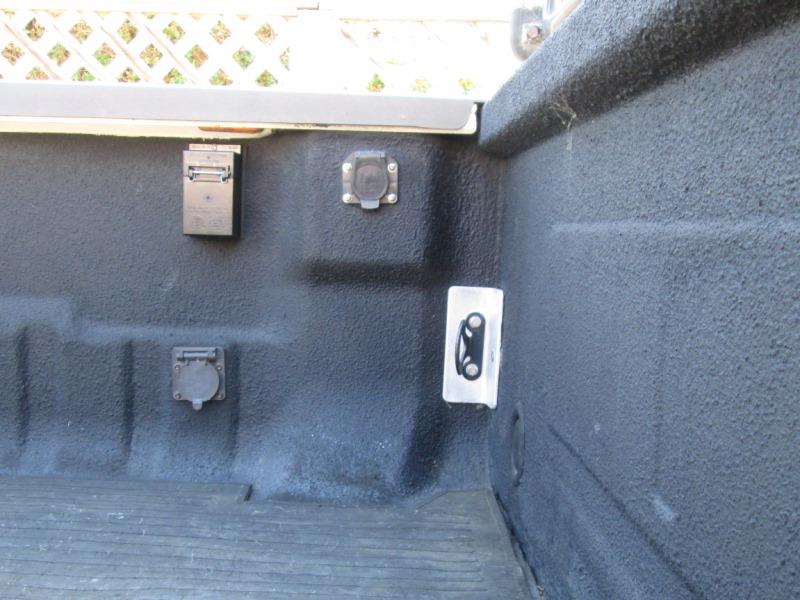
And mounted...
No pics, cut a 1" hole in bed, used a plastic grommet to protect 14-3 ga cable. Temporarily I'm making connection to extension from truck at stake post.
Plan is to add a weather proof box between bed and cab underneath. Drop cord down from bed plug to box and tie inside to cord from cab. That way I can disconnect the cable if anything, bed or truck side, needs replacing or worked on without cutting wires. Round toit ONE.
Parts on order. Went with cheap 1000 watt inverter, due to enough power to use for other stuff/tools pumps etc (justification). Can always upgrade. 2) 15' 14ga extension cords, one for cab to receptacle and 1 for camper fridge out as umbilical to plug into new receptacle. And a 4ga set of jumper cables to steal wire, lastly an inline 100 amp fuse.
Once parts arrive cut off the female end of one cord and push out from cab to feed new bed receptacle. Easy.
Adding the 4ga battery cable wont be. A lot of eyeballing and I've unfortunately narrowed mounting the inverter to back wall behind drivers seat. Really only good place. Does mean the cables are going to be a lot longer than they should be. Hopefully about 350 watts can be delivered thru the 4ga cables supplying inverter without it kicking off. Though 20' long I'll drape and test out inverter before cutting see how much amperage I can draw. Guesstimating about 8' length which would help with delivery but if inverter doesn't even try then I get some 2ga wire. TBD
Fridge Mods
Next round toit is the camper. To be done-temporarily using extension cord.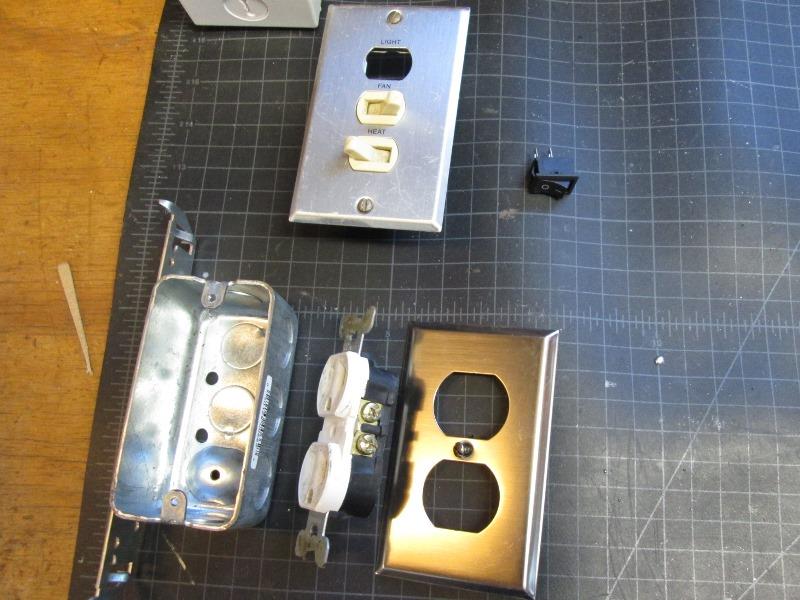
Was going to do the following but whole idea got nixed. Plan is to some how switch existing campers fridge receptacle to either camper 110v source(shore/gen) or power from truck receptacle- to be done-for now running ext. cord
Mounting separate box and duplex receptacle behind fridge. Later Ill route cable thru camper to other side but for now, cut off female end, tie to new receptacle and drape around front of camper to plug into new bed receptacle. Trying to think of a simple inexpensive way to use a switch to change 110v source receptacles. For now it will be unplugging switching plugs if were somewhere with power or home pre cooling. 3way switch would work but I want to break both hot and return. Don't have issue with the earth ground but otherwise don't want any interconnection. Hmm thinking about it I think the return/common is chassis tired -need to check, then again may not matter. A double pole 3-way may be made but can imagine what that might cost. I know pulling the refer grill is going to get old.
Whoa just looked rotary changeover-not too pricey-need to research amp (prices from $10 to $200 / but affordable-YES!
So plan changed-round toit. If source is selectable no reason to add another receptacle so adding separate box nixed. Power will come from camper and from truck to selection switch, switch will send selected power source to existing refer receptacle.
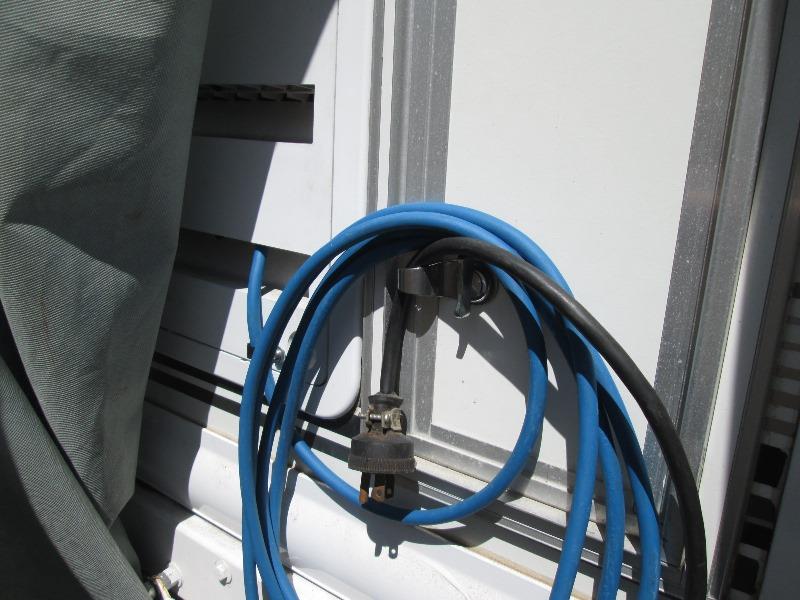
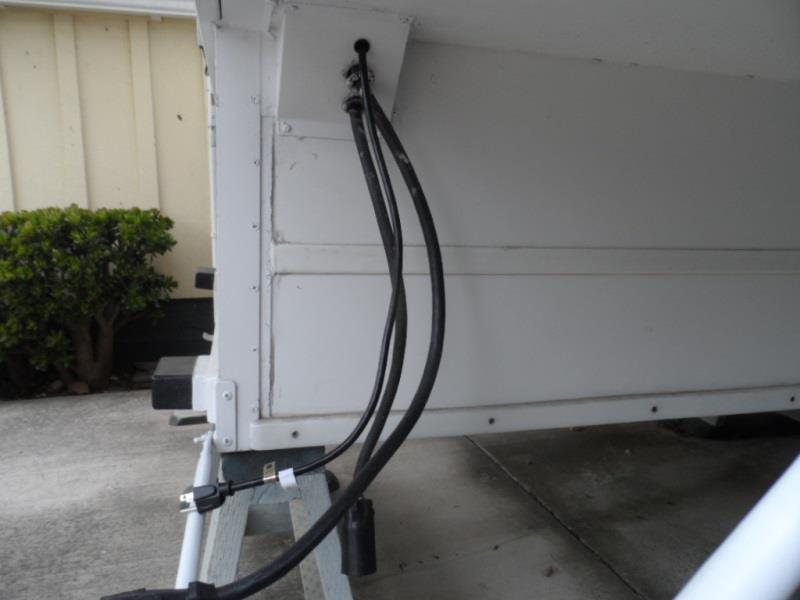
Will be a bit involved, so-for the interim its just running extension cord from fridge thru grill, plug refer into it, drape around camper and plug into added bed receptacle.
When we return, at minimum I'll reroute extension thru camper to hang with other umbilical cords. I may or may not do the switching, be nice/convenient but we've never used gen to power fridge and usually don't have power camped.
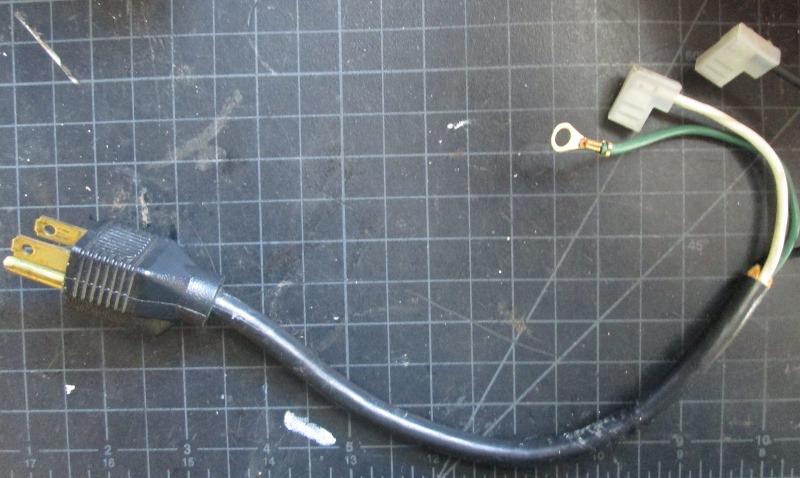
Temporary extension cord
So with that resolved its getting the extension cord to fridge...
Removed lower fridge grill, removed bottom air deflector and drilled a 5/8" hole then enlarged with rasp for 3/4" grommet.
Slipped old cord with female end thru grommet, once pulled thru will only be about 12" inside. Spliced an old male end onto cord
And ready to plug in-cant you hear the violins at Carnegie Hall...pretty hokey but functional until I spend more time.
So fridge ready...
Inverter install
Next is the inverter.Need to get mounted to start wiring. Determined only location is behind the seat. Drivers side would be inline with easier engine bay routing and bed receptacle. Doubled the length of battery cables needed but no other option. I carry a lot of crap so first is cleaning out truck to work on it. Once mounted run extension cord out to bed receptacle. There's a rubber plug that I can use so shouldn't be too difficult. Hopefully while mounting and running cord a reasonable route for the battery cables will unveil itself-don't have a clue...
Removed the rear wall fabric board... [Missing picture] could a swore I took picture of wall with fabric removed...
there's a sheet metal box at the top of wall under window and what I thought was a box few inches down is just the formed fabric board.
Other than the top box one single sheet metal wall, cant screw to it.
The upper box too high to mount inverter, seat would hit. What I came up with is making some brackets.
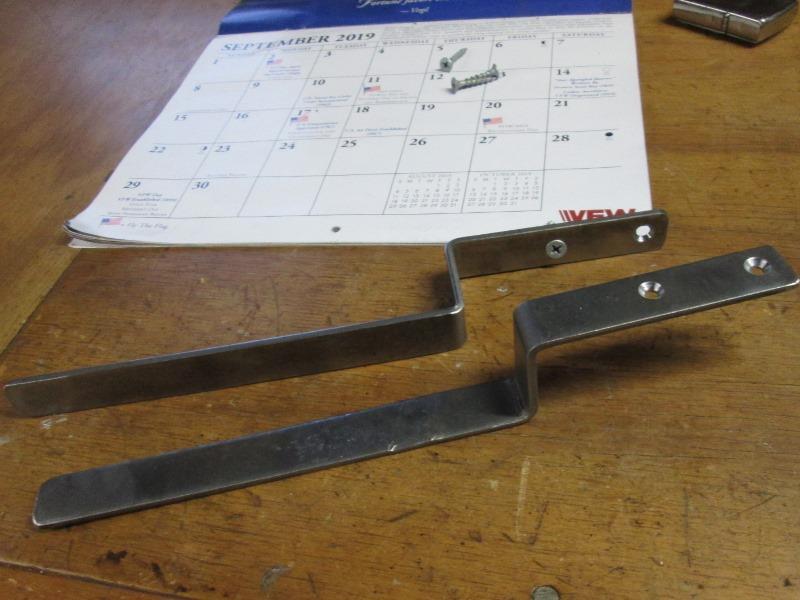
Bent some flat bar to match box, inverter will mount and be recessed a bit under top fold box.
Inverter should be here tomorrow. Ill set up with 20' jumper cables, truck running, use my heat gun @600 watts on low to see how it performs. Heat gun has a high setting of 1500 watts though surge is 2000 doubt it will run, actually not trying. Hoping it performs, actual fridge load is 350 watts & cables will be considerably shorter so should be good if it passes initial testing. THen drill the brackets to match inverter, mount inverter to them then screw the brackets to wall. I'll probably run the cord to bed plug first. Have a hazy idea to route battery cables but 1 step at a time.
Inverter arrived
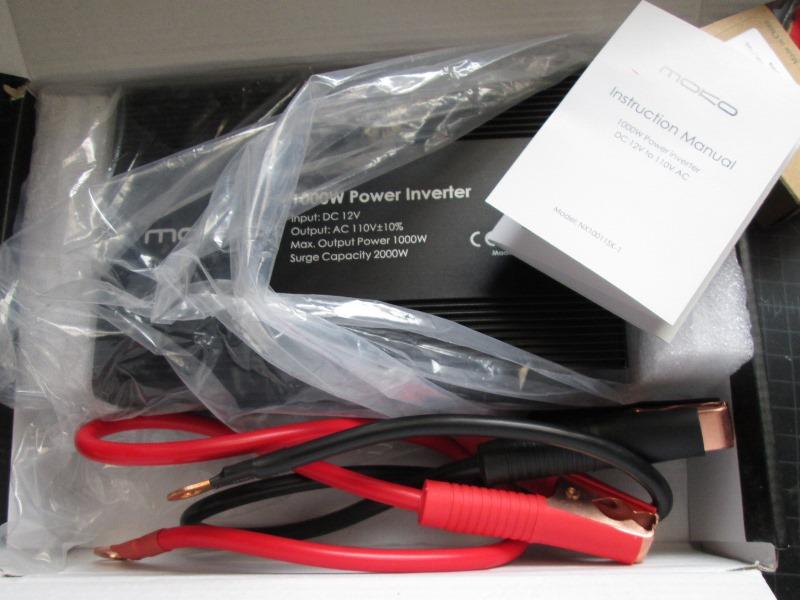
Pretty nice for $38. Opened up to see internals. Only thing I didn't like were the 4) 40 amp mini fuses soldered directly to board-wont be any 'in field' fuse replacements.
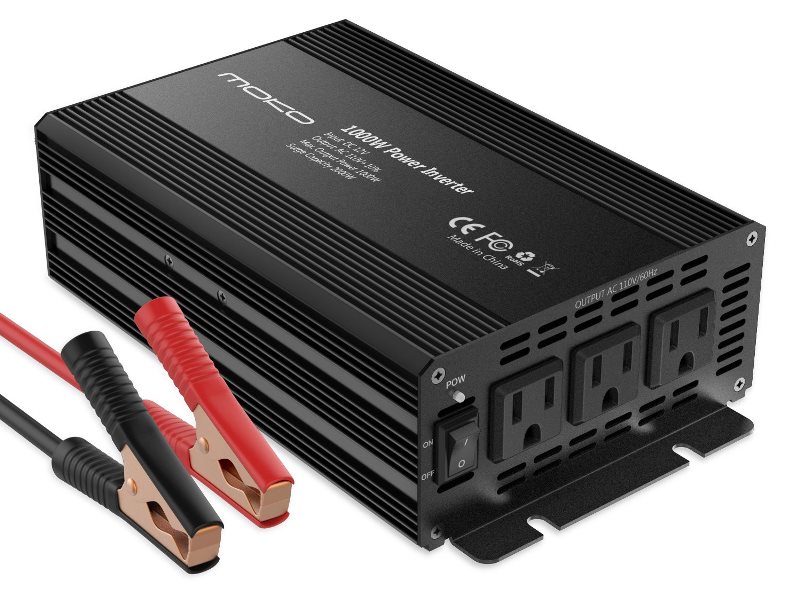
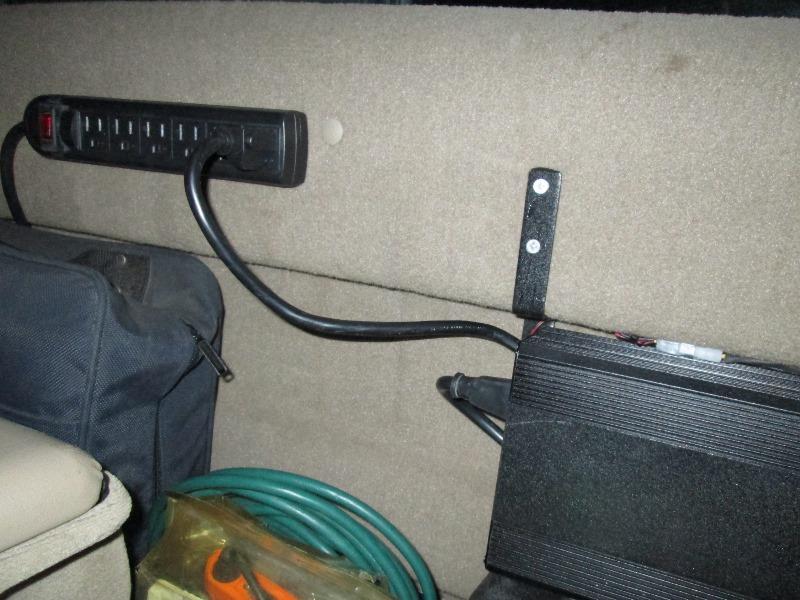
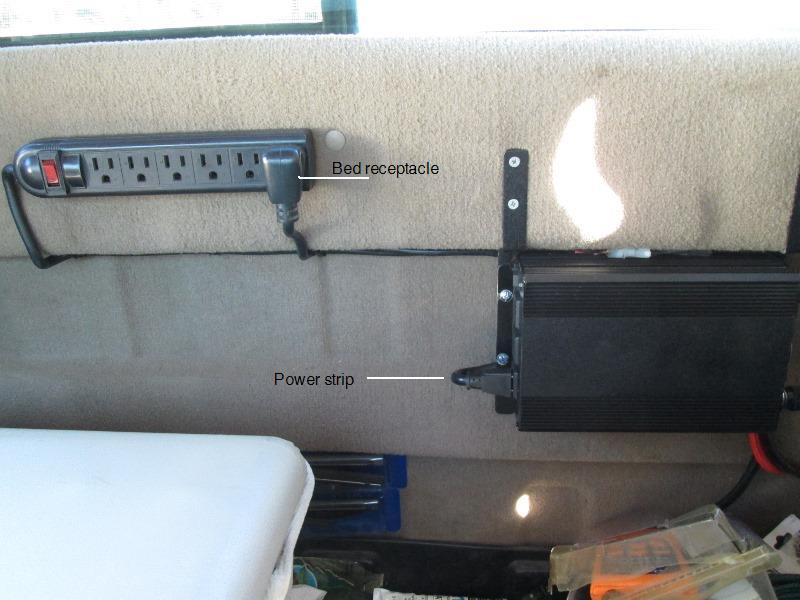
If into modifying, would be very easy to. The 3 receptacles are fed by single leads that feed all 3, cut and splice in case mounted fuse holders or thru a circuit breaker. May do later. For now I'm going to add a small power strip with 15 amp breaker, run everything but fridge thru it, plus would be easier to access.
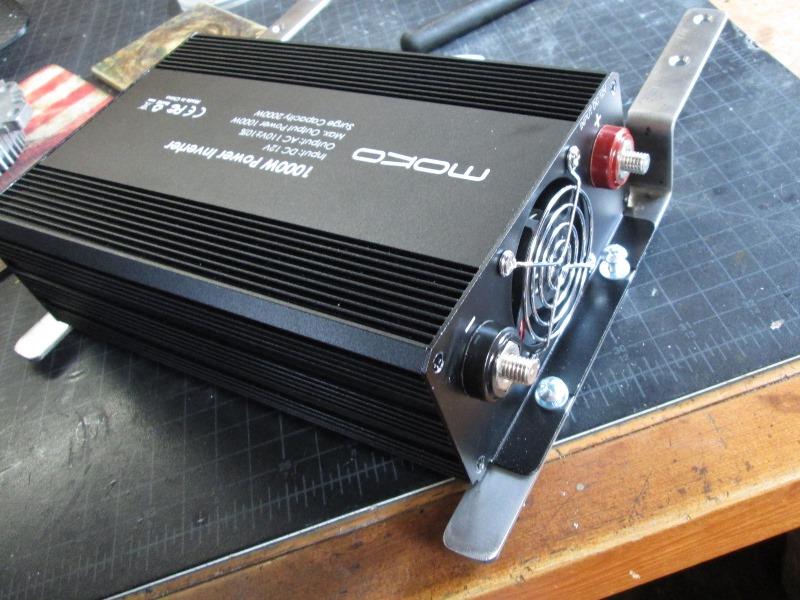
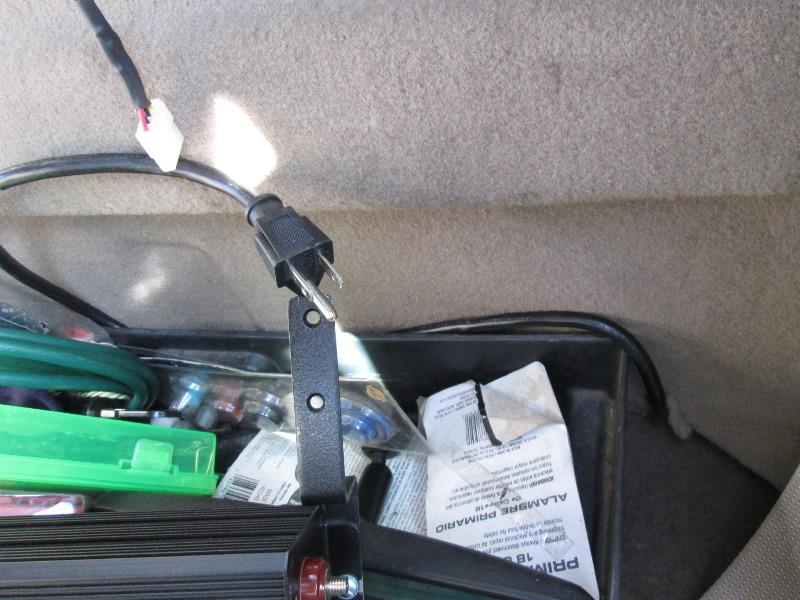
And inverter mounted to the brackets. While case open I did solder leads to the on /off switch terminals for a remote switch. Leads run to a molex connector. (old computer stuff). Other half of molex I soldered leads that will run to dash for remote switch. This allows me to mount inverter without knowing how long wires need to be, plus I can unplug if inverter needs to be removed with out cutting wires.
I should note! inverter did not come with remote switch. Adding remote is simply running a wire from hot side of case switch to new remote switch and back to case switch load or out side. Basically a bypass switch. Reason is safer (I didn't check this one) but some inverters do not use full 12v+ to turn on inverter.
Pause to install the dash remote switch.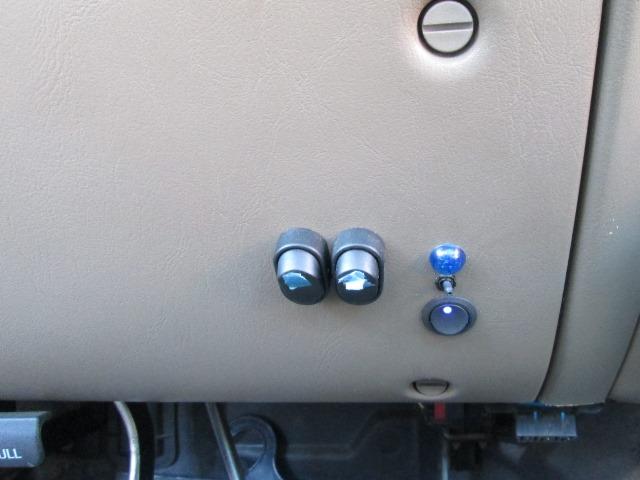
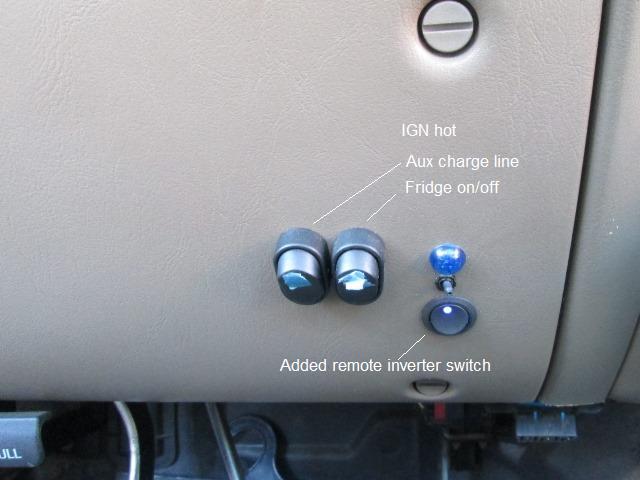
Installed remote switch in dash, (existing switch on left turn on aux charge line to camper, middle turns fridge on/off. Pilot is from refer), bottom right is new inverter remote switch. From inverter location terminated with molex connector ran wire to new switch. With inverters switch off, the remote can turn on/off inverter. Case switch still functions (though cant turn off if remote switch on).
Cable for bed plug and molex connector from dash remote switch. Doesn't show much-Cut off end of extension cord, pushed thru existing grommet in wall and routed under bed, up between bed walls to bed receptacle connection.
Bed receptacle done, ready to plug into inverter.
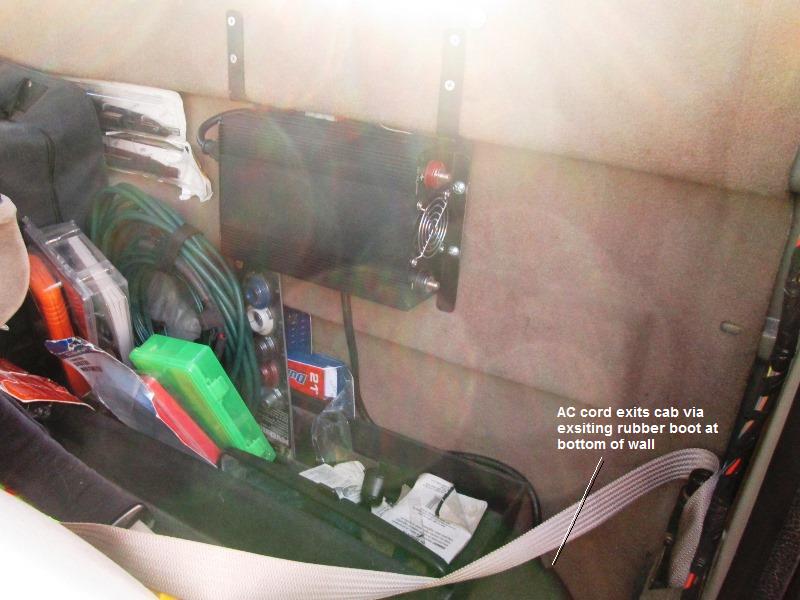
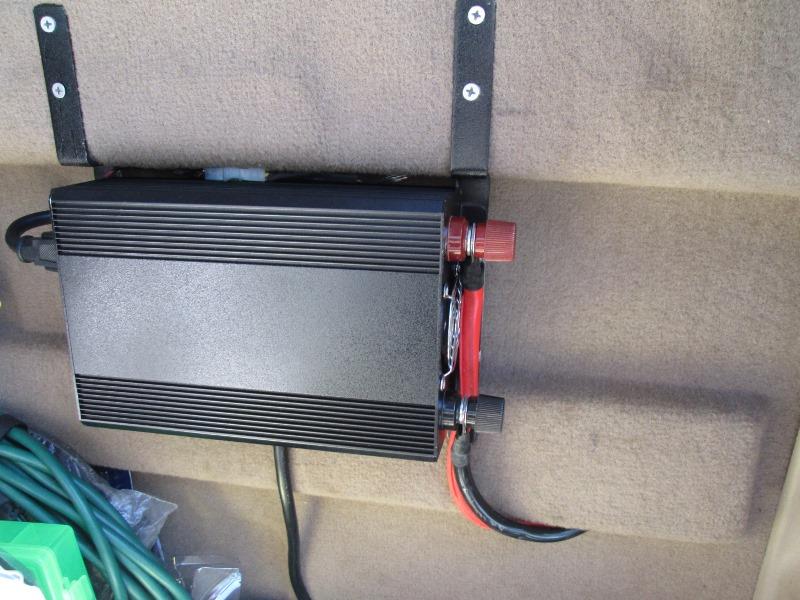
Mounted. Nice morning sun..Inverter mounted. Its spaced about an inch from back wall, 1/4" from lower fabric 'box' and about 1/2" from top box.Seat is about 3" away. Plenty of air
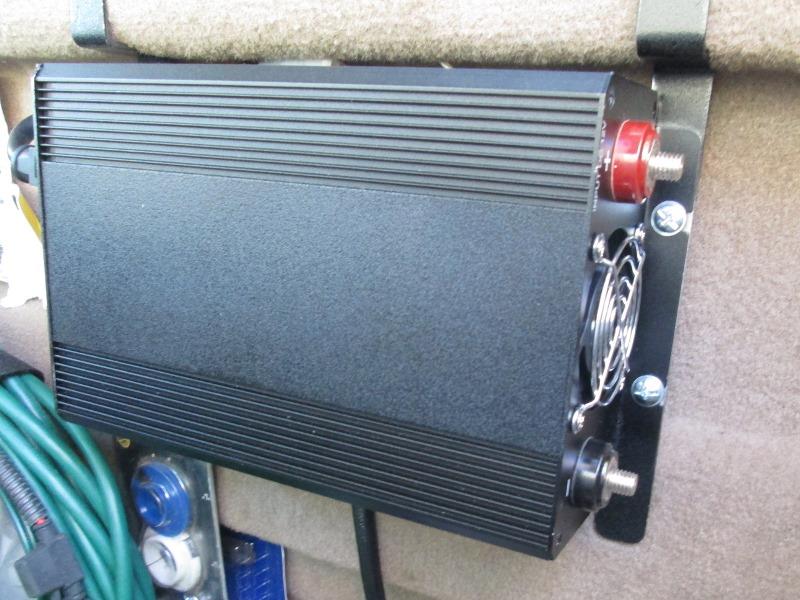
I did paint center textured black to cover upside down text and the brackets. Plugged in bed receptacle and hooked up the battery jumper cables again. Testing in dash remote switch, plugged in heat gun to bed receptacle, works. Kind of nice as its rated 1000constant/2000 watts peak. This one switching the heat gun to high 1500 watts it runs for about 1 1/2 seconds before it shuts down power however it comes back on trying again and repeats. Verses one in camper when it passes use rating it shuts down completely and has to be reset.
Battery cable& fuse connection
For wire I'm using jumper cables. $16 for 20' of 4ga wire (though copper coated aluminum). Copper wire would supply more battery amps, & heavier gauge especially since I extend length.
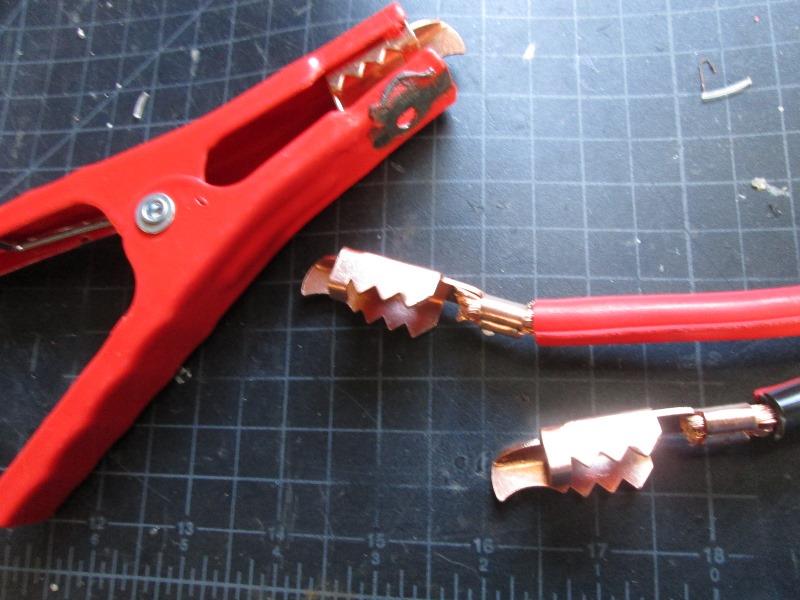
Ground out the rivets and removed cable with ends, the other reason to use jumper cables, (other than cheap) pre made ends
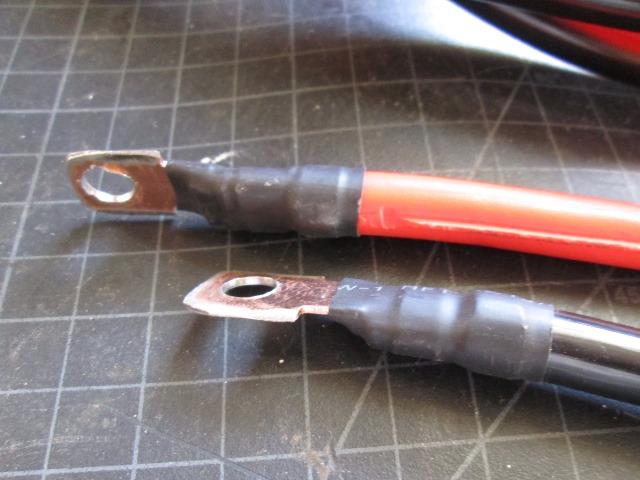
Cut/ground to use as eyelets. Drilled out hole to 5/16". Double shrink wrapped.
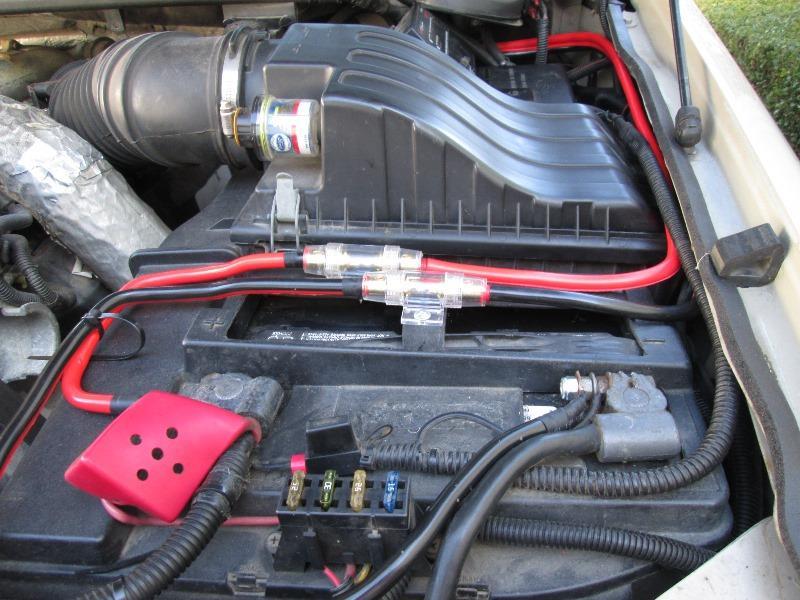
Using inline fuse holders. Main need is power wire needs to be fused, that's a lot of cable direct from battery. Using 100 amp fuses to maximize current flow while protecting battery and wire from direct short. Using on both hot & ground to allow cutting cable to needed length to make battery to fuse connection and easier routing thru truck from cab while keeping pre made ends. Crimping new battery lug connectors a pain. These type of fuse holders get away from that and simpler to use. However this is the first and last time I use this style of holder. The holding power of small set screw is not very secure, at least on very fine strand aluminum wire. Saves from installing battery lugs but never again. This whole project is done by the least expensive possible but these are junk. On this inverter install should be adequate for now, barely.
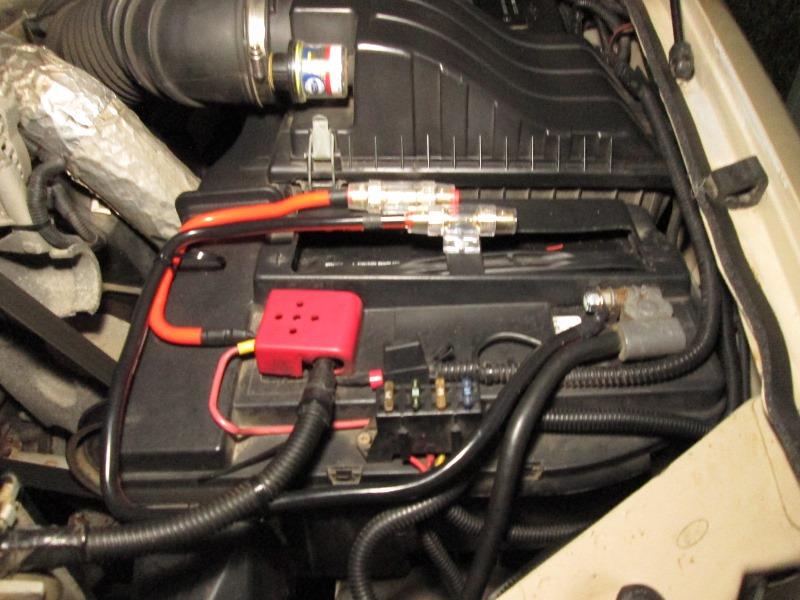 Battery connection done. Down the road will replace with ANL fuse holders, crimp on lugs. At that time, knowing now actual length of wire needed, I may replace with copper. Calculated usage (350 watts) voltage drop is average 0.42 volts, copper would be about 0.22. At max load of 1000 watts would be 1.1 voltage drop, copper 0.6 volts.
On to the battery cables
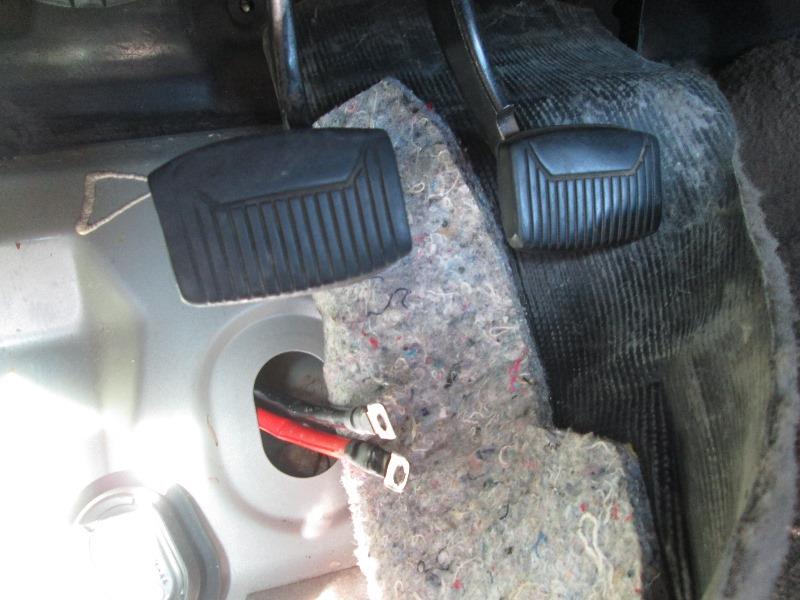
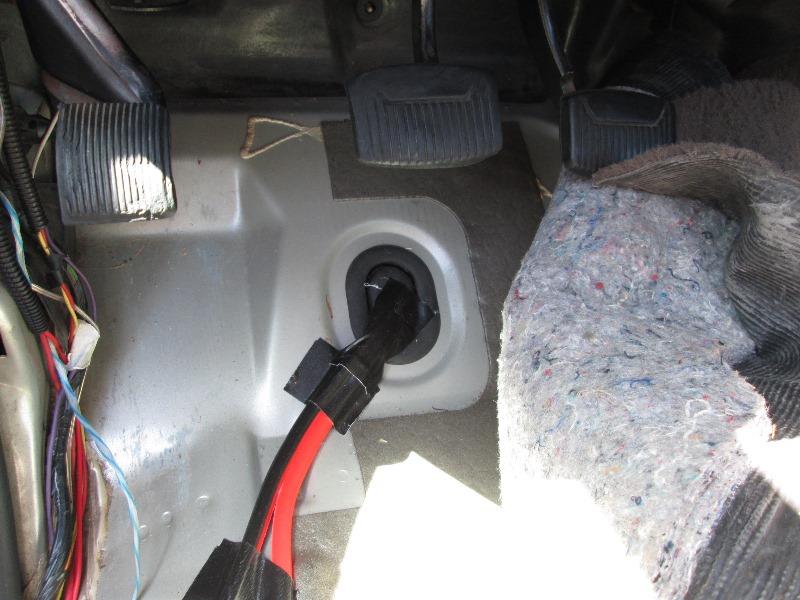
Now the hard part, getting battery cables from cab into engine bay fuses...Wow. I was so close to drilling thru the trucks floor beside the seat and door. Be a good place as far as routing wire easily. Double structure so it wouldn't see direct road wash. But I just really didn't want to. hee hawwing around I looked the front plugs again under carpet. They would work but be difficult to get cable to turn into it, and right where my boot sets. If run along door sill then up inside of firewall, over and back down between pedals to floor maybe, at least it wouldn't be under my boot. Pulling back the carpet to see where I could run cable, discovered a 2"x3" rubber plug! Hokey smoke.
Pulled the plug and there's another piece of painted metal about 2" away. Got under truck and looking up there's another identical hole but about 6" toward door. Which is directly below where cable needs to go up engine bay firewall. Enough space in the double wall box for cable to easily make the S turn to go thru. Rubber boot sets a about 45°, because of the S turn cable is already wanting to lay flat on floor. Its between clutch and brake so I wont be grinding on it.
Shoved cable up from underneath to see...couldn't have planned a better option. Sooo glad I hadn't drilled floor. Pull it out, from engine bay dropped the cable down then started working thru holes. Several trips from below and above pulling a few inches until enough cable was inside I could reach while underneath, push and pull until I had enough to reach inverter. tucked cable out of harms way, made the connection at inverter. That was a chore. Went back to hole in floor to put the rubber plug back in- doh!.Good grief, forgot a bout the plug. I could slice plug and slide over cable but it may not seal.... Or undo what i just finished and slide it down cable to hole... Apart it comes, pulled inverter connections and cable back to hole. Cut a slot in boot, slide over cable and rerouted back to inverter. Although this time I went behind the wall covering to hide cable.
Prospective off but hole is between clutch and brake pedal. I tried several times its just out of foot placement. Still fully wrapping with gorilla duct tape then tape it down though it doesn't offer to move. Carpet is pretty stiff then carpeted mats and plastic mud mats on top. No worries about it grinding thru the 1/8" sheath but last round to-it, cut and lay more carpet pad on either side of cable.
2 days I've been on this project I was stressing over the cable routing. Stoked.
Ran wires to inverter, pulling back into engine bay with a bit extra cut to length and attach to fuse holders. Button up the inverter connection, reinstall the trim, sill and other stuff removed.
Last is zip tie the bejewels out of cables, well after I get some loom to cover it all.
Currently, not shown, but positive is wing nutted to battery post clamp. Don't know what the inverter uses when off, assume some standby power consumption. Nice would be a constant duty solenoid to switch battery power, simple disconnect desirable. But the wing nut will work for a while.
Started truck retested everything with 600 watt heat gun=about 60amp load on battery. Does kick truck to 13.8-14+ volts at idle. Fridge draws 325 plus charge, say 350 watts/3 amp AC, half of what tested at, or 30 DC amp load. Should be good.
Few minor pick ups to complete, Coming up with an easy way to switch refrigerator AC source, a disconnect for battery to inverter and piddly stuff as I get around toit. Have a week out trip planned soon so get some really testing and results. Anxious to see if improvement on cooling.
UPDATE
Just returned from a week out and using the AC inverter to power fridge on the road is simply amazing. Though the air temps were only in the mid 80°s, fridge stayed cold. Actually had to turn fridge temp down. We had placed our thermometer in the cab so we could 'watch' fridge temperature. Plugged in overnight before we left the pre cooled fridge started out at about 39°. Once on the road after couple of hours the temps started dropping. When we stopped for lunch the fridge had fallen to 35.6° so turned the fridge up a notch. Just unbelievable. When on DC the fridge was lucky to maintain mid 40s.Am starting to hardwire camper, replacing the temporary extension cord. Was going to do some type of auto switching between AC sources but as that is not our normal scenario just unneeded, Decided to simply add split AC receptacle at back of fridge. Manually plug fridge into camper AC source if we camp with shore power. If we/you travel and nightly stop and have shore power then manually moving plug might get old. Several ways might be done, simplest would be to reroute fridge receptacle inside camper to make easier but even that, doesn't seem worth while. Will make a nice project if I want to upgrade but for now this works.
Basically what we have:
Truck mounted inverter with bed mounted receptacle that campers fridge AC plugs into.
A 12v ignition controlled switch in truck that turns on/off fridge. [This is important, if fridge not turned off it seeks alternate source and will go to 'check' within a couple of minuets if AC or gas not available. Fridge must be manually turned off and turned back on to clear 'check' light. ]
Fridge has added 3 way switch that selects 12v source, camper or truck, that turns on relay feeding 12v to fridge.
To start an AC source needed, typical is shore. With fridge 12v source selector set to camper (normal), Turn fridge to auto/AC, once running in AC turn off fridge 12v power
by selecting truck. Once truck started and sending 12v to fridge board, fridge comes back on and auto goes to AC if available (inverter turned on and fridge plugged in to inverter).
Alternatively if not on shore (camped on gas), plug fridge into truck inverter source (if not already), turn 12v source to truck, start truck turn on inverter. Switch fridge to auto/AC, once fridge running on AC inverter shut truck off. Fridge turns off. When truck restarted sends power to fridge control board, comes on and starts in AC (if inverter turned on).
A lot simpler than trying to describe, all but semi auto once set up. The key is ability to turn on/off 12v to fridge. Fridge does what ever it was last set to when power restored. No further action required remainder of day, fridge turns on and off with truck. Once at camp, unless we have shore power, flick inside 12v switch to camp, turn to gas. Changing AC plug not needed,
TO DO: While truck ignition turns on/off fridge the inverter is manual. Stoping I turn off but if forgetting the inverter still running, even though no load (fridge auto turns off) so wont kill battery. But I am adding a relay in line with the inverter remote switch so when truck shut off it automatically turns off inverter. (Or inverter can only be turned on with truck running). Primarily due to other inverter uses 'could' kill battery within a few minuets, just do not want the possibility. I used air compressor plugged into inverter to air up tires last week, turned on inverter and truck was off, that's when I realized potential of draining batteries, say a phone charger or something.
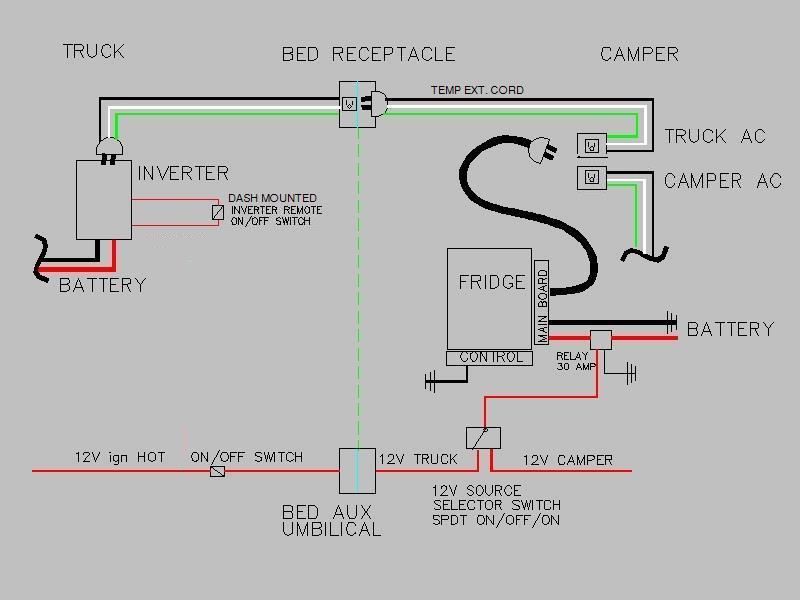
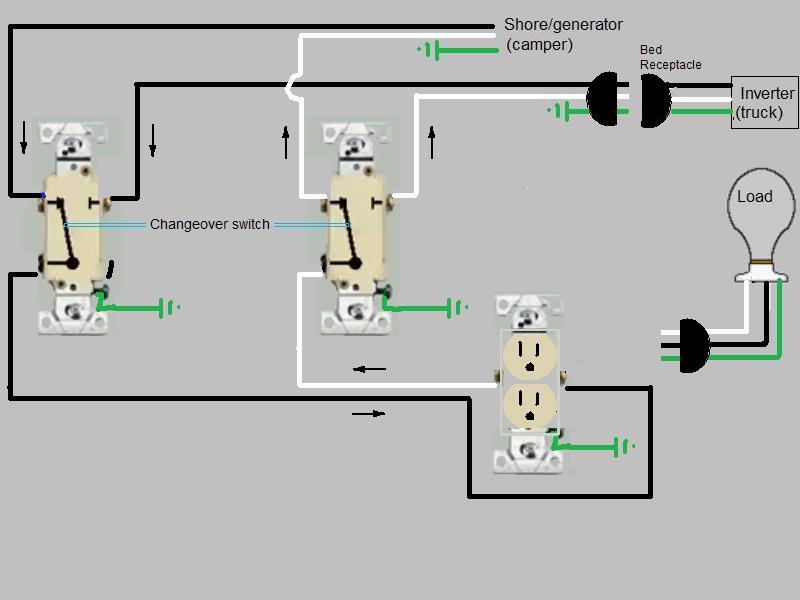
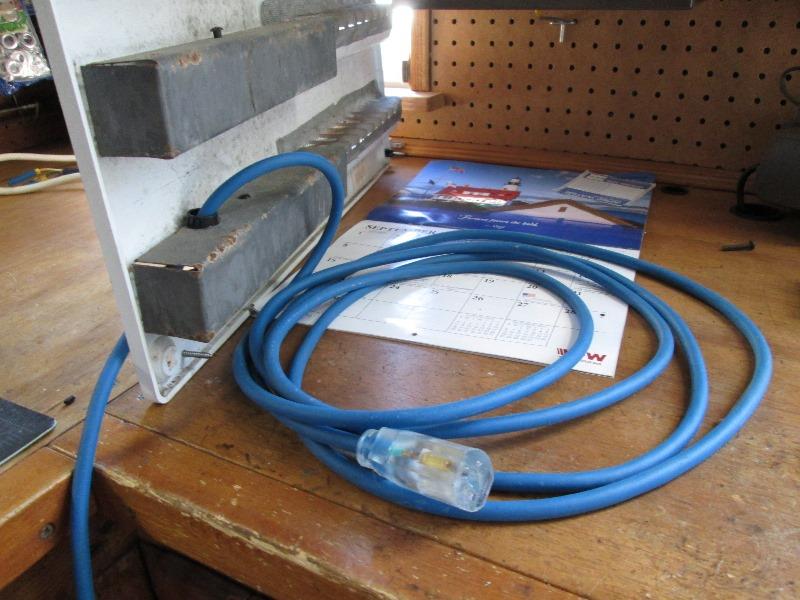
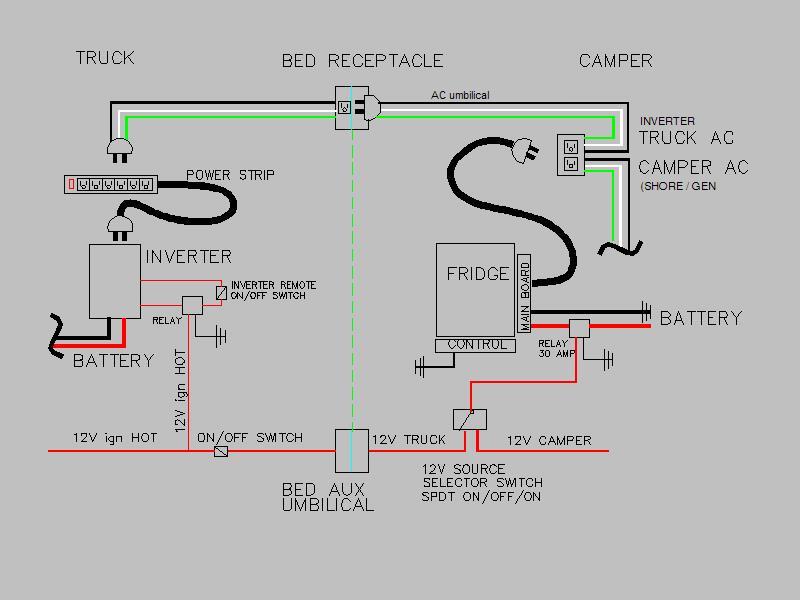
Wiring as set up with temp ext. cord.
Finalize Camper wiring Hardwired AC umbilical cord replacing temp ext. cord, Add split receptacle in camper. Add power strip to inverter and add ignis. relay to remote switch
New AC umbilical, Drill 9/16" hole, insert plastic grommet. Cut off female end of 14gage extension cord and pushed thru. From inside pull until about 30" hanging out side.
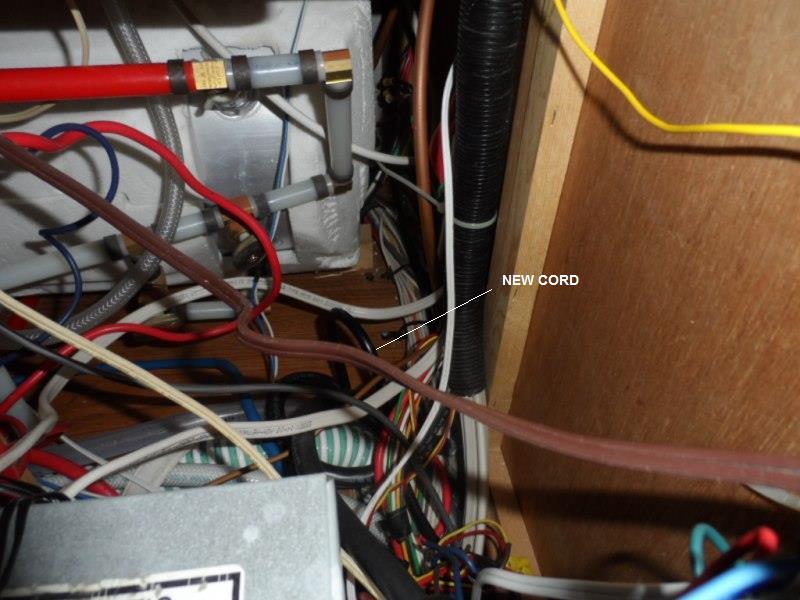
Cord pushed into camper, front left corner behind converter. Route into water tank box, leaving small excess loop.
Routed across wall at back of water tank box.
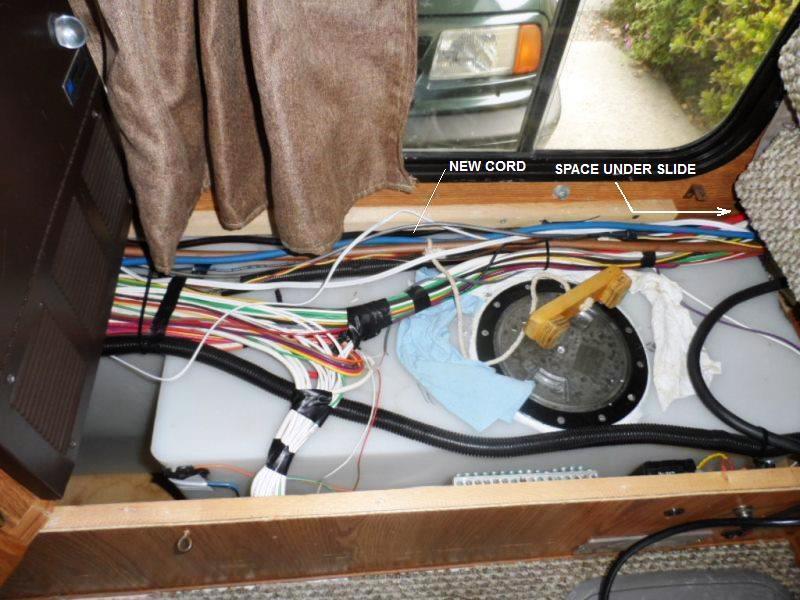
Across water tank to area under slide
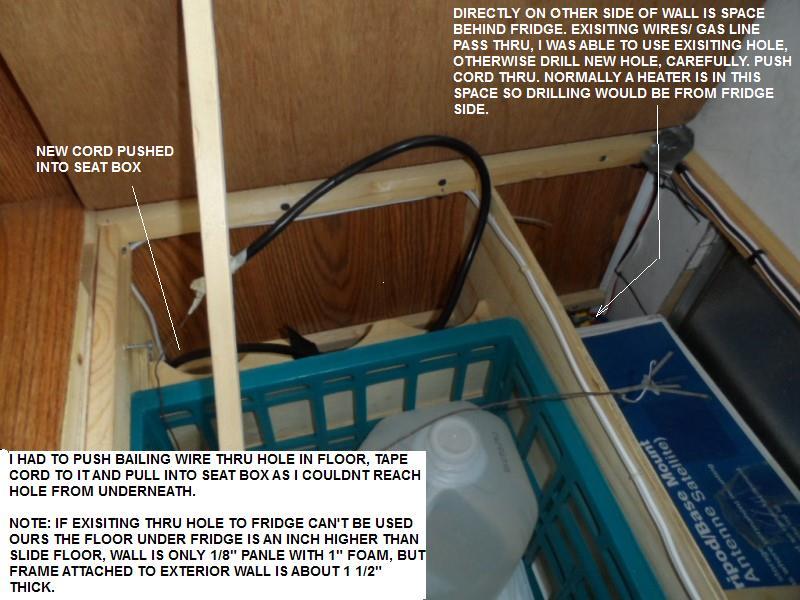
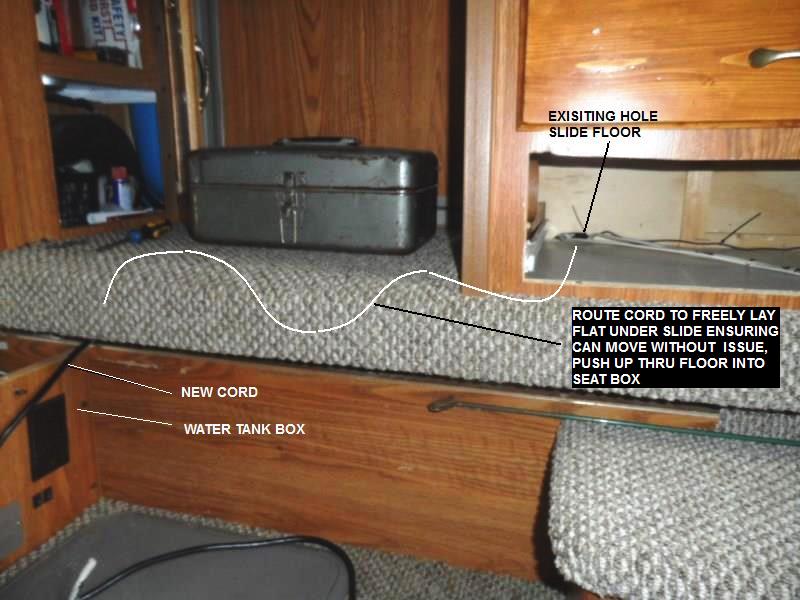
With seat box top removed. This was the most effort, getting cord into seat box then thru wall back to fridge.
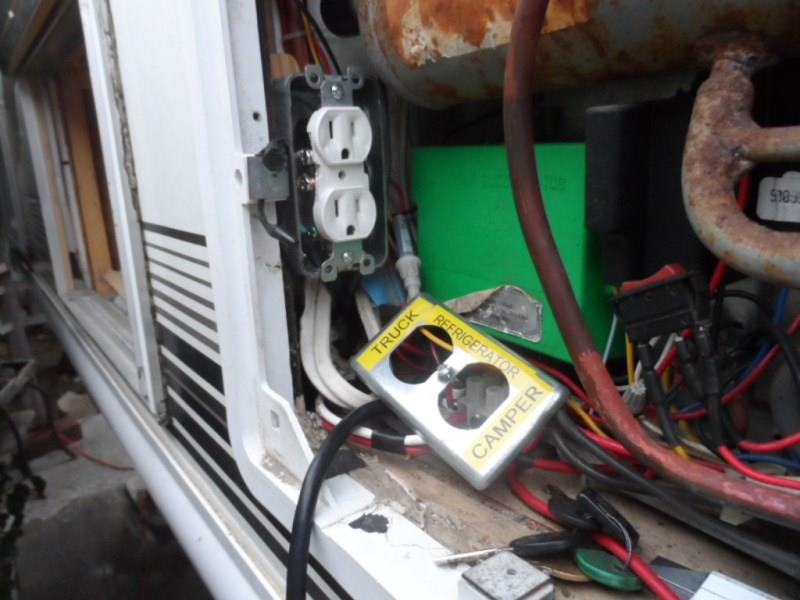
Once cord inside removed existing wires from box less receptacle, remove receptacle. Mounted new box, attach existing romex leads to lower receptacle (after removing tabs between outlets). Attach new cord to top outlet.
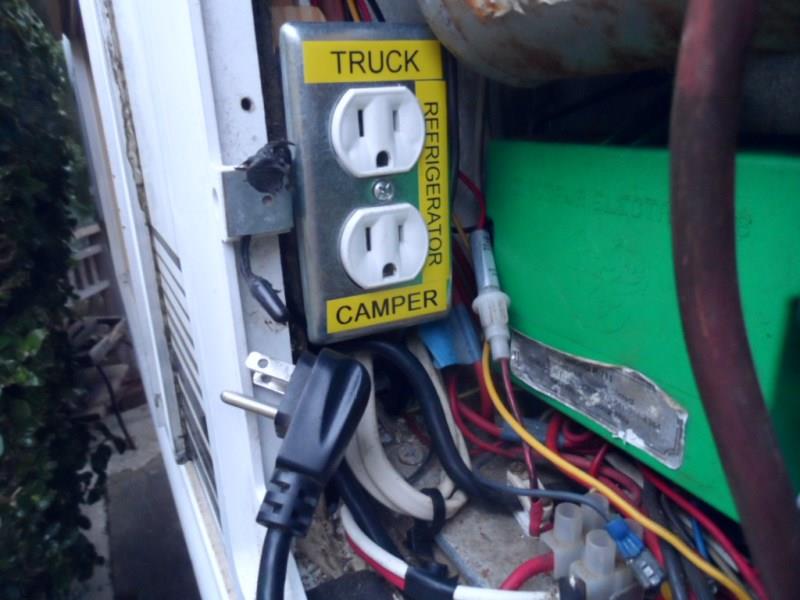
And done. We usually don't camp with shore power, plug would normally stay on truck receptacle, will only need to access this if shore power available and wanted. Mentioned earlier but if nightly switching AC source then another means of changing likely desirable. but this will work for us. If anything I would simply make this new receptacle a junction box, extend leads and fridge pigtail to an inside receptacle just to make a tad easier.
One round to it though is I was going to use a snap lid cover so unused outlet would be covered. Simply didn't check placement with snap lid in place so ended up mounting box an inch to high. Easy enough to lower but also need to change fridge pigtail to a straight plug to use snap lid cover. I also am going to look at hinging the fridge vent cover. I never understood why they clip on as they do
I now have option to either use trucks inverter to power fridge with AC or previous modified DC setup. Though I now foresee always running the AC, our modified DC system was able to run fridge and still charge batteries, but the AC element just higher wattage (colder).
When I modified the DC system to work (supply enough power) and added ability to control fridge from cab I didn't realize could be used for AC, course I didn't have an inverter then. We do not use the gas on road, however if you do or I need to, adding the in cab/ switched ignition control of fridge would let you use, easily turn on/off say when driving into a gas station or while refueling, without ever needing to go inside or to back of fridge.
Round toits...
Anyway Roundtoits
Lowered the box and receptacle 3/4". Replace cover with labeled snap lid cover. Gothca1: Realized, tucked behind box, fridge board cover (green) couldn't be pulled out far enough to clear board components. Removed the receptacle cover, remove board cover, trim about 3/8" off edge flange of board cover so it can be removed. Clears box, but still need to remove the snap cover plate, minor as accessing rare.
To use with snap cover had to replace the fridge right angle pigtail plug with a straight plug.
Replacement pigtail
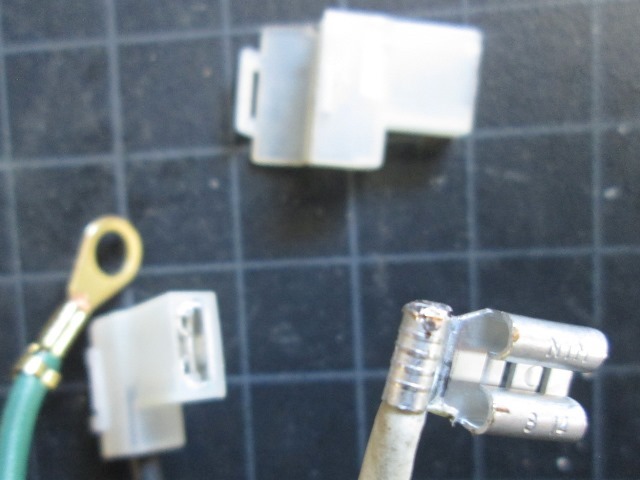
I have several of these 12" leads, has ground eyelet just had to add the 'flag' tabs to fit behind board cover. Transferred the plastic isolators from old cord
New pigtail installed
And normal position. When camped without power nothing needs to be done in here. Only if shore power available and wanted will I need to open. Well, pre cooling before trips...
Still looking at hinging cover. Full length stainless piano hinge would work but would need to be surface mounted unless a lot of trimming to cover and camper flange. Actually have to be surface mounted to get full 180° swing. Paint it white shouldn't look too hokey.
Other round to it
Originally added new remote switch where aux charge switch is. The remote switch was very hard to see on the road. Ended up swapping wiring between it and Aux charge switch as shown. Aux charge is no longer primary power for fridge so placing inverter remote next to the more visible switch beside the fridge on/off just makes more sense. Plus I can 'see' on the amp gauge if aux.charge on.
Also added an Ignition controlled interrupt relay to inverter remote switch (shown on diagram below) so inverter can only be turned on if truck running (auto turns off when truck turned off).
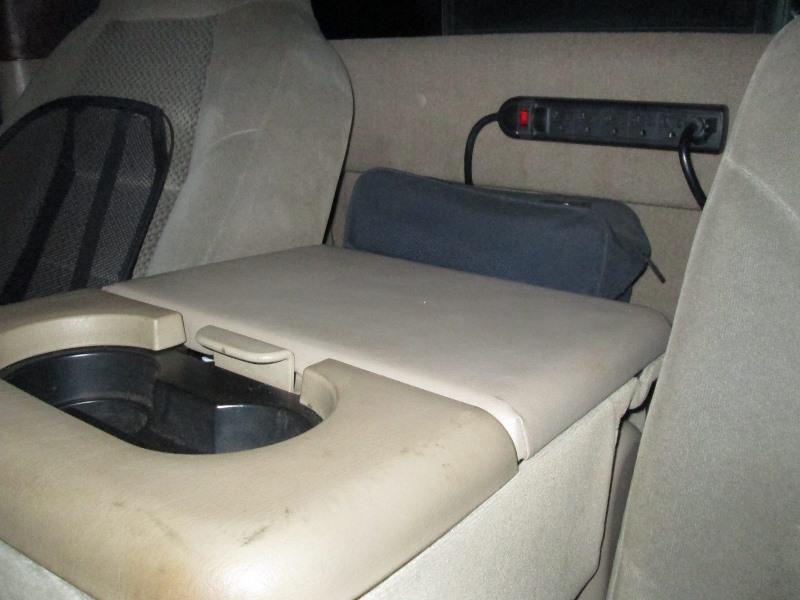
Last thing was add small power strip plugged into inverter, plugged fridge into strip. At 15 amp hopefully protect inverter (and its soldered on fuses) from shorts on the output side. Mounted behind center seat section/console also more accessible from either seat or from outside.
When I get around to it is add some cable clamps to secure fridge cord make a bit tidier dyer looking. Dont like the cables but...function over form. Will use heat gun to form cable so they lay on under side of wall box over to inverter.
Done.
Half a dozen clamps after shaping with heat gun. Change the bed plug to a right angle plug, was hitting top of seat.
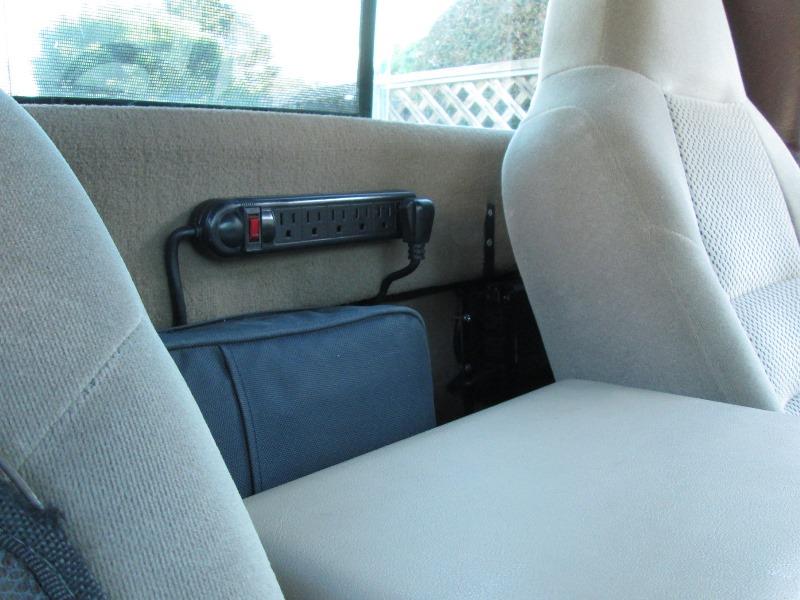
Easy access if we need AC. Inverter tied to ignition. If we need power without truck running, using the switch on inverter will allow but I see that as a hazard-need to add big ugly LED somewhere...
And final completed wiring
Did get the fridge lower cover hinged-moved to its own page. Fridge cover hingeThis page messy enough
Back to our F250 truck page
Back to Ourelkhorn Camper Modifications page