Swapping in mirrors with lights on 2001 Ford Super duty
Swapping mirrors from a later year truck. Nothing new here-something thousands of folks have done, I have folding, telescoping, power adjusting glass tow mirrors on our 01 F250. Couple of years later Fords came with mirrors that had signal and running lights. Been wanting to add the mirrors with lights for years. But pre '03 doesn't have the required wiring for the lights and uses a different plug. Some of the aftermarket mirrors are now supplying adapter (rectangular plug to older round plug). Makes it easier but still need to find and run signal/running light wires. Which is the real work but not difficult, with the resources of other folks over the years documenting this, what you might incur.
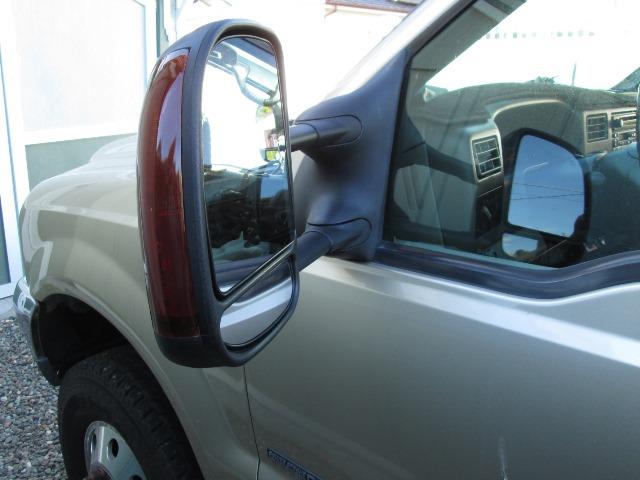
I'm using same rounded tow mirrors but with lights (they are also heated but I'm not wiring the heaters). Many swap to the later squared mirrors. The mirrors just bolt on and are interchangeable between all the years 99 to 14 I think-its just the wiring that changes. But again doable. There are too many how-tos for me to make the effort so this isn't. Just documenting what I did. Pretty straight forward.
Mirrors ordered came with adapters to match my pre '03 round plugs. They will plug into existing round plug/3 wire in truck to operate the power adjusting of the glass. For the lights Ill cut the wires off from supplied mirror plug. Run signal, running light and a ground wire to door. These I'll connect to the wires removed from mirror plug. Likely just use bullet or spade quick connects or just solder.
The running lights are easy. Since mirrors are LEDS not much draw and can be tapped anywhere. Brown wire from headlight switch. (if non LED probably should tap brown wire to trigger a relay as switch isn't designed for high loads). Easy for me though because I already added a relay to power cab lights triggered by the brown wire so that's what I'm using. Add a double tap to relay output to feed mirror running lights.
UPDATE 2021: I originaly ran mirror running lights tapping relay that feeds cab clearance lights, but when cab lights turned off (when camper is on) no mirror lights. SO disconnected from relay and ran back to trigger wire on manual switch that feeds relay, now mirrors come on auto with parking light switch. Simple because so little draw.
The signals though is bit more work, mostly finding source wires. Several ways to do but I'm tapping the wires in the loom on top of steering column just before the plug on top. The one link above identifies colors so other than access makes it nice not stabbing wires trying to find.
The plan:
Waiting for lights to arrive I'm pre wiring but not removing the old mirrors until new ones get here. Having identified what I need after reading several how tos.I'm starting with drivers door-wire to under dash, connect to source feeds, continue to passenger side. Once wires fed from driver door to dash connect running light wire to relay, then back out adding a length to reach passenger door. Then open up steering column. Run drivers side signal wire to left signal source.Connect the ground. Drivers side done. While column open connect end of another wire to the right signal source to feed passenger door. Button up the steering column. Run the right mirror wires, signal and running light, across dash to feed pass. door. Open up passenger door, snake fish wire from door to dash, pull the wire along with a short ground wire into door. Once wires run then Ill mount the new mirrors, connect to pre wire. That's the plan, sounds simple.
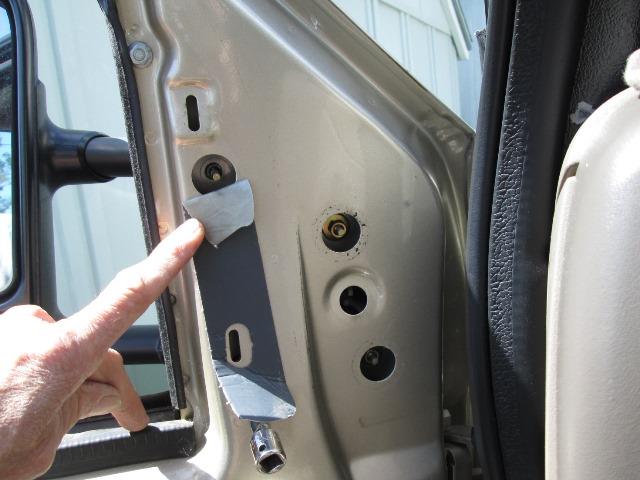
Removing door panel. Remove the large triangular plastic trim above door panel, behind this are the bolts holding mirror. It pulls straight out away from door. Roll window all the way down. Remove the switched panel, pull up on the front edge then slide forward. Unplug all the switch plugs, they only fit one hole in one orientation so you don't need to pay attention to what goes where. Carefully remove the small light lenses lower corner of door. End with slot first. Behind this and the switch panel are screws. Remove both screws. Now door panel will lift off. Raise up about an inch then out. Several hanging clips but should easily come off, just ensure your free of the plastic sheet glued to the door, it may catch. Remove 4 screws holding speaker, unplug & set aside. Behind the speaker is the mirror wires and plug. Also access to wire thru door boot to cab.
So now its just execution of plan:
Drivers side first, . Remove the large fuse panel access door under steering wheel. Between door and cab I released the boot ends from metal holes. Easier to work the boot. Door side I entered boot thru one of the off center holes in end. Working thru speaker hole I snaked a piece of aluminum wire thru the door to cab boot to under dash (just above the ebrake). I was abel to stick finger thru door boot hole toward under dash, from under dash I 'found' my finger. A little bit of a dogleg but free access- Not easy not fun but doable. Once wire thru boot inside I could feel the end inside and with finger tip was able to guide it. I twisted/taped ends of red & yellow 18ga wire and a 3' piece of 16ga black to the fish wire. Pulled the wires into door.
UPDATE: Few weeks later adding power steps-kit came with a 18" piece of semi rigid plastic tubing-sooo much easier to poke thru boot then feed wire thru tube, pull wire thru then pull out tube-never occurred to me. Makes it a lot simpler
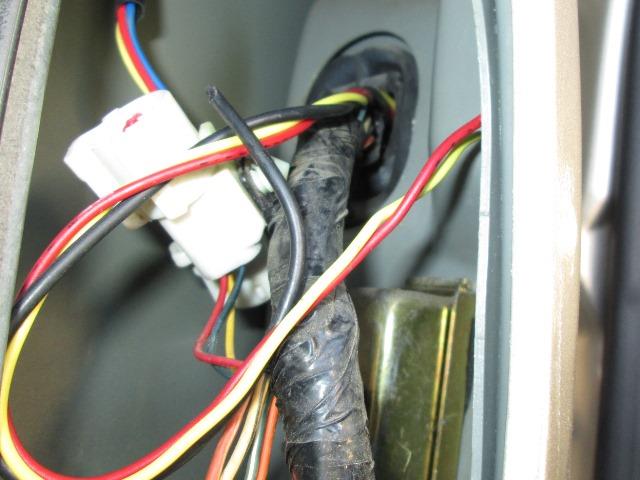
Easier said than done, took me well over an hour to finally get the wires in door. A good portion was just feeding the fish wire thru boot to under dash, once it was thru, 5 minuets-done. Colors are what I had. Setting up with red for running lights, yellow signal, black ground. Once done I'll label wires for future. The other yellow/red/blue wires shown feed the glass adjusting motor. And wires in drivers door to under dash. Where's my gold star...
Ran red wire to running light relay (or wherever your connecting). Cut wire and inserted both ends into spade terminal to plug onto relay, Red wire will continue on to feed passenger door, one running light source connection. Cut the yellow wire to reach top of steering column. Removed the column cover behind steering wheel.
Connecting signal source
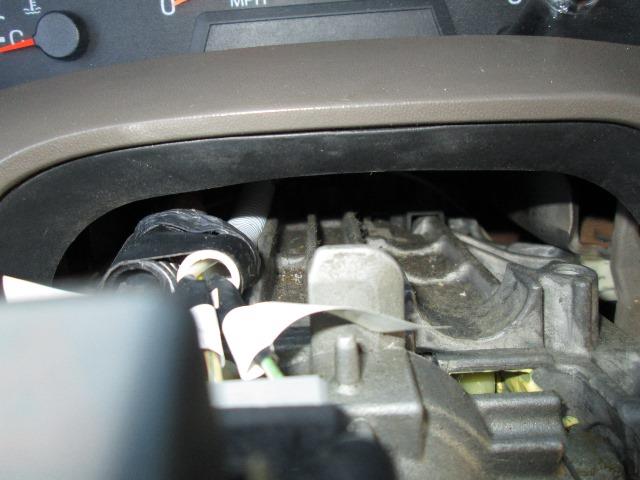
I'm tapping the loom on top of column just behind steering wheel. Removing column cover. On bottom half of cover are 3 screws (and 1 smaller hole for switch release) threading into upper half. Just unscrew and halves separate. Remove lower half. To remove the upper half ignition switch must be removed. Small hole in bottom of switch housing is a BB that holds it. (With lower cover off you see it or you could pull the switch first). Put key into ignition, turn key to ON position (don't start) Lower tilt wheel all the way down (for more room to remove top cover). Insert any thing 1/8" to depress ball, pull switch straight out. Depress the EM flasher switch down. Then work top cover off. Especially on a diesel after removing the cover put the switch back in and turn off. Key left in the on position other than beeping might drain your batteries. However you need to place Ignition switch back in so you can turn on to test wiring.On my 2001 F250 (years are different) I'm looking for green wire with white strip for left signal. White with blue strip for the right signal. They were on the top right side. Used a sewing needle to poke and tested to verify. Carefully made inline incision in sheath, cut half way around, with small X-acto knife. Folded back sheath to expose about 3/8 of wire. Carefully inserted pointed of X-acto knife between wire strands and bottom of sheath. Very hot iron pre-soldered exposed wire. Pre tinned the lead from drivers door then soldered to green/white stripe wire. Tested then taped. Repeated on the white wire with blue strip, slit open-pre solder it and length of wire to feed passenger door then solder together. Test, tape

Just showing the wires. If it had not been for predetermining colors I would been poking all the wires on left side where turn signal switch is. Gotta love the internet and all those who share. Alternately at the drivers left foot is a large bundle of wires where tap could be done. I would still identify leads here unless you otherwise 'know' which wire you looking for.
Between all the testing of wires, cycling switch to on & off (and powering glow plugs) testing signals etc-killed my batteries. Just FYI. Worth resetting the radio to disconnect batteries or have charger going.

Labeled the wires. I ran in a separate short piece of loom to get behind dash. Taped to existing loom. Cool signal wires sourced. Right signal wire and running light wires are hanging down until i open up passenger side, then Ill feed across dash. Buttoned up the steering column.
Pause... Big relief-. Finding and tapping the signal source was my biggest concern. I have a lot left to do but in my mind its all down hill. Now its snaking the wires across dash for passenger side.
Removed the glove box door. With door closed just 3 screws holed it on, pull bulb. Removed the passenger kick panel. Raise front edge of door sill, panel just pops off but there's is one long round push retainer toward firewall that needs to be removed. Pop bottom out of sill, back side of kick panel are 2 metal clips attached that insert into door frame, pull panel toward middle of door opening. I hate these clips.
Remove door panel etc like drivers side.
Sticking my head into glove box space I can see behind dash across toward steering column. Alternately I could remove part of the dash to feed but I was able to feed the fish wire. Pretty sure its not tangled, but if in subsequent dash removal I can cut the wires and reroute as needed. Once fed across, taped wires to the bailing wire and pulled the leads to glove box. Routed over top, I guess its the heater box, then down between it and kick panel area. From door side fed fish wire thru boot,, attached feed wires and pulled into door. Success! Doors prewired.
And Fed Ex just stopped! Mirrors are HERE.
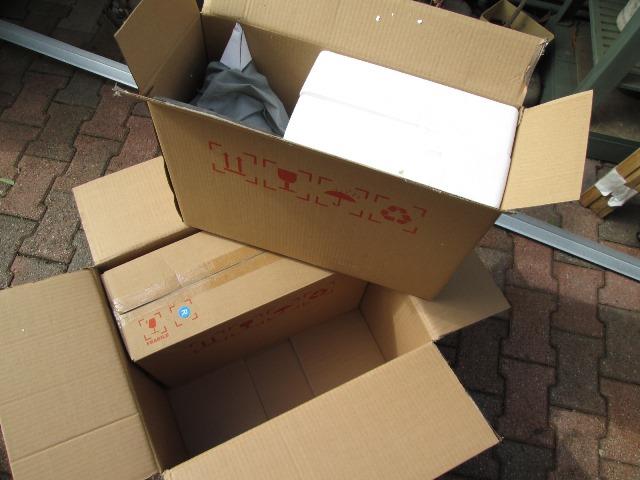
Wow pretty impressed with the packing.
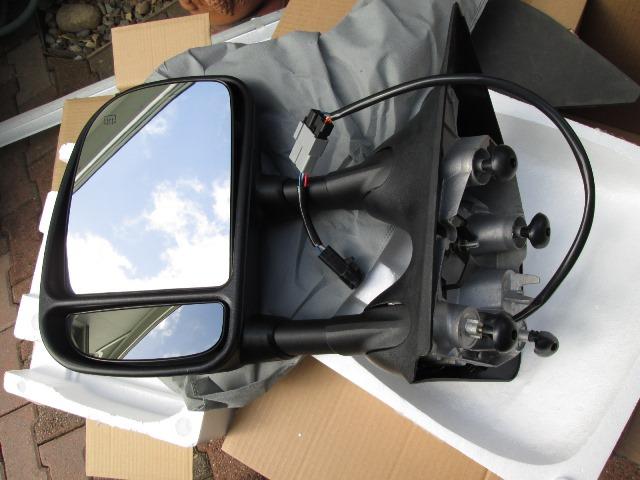
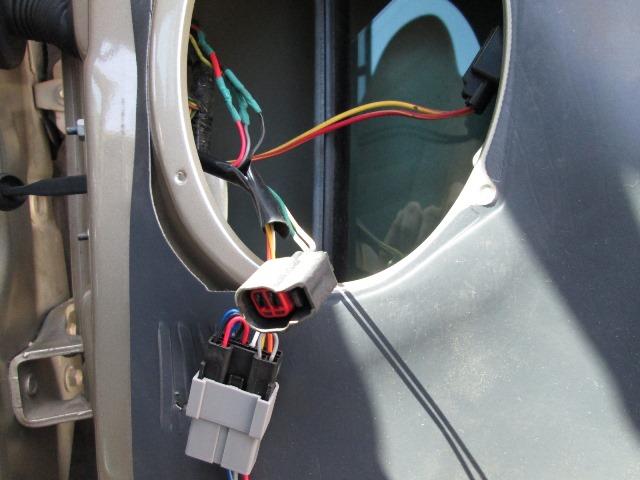
Mirrors in cloth bags,heads in styrofoam boxes. Also the included adapters. There are 7 wires in mirror side, 3 on the truck end. Plugging into truck as is, adjusting of mirror motor functions like stock. The other 4 wires is what you need to feed to make lights, heaters work on our older trucks.
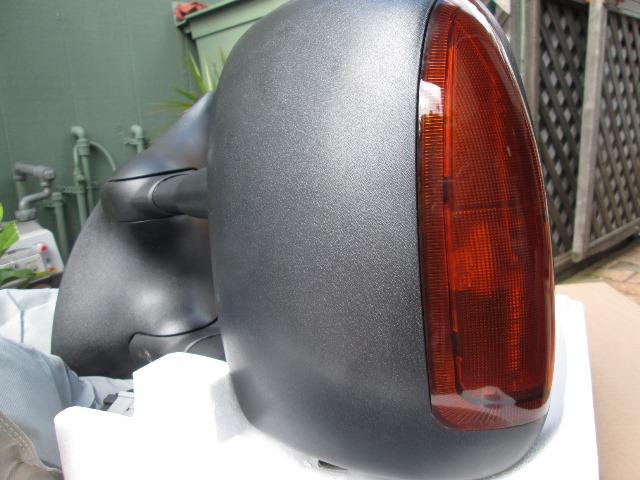
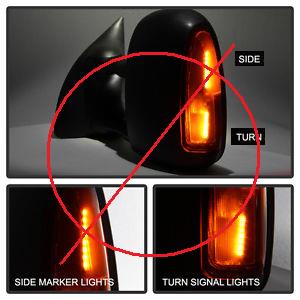
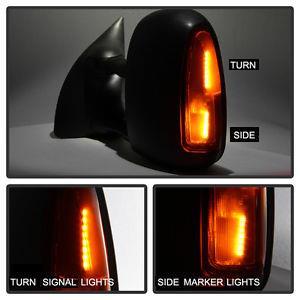
A The whole point, LED signal and running lights. Actually blown away with how nice these mirrors are. Searching for the least expensive I was anticipating junk, but they are really nice. Was kinda wanting smoke thinking orange lenses would be rather loud, but the lenses are very dark amber- I like em- a lot.
First I need to identify wire functions. If inclined you could source/add pins to the adapters rectangular side and add your wires. Or could rewire, getting rid of the stock round plug entirely. Plug directly to mirror plug. Nice clean install but unwarranted IMO. Easier, I'm using the adapters to feed the mirror adjusting motor, Cut the wires from mirror just before plug and solder my leads directly. If I ever need to remove mirrors Ill need to cut-at that time I may add quick connect. For now soldering.
Tested the mirror plugs and wire functions. No documentation so its up to me. The colors used do not match but plugging in adapters easily see which 3 wires feed glass motor from my stock round plug. Then its testing to see which is hot for heated mirror (I'm not connecting), which is the running light and signal.
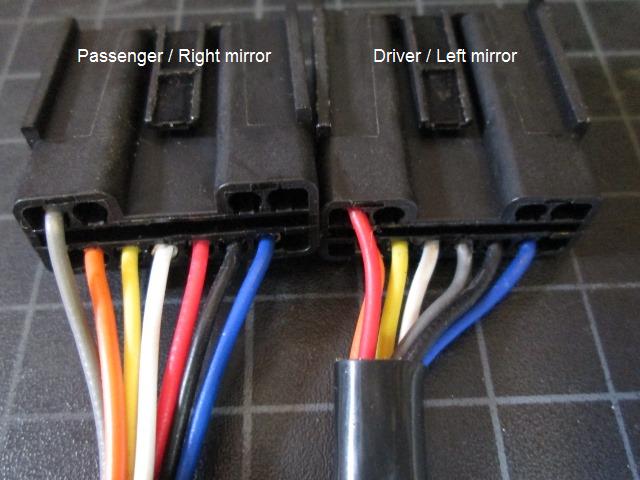
The red and gray wires are swapped between left and right mirrors- no idea why- not like your going to mix up mirrors.
Top row: single pin used is the signal light ( Drivers side is red/passenger side is gray. Color regardless, its the single pin on top that feeds signal light)
Bottom row: from left to right. Orange, yellow, white feed glass adjusting motor, go to trucks existing round plug. Red or gray is the running light. Black is ground. Blue is the heater.
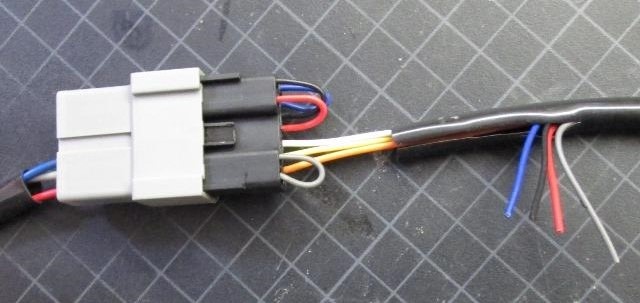
On the round plug, again different colors, though I'm not changing just to identify the 3 adjusting motor wires from truck to mirror thru adapter.
Trucks wiring/round plug to adapter round plug to mirror rectangular plug
truck purple goes to adapters blue to mirror white, truck yellow goes to adapters gray to mirror yellow, truck green goes to adapters red to mirror orange.
Opps-passenger side I also cut the blue heater wire, Ill reseal end. Not hooking up now. I may later if I get a wild hair and can use existing power from within door use, but in 15 years I've never wished I had heated mirrors. Now to remove old mirrors and mount the new ones and wire.
Mount mirrors
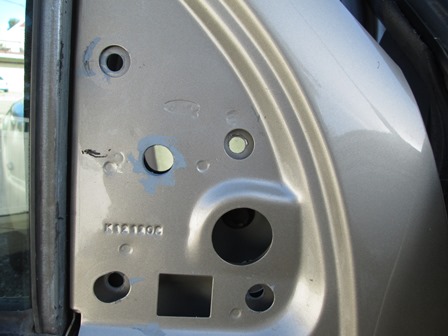
With window open remove mirrors. Unplug harness then remove the access plugs and tape covering mounting bolts, you don't need to remove center plug. Either clamp or hold onto mirror while unbolting. Don't drop the nuts. Factory mirrors the studs had unthread end, once nuts unscrewed I used a magnet to retrieve. Outer nuts would likely fall to bottom of door, the 2 towards window though could fall/ get wedged between door sheet metal halves.
I had read where the new foam gaskets on aftermarket lights are too thick. Well they are a little thick but more dense/ stiffer than what Ford used and do hold out mirror so its difficult to start nuts. Looked at reusing old gasket-its so soft just shreds plus its compressed to almost nothing-using the new ones. The gasket self sticks to back of mirror, it is not intended for it to be under perimeter of mirror housing but between the metal part of mirror mount and truck body. Its should fold over and stick to mount sides but its so stiff it pulls itself back flat. I think that's where some folks error is gasket ends up under the edge-that would keep mirror from setting flush.
Anyway to start simply clamp. Used some small padded 12" bar clamps. Once you get one nut started its down hill. Repositioning/ -tucking in the gasket so its not under the mirrors edge with plastic putty knife until all 4 nuts equally started. With mirror in position its just incrementally tightening. But I didn't and recommend not fully tightening from the get go. Once snug I let it set to let gasket compress. Retightening occasionally over few hours. My concern would be the gaskets resistance to compression that screwing tight may cause truck metal to yield instead of compressing the gasket. Worse snapping the pot metal/maybe aluminum mirror body. No hurry-do some wiring tighten a bit-little by little.
Soldering the new leads. Drivers side spent more time waiting for iron to get hot. Passenger side not sure what happened but red/running light wire was 2" short. Looked back under dash couldn't see anything- it reached last night? Added couple of inches.
Soldered the ground and running light wires-tested to be sure- good to go then solder on remaining signal lead.
Heated the shrink wrap I had previously slid up the wire. Seems to be a lot of excess on this side. Wasn't an issue on drivers side. Taped it up and zip tied out of harms way. Then remembered the oops, the cut blue heater wire is up inside loom err -reopen up loom pull out blue wire. Probably never connect but...Taped up the loom went to plug in--umm
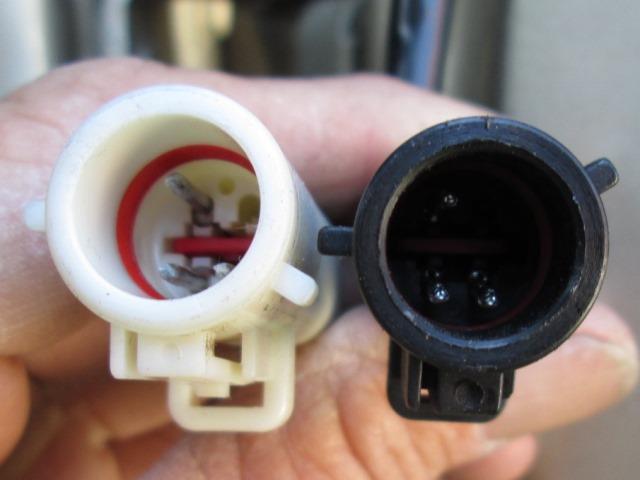
Mirror adapter wont plug in, pulled it out. Note the alignment pin on right side of black barrel. Its clocked differently (2:00 verses stock 4:00) than my trucks plug white (or both stock mirror plugs). Trimming off the little nub and it will fit- wire pins are orientated the same- hopefully not wired different. Trimmed and plugged in, mirrors operated as they should. Hadn't compared the 2. Drivers side plugged in fine- odd that this one different. Loomed with tape, zip tied so they wont fall. Put it all back together. Everything works.
Liking them a lot. I have minor nit pics. The new mirrors set a little different, a bit more sweep to rear. Only because I've been looking at them since 2001 otherwise you wouldn't notice. Other than fixing the odd clocking on the passenger plug, is the drivers spot mirror. Simply doesn't rotate out far enough, half of what's seen is the truck itself. Though these never worked well. I had and probably will on these, add small round spot mirrors at end. More than once I've almost rolled right over a mintage if they're just at my rear fender. LEDS Could be a little brighter for daytime use but at night awesome.
Over all pretty happy with them though. Fit and appearance a lot nicer than I was expecting for non factory aftermarket.
I am going to add a separate fuse block for the mirrors. Couple of reasons- just a lot of wire-any issue would take all of truck down. Primarily though when I tapped the steering column for signal I shorted the right side, twice. Pretty good arc. It occurred to me later no fuse blew...why? Whether just luck or where I tapped is before trucks fuse unknown. But same issue, any problem with mirrors (or wiring) would kill entire circuit- trucks signals or running lights. If on un fused side could be melting wires. I'll check/pull fuses but still think smaller fuse to separate the mirrors from rest of truck. Cheap insurance to add fuses.
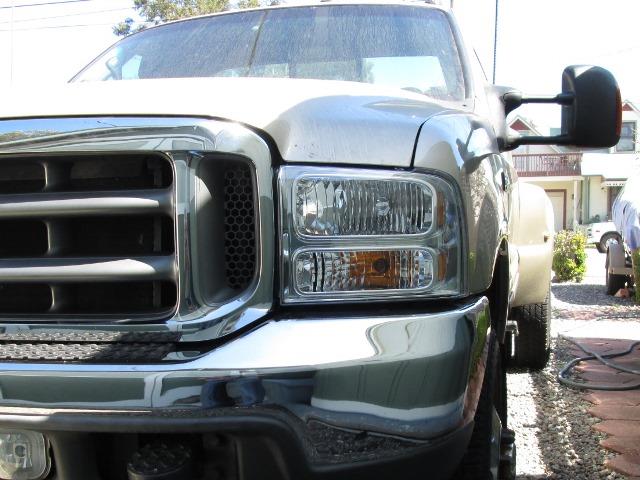
What can be said- there just mirrors- but really liking the mirror lights, Also in the middle of converting to '05 headlights.
Couple of links to others installs
eurekaboys install - some pictures
for-truck.com forum thread This identified wires colors on column
thedieselstop.com forum thread good article also wiring access
another good threadremoving door panel and access though this is adding light to door..
UPDATE:
Well when I initially identified wires and which light was which on new mirrors I went to vendors site. Looked at pictures of which was the signal and which was running light and wired accordingly. Have since determined pictures were wrong, at least for my use. The internal led lights orient a bit different, vendor showed signal on bottom, running light on top.
.
You cant see the running light unless beside truck or slightly behind, cant see signals except from front. So swapping the wires in doors. Easy enough, I guess now I'll add the quick connects that I was to lazy to do and just soldered.
UPDATE 2022: Recently added converter to make dually fender lights blink with signals. Which allowed also rewireing mirrors so both LED segments are on with running lights and blink with turn signals. So now from front or back of truck you can see mirror running lights and/or signals.
Second and real issue, mirrors set swept back further than factory mirrors, hard to see & adjust when camper is on. Not sure- I may try spaces under back post, if cover can be removed to expose the position indents, rework so it sets straight...TBD. Also drivers mirror, mirror heads will not adjust out enough.
Fail
Bottom line these are not my factory mirrors, if not for the lights Id put them back on.
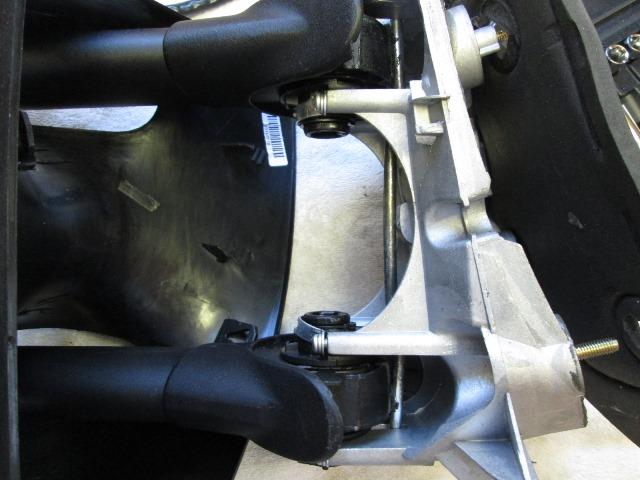
Discovered why the passenger side was so much stiffer to swing. Pivot clamp was off the edge and clamping against the part that's supposed to move- err- quality control. You can also see the 1/4 round bar that acts as positioning locator, Its under tension and snaps into cuts in arms. That's what Ill be modifying so arms are rotated further out when bar snaps into slots...
Reworked the passenger mirror arms (twice) internally so that arms are swung out a bit more 'parked', works but looks like crap because arms base is open/exposed, mirror glass is maxed inboard so you see behind glass because the head angle is wrong. First attempt went too far, if I was in left lane of 4 lane, close as I could get was about middle of left lane and out to shoulder.
Second attempt brought them in and works and currently using but I defeated the swing out, to much tension. So its coming back apart.
Problem is the mirror arms are swept too far back and the angle of the heads in relation to arms, they are just too close to truck. Rotating arms out where they should be, the head angle wrong, mirror glass maxed.
And fixed
Reworking the passenger mirror so it swings again. First though, I'm trying spacers under the base on drivers side. If it works then Ill do the passengers side. I originally nixed this idea and tried internally as it will leave a gap along base but it will look better than what I need up with on passenger side.
I don't know if all these after market mirrors are like this, they need a redesign. Arms need to be not so angled and head angle reset. But build it, price it cheap and they will buy...
Finally
Well (3) 1/4" washers under each of the 2 posts toward window on drivers side worked as far as leaning the mirrors out enough. Gap not really noticeable, better angle on the glass. Dang spent like 2 days reworking the passenger mirror and still end up using washers. Would have worked from the get-go.
Reworked the passenger mirror returning to stock, used the 3 washers under reward posts-perfect happy medium. However fiddled with passenger mirror so much cant get the tension right on the arms and cant tell until I mount where its at. So before installing mirror I bored a hole thru door to access the tension adjust nut. Mounted the mirror, adjust tension. Cool it works again. Hooked wires to check, glass will rotate and not maxed...arms out a bit so better field of rearward vision...rather a pain. Button up the wires-
Happy with the results of the effort though adjusting the angle shouldn't have been required, but they are where I want them- we got lights. I still haven't wired the heaters but that's minor once I get timer switch. Meantime Ill save my allowance for factory Ford mirrors if these fail. (one would cost more than both of these imports....) Truly one of those get what you pay for deals. Oh well happy now, the wiring which was needed in either case, these allowed me to do without springing for the cost. Factory mirrors will be plug and play when/if needed, well I'll have to match plugs but minor. Maybe these mirrors will surprise me, maybe cows really jump over the moon....only issue I see down the road is if lights quit-they wont except aftermarket or factory light assemblies, or I break a glass, I assume they wont fit either.
Done-we got lights
Back to our F250 truck page
Back to Ourelkhorn Camper Modifications page