Slide out structure failure & repair
As this is more for my own documentation-the project went sideways couple of times-this page is a mess. But basically starts off in repairing or adding support for the slide wall. Tying in the front jacks together in my opinion was part of that-I decided to modify the left front bracket-then discovered issue with front wall and its fix.
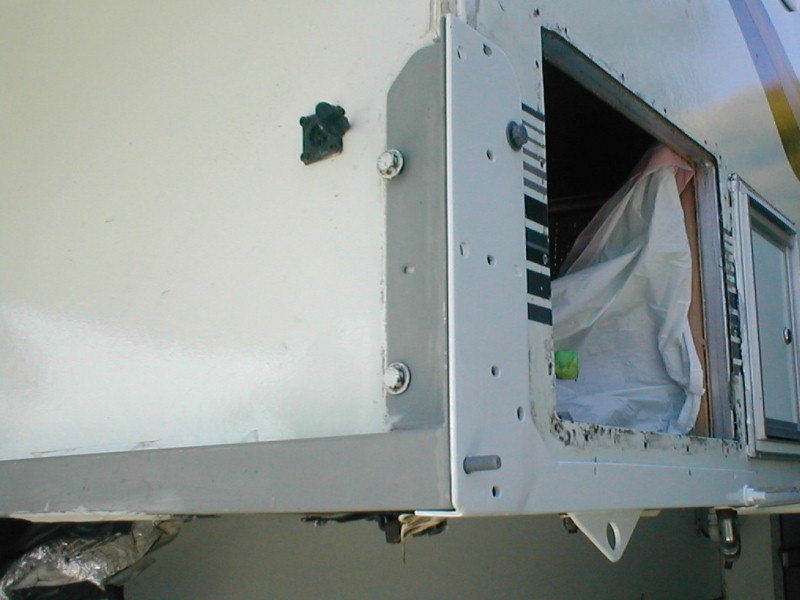
- Our Slide in truck camper slide out has not been one its better features. Nice in room allowed inside but functionally just too much for a truck camper. I mostly contribute to it being a full wall slide, just not enough wall structure. It's been temperamental in its easy to twist camper so that slide doesn't want to move. Also the way it's built-relying on the welded aluminum frame to provide the means to anchor to front and rear walls, support the weight of slide, basically a 1 1/4" aluminum square tube. In the rear there's a bit of structure due to lower wing and cabinet. In the front however there is only the corner of wing wall and front wall. Not much tying it all together.
Last year it had been getting bad, as slide was being extended it would reach about half way and then suddenly tilt out and twisting. When fully extended there would be at least an inch gap because the slide was so tilted. Knew we had a problem that needed addressing but just never came up with a plan. Last trip out when extending it really let go, thought it was falling out. Stopped brought it back in-not really seeing anything extended it back out. When fully out it was setting with over 2" gap along the bottom. Only contact was along the top against inside ceiling.
My best guess is the front corner has been broke a while, but this last trip the other end at rear wall broke, simply no support. Weight of slide as it was extend would flex floor allowing it to lean.
That's where we're at. Obviously we cannot use it any more until fixed, If tried to continue it actually could fall out or at least to point motor couldn't lift to bring back in. Even if not extended just going down the road with no support at outer wall, camper would destroy itself.
We discussed a lot of options. Primarily fixing but also converting it to a non slide. Removing the slide, rebuilding wall and then rebuilding interior, sans no slide. This is where I expected to end up, I didn't think I could rebuild the structure to the point of using slide (shifting a few hundred pounds out over center of exterior wall. What would be required to remove slide, de-skin camper exposing frame and rebuilding in my opinion prohibitive. Just really a lot involved, doable but wow. -Fixing to use as a non slide a bit more practical and certainly a lot less de construction and rebuilding. If the plan I'm proceeding with doesn't work this is what I will revisit. It will shed a few hundred pounds, structure will only deal with a fixed wall, not a moving structure passing thru a huge gaping hole. It can be easily done. If not for the decreased storage-loss of the camper interior space as were used to (and the amount of work) I wouldn't even attempt to fix. I'd just convert to a non slide fixing the structure to that end..
It may not be clear-I have the ability if inclined to do the work-the amount of thought given to this has been considerable of which I've only skimmed. I may yet be documenting on the complete rebuild or I how I converted to a non slide. But in looking at options a very simple 'fix' may return our camper to full function with minimal work. So that s how I'm proceeding. At worst if slide use still not doable-the camper structure will be tied back together which has to be done no matter what. And I could then continue with conversion to non slide-but I'm hopeful.
That's the intro-few months condensed.
Formulating a Plan....
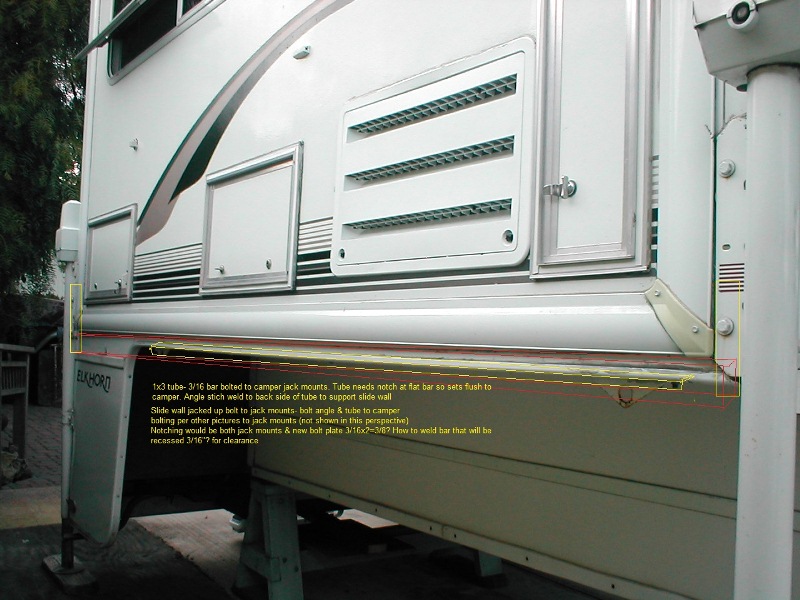
Primary Plan is to support the slide wall using a piece of steel 1x3x.120wall tube, spanning whole side of camper. It will be bolted to camper jacks. A piece of angle stitched welded to back side of tube that slide wall will set on wall. Both tube & angle will also be bolted to camper. Though part of secondary repairs-done after slide wall I will also add a tie between the front jacks. This will completely support slide wall, ties front & rear walls to side wall. Also adds a bit of stability to front jacks. Also other than support, the additional tube along with the angle, all bolted into original structure, should solve sag. It will transfer the vertical load from the horizontal slide wall floor to the outside corners. In the rear because there's a lot more structure will work, The front, possibly the corner frame stud could separate so I see the secondary plan as needed.
A few picks- fact gathering. I tested my plan by simply putting a floor jack under camper slide wall with a piece of 2x4. it worked perfectly. Slide stayed level-fully extended and retracted. So all I need is to support & stabilize.
Basically sketched in new supports. I thought I would attach brackets to jack mounts. Saw a lot of pieces/joints- & using only the lag bolts into frame.
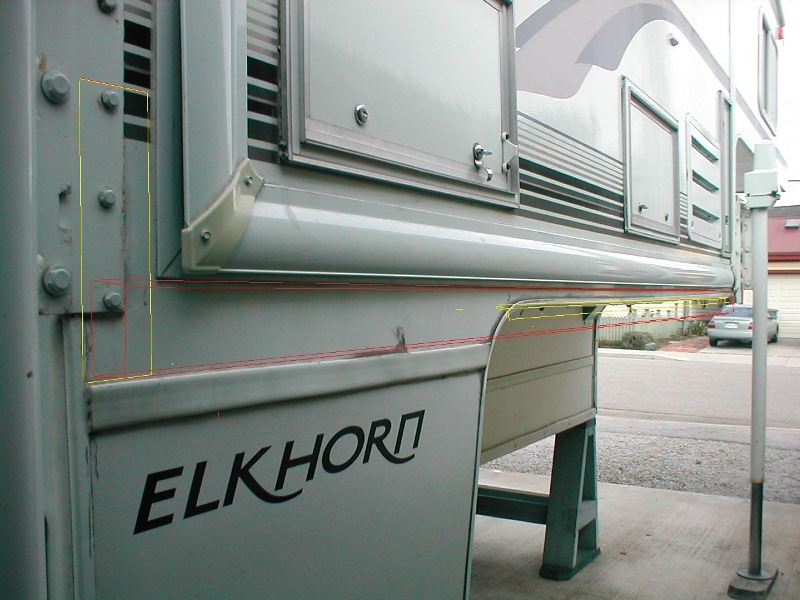
Same just 'eyeballing' how this will work & what is needed. I'll need to remove the edge trim so rectangular tube can set flush.

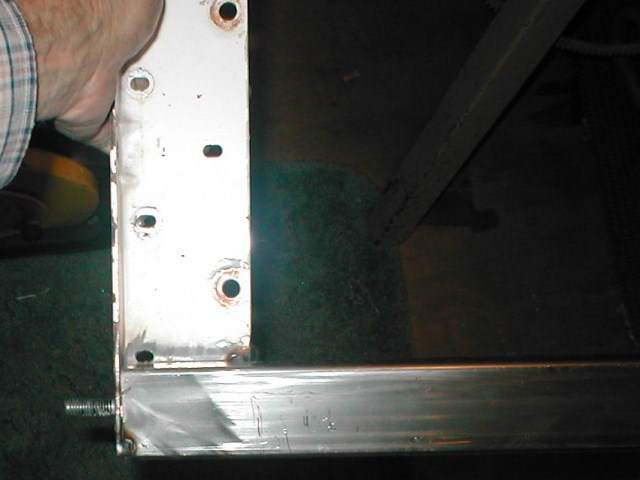
Skewed picture showing the front & rear jack mounts. It became clear by unbolting the jacks I could make a full plate the utilized all the bolts, specifically the jack mount bolts that tie to end wall mount plates. The new bracket plates will duplicate original jack mount plate but 3" longer. Need to remove and use as pattern. At this point unsure whether new plate will set on top of originals or replace. The jacks surface mount so they don't care but I think on top-will allow removal without breaking jack mounts loose-though can't imagine needing to. Possibly removal of single jack mount for repairs without removing entire new support-just convinced my self-on top of old mounts. Will require a deeper notch in support tube...details. The cross tube will stop just short of jack flange.
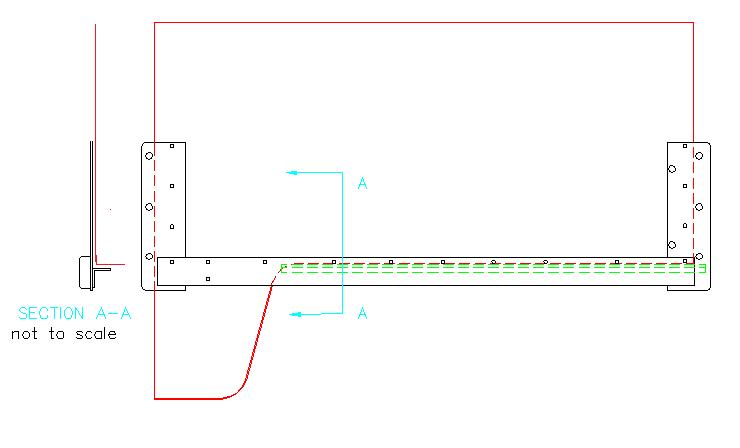
So the plan-simply make duplicate jack mount plates about 3" longer. This would allow a flat surface to weld cross bar to, utilize all mount bolts. When jacks reinstalled will tie to mount plates to end walls, wrapping corners. Once plates made bolt them on-tack weld tube that will span from end to end after jacking camper up. I'll also mark the tube for holes. After final bolting on camper the cross tube will also be bolted thru tube into camper along bottom of slide wall. I'm planning on sleeving these hole thru the tube. Remove, drill all holes in tube weld in the sleeves -fully weld out to brackets. Reinstall on camper-reinstall jacks. Ensure slide wall is where it needs to be and slide functions- tack weld the angle to back side of tube the slide wall will actually set on. Mark again for bolt holes that will also go thru angle into bottom of slide wall. Remove, drill out angle, weld out. Then decide on coating.
Reinstall final time. Bolt it, caulk out. I'm at this point debating whether to use putty tape behind tube-probably.

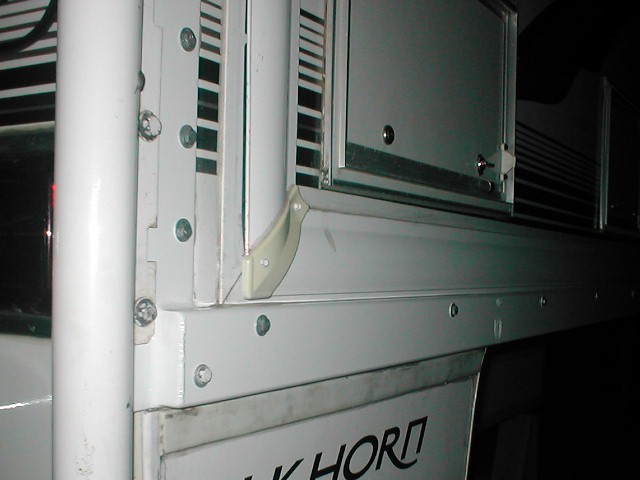
Secondary stage plan. In addition as outlined above make another rectangular tube crossing between front jacks. This secures front right corner, ties both front jacks together. It will replace the 'drip' rail. Can only be at max 1x2 1/2 to cross under window and not hang below wings-truck side rails are within 1/2". Simpler end brackets again bolting to jack mounts with a few along front into camper so it can be sealed. What I'm not liking is the top edge will be flat. Could saw cut/split tube at top corner, fold top down re-weld. Would be a lot of work....but I'm seeing that top edge holding water...more thought required me thinks....
Additionally I'm making a square frame out of 2 or 3x1/4 wall aluminum angle. This will be bolted on the back inside wing wall (parallel to tailgate opening. To insure slide wall wing at rear supported/tied back to bed wall. More support for the gen compartment. Not really needed but...As much movement I saw all structure is suspect. I may also run a full angle at bed vertical wall and wing bottom. Though I believe tying the front is required and needed to be done to insure front corner is secure-not as critical time wise.
That's how proceeding. Once done the rectangular tube across both front and side would also lend itself to adding some diagonal supports to lower front jacks. Add a lot of stability when camper off truck...Need to think about that during fabrication. Possibly adding threaded studs as allowance would make adding later simpler.
The Repairs begin....
As I'm welding new support tube to new jack mount plates and welding the angle that slide wall will set on to back side of tube it will require several temporally install and removal of components. I could measure and build this support assembly and it might fit. I'd rather and am fitting piece by piece to ensure it fits.
Step 1. Remove jacks and side mount plates to use as pattern.
I don't want any movement-just trying to stabilize so when jacks removed everything stays where it should be. The floor jack supporting center of slide wall is still in place. I put a small jack stand under rear of camper lower wing and a block of wood. On the front overhang wing I used a 1X6 with some blocks screwed on. Raised camper with jacks just a tad put the supports under, lower camper so there was weight on supports. Raised the jacks until free. Unbolt, then laid aside.
Removed both side jack plates. I reinstalled the main bolts that go into the front interior jack backing plate.(Note: I felt this critical. If the inner backing plate, actually angle, were to somehow move, would be MAJOR pain to realign. 95% sure it can't because front jack bracket also bolted to it, Worth the extra effort to constantly remove and replace at every step) I reinstalled the both jacks. Lowered them enough so there was some load-but most still on the temp supports. Note jacks are re bolted only to front and rear wall mounts so Camper will set until I fab the new brackets-again I don't want the wall moving. If for some reason I can't get back-don't want the camper setting there. In case I didn't state the camper is setting on stands. Normally they only take some of the weight. It's the other reason for the temp supports. But mostly I have the slide wall where it needs to be-just trying to maintain while I work on it.
Step 2. Fab new side jack mount plates.
That simple. Using originals as a pattern but 3" longer. Details...Intent is they would set on top of original mount plates. The rear is 3/16" x 3" flat bar. easy, duplicate. The front not so easy. They are 3/16" x 3 7/8" or so. Odd size. However they were installed overlapping the slide hole trim-not flush. Require I trim the slide trim so when reinstalled the mounts will set flush on wall like they should. Also when slide pulled in its outer trim over lapped the jack brackets. So I need to trim new front 4" flat bar to about 3 5/8" to clear. Material I picked up was scrap, 3/16x 3 flat bar for rear, but no 3/16"x 4" so got a piece of 1/4"x 4. Figured couldn't hurt on front brackets to have heavier material. Just more work now that I need to trim. Drilled all the holes.
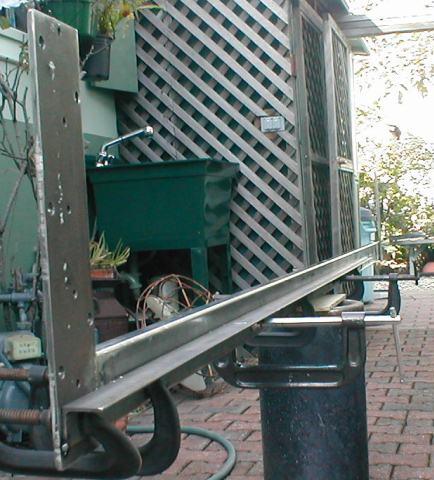
Step 3. Cut and position supporting cross tube.
To get length, again, I'm going to reinstall jack mounts, new plates, jacks and fit cross tube in place. I don't want any surprises-more work this way but cheap insurance. As I'm welding I can only tack then remove to weld out. Once everything reinstalled getting measurement for tube needed it became apparent the front was simply too thick with the new 1/4 on top of 3/16. I had planned on notching tube to set flush but more notch out than I like. The rear not so bad as jack mount actually sets a bit in or flush. Sighting along slide wall the wall curves back last few inches where it ties to rear wall. So with straight edge of new tube notch in rear would only be as deep as additional new bracket. It was obvious if I didn't stack new plates on top of old ones. the rear would require no notch in the rear, and only 1/4" notch in the front of tube. So planned changed, I'm not stacking but replacing original jack mount plates with the new ones. Glad I got the 1/4" plate for front will add a bit of rigidity. Removed the jacks again and mount plates. Installed the new plates without originals. reinstalled the jacks. Got measurements for cross tube.
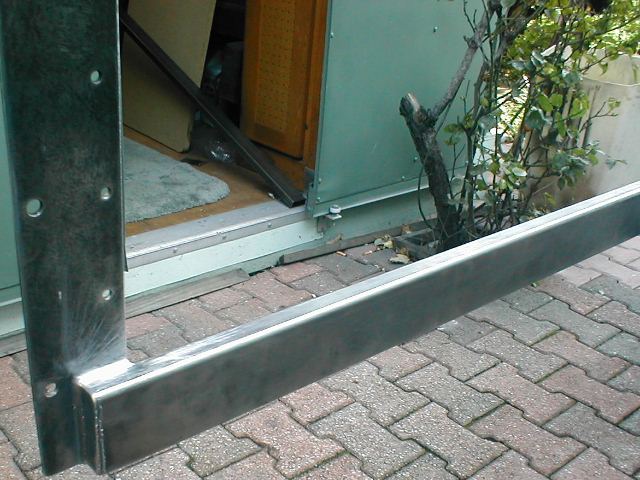
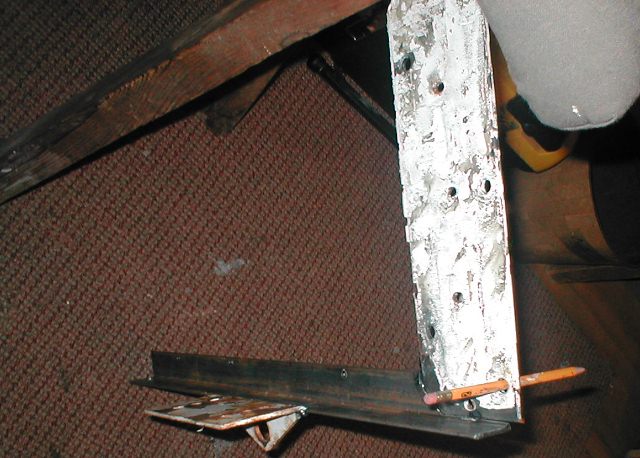
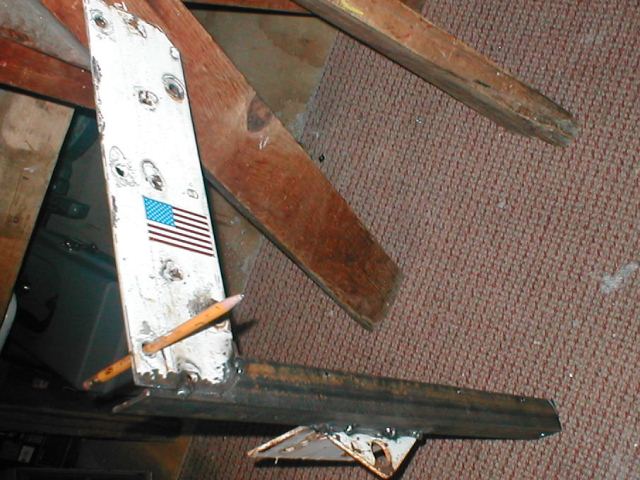
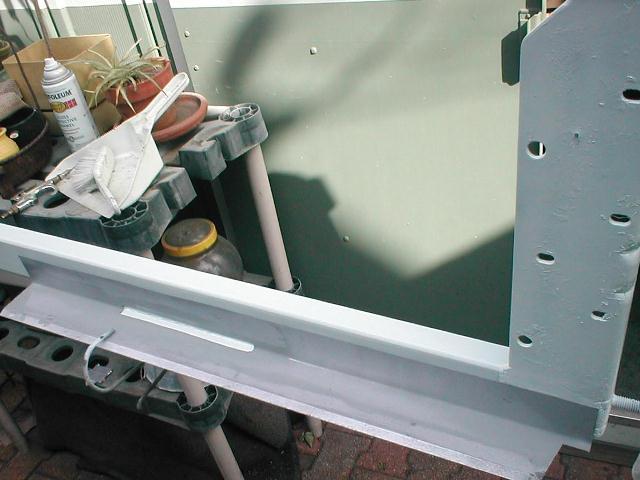
Once cross tube cut to length allowing for end capping pieces and 1/4" fillet weld, C clamped tube on the camper, verified wall position-double checked everything as once tacked were set. Tacked welded tube to new jack mount plates. Once cooled, removed jacks. Unbolt the plates with tube. Reinstalled the original jack mounts and jacks and lowered jacks. Took support assembly. to shop. Capped tube, fully welded out. Ground and cleaned up.
Step 4 . Cut and position angle to back side of cross tube.
Uninstall jacks and mounts. Reinstall the new cross tube with jack mounts. reinstall jacks. C clamping tube tight against camper, looks good. Mark both the tube and camper where existing large flat head screws are on under side of slide wall so I miss when I do final bolting of support. I will drill both the cross tube to bolt to wall and the angle to bolt into slide wall bottom. Angle will go from front jacks mount under slide wall to rear lower wing wall. I cut the rear wing wall about 3" back where it curve up into slide wall so angle could extend a bit further back & past rear tie down. Cut to length, with slide out a little clamped angle to cross tube and to slide wall bottom. Tack welded in place. Removed the jacks, remove clamps that held tube tight to camper and angle to bottom but left the ones that clamped angle to tube. Unbolt assembly and removed. Reinstalled the original jack mounts and jacks. Take assembly out to shop to stitch weld angle in place, drill all mounting holes. Bolting of the assembly other than at jack mounts is primarily to keep tight against camper for sealing. It will add some rigidity to the whole thing bring tied to camper.
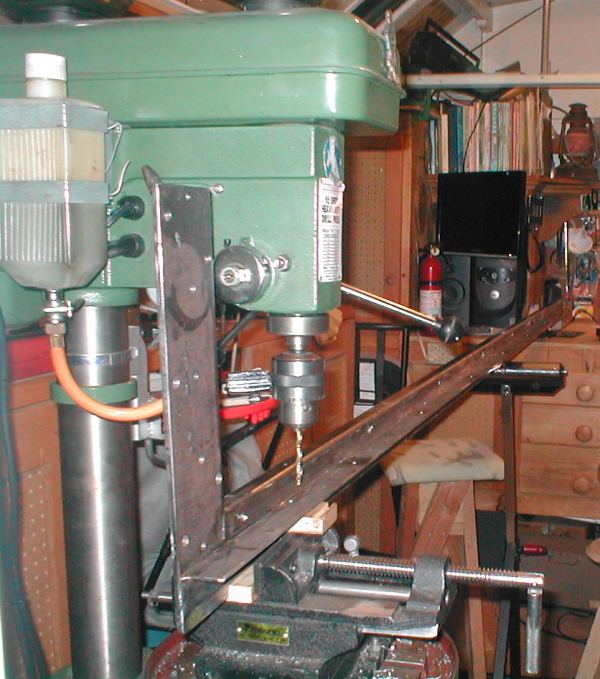
Welding angle to tube may cause some warping. I'll try to keep short stitches-jumping around minimizing heat. Top edge, as I need to grind out so it sets flush also where most load will be, so a lot of stitching.
After welding remarked for holes-set up to drill on press. Can't see, this is after welds ground out. Top of angel was 2" fillet weld every 10"- all but ground out to set flush against camper. Bottom of angle fillet welded bout 1 1/2" long every 10", those were just rounded so as not to hurt myself when raising up under it.
Weighed completed assembly its 45#-minus plates that won't be reused=43# not too bad. It's what I guesstimated when I picked up materials, but sure felt heavier carrying around so relieved. We're going thru camper to see what we can remove. Next is to coat-which I haven't figured out.
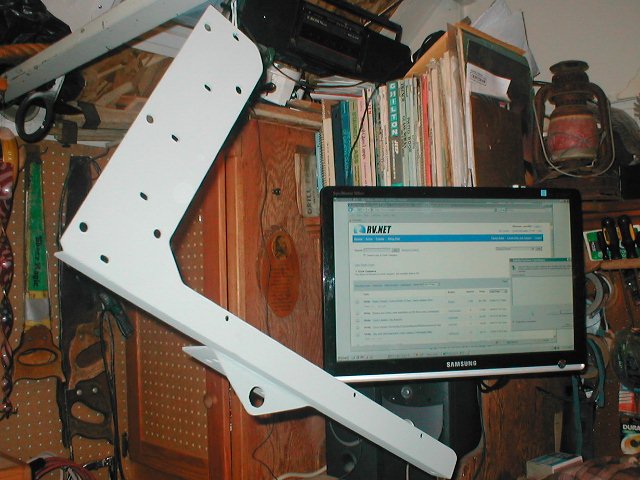
Decided just to paint, After a lot of cleanup grinding-sanding and wire cup brushing coated with zinc primer. Several coats of white. Letting it hang for few days to harden and figure out front brace. I'm afraid to mount until I get the front at least thought out as I don't want to need to remove once installed. What I thought was going to be an easier fab has me stumped. Tying into front jack mounts in the front not as simple as I had though, dimples in corner brace spacing of mount holes. Kind of in holding mode-at least till I'm sure I can add front brace without un installing new side brace. I'm thinking it may be easier to just make new front corner jack mount instead of something that bolts to the...but back to the task.
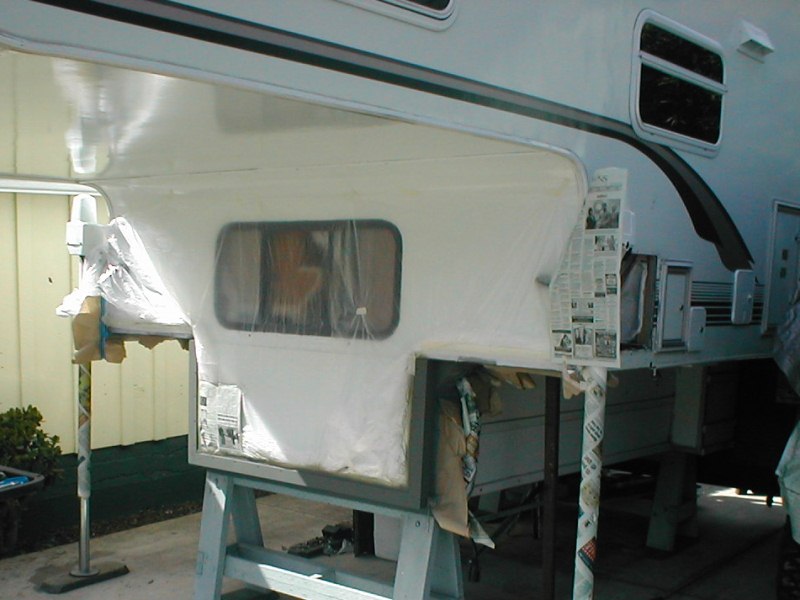
Installed! The slide works...
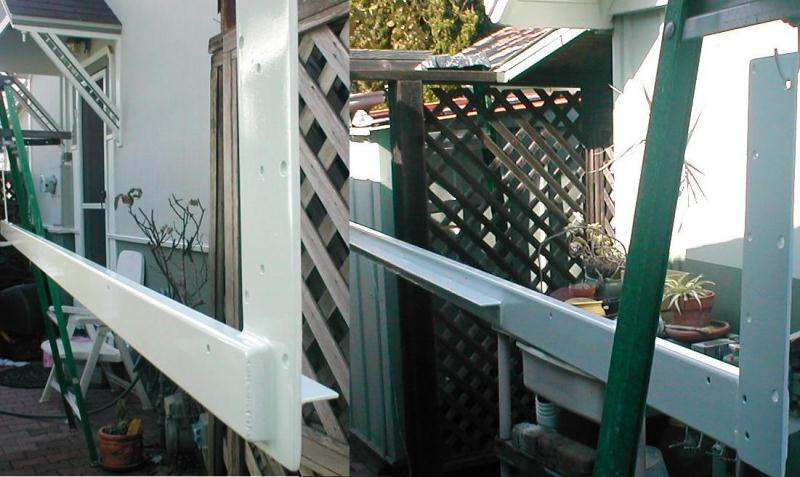
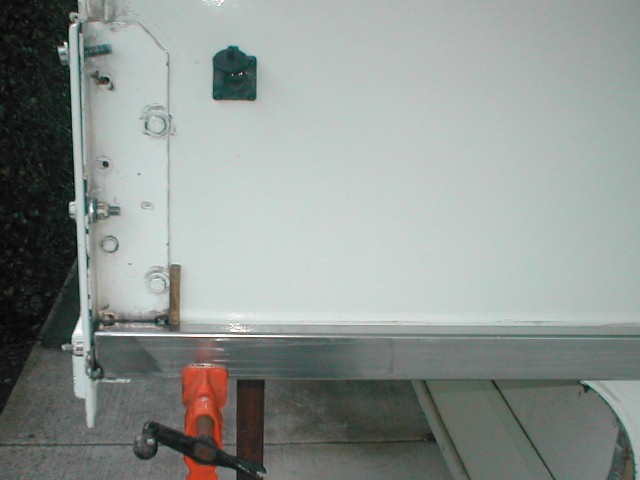
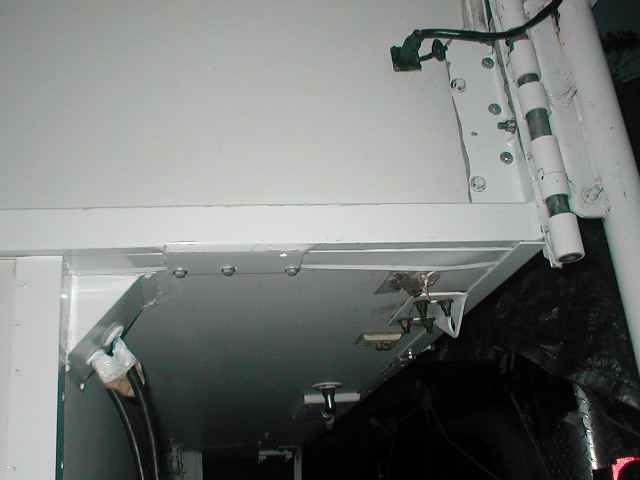
WOW. Well its bolted on-I used putty under face and on angle- took forever to get holes to line up. I had realized doing both legs would be next to impossible-but forgot that I wasn't putty taping under wing till I started bolting (with putty on both sides. But got it. Took about 2 hours slowly bolting. Bottom line...Slide WORKS!!!! In & out several times-just stoked. Looks ok. Need to get some paint that i can brush-coat and seal the bolts. Fresh spray would just wrinkle. So we have a useable slide again. Couple of pics-showing installed jack to jack support, bolted into camper wall and existing frame. Should never see any sag.
And couple of views underneath, slide wall setting on & bolted to 1 1/2" angle that is welded to full length 1" x 3" tube. The 1" x 3" tube with new welded jack mount plates fully bolted into camper structure.
Underneath wing looking forward..

And from front looking toward back..
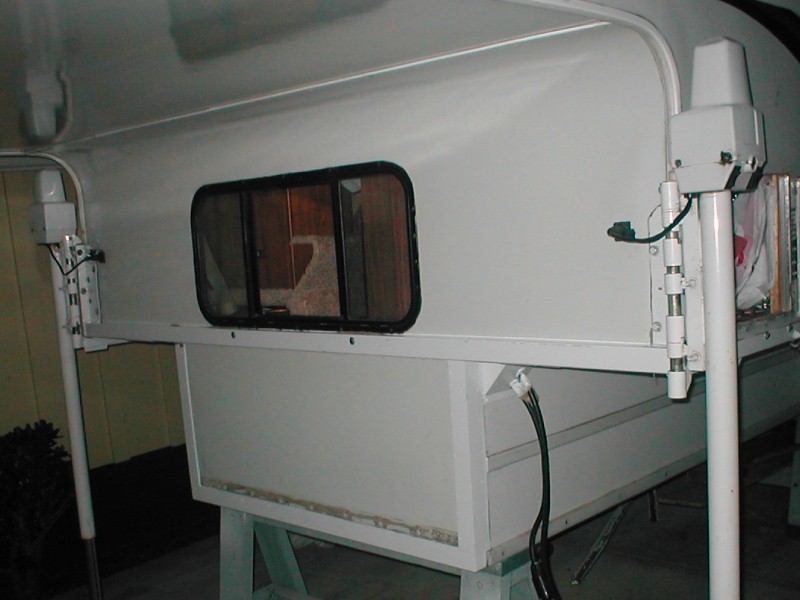
This picture is actually taken after front tie (below) was built and added. It does show allowance for front tie, running the side underneath angle long so front tie could sit on it.
The Front tie....
Now to tie the front jacks together. Was puzzled how to do because of bolt clearance, spacing, and the fact the front part of jack mounts are bent 90. Staying away from the bolts didn't leave much surface for bolting on new cross tube. But figured out if I simply butt weld the 1x2 cross tube to the inside of front jack mounts it would stiffen the angle mount leg, simplify installing, Bottom jack bolt I'll turn around-weld to mount. It requires removing left outside jack mount to install. I'll add pics but basically welding a piece of 1"x2" x93 1/2" tube between/to the front facing half of jack mounts.
Removed the right jack plate, removed the drip rail-removed all the aluminum edge trim. Went to remove the last piece-left jack plate, the bolts that go inside thru the back up angle spun. Unlike the slide side, obvious the nuts inside aren't welded to angle. I tried, it's impossible to access the nuts from inside. No help for it-gotta remove the water heater to get access to the nuts. errr
Removed the water heater, ran a hand full of nuts to cover exposed bolt threads and welded the 4 inside bolting nuts to angle. Reassembled the water heater. tested for leaks. Now back to the project.
Removed the final jack plate, took to shop-ground off powder coat and 2 small webs(stiffeners). Insert the lower jack bolts pointing out and welded to the bracket. Reinstall mount plates on the camper. Notched one end of tube to slip past bolt head. Clamped cross tube and tack welded on camper.
Just showing tube to be welded into corner of jack mount plate. Lil pieces of brass bar to block heat and not smoke the filon. As the tube is now tack welded to mount plates that have bolts sticking out into & thru outside plates, have to remove the left outside plate to remove assembly. In removing left side jack plate to weld and drill out new assembly the last bolt spun, one of the ones I pulled water heater to weld. I don't know at this point if weld inside broke or the bolt is stripped-either way the water heater has to come back out. Good grief. For the moment I just cut off the bolt so I can remove the new support. Weld it out, drill for bolts thru cross tube into camper, prime & paint. In meantime Ill remove water heater (again). If weld broke I'll re-weld, if stripped I'll have to cut nut off-replace nut and bolt.
I'm leaving water heater out until this is done. Since I need to remove heater again mostly I'm thinking I may add another piece extending the left side jack mount back. 'Wrapping' the left corner, similar to right side, I'd only go back couple of feet. Would add some additional support but also give an easy attachment point if I pursue the diagonal jack leg supports.
Picture of new cross tube tacked inside jack mounts, and lower jack bolt sticking out. You can see how welding to inside leg of mount plate will stiffen mount.
Got it welded out. Remounted on camper- drilled two holes thru it and camper under window. Mostly to secure for caulking. Il use carriage bolts with nuts inside with 3/4" angle as a backup between the bolts to "sandwich� camper wall. Removed, squared the outside holes for carriage bolts. Primed it. But during its fab I kept thinking I should also extend the left side jack mount a bit. Sort of like the rights side, so jack is not entirely relying on corner structure. So didn't paint the front cross tube till I address the left side jack mount just in case.
The Left side jack mount tie....
Well seemed like since the right side is independent of welded aluminum frame I should do something to the left side. I simply want to add something to 'wrap' the corner like the right side. So I just added about 24" piece of 1 1/2" angle to right side jack plate. This will take some stress of corner joints. Having a hard time though because of the water heater opening attaching it and catching the frame. Oddly though, on the left side the new 1 1/2" angle butts up to tie down bracket. On the right under slide the angle is almost 2" away from tie down bracket. But this actually works to my advantage. I can weld the new left side angle to tie down. The tie down inside back up bracket is bolted to frame, which will tie the whole new jack plate & angle. SO that's what I'm doing. Placed modified bracket with angle back on camper-tacked to tie down bracket. Removed bracket with tacked tie down for welding.
Left side bracket with angle and tacked tie down. Pencil is where front cross tube bolt stick thru.
Just from the front. There will be 2 very large lag bolts going in from bottom thru fame and into wall at end. Few small bolts along top of angle to hold snug for caulk. But welded to tie down is where transferring a good deal of strength away from corner comes from. That and camper wall will "sit" on angle.
Purdy, welded out, primed & painted. Not showing but there's also a short 3/8" welded bolt sticking out for future jack leg stabilizer attachment.
One last reinstall on camper, to double check new cross tube and left side brackets fit before painting. Well it became apparent I need to add some plates on the front cross tube to attach to underside of wings. Mostly to hold tight, add some of the load from camper side walls on the cross tube. So back off it all came. Thought I was ready to paint. Ground off fresh primer. Welded on (2) 3/16" 3" x 6" lg plates to underside of cross bar. Drilled for bolting.
Picture checking fit of modified cross tube with added plates for wings to set on and extended left jack mount prior to installing jacks. This is probably the most tell-tale picture of how all this works. Forward facing jack mount plates are welded to cross bar. Similar to slide side, where side mounted jack plates are welded to full length tube.
Did a full bolt up of all parts. Reinstalled the jacks. Looks good, everything fits- I think I'm ready to paint. But in using jacks to lift camper (stoked with how this is working) I noted as camper cleared the sawhorse the front wall and side bed box walls are not moving together. From there it all went to poop.
Reattaching the front wall...
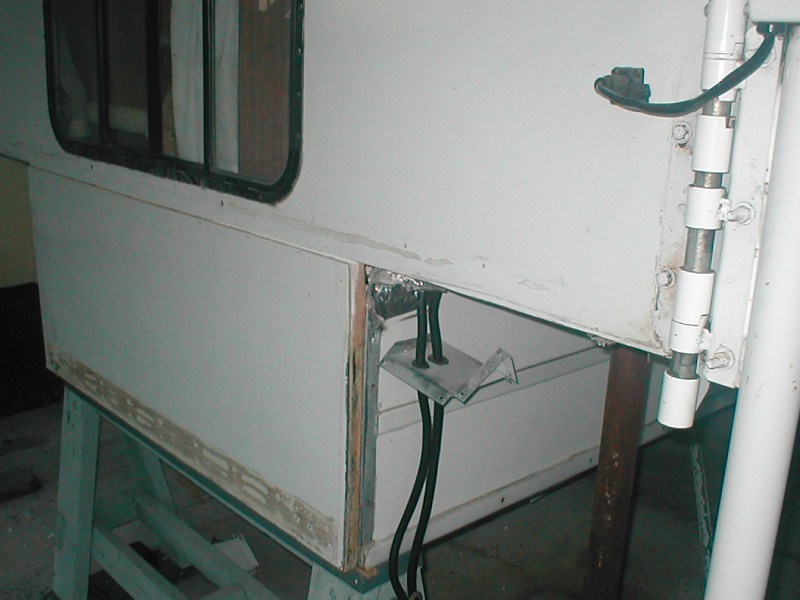
With the constant removal & reinstall of jacks and supports I hadn't noticed how much front wall was moving. A lot of inspection revealed the front wall does not appear to be moving or attached to the lead edges of box? Rather bizarre as lifting with jacks sides move 1/2" before front does, with floor setting on sawhorse releasing tension of jack the front wall will continue to drop another 1/2". So about an inch of movement. Decided I need to open up front wall, can't see how it's supposed to be. Marked front wall at bottom of new cross tube. Removed cross bar, jacks and left side plate. Also removed the bump stops. peeled back the filing- there appears to be a 1x2 frame and that's all? After a bout 2 hours of serious looking have a plan.
I should note our camper has always moved a bit in front, where the front wall joins the bed box. Constant caulking. Manufacturer used the same aluminum edge moulding/trim as used on wing edges, wrapping the edges and bottom of front box, unlike the exterior corners that wrap the wall to wall joint sealing the corner. It's like the front wall was just kind of stuck on. Also as the aluminum edge trim used on bottom edge of front wall it protruded beyond level of floor. Which is why it moved, as weight of camper when mounting in truck would force the front wall with trim up until it was level with floor surface.
I didn't get any pics of this tear down and rebuild-here's an after shot with filon reattached.
You can see the edge of front wall-just kind of stuck on. The side edges of box are covered with flashing and the edge of front wall had edge trim but nothing sealed this joint. I cut out the corner radius to make sealing easier. Actually I cut the filon-the corner was a piece of plywood block that was stapled into corner-absolutely no structural value.
I'm going to cut off the filon at the bottom edge of new cross tube. Pull off filon, verify what appears will work. Attach (reattach) frame to bed box edges. Installed a 1/4 piece of plywood-reinstall the filon. Then warp the bottom and sides with 2" aluminum angle, the sides butting up against new cross tube. AS I'll be removing jacks, all new tie brackets, with the camper setting on floor, there won't be anything supporting front wall. So I'll have to position on saw horse to just edge of wall to push it even with side wall-attach it then move back so I can install the angle. Means at least twice removing reinstalling jacks and brackets. It will be very sketchy once I open it up, without the jacks or brackets. So with all material on hand I need to work quickly. .
Once I removed the filon-it's exactly what it looked like peeking under earlier. Front wall under window is simply 1"x2" sides, 1"x3" top & bottom frame with the filon stapled outside and interior paneling stapled inside-there's nothing there beside filler bead board. What holds camper together is under window is a 1"x4" that goes side to side. The lower frame was just edge screwed into lower box. I assume, they look like small drywall screws, have just wallowed out. I used 8 #14 x3" wood screws reattaching 1x frame into edge of box. Then glue and stapled 2'x4'x 1/4 ply to frame. Glue and staple the filon back on. Reinstall brackets and jacks-tested success!. This project has become a moving target. Now I'll warp sides & bottom with 2" angle. Coarse I have to reinstall the supports and jacks to ensure fit. This should effectively fix.

Cut, drilled & counter sink 40 holes...Bolt it on tomorrow, I was going to weld it but it's not square or flat not sure I could match. So I'll bolt-check square and fit, record fit best I can then weld al angle together and hope it fits. Hard to see but the angle is notched, I don't want simple butt joints, sides run long to inside leg of bottom piece.
As I had to remove all the edge trim earlier to install the cross tube my intent was to replace & wrap the corners of front box for sealing using aluminum angle. As mentioned always a problem. Now it's semi structural. It also will give a uniform surface at camper floor and front edge of wall.
Let's see, where was I....oh yea, once aluminum is attached removed the cross tube, prep, reprime & paint. Hopefully I can get this all finally bolted on without thinking of something else to do. But the end is near (again). Need to get some caulking done before it rains...unlikely though (beating the rain).
Final push- install the front jack tie & new left mount...
Welded the aluminum angle frame trim together & installed. Surprisingly it fit. I picked up some 2x2 angle flashing to cover the front under side of wing walls as I'm not using factory edge trim. Cut 1/2" off the front side that will set behind the cross tube so edge will be embedded in the putty tape. Couple of staples to hold to wall until cross tube installed. Had to notch the inside corner where I fillet welded on the plates to the cross tube.
Decided since it was so nice to paint the new trim before installing the cross tube.
No pics of installing the cross tube and left jack mount. Due to the putty tape it simply was a battle, but we got it. Nice.
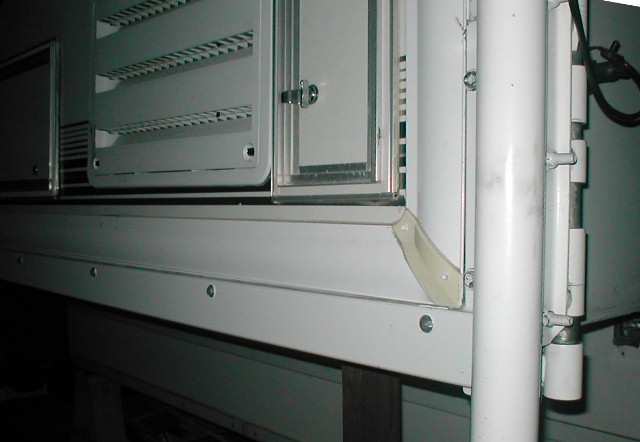
Can see in this view the added plate to front cross tube under wing bottom. Also how wall sets on mount angle and tied in tie down mount. The bolts thru front & side jack flange plus the bolt sticking thru ties the 2 corner pieces together making a corner support instead of relying on the face mounted jack mount. Much stronger I think, at least the jacks are now actually supporting the camper, they're tied together so should prevent any failures due to camper corner frame issues.
Course on left side I didn't notice until I installed the cross tube & left mount that the ground plate was underneath so buckled the flashing. Oh well nothing to be done. It really has no function. I might pull the ground strap, clean the connections reinstall on top of flashing.
(addressed 2 years later, replaced ground bus )
The whole thrust of this project was fixing the slide out-which we did, tying the front jacks and extending the left jack mount-essentially wrapping the front corners was in my opinion a part of it. Though I thought would be simpler task it took twice as long as the actual slide fix.
Reinstalled the water heater. Caulked everything. I have yet to reinstall the bumper ( where the stain is). I also need to add a small pieces of trim to cover staples where filon is cut under cross tube. Details, that and get a pint of paint touch up and paint the bolts.
Totals about $250,
2 1/2 weeks' time
total weight about ~75# ( 43# slide wall support, 26.3# front jack tie, left mount extension & front box trim)
preliminary removal of unused stuff-55# so net gain of ~15#.
For camper that will see a few more campsites for a least couple of years-not bad for being almost scrapped.
Back to Ourelkhorn Camper Modifications page