Shop rebuild 2010 part 3
With the exterior sealed up, and the interior floor done, walls and ceiling painted the building is done. All that’s really left is moving stuff back in. I do have some rework of the benches and cabinets but since shop is empty it would be nice to make upgrades. I made arrangements with owner of borrowed trailer that shop contents are in-he said he wouldn't need it back for several weeks so stored at my house was as good as at his. But I also made arrangements so that if for whatever reason he needed it back or if it was going to take longer than the 2 weeks I anticipate I to finish up I could off load everything into my moms' garage. With that covered I could take my time and refit the shop.

I want to ensure I don't end up with this-a shop so cluttered couldn't use
First the electrical
Plan is from new 20amp breaker adding (2) 12ga branches, one directly to air compressor (its in another small building), other line will go directly to shop and 20 amp receptacle specifically for welder. From there to the drill press, then go outside to feed plug where I usually grind etc. This removes high amp tools from house, also gives me a considerably larger/shorter wire run from main. It also removes drill press from the 15-amp line that feeds bench plugs and the 2 lights.
When I get benches back I'll completely rewire. Benches were originally built for an open garage with feed at back. The 2 benches joined in a junction box that use to have cord on it to plug in benches on switched plug. Also the light on shelf was tagged there. When Installed in this shop cord was removed and a line from breaker box was added to feed so it's a pretty convoluted path.
I digress...For now I just need to get the wires stubbed up inside the shop. I kinda like wiring-but I don't like pulling. After a few hours have a coil of phone, and 2 coils of romex hung on the wall. Back to the 'furniture'
The 'Furniture'
Somewhere in this process of trying to decide if I should just replace- I realized if flip cabs upside down and cut material off both ends-no rebuilding required. Cut to a height that would be good as standing height work surface & install a top, using cabs for base-then I could build shelves above. Ding Ding Ding! Wow

Cutting the cabs worked pretty well. Then placed cabinets in shop and started laying out for a full 8' top to go across. I noticed the distance from back wall. Even though benches aren't in I know from before as back bench isn't as wide as building there is an unused space in corner. So I started measuring- more than enough room with new shop depth to place one free standing cabinet at door, space between for welder another cab at end. There would still be a little over 17" so I could extend or build a cabinet in corner. Then it dawned on me. As I'm replacing the tops on workbenches I could put back one 6" from wall, and make a 30" top instead of 24". Still leave 17" for cabinet door on end cabinet IF I make the new top 7'-6" for free standing cabs. Cool, in my eagerness to just get stuff done- I almost passed by the ability to increase top depth.
Back to it, I started measuring again for the new top on modified cabs, while imaging new deeper workbench in. The back bench that's getting new deeper top is butted against side workbench to make the L. Since I'm making a new top, back bench could go all the way to wall and have the side bench butt to it instead. Wow that would increase the work top surface to 10' on long leg! I stopped.
It became apparent that if a little more time was spent eyeballing and figuring I might avoid a lot of "wow I coulda or shouldofs". I have the time, If I spent some planning out what I 'might' do I could end up with a lot more than larger useable floor space. I have an empty building, I won't have this opportunity again. So I spent a couple of days exploring options. The plan was to simply fix & enlarge the building. Fix and refurbish furniture-and probably add some storage etc get my stuff back in and get the shop up and running. But if I take advantage of the moment I could actually build a better shop. Well, within my means and needs, wont make the cover of "Dream Shop USA" but I'm now actually 'remodeling' the shop. So few days of putting stuff back together has become a whole new project.
That was the plan...
Surprisingly seems my original floor plan layout ended up being the most optimum, I did come up with a few ideas. Reworking of the benches Ill add dome drawers. Also a few door on areas used for storage. Actually laying out for what will fit instead of everything on open shelves. A lot will be done later but allowing for it now will simplify, like adding cabinets at end of benches.

Large picture, click for clearer
Laying out the benches
At any rate I laid out the cabinet on North wall. Kinda what I first saw but adding the shelves, storage on top for material. Using the 2 modified existing cabinets- welder space and space at end for access for other wall cabinet.

Nice, this is going to give me a lot more storage and a place for welder. I'm building this first, need to stub some wiring for a small florescent in recess over top between shelves, and a power strip. Also need to add a box, stub wire from there to drill press for exterior plug as this cab will close access. Then I can get some stuff put away.
Rework existing workbenches.
What it will be once finished. Rear bench need several cantilever 6" blocks to support new top and upper shelf assembly. Also at the bottom shelf which needs to be extended. Build corner frame to bolt to both benches to.

Side bench (south wall) as mentioned only needs legs notched to set against wall. Laying out end cabinet to get dimensions for the full height end board so I can wire. And why I layout-down the road Ill be moving internal slider doors outside-the cabinet would interfere and face needs to set back for future access. It was going to be 30" deep but needs to be max of 29 1/4" so 28 1/2" ply side to allow for 3/4 face. Details ya . As new door frame will tie in this would have bit hard had I not caught, not only dismantle/rebuild the added cabinet but probably redo the wiring as its going to be routed inside.
Update 12/17:

First was addition of 4x4 pole for old Post drill and the subsequent cabinets. .

Second was rework bench & removed 2 large drawers, add 3 smaller drawers with an open cabinet for shop vac. Then later reworking substructure and converting bolted vise to a receiver mount.
Completed 'Furniture'
After completing the east wall I moved a lot of stuff in. Then got some help and moved both benches inside. Once in position made necessary modification to each bench getting ready for tops and bolting to each other-or actually to new corner stand joining them. After top was on I did all the divider panels adding material to accept the doors. All of the workbench panel doors and drawers were finished after I got stuff back in the shop. Also as mentioned the end cabinets were done after everything was back in shop. I had added the vertical end panel toward door and rewired entire shop. All total, the 3 wall cabinets & workbenches took almost 3 weeks. Got everything out of trailer and returned it. Kinda stressing over that-I really didn't want to move the stuff twice, borrowing something is one thing-not returning when promised is another. I spent another 2 weeks detailing, making doors, some trim work and making the drawers. A week sorting putting stuff away. Got the east wall 72" cabinet built. The other one I decided to wait doors rebuilt-just in case. So bout 5 weeks refitting the shop.
Just nice
Everything in shop has a place. One thing I did was stop 'Storing everything' in new shop. I have a lot of crap-as much as expanding the building and rebuilding storage/benches this gave me more working room in the shop and space for supplies & tools. Have a small shed with metal shelves used for simple storage. I cleaned one wall and now 'store' in it. IE all auto stuff, motor oil, lubes, grease, fluids, analyzers, charger etc now live in it. All welding supplies, chop saw blades etc have a separate dry cabinet (converted dishwasher). Also the arc welder and acetylene cart are in it. Few large tools seldom used like pipe bender, hyd. spreader etc. Household stuff, plumbing, paint, cement, mortar, garden chemicals etc now live on a couple of shelves in garage. All Jeep related stuff has it own 4x5 storage shed-parts, jacks, tow bars, cans, trailer tie downs etc, hitches, hard parts.
This was simply a matter of reorganization. Stuff I use is in the shop, stuff I don't isn't. I know where most stuff is, if not I know which shed its in. It would be nice to have everything in one building but this works. When I started unloading the shop out of storage trailer after completing the interior rebuild is when it got sorted. Only thing not in shop that should be is acetylene cart, but it takes up too much room, even though I don't weld or grind inside but because its in another shed, its a pain to get out. But now out of the shop I can fab-fix anything and room to do it.
Well not sure why the sidetrack, important but not part of this documentation-so back to rebuilding shop 'furniture'.
At any rate here are finished pics-and what I ended up with.
North wall

Fuzzy pic of finished North wall cabinet.

Mig welder cart parked under, the grinder parked in front. New table in foreground hasn't found a place to live yet. These are all on wheels so get rolled out of the way as needed. (In this pic I'm in middle of adding new anti fatigue mats on floor. Drill press got a new drip pan. I usually put something in front of cabinet when doing a lot of metal drilling-thinking of a curtain to containing it? Ill add these in detail to its own page later)

Left cabinet behind drill holds spray paints, chemicals, cleaning, shelves above heat guns, dryers odd tools etc that are not accessed that much. Center as mentioned is welder but on sides and back are hangers for all my plumbing wrenches, C clamp, welding hand tools, pipe clamps etc. Upper center mostly loose hand wrenches. Right hand cabinet is my go to cabinet. Upper shelves holds hand tool consumables and tool bits, I.E. drill bits, easy outs, blades for various saws, sanding disks/belts etc. Glue hand staplers & staples. Cabinet below holds few hand tools, jig saws, propane torch, sanders. Mostly screws, nails, bolts & nuts, hardware.
Now the workbenches:
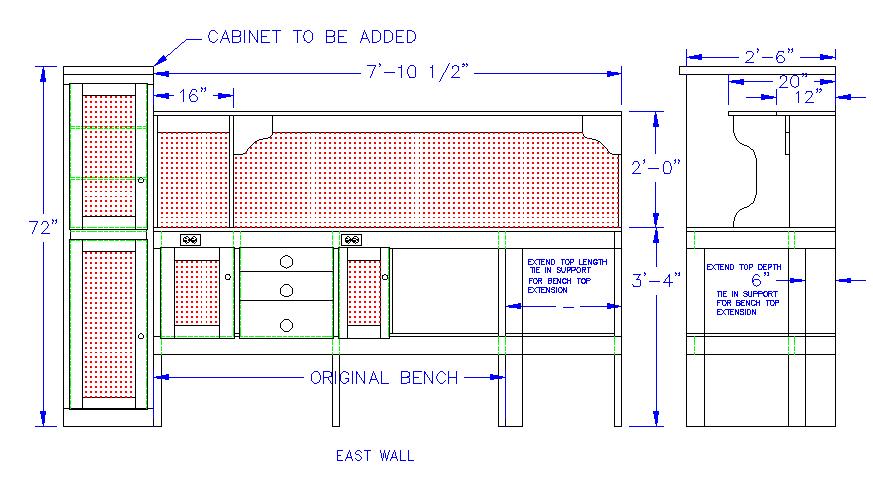
East Wall

This, center section, originally was a simple 24"x6' work top with a shelf underneath. It and the overhead 12" shelf and pegboard were built almost 40 years ago. Shown are new doors and drawers added to it & the planned full height cabinet on left. Recently added the overhead cabinet top left. Also added another vent above the shelf. Simple RV vents they work nice for venting & light. I had added one in roof not long after completing the remodel due to heat build up in extended shop. Sometime Ill cover remaining wall to match new vent.

New far left 30"X72"cabinet is divided in half. Bottom is open and holds my R/C hobby stuff, of which most is in a roll about carry hard case and a smaller soft day use case. Upper half is shelved, one holds all my spray stuff-spray pots detail guns, mixing stuff etc. 2nd shelf hold painting sundries-brushes, spackling putty etc. Finally all stains, finishes, small enamels etc.
Original center section lower shelf was divided up-left door is soft -towels, clean throw away rags etc. Next are the drawer's 24" deep due to old bench. Top drawer are measuring items and boxed files, 2nd drawer cutting stuff-burrs bits stones etc and router bits. Bottom is angle grinder & supplies. Middle door also a recent addition-hides a small 12-drawer cabinet that holds small items. Then foot rest area. In back half is a shelf. This is open behind 12-drawer cabinet. Mostly odd/old electronics, car stereo stuff, computer takes outs (fans, power supplies etc). It's also open to access the large corner space between benches. On floor are heaters, some odd stuff shoved in the back. Miter saw is under foot well. I've often though I'd like to build pull out shelves, probably just a tray or sheet with casters.
Just for grins detail of drawers

Simple false face boxes on 1x2 runners with hardboard bottoms
South Wall

The left door is open to corner shelf also. Back in corner is stored some very old tools I've collected. In this cabinet is stored large case tools. The other 'foot well" has a shelf behind 2 small doors. All wiring, electrical components, both 12v & 110v are stored here. Normally where I solder because of opening window. The 2 preexisting large drawers were built to store glass pieces. In each are trays they were built around. Trays are divided into 6x8 spaces. Each has assortment of different colored glass scraps. I have another large cabinet for full pieces ranging from 1' to 3' square. Once upon a time I use to do a lot of glasswork. If /when I ever get rid of the glass I would cut the drawers and bench at the 4x4 post. Open it up to put gas torch.
The upper cabinets on right were added much later, mostly as a result of adding the post for my old drill. There is a link to page outlining its restoration on shop index page & & how that cabinet morphed into what it is. The drill had gotten laid outside during the shop rebuild, previously it had been stored under bench since shop built. One of the things that was on the list after shop is finally done is mounting the drill.
My main vise is outside, mounted this small one for light inside use.
Note in this picture that the white top stool on right is where I use to set at back bench . Behind where the other stool is where bench was originally bolted together, you can see a remaining bolt hole in face.
So that's where were at. Shop is done. Benches are back in and everything replaced. 6 months later I finally converted the doors to external sliders and finished the cabinet. I then built the over door shelf tying the north & south wall cabinets. All on there own page, and other shop related stuff. Currently adding an overhead cabinet that will cover the last of the "splice".
End of Shop rebuild 2010
-
Back to The shop rebuild part 1 Formulating a plan-raising and moving shop to rebuild floor
Back to The shop rebuild part 2 The shop rebuild part 2, building new foundation & floor, moving rear wall
Back to Top of this pageThe shop rebuild part 3, Rebuilding the benches, cabinets. Adding more
Back to The Shop main index page