Picked up a small sand blaster

Well in the middle of rebuilding fenders mounts for trailer. They were simple folded sheet welded to ends of fenders and welded to frame. They also act as steps. On them were riveted aluminum tread plates. I always intended to remove the plates but never got around to it, dissimilar metals-a block from the beach=electrolysis. Kept my eye on em and they actually seemed ok for several years. Few months ago I noted the paint started bubbling pretty bad, need to get those plates off. When I finally got around toit the steps just crumbled. Literally 3/16" steel like graham crackers-
Cut the fenders and mounts off. The electrolysis fortunately stopped at the weld beads to frame.
Cut up some 3" angle-welded up some new steps. Inside corners was painful to seal weld, cleaning just a pain-plus there is some pitting on top of fenders. Decided i need to get blasted.
However seemed a perfect opportunity/excuse to invest in my own blaster. Decided for cost of having done or calling a favor to instead look for a small set up. Virtually knowing nothing about the subjects started researching. Hmm. After a day or so I realize my compressor probably not up to running sand blaster, cant afford most blast setups. I really don't currently have room for cabinet. Started looking at small hand held siphon units just to tackle this project.
I looked at several-can be had fairly cheap. Actually ended up on You tube-several how to on building your own, then migrated to the pressure pot type. Folks are making small ones out a 5gal propane tanks. Simple fun project. If you have stuff on hand, which I do except valves. Happen to look at my Harbor Freight add-they have a 20# pressure pot on sale. plus I have a 25% coupon. Heck I couldn't pick up parts for that, wont have to cut up propane tank-weld on it. Did some research. Well get what you pay for, Seems the H/F valves used are short lived, takes more air than my compressor can deliver for continuously use. That said decided for the price the tank, pre built, with hoses fittings etc worth the cost. Will allow me to use, fix- up grade as needed.
Road trip!
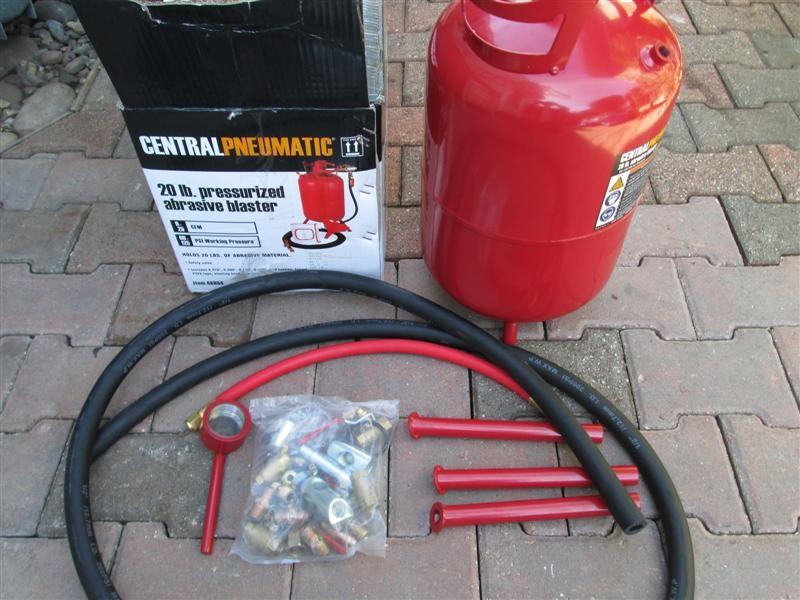
Picked up the 20# 68994 blaster as pictured above. Pretty stoked-hope I can get to work. One of the reasons I got this one verse the 40# is simple space to store. The 40# does come with water trap & regulator and has wheels, otherwise identical setup, does cost twice as much but if you have the space Id opt for it. I have an old separator and regulator I can add to this one. I have one at compressor-adding another at tank will help insure dry air.
Some Assembly Required

Just opened box. Kind of impressed with included parts for the price. Noted the legs cut at angle with washers welded to ends.

Laying out the parts-at s a lot of fittings to make up...

First order of business-some cleaning up needed. All the fittings had some burrs hanging. Not sure why they milled the 2 blocks instead of using tees. The tank itself had quite a few LARGE flakes/weld splatter that I shook out.
First thing I noted instructions say to use 3-4 wraps of teflon tape on threaded fittings. Well has to be the thickest mill tape I've ever used-4 wraps of tape? there crazy. Wrapped with 2, but when threading in by hand fittings bottom out before getting close to being tight. The male/female threads are Way undersized?. Remove-clean re tape. Some I had off 3 times-re-tape trying to get tight before bottom out. I knew what I was buying-but good grief...

With the assembly-disassembly trying to get fittings tights and valves orientated took me an hour to get top manifold done. Getting a bit frustrated. Then holding up reg, trap and quick coupler realized assembly will be hanging off tank a foot...hmmm..
So back apart it comes..twice

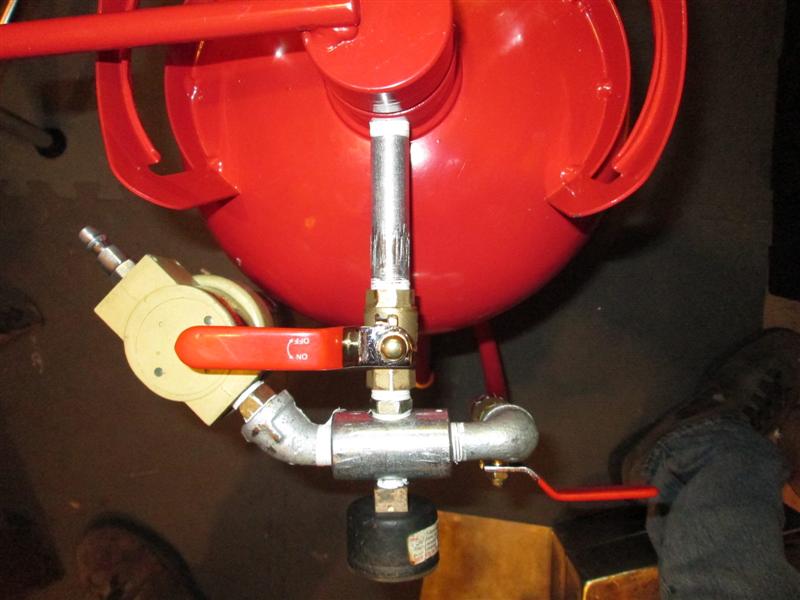
Took down to the 'tee', rotated so center is pointing to tank. Allows putting outlets pointing to sides instead of straight out. Installed the fitting/valves for air outlet and inlet. Testing with valves closed the old regulator failed, regulates but its leaking, bad. So took apart manifold apart again, removed regulator pulling the gauge, drill/tapped the tee and installed gauge on it. At least I can see what my compressor is doing. If I need a regulator I'll add after the trap later.

And how I plumbed. Added a 90° street elbow for the throttle valve & hose to tank. Added a 45° street elbow for the air inlet. This lets the trap set tucked up next to tank. If needed I can add back another regulator, probably not needed, I just had it. Oh well.

Going to make a small bracket to help support the water trap, insure side pressure doesn't unthread tee. I may add hanger for the hose also so it does not get 'hung on plumbing.

Might note orientation of valves, they are full rotation ball valves, the handles hit stop on body limiting to 90°, CC swing to open. Throttle valve I installed with 'on' being straight up, if installed down, when handle in off position could get accidentally turned on easily rotating down. Also the feed hose, directions show swivel end at top, I put on the bottom as lower abrasive valve will need to be accessed more frequently I would imaging. Up to you.

Legs installed, notice anything?...I was tweaking my manifold when on floor before I realized tank was leaning. The angle legs with feet that i thought was cool allow tank to set a good inch off level. Its the bungs on tank, one is welded on way crooked. Leg would need to be extended almost 1 1/2" to level tank. All legs the foot angle does not set flat plus rotated? I cant lengthen the leg that's off so I may re cut all of them , use rubber cups for feet. After I get this running...
Adding the bracket for water trap, install the hosed and 'gun'- load 'er up and see what happens. Just stopped to set this page up, allowing me to enjoy what I've done before tying to use-because I anticipate 50% chance this may not work, at least with my compressor. I know some of my air tools its stop an let compressor catch up.
Mounted water trap
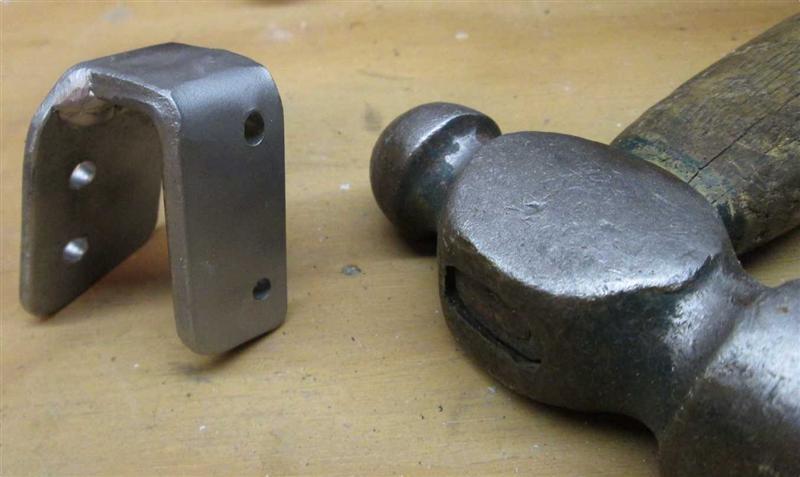
WHOO!WHOO!Made little bracket for the trap. Figured there's was no use putting off firing up the blaster. This bracket a perfect candidate and justification for the sand blaster. Ugly metal welded together, inside corners difficult to clean.
Draped some plastic out in yard. Loaded the blaster with a couple of pounds of media. I thought maybe I could blast into a box to capture media-wrong. Turned on compressor after checking blaster valves off. Turned on air to pressurize tank, Turned on air to nozzle, turned off then open media valve, opened the nozzle valve whoa-cool. Like spraying paint. Way to much air though. Turned down the throttle valve but ended up turning compressor down to 80. Started blasting the bracket but it kept running out of media. Give the tank a lil shake and it picked up but in bursts. Were blasting!

But White Metal! Pretty stoked. I didn't think my compressor could keep up but not an issue. Though I wasn't running for any length of time. But still if I can run for a few minuets I'm good. Most will be small items, and blasting metal scale for prep. Dialing it in. Its a start. I can see a cabinet is moving up the list.
My old ball peen was handy so I hit it to see what effect on rust/paint, almost liking wiping. I can even read some light stamping,
MADE U.S.A.
3764
Cant tell because of dings if there is an "In" after made though large space, first 2 digits questionable., Air to media is going to take some fine tuning. As this is the size of a match box I didn't run until I had it going steadily. Hopefully the pick up because I put so little material in tank. PLus I kept turning down the air. Well see.
Update: FAIL
Complete & total failure. My ability to easily prep stuff isn't going to happen. My sandblasting days are over before they even started.Really wanted this to work, kinda bummed but several issues I can not over come. My compressor is woefully too small. I remembered 7-9 cfm @125 & 40psi. New this would be problem but assumed I could work in short bursts allowing tank to recover. Wrong-it ran continuously unless I completely stopped, restarting, pressure dropped so fast comp kick back on, sand tank pressure can't be maintained. Plus I simply couldn't get any material to flow, period.
Second was water- tons of it. Compressor running all but constantly getting hot pretty I made more water than I could believe. Running 2 traps and still over powered. My assumption is when I tested, started off with cool compressor-fresh dry media comp set @80psi. That & I only blasted for 5 maybe 10 minuets, but not continuously that was total time. Fooled me into thinking this was going to work. In retrospect I also only put in a couple of cups of media, was shaking tank to get it to feed so may be I was 'sprinkling' the media into to air stream. But 2hours later I gave up, nothing I did/pressure valve adjusting etc. would produce anything more than half second of blasting.
Broke down the blasting tank-the glass bead was clumped/damp. Pulled the compressor out, doh 6.2@40, 5.1@90, don't know why I remember higher numbers. Lucky I can run my air tools. Blast tank requires 6 cfm min. The water, there are some things that could be done but pointless with this compressor.
Looking at new compressors-well I don't have a grand-best I could do is in the 15-18cfm range, marginal for blaster but work. And that's If a I ran a 220v outlet.
Oh well...day may arrive Ill upgrade the compressor to 220v, try again. Should have picked up small cheap siphon unit I started out to get.
Bottom line between lack of air and water, some serious work to get this viable option. I've seen several methods to remedy the water, leaning toward a condenser before air enters tank from pump. That's simple depending how creative I want to get and actually sounds like a fun project. The supply issue however is dollars- requires either a MUCH larger compressor or possibly a second smaller one plumbed into a combiner tank. Oh well, wishful thinking allowed me to assume what I had would work. For my $40. dollars got a good self education and what I really need IF I pursue this.
Back to top of page
Back to shop tool mods
Back to Our shops home page