Replace drill press table lift/add counterweight.
Contrary to Googles sending folks to this page- The actual addition of table counterweight is on Part 3 table counter weight page. Though I added the counterweight while drill press was down for this repair, and started toward end of this page, the info for counterweight isnt here. Drill press disassembly is NOT required to add a counterweight. (Other than belt and pulleys and the belt gaurd box). If thats the info you looking for, jump ahead.
Ill start with comparison of old and new cast bracket, some observations, then details. I end up having to rework the replacement bracket a bit, rewired the drills power source as it was 'permanently' hardwired and this is second time I needed to unwire drill. While drill is apart I'm going to add a counterweight to make lifting table (with 6" cross slide) easier.
Found replacement (hopefully fits) otherwise might try to weld cast iron. Never attempted. I don't know why it cracked, just noticed small 1/4" line in paint, within 2 weeks had traveled down side 1/4". Then it went into crank handle boss an inch, where dot is..toast.
So looking on line I found a couple of methods to try to weld. But I'm ordering a replacement. Can't order parts for this 1994 Harbor Freight/Central Machinery T-583 17" 16 speed drill. However everyone and their brother sells this unit or very similar unit. I use Searspartsdirect.com and use Model #137229171 CRAFTSMAN Drill Press. So far I've ordered other stuff and it fit. The column & related parts though I do not know if its the same diameter, its not stated. Mine is 3 1/8" (3.15) OD.
Took the gamble and ordered figuring if it doesn't fit Ill return and attempt welding mine. It comes with the table arm and pressed in rack gear.
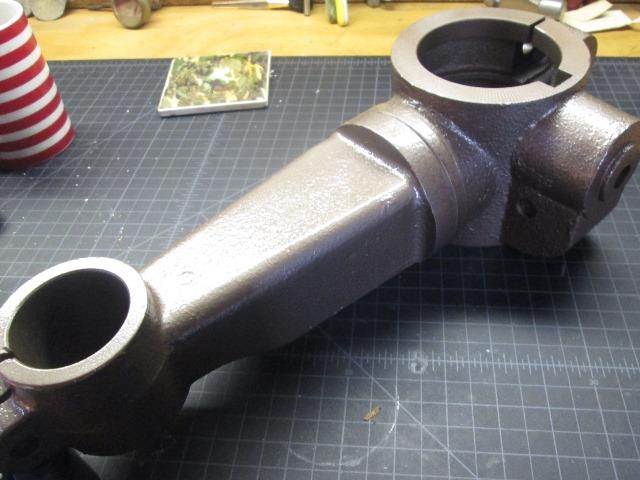
Arm arrived- it fits! almost. This is new bracket and arm cleaned up, painted ready to reinstall. Though this page mostly to document what I did in preparation, subsequent addition of counterweight and rewire, the new bracket is the same. Albeit its about .025 tight or smaller ID than old bracket. Just a source if you need one.
I assume the Craftsman drill has a better finish on the column, which would make column smaller OD or actually 3 1/8" (3.125) where mine is 3.15 OD and very rough. I spent couple of hours with file, emery and sanding drum to open up new bracket. Wasn't hard, just paying attention to keeping ROUND. Cast easy to machine but just time consuming doing by hand. Do a bit, check, do some more. But got it.
It is a better casting as far as design. Looking at mine I'm surprised it lasted almost 25 years. At first glance, difference between new and old one appeared new one will be weaker. It doesn't have the boss between column clamp and handle extrusion

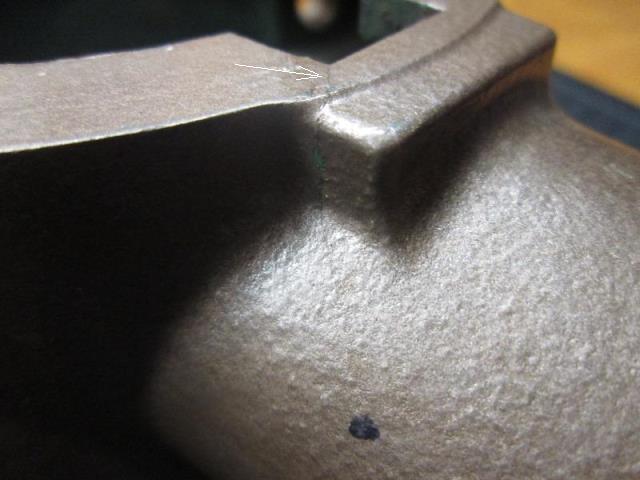
But closer inspection revels both why mine cracked and that new one less likely to crack. Though by design-it is the weak point. Comparing to first picture above- the external boss of the 'box' between main body and handle extrusion looks stronger

However looking inside shows quite a difference.

On the inside of old one, the slot for gear rack is cut and only 3/16" thick, new one runs full depth to ID of handle boss. Also, though really doesn't show in picture, the area inside the external boss 'box" is also cut, Its only 1/16" thick, probably less in the corners. That's where the crack is, started at corner of rack slot, across the top, the down the corner of the 'box'. Just an observation. Well see if new bracket last 22 years. But to the beginning...
- Prep while waiting for new bracket
- Step 1- Wiring

It will function same as before, plugged in switch box sends power to drill or pedal but drills input cord will be plugged in instead of hardwired.
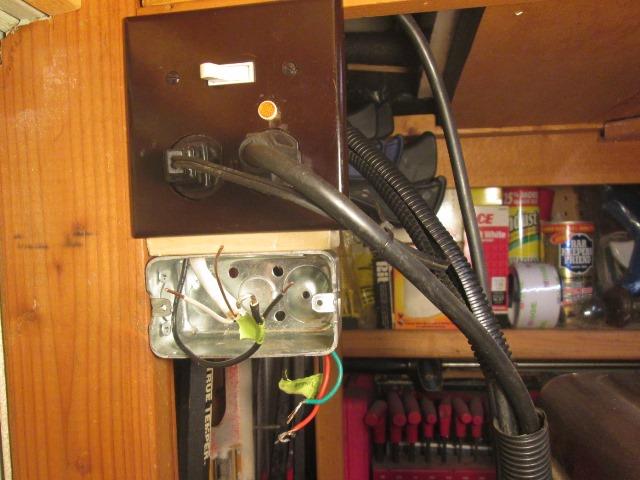
Here I pulled the drills cord that was hard wired, replaced with short lead of romex to feed one side of new receptacle that will be in new box. The other side of receptacle will be hot for general use. All of this is plugged into main switched receptacle. Added the box. To the drills cord Ill add a plug (I ended up replacing drills rather light cord with 16awg pigtail).
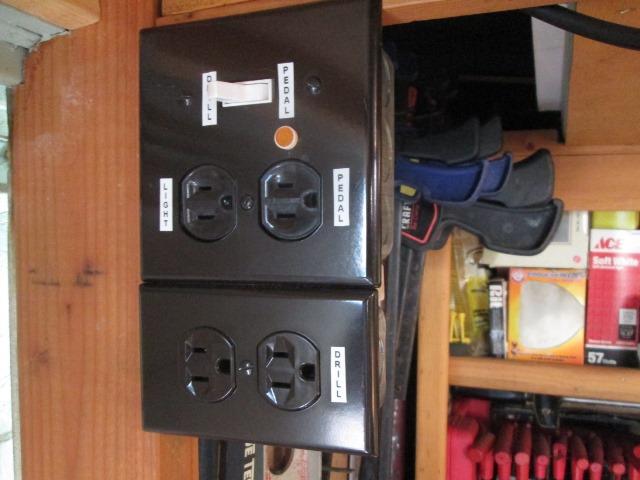
Just finished picture. Got carried away with the labels, maybe get some black labels. Anyway can simply unplug the drill now. Proceed with taking apart.
- Step 2-Disassembly

Remove left hand nut from quill pulley. Remove it and center pulley. Removed belt guard box.

With access inside of head, easier to loosen belt/motor adjusting cam and slide whole motor & bracket assembly out. Disconnecting wires at motors connection box also simpler than inside of head (take pictures!). Drill in pieces.
for my own record...


- Adding table assist counter weight

Starting the table counter weight while waiting for replacement table bracket. This will offset some of tables weight making easier to crank. Here I'm just looking at adding counter weight cable hole. Some details to figure out. All I need to do now is what is needed while apart that can't be done after drill reassembled. Mostly which is building counter weight, sliding it, with steel wire lifting cable attached, into columns. Also need the exit hole for cable, be easier now to place. Drill belt guard box.
The existing hole in guard box between 2 mount holes is centered over column. I've laid out where hole for cable exit should be, sort of. Basically down inside the column Ill place a length of pipe with weights. A steel cable attached to pipe will come up thru centered hole in box, over a small pulley then back down thru added hole to table bracket. I'm making hole a 'slot' due to unknown pulley size and relation of motor bracket which is underneath. This will give me small amount of adjustability so cable doesn't rub.
So all I need to reassemble drill is make and drop added counterweight inside of column, add hole in guard box, and the cable. As I don't know exactly how I'm adding the needed pulley that's how I'm proceeding, just enough to reassemble drill after parts arrive. I'm planning, I hope, to use the guard box mount screws to mount pulley later. Entire process on its own page-see bottom for link.
- Reassembly

Interesting slipping new table bracket with gear inserted onto column. More was feeding counter weight cable and setting the head back on column while pulling cable. Missed that 3rd hand. But its on.
AS mentioned the new table lifting bracket had to be opened up a few thousandth. After couple of hours got it sized to fit column. Painted it. I'll note, the replacement bracket and arm are not drilled for the angle marker tapes. Not that I ever used (tape, I use protractor) but requires holes for the attaching drive screws. I may once/if I pull the old ones off is use some 3M tape to attach on the new bracket and arm, doubtful but not drilling the brackets. Simple 0° marker on top would be more useful. Hmm, since its square...added some striping tape.
To get the new table bracket on column requires first feeding the gear rack inside, then slipping it and bracket onto column. Kinda awkward. Once on column slide the top ring onto column to capture top of gear rack. On mine I also have small auxiliary table, slide its bracket onto column.
Sat the drill head on stool next to drill, fed the new cable from counter weight thru head, then lifted head onto column. Secured, aligning previous indents from set screws on column.

Slipped the motor in, slid in the cam adjuster and tightened its bolt. Referring to pictures rewired motor. Reinstall the belt box then the pulleys. Check it still works...Functional drill, amazing how many times I went for it to use while repairing..

I pulled the belt box off again, added some brass grommets to holes. They aren't fully compressed so they can slide in the slotted holes. Reinstalled. Installed new belts.
Attached the table arm. Raising/ lower to check it works is when I notice the crank handle is cracked. These are available but I think Ill make one, it could stand to be a bit longer. If I noted before though I would have ordered when I got bracket.
Now to find or make a pulleys so I can continue the counter weight. Not a high priority, be nice to finish though. Though pretty much done at same time, details of counterweight and pulley addition on separate page, but first I need to make a 'new' handle.
But drill is back up and running again!
Part 2 new lifting handle self generating 'project' ..
Part 3 table counter weight sheaves and hookup
Back to top of page
Back to shop tool mods
Back to Our shops home page