Add stabilizer arms to front jack legs
-
On this page:
•This section, fabricated simple camper jack stabilizers.
•Update 07/2015 allow for rotation of jack clamps to solve clearance issues
•Jack stands Aluminum stands for added off loaded ground contact when needed.
Our camper has always been a bit wobbly, at least more than I'm really comfortable with when off loaded. At home it sets on saw horses built to minimize camper swaying when parked. Though the 'comfort' level when off loaded is important-primary motivation is how much the camper weaves when raising and lowering. As the camper ages seems to be getting worse, to the point not sure I really want it unattended-sitting in a campground. Getting ready for an extended trip where we will be off loading and doing a lot of exploring in the truck decided to address.
This is 2 part project:First I picked up some simple aluminum jacks stands as I'm not sure I’ll finish this before we leave. I’ll add some notes on those to bottom of page. Camper will be lowered then raise stands, not really taking much weight but to help stabilize at camp. Second and the main project is adding arms that tie lower part of jack legs back to camper. There are some manufactures who make these, currently I'm only aware of Tork Lifts "wobble stopper". Good product, a lot of folks given great reviews. I seriously though about picking up some, however there not exactly cheap. Basically on truck camper front jacks the distance from mounts to foot leaves a huge lever against the mounts, plus simple flex of tubes. Allows for quite a bit of movement especially when fully extended. Adding, whether self built or purchased, something to move the last attachment to shorten the leverage makes a huge difference.

For most the T/L arms would be ideal, you'll note in this pic it shows 2 pair installed. As cost a factor I decided to attempt rigging something up, mostly because the Wobble stoppers only come with a single arm each jack. Price of 2 pair prohibitive. On our camper jacks are parallel to front so only 2 pair of arms would stop any side to side (which is where most movement is) but would offer no front to back stability. Also want to try and place so that they can be utilized when loading & off loaded. As mentioned, when camper is raised high enough to load /off load is really sketchy, camper is just weaving.
Front to back arms
-
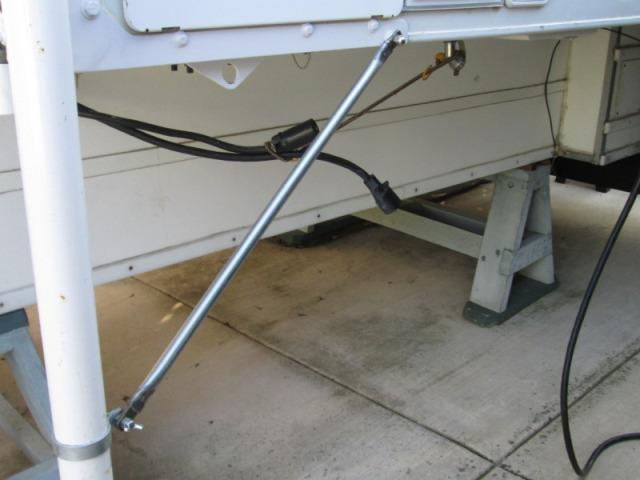
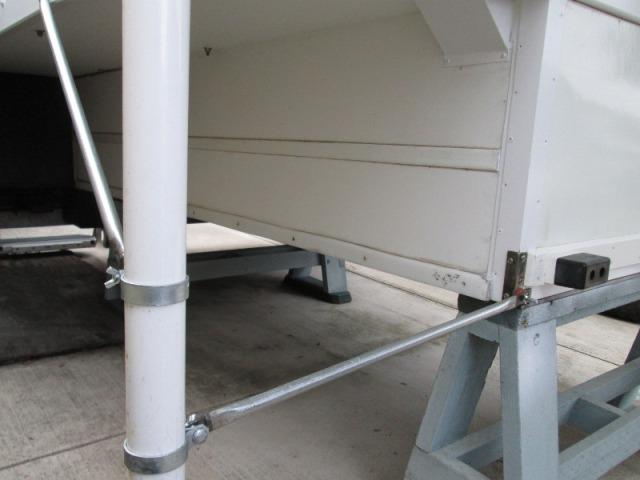
Front to back arms from side of camper to jacks will be rather simple so started with them. Thinking I might pursue this I had previously installed a bolt on the driver's side when I reworked jack mount extension. On the passenger side the front to back slide support tube I added recently hangs below camper wing so just drill for a bolt. Get some clamps for jacks legs and make some arms.
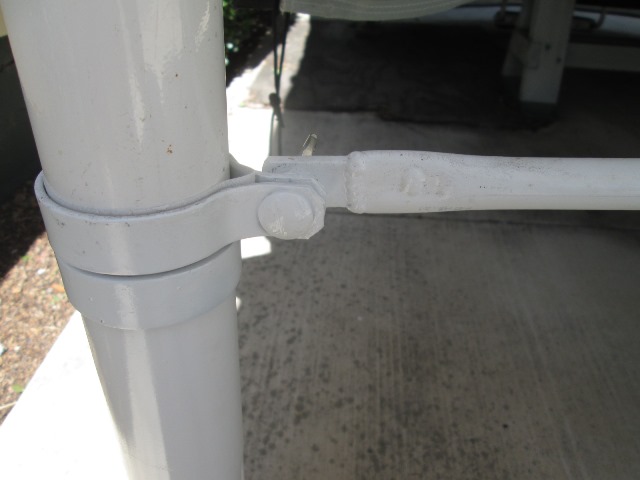
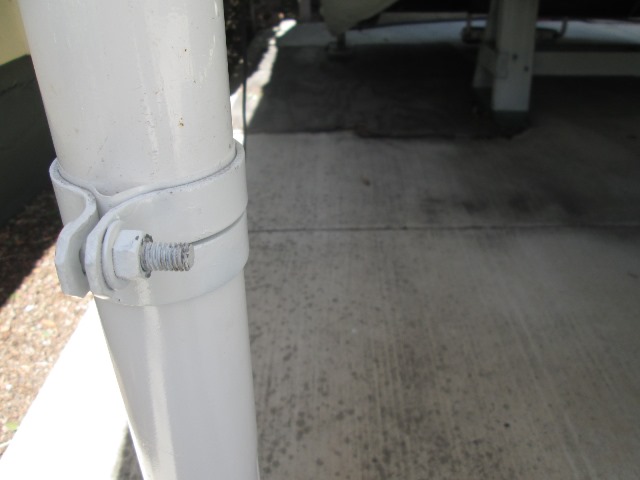
Clamps: I used galvanized fence panel clamps. They are 2 3/8" ID, the jack tubes, Atwood, are 2 1/4" OD, but they do clamp tight enough for a push/pull. Actual Atwood jack clamps (p/n 85580 for elec/ball manual jack, p/n 85324 for smaller 2" acme screw jack) are ~$18 a pair. Fence clamps $3. If your application has a lot of rotational pull then the Atwood clamps would be better. However the fence clamps are malleable, easy to rework and again do clamp fairly tight.
Hardest part for front to back stabilizers will be placing so I can drive under camper with them on. So drove truck under camper, mid of fender at jacks & measured for placement. Was able to get fairly far down the leg without too great an angle. Appears plenty of clearance. So they can be attached when I swing the jacks out and drive out or under camper. As they also angle out from camper to jacks will offer, though slight, a bit of side to side resistance but mostly front to back movement.
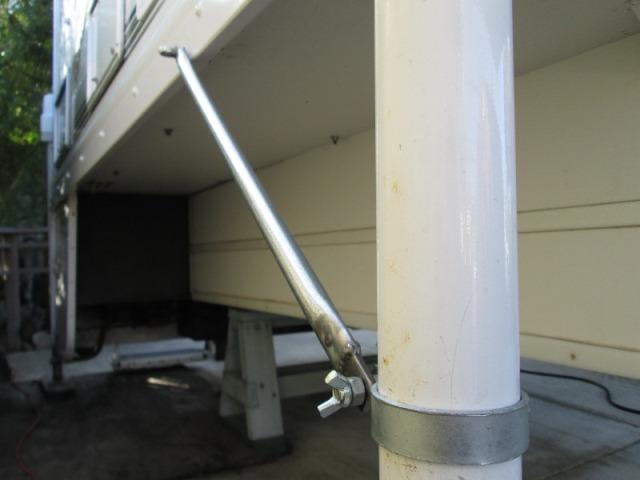
So for the jack to side arms all I need is jack leg clamp and make the arms. As this is quick & dirty project to prepare for trip, I'm cutting a lot of corners. Primarily the arms, secondly the jack clamps. Once this is set up and I know worth the effort I plan on redoing when I have more time. I used fence clamps intended for panel attaching, I may replace with actual Atwood clamps. Installed clamp on jack at approximate location, using 5/16" x 1 1/2" carriage bolts. Arms will mount to threaded portion sticking out so the clamps will stay in place. (updated 7/2015)
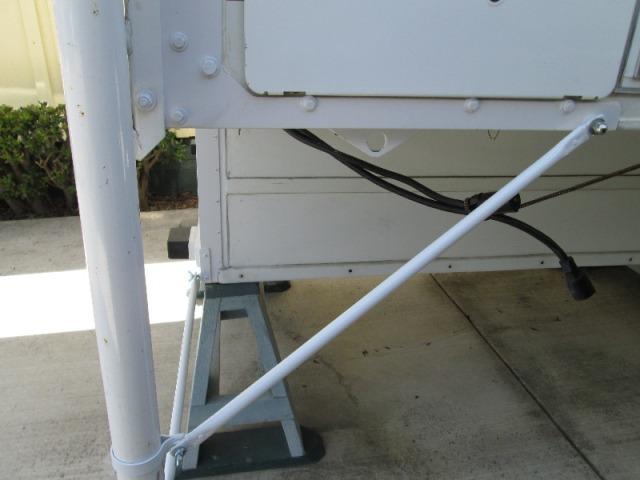
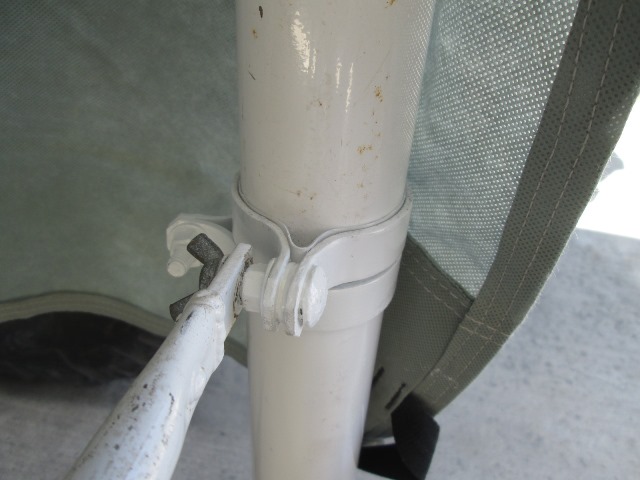
The arms to save weight, expense & ease of fabbing I use 1/2" galv conduit. Cut 3" lengths of 3/16"x3/4" flat bar. Drilled clearance hole in one end of the flat bar pieces, ground a very slight taper on other end. Flattened one end of the conduit enough to insert flat bar then peen conduit to bar. Welded using continuous series of tack welds. Then measured how long to cut conduit so second end hole would be where I needed it. (approx. 25 3/4 between holes). Once I had second piece of flat bar in position tack welded it. I then drilled thru sides of conduit and into flat bar about an inch back from end, plug welded both sides/both ends. This will ensure bar can't pull out, stop any movement of bar inside of tube. Made second identical arm.
Surprisingly they work! When initially installing adjusted clamps for length made by loosening clamp bolt.
Drivers side...
Passenger side...
You can see the plug weld on arm. Intended as temporary these if they hold up may end up permanent.
Raised camper to 'wiggle' test. Big improvement however did nothing for side to side, thought it might help but didn't. Just verified I need the second arms.
Side to side arms
-
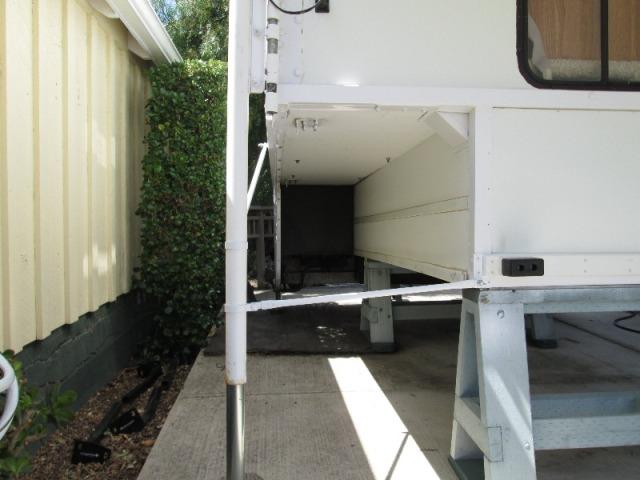
The side to side arms, from front of camper to jacks, really couldn't be done/installed while on truck as I originally hoped. The clamp on jack side would only be a few inches below mount- fairly shallow angle to clear bed rails & just wouldn't add any stability. So nixed the idea of being able to install and use to stabilize when loading/off loading. Since I can't- Ill maximize placement for off loaded stability, installing them fairly low. After pulling truck out I can install them before lowering camper to ground and utilize for raising camper to back truck under. Its the act of raising/ lowering camper that makes it dance. Being farther down on jacks will add substantially to off loaded stability.
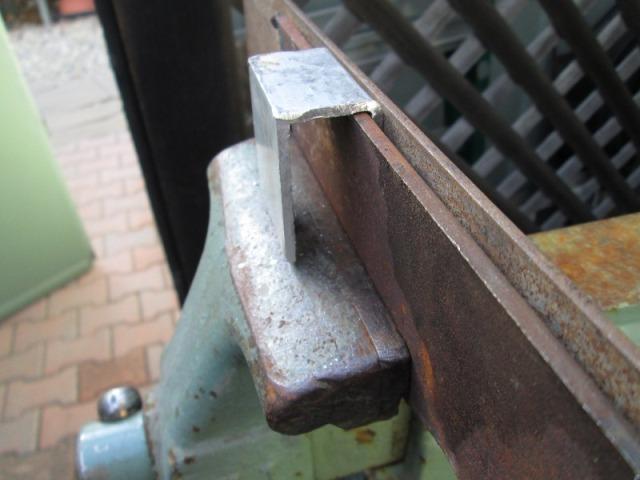
The front is going to be a bit more work. Need to make some kind of brackets for front of camper. Took a lot of eyeballing but finally came up with plan. Using some 1" angle in lower corner. Weld a bolt sticking out for arm attachment. Added a small tab for extra front screw. Used #12 CS oval heads, as I had added the aluminum frame around perimeter of camper front they thread both to frame and into camper.
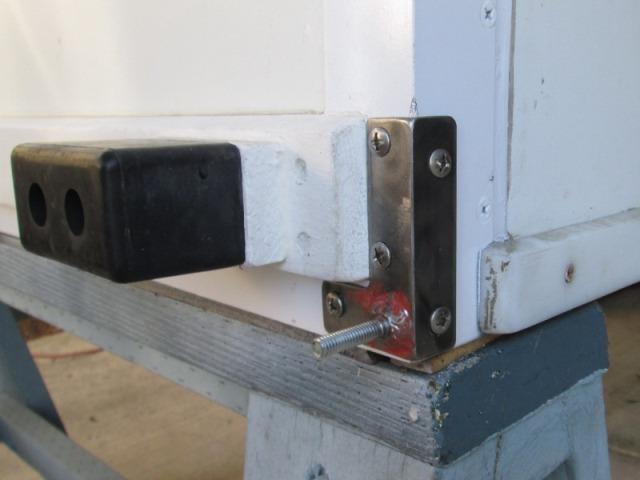
These ended up a lot nicer than I had hoped. Originally figured it would be something surface mounted, corner wrapped just stronger, less working of screws
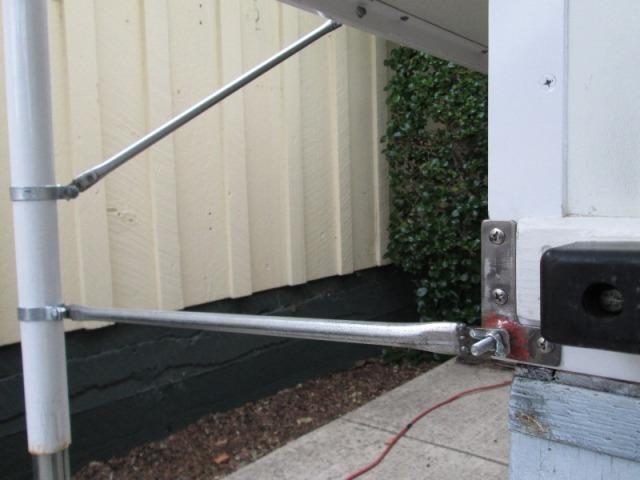
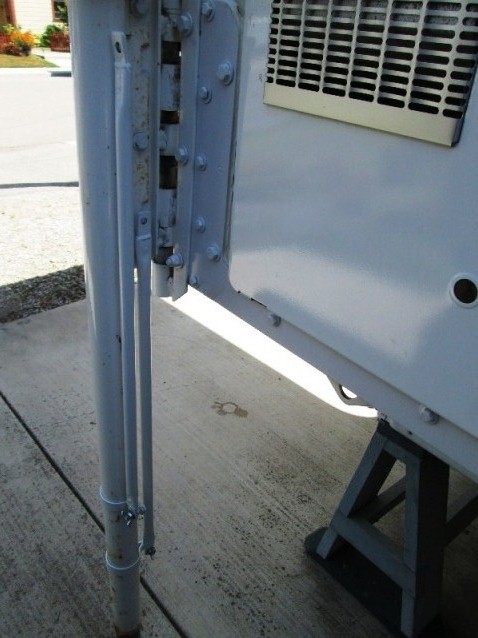
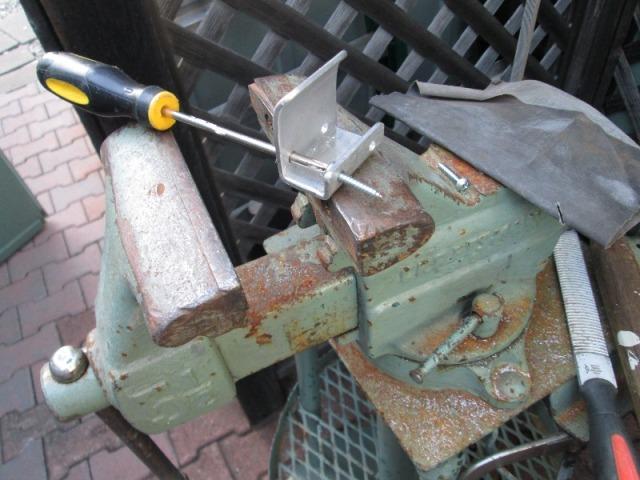
Added another clamp to jacks, measure and made pair of arms. You'll note the Torklift arms are telescopic, nice for storage but more so for adjustability as the distance or where jack legs will be invariably will change. Mine are fixed length, may or may not be problem but if I had more time I would make adjustable. For this go round Ill rely on moving the clamp on jack if needed. Though pretty flat there is a small bit of angle to ensure they didn't end up too short. Nice is they are identical lengths. Installed and wiggle tested. Wow. I'm stoked. Even with camper 30" off the ground hardly any movement. Was having some doubts.
Cool, when off loading-swing jacks out, attach the front to back arms-will clear dually fenders, add a bit of security until truck pulled out. Then attach the side to side arms. Lower and be camping not feeling like walking in a boat. Though more importantly is how much less the camper will be bobbing around when lowering and raising.
Now to pull everything off, prime and paint. The clamps will be painted in place. The front brackets I'll pull, prime, reinstall and paint in place. I might run a small bead of caulk at top of clamp just to stop nightly fog water from running behind. Used zinc primer. I'll play with arms a bit first. I want to see if possibly they can fold up and 'live' on jack be nice but never part of the plan.
Everything painted waiting for reinstall. The front to back arms will fold up on jacks-just need something to secure them-tighten lower bolt, Velcro strap at top if I had some. The lower arms won't swing up, they are, one to long and second on back side so jacks can't rotate in for traveling. However if I leave attached at camper side they might to center, store folded up under rubber bumpers...hmmm
Reinstalled the front camper brackets I bedded with Sikaflex 291 I had leftover.
Done
Driver side
Passenger side..The side arms fold up and store on jacks. The front arms wont clear jack swing mount so for now I'm dismounting, place on other side and slip back on as shown below. They will however if pivoting on camper side rotate toward each other, just need to make a little bracket in center of front, then the arms can be stored across the front underneath the bumper board. Or without making anything they will stand vertical resting against bumper board edge front arms, not pictured but is probably what I'll do. Takes all of 5 minuets to take these on & off so I may just do that.
Just showing folded up- you can see the front (shorter inside) arm rebolted in front of jack mount. Have some little loop bungies but I'm sure Ill also zip tie until we reach our destination. Ya know in the time I've spent thinking and writing how I can get around not making a bracket I keep seeing ...I could have made it.
So got back outta the chair, cut off a piece of 2" aluminum angle. As this is going under 1x4 I'm bending so top leg will screw to bottom of board instead of into camper wall.
Sandwich between 2 pieces of plate so I could hammer over top edge 90°.
Rounded all the edges, drilled thru so I can run screwdriver thru bottom leg to drive screw in upper leg for attachment. Bent a small lip, not sure why though, loose, the pivot bolt wouldn't allow to roll off.
Installed; bedding bracket in caulk. Not that pic shows very well. Works nice-remove nut from jack side-swing it over onto cradle, tighten the pivot nut. I like it-took all of an hour. Procrastination
Ill report back with actually usage. As I said earlier the arms I made were planned as temporary.But as they appear to function unless installing the front side to side becomes painful I may redo.
-
Been using for a little over 2 years. All I can say is if I ever buy another camper it will NOT leave the dealer until wobble stoppers are installed. Well- I might make them again for the $10 in hardware cost but point is they are awesome. Both when camping off loaded and the stability when raising and lowering camper. Arms have worked flawlessly. I've never had to readjust clamps due to the fixed length as I thought I might need to. Just spin off the wing nuts, rotate & slip on arms and snug the wing nuts. Rock solid. That said...
The 'ears' of the clamps for the front side to side arms do stick out about 1 1/4". Left me with about a 1/2" clearance between them and fenders. Its close. Either our camper or the truck is not symmetrical. I have to have camper almost touching the right fender well to maintain that 1/2" gap on right side. I haven't yet but I could easily gouge right fender. As time passes not any easier to get under or out. Couple of times camper shifted, taking a bit of jockeying to get clear. The extra effort loading/unloading worth the effort but it is getting old. Time to address...but how?
Looked at a few ways. Split clamp like newer style Torklift models would work but in the end I decided all I need to do is rotate the clamp on jack. Could just loosen bolt, rotate and retighten, sounds like a lot of fiddling. Mostly because I also, due to fixed length of arms, need to maintain the height location on tube. Could split the arms, weld in nuts using a piece of all thread and make the arms adjustable...Still, having to unbolt the clamps doesn't sound practical. Looking thru junk found 2 extra of the original fence clamps.
Hmm just install another clamp under arm clamp? Act as a stop/locator. Loosen the arm clamp just enough to be able to rotate out of the way when backing in or out. Needs to be snug enough doesn't 'freely' rotate. But not as critical as it sounds. The arms work together, when force applied pushing toward jack its pulling on the other side. With the ears of the clamps in direct line of the push/pull action when camper trying to flex jack- one will always be in pull.
Still I need to snug as much as I can and still rotate clamp on tube. details...To see if this would work added the new clamp below existing clamp. Then loosened the arm clamp. Well sorta works, but its going to grind thru the paint, and to tighten enough so clamp doesn't wiggle I cant turn it. Ahhhh. A strip of high density polyethylene- HDPE, more commonly referred to as plastic milk carton.
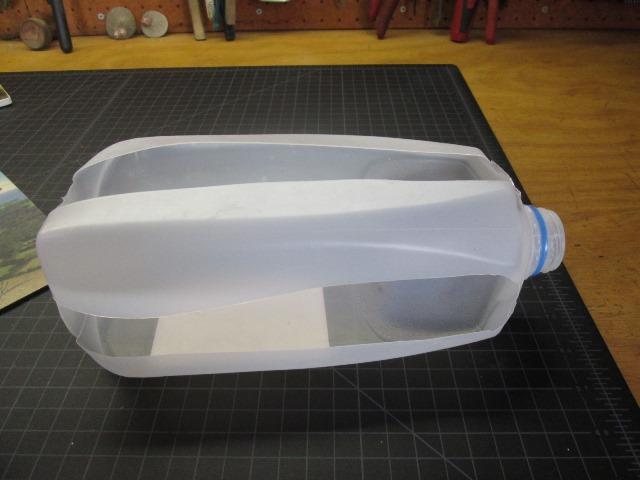
Stuff is really nice for making shims, odd washers etc. Works well for flat bearing washers as its pretty slick. Cut some strips then trimmed width. Length about 3/4" longer than OD of tube.
Slip under clamp..I can tighten the clamps down pretty good and still turn. Cool.
As I was tightening clamp while rotating, the strip self aligned the ends so they are butting, pushed the excess into the opening of the clamp. Ends of strip are 180° from clamp opening. Wow, I was going to trim length but this works better. Not planned but Ill accept. Puts the slippage between tube and shim so the rough galv surface of clamp wont eat up strip.
And rotated out of the way. That was simple. I don't know how long the HDPE strip will last. Given it only rotates 90° and so infrequently I imagine quite a while, couple years. Dirt is what will kill it I think. Material is cheap enough so Ill cut some extras and put in the camper. Any real issues would be solved with an open end wrench. Going to make backing the truck under NICE...
I do need to pull the bolts though, add spacer between ends of clamp. I assumed allowance room to tighten more as HDPE strip wears. But the gap between clamp ends lets them flex independently, not good. Just happens the gap is 2 washers. Course I didn't see till I painted. Life's rough :)
Done.
Update 05/2019
6 years later...Revisited this page as it occurred to me the friction strips on that allow rotating arms might need replacing. Checked and they are fine. I assumed need changing every couple of years but virtually show no signs of wear. I'll add these arms have just been amazing, both in loading and unloading camper but more so when using camper off loaded which we do often. The extra 1" clearance between clamps and truck fenders gained by the ability to rotate arms removes the stress of getting truck in/out. All in all One of our more appreciated mods.
The stands, outlined below we've only used a few times. However the 1st trip (that they were cobbled together for) was well worth the effort. We were off-loaded in Utah, set up on dirt. Storm blew in 3rd day. It rained a lot. Wishing camper was on truck but the wind was fierce, so much so I couldn't risk loading the camper to get off the dirt. Cant tell you how glad I was having the extra support.
end of update
Jack stands
-
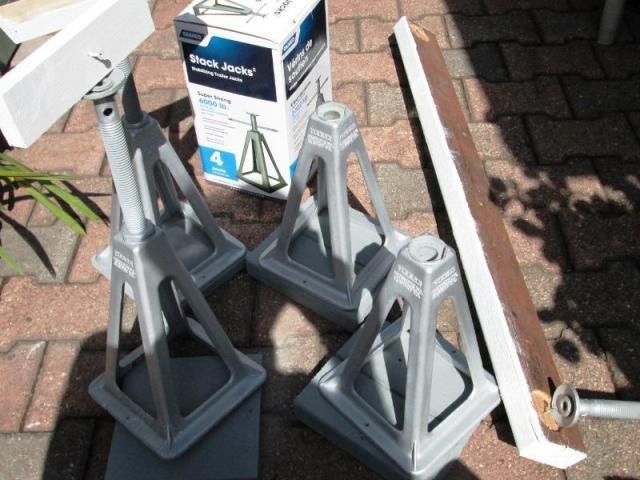
While paint is drying played with 'new' stands. Included in stabilization efforts when camper off loaded are the jack stands I'll be setting under camper. Simple aluminum screw stands-need to make a bottom board for better ground contact and a top board to spread any load on camper bottom. Though no real weight is planned-just enough to help stabilize but want to insure I don't 'punch' camper bottom. These wont be used much, extended stay or questionable ground.
I had picked up some Camco stands but the 17" max height won't work. I had measured how low the camper would go-but I didn't take into account the generator tail pipe. Though I am using wood for base & spread load at top the 17" just not enough and require too much blocking. So I scrounged around in various sheds searching (which I didn't want to do) till I found all 4 of my very old stands as I remembered them being taller. Yup they will go bout 18 1/2", a lot beefier so cleaned em up a bit,. painted with some aluminum paint. I'll be returning the Camco stands.
I matched drilled all 4 stands with 2 small 1/8" holes and used finish nails on the wood bases to keep from sliding around when using. (Any stand will fit any base). For the tops as the screw is hollow a simple screw to keep wood in place until raised. I did make a continuous piece for the front. On it I counter bored a pocket along with center screw so it doesn't fall off until raised.
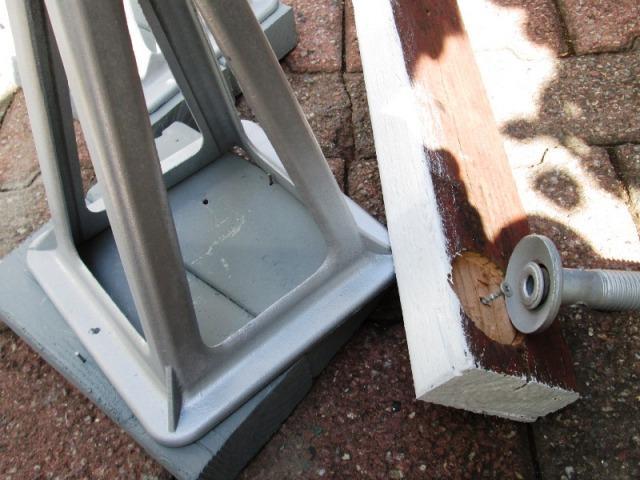
Just detail of front board. Note on the rear stand I used 1x top & bottom. The fronts are 2x's. Once camper lowered, set jacks underneath, raise stands until contact and hand torque. Amazing how much more they stabilize camper-more so than stiffening camper jacks. These will not support camper, just to keep box from moving independently of camper jacks.
A side note-looking around to see if these Reese stands were still available (their not) I discovered they are actually considered antiques. Well I know I've had them for at least 35 years. But I found some on Ebay- I also found some at action house being sold as "Vintage jacks" current bid almost $200? wow. Came across an old forum post-back in '05 a set sold for $182. Do I insure them? Chain them to camper? Hokey smoke.
Conclusions
-
I'm pretty happy-came out better than I expected with the time allowed. Our next trip will tell the tale. Over all though efforts seem to have been worthwhile. Looking at the Torklift Wobble Stoppers, many nice features-but the best is the arms are telescopic so can be adjusted for the variable distance. Which for the moment is the only reason I see remaking the front arms.
Added short stabilizers to rear jacks Rear stabilizers page
Back to top of page
Back to Ourelkhorn Camper Modifications page