Generac Impact 36lp Generator starting problem
Bypassing failed main board relay that energizes starter solenoid/contactor, 08/2013When pushing the start button generator starter usually just 'grunts' instead of spinning.
Note the starter solenoid is referred to as the 'contactor'- I call it starter solenoid, what it is. When energized it sends full battery power to starter motor.
- I had determined (wrongly) that my generator starting issues was a bad starter solenoid, it wasn't. I had pulled apart the solenoid thinking it was bad contacts inside because I hadn't tested the feed line that activates it.
- Jumping 13 to 16, sends full battery to starter motor, should turn, but don't. For some reason its a first response to stick something between large temainls to hear motor turn. 13 is direct from battery. Jumping directly between 2 large terminals like a big screwdriver, could arc weld what ever you use to terminals or chassis and cause serious problem like burning up motor, cable to battery or damage battery itself. Use a jumper wire if you positively think you need to test motor, make connection outside.Do as a last test. Assume starter motor good.
- Briefly Jumping 13 (or from other 12v source) to 56 should energize solenoid, sending power to motor, if motor turns , contactor/solenoid good
- Pull wire from gas valve, With multimeter connected positive to #56 , ground to chassis, hit start button- you should see full battery voltage, motor should be turning (may start if gas valve wired). If volts low/fluctuating or nonexistent, motor not turning, main board output suspect.
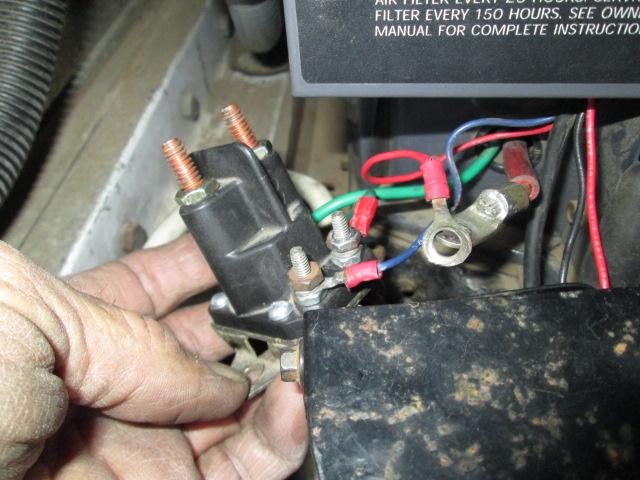
Picturer of contactor/solenoid. 2 screws bolt it to gen, its directly behind the small black box and below the generator panel. DO disconnect the battery unless you want to arc weld everything together.
Once I determined it was the #56 wire from main board not delivering full power I dropped generator in hope against hope a bad wire, corrosion etc. Though not a bad thing was a bit of work, not needed. Bypass could be done without dropping, remove and isolate #56 wire from board, add new (switched) 12v source to terminal 56 of solenoid.
Other possible issues
If your generator, when pushing the button intermittently turns or grunts, it could be as simple as dirty or loose wire connection, especially the main battery & starter terminal connections. Check them all. If it turns but doesn't start listen when pushing button-you should hear a rather loud click which is the fuel solenoid opening. Ours as the wire terminals on gas solenoid are exposed they simply corrode-had this happen several times, cleaning fixes. I've gotten trained to listen for the click-if it doesn't I don't even try to start and go wiggle the fuel solenoid wires. You really need a manual for these. Other simple issue are generator shutting down-which can be caused by a faulty oil temp or oil pressure sender. Assuming your oils not super heated and you have pressure-these 'conveniences' cause more grief than generators they save, unless your running for hours on end. As they work by grounding simply disconnecting allows generator to run. but get fixed ASAP.
See Generator contactor page if you really believe its contactor or just curious what's inside. With care can be cleaned if its just burnt contacts, simple not too expensive to replace.
Jumping across main terminal would cause starter to spin so assumed it was the solenoid-wrong. Symptoms were when pushing start button- I hear the gas solenoid click then a few seconds later the starter engages-however recently starter just grunted, it would repeat the grunting as long as you held starter button. Sometimes it would spin, usually not. If it did spin as it usually never fires first try was getting afraid to let go of the button because more likely than not it wouldn't engage again and only grunt. Worst thing you can do to a starter is keep it engaged for more than a few seconds. Decided I needed to try and fix. If I can't Ill drop. Decide if I want to pay someone hundreds to look at.
We no longer really use the gen. anymore for charging or running extended times. Even in inclement weather solar generally meets are needs, though on occasion its kept us charged. We've gotten spoiled with it. Its usually only used now to run microwave and usually last thing in evening at dinner. Which if doesn't start we've killed the batteries trying.
At any rate If you have good main battery power to starter solenoid - IF when you jump between battery and starter cables starter turns- IF you remove the blue wire from small terminal then apply 12v to the terminal on solenoid and starter engages this may help. You need a multi meter and you need to check the voltage at the blue wire on small terminal of starter solenoid (contactor). Power is delivered from the main circuit board on generator when you press the start button. Mine the voltage at the blue wire was not at full battery voltage and within half a second would drop to 0.05 volts. As long as button was held it would repeat-near 12v then drop. So starter only briefly received enough power to energize. Effect was starter grunting. Randomly it would hold full voltage and starter would spin but usually it wouldn't. IF checking the voltage and it drops the problem is the main A6060 board. It supplies the 12v to the starter solenoid when holding start button. It was a learning process to discover my problem, failed relay on the board. unfortunately board is potted and relay can not be replaced. Needs a new A6060 board. It's a $300 item-I decided to bypass for now, which is what this page describes.
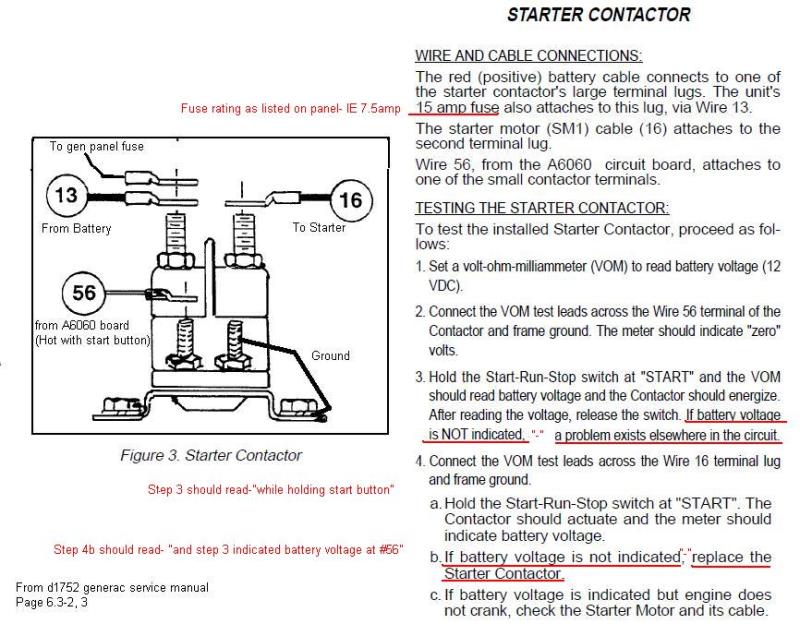
The test, noted in red are my 'corrections'. 1st 2 tests will turn motor but gen should not start as gas isn't being turned on. Contactors job is to connect terminal #13 to #16 when 12v is applied to #56.
Identifying and fixing our generator starting problem:
-
After unsuccessfully finding any bad connections or component problems with generator installed in camper, I decided I needed to remove it. Preliminary discovery was the fluctuating 12v feed to starter solenoid. Hoping that may be there's a bad connection or something simple behind all the tins and shields that I cant access with it in camper. Need a service manual as I have no idea how this works and have a clue what I'm doing
I downloaded a copy of the service manual D1752 from generator-parts.com, this is for a Impact 36lp plus- model 0009411 which translates to a 941-1 (tag says item #-last 4 digits are model), there are manuals for most.
One good source is generator-parts.com.
Another is ASAP
Generac Impact series includes: listed under "Generac Service and Diagnostic manuals"
Models 802-3, 803-4, manual #?
Models 940-1, 941-1 manual #D1752, owners manual #A9195
Models 940-2, 941-2 manual #D9057
Models 941-3 ?
Models 941-4 ?
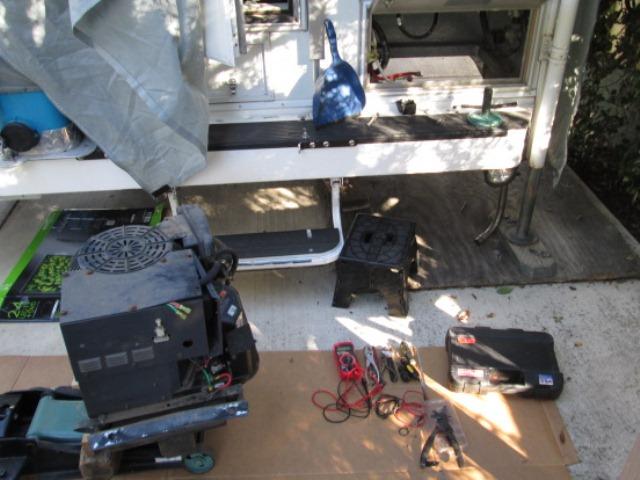
At any rate I dropped our generator. Using a floor jack and some cribbing to hold steady-fairly easy after disconnecting gas and wiring. Rolled around to work on it. Took off all the tins to access wiring & components. Cleaned ALL wiring connections-specifically the grounds. On the plugs I separated inspected and worked a couple of times and reassembled. DO check all the 110 screw terminals-several were way loose.
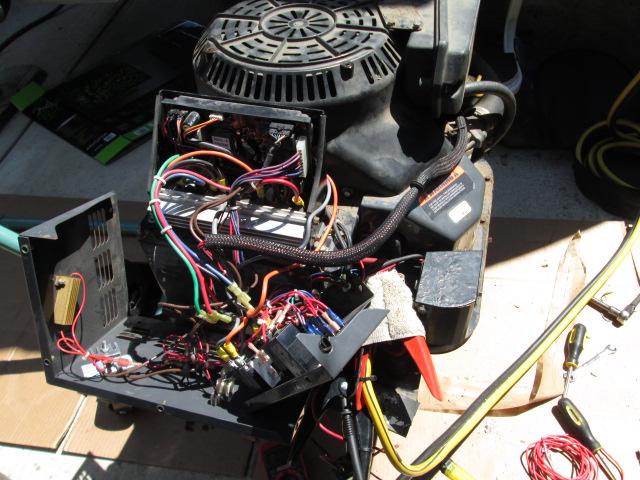
Using manual tested everything. All within spec-except output from board relay to starter solenoid, which is the blue wire #56. When hitting the start switch, its other functions-grounding main circuit board so it functions, opening gas valve, activating ignition and controlling the stepper motor for carburetor still operate. Its just bad output from failing relay on the potted circuit board. Also if manually applying 12v in lieu of the 'blue wire' from circuit board, as mentioned earlier to starter solenoid, starter work just fine and it starts, so its just not getting power from board.
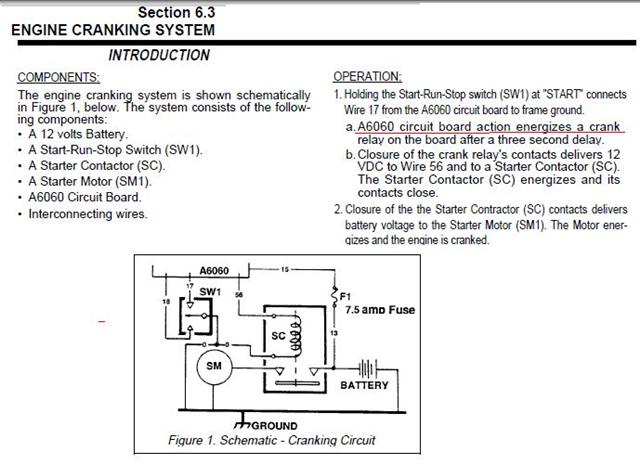
Section 6.3 of the manual outlining what is supposed to happen-1a & 1b. Oddly it doesn't suggest what to do if no or inconsistent output from relay in any of the tests. I guess this cant happen-failure of board relay.
So my solution, at least for the moment, instead of replacing, board which is almost $300, I'm adding momentary switches to feed 12v to solenoid. Though functionally duplicating what board is supposed to do does require 2 hands. One hand holding down the stock switch to activate its other functions, then couple of seconds later hit new start button to spin starter-wala fires right up, then let go both buttons. Stock switch still turns off.
I looked at adding a relay that was triggered by stock switch. Unfortunately it doesn't really turn on stuff except the terminal to gas solenoid-which once started remains hot via another wire from board so cant use (or starter wouldn't disengage). The grounding feature of start switch 'could' be use to activate another relay, however I do not want in any way to interfere with it activating the main board. But just touching the solenoid feed terminal with 12v fires it up-completely independent of other logic circuit/wiring and main board, seems simplest. Hardest part will be running wire to kitchen vent.
I may order a board while there still available-new stepper motor and oil temp & pressure cutoff switches and replace all later. Will be about $500-so I may not. The other stuff there are work arounds-but not the board. It controls everything including charging and power output. The stepper motor just unique, controls carburetor in relation to load. The oil shutoff sensors-I'll probably add a plug on wire going to board UPDATE-There is an existing plug on a single wire that leads to both oil temp & pressure switches. Its on the loom going to gas solenoid. One of the wires drops down thru bottom cover of motor, unplugging that single wire will allow gen. to run if no oil pressure or high heat (or more probable failed sensor). . They both work by grounding wire #85 or terminal 3 on the circuit board, simply disconnecting overrides. I've heard a lot of stories of them failing and generator wont work-not a single story how they saved generator. If generator were to quit due to sensor-and its got oil and not hot, just unplug sensors.
At any rate Adding two wires to starter solenoid energizing terminal with a plug. One wire to new momentary switch on face of generator powered by its fuse. Second wire thru inline fuse holder (to protect but also so I can unplug should I need to drop generator again). It will continue to stove vent where it will connect to another momentary switch, powered by something inside. Ability to start generator (like factory) from inside or at the generator itself.
Kinda what I'm doing. Adding momentary switches.
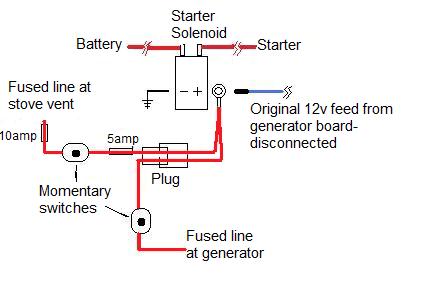
The wire going to stove vent due to the length and is energized its entire convoluted path I'm fuseing at both ends. I used a 10 amp inside at the vent and a 5 amp at generator end, thinking the 10amp inside the vent would be last to blow if problem but it's protected. The only deviation from diagram above is power at generator I grabbed from its fuse. I'm going to move it to the hot side of fuse and add another inline 5amp fuse. So the entire auxiliary starter line will be independent of generator.
Made harness, a ring terminal with 2 wires going to female connector. Male side connector leads, one wire goes to new momentary switch on generator panel, from switch goes to generator panel fuse (but changing to another inline fuse). The other wire from male connector is soldered directly to another inline use holder. The other half of fuse holder I removed wire from terminal. After running wire from stove vent Ill insert thru fuse holder top-solder on the terminal.
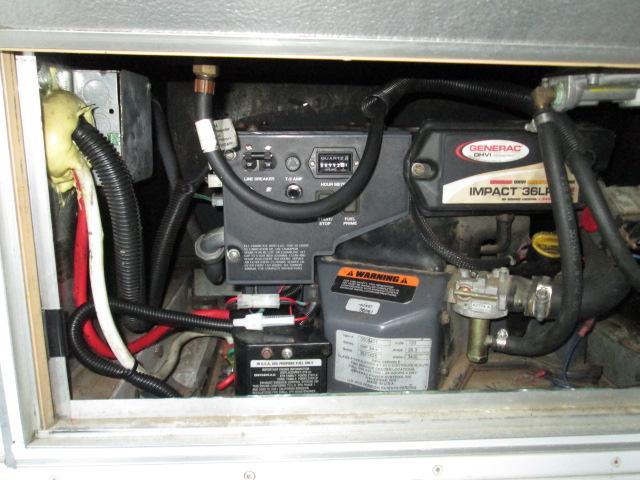
Drill hole in panel for new switch just below it fuse holder. Connected wire to panel fuse. Turned on gas, hit the factory start switch- holding counted 1001...1002. hit the new momentary switch while still holding starter switch-varoom!-let go both buttons-continues to run. Awesome!. Let it idle a minute, turned on the breakers it throttles up. Went inside, yup microwave clock is on. Checked the meter and batteries are charging. Put my cold cup of coffee in micro and turned it on. Varoom the generator throttles up, shut off micro & took my coffee in the house. Asked Margaret if she'd like to try some of my coffee I heated in our microwave. Just excited-thought this was going to cost a fortune if fixable.
Now the not so fun part-running wire from stove vent to generator for the inside start switch. Last will be adding switch in vent panel. Took 2 hours, to run probably 20' or more of wire maybe 12' distance.
On our camper the Stove vent contains panel for generator start switch & hour meter. Those and other wires exit top of vent in false bottom under microwave. Enters hollow wall of wardrobe closet at rear. Again on ours the closet has a false back. 6 screws it comes off. there are quite a few wire looms including connection for CATV behind false closet wall. From there you can access space behind stove the leads under kitchen sink, to the left space behind leads to under bathroom sink which leads to exterior cabinet in rear wing. However between bathroom and closet is box for propane tanks, there's only a 2" gap that's 8" down to space under bath sink- around some plumbing, cab brace wiring and other stuff that you can almost reach- so its right there ...just next to impossible to get to. Finally got it, just when I decided starting generator in the rain outside at 30below would be better than this-the fishing wire poked thru into bath cabinet. I swear it's a test.
From there downhill, followed plumbing to exterior cabinet-thru bottom into tray that surrounds holding tank across the back. Exits other end, which is at generator bottom opening. Brought wire in to generator pulled an extra foot. Went back inside pulled extra wire to ensure it was free and had plenty of slack at ever turn, slipped some loom material over questionable areas.. Back at generator poked thru fuse holder cap, soldered on terminal installed fuse. Wow-knew it was going to be rough but good grief. If I ever built a camper Id sacrifice a hundred pounds and run multiple wires from every place to every place-period. Done in the generator compartment
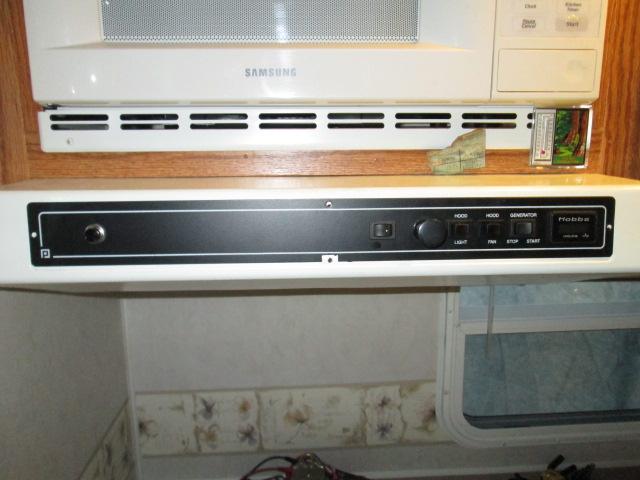
Now the fun stuff adding switch to interior panel. Pull vent panel, only one wire to unplug and the plug for generator wires. Well it used to be that simple. I added a cable control to open & close exterior vent while back. It was done with vent in shop. Hmm it's done so that vent can be removed with single connection to allow access behind panel but I didn't allow for complete panel removal. Who would have thought. Means lying upside down on top of stove removing all the connections for cable to allow panel to come off to drill. I could drill in place, 1/2" hole thru thin aluminum-could be disastrous. So off it came.
Took to shop, drill hole and installed the new momentary switch all the way to left side. Was going to put it next to the other switch but often stumbling around in the dark I'd hit the generator start switch cause its identical to the fan & light switches. Panel loosely back on vent hooked up wire from generator to switch, from switch to inline 10 amp fuse that's tied to light 15amp hot wire. Reconnect & adjust the cable control. fasten panel down.
Push & hold the generator switch in Run(Start) position-counting 1001...1002 push new momentary switch, generator fires up. Let it idle down repeat several times. Done! We have generator-Whoo who, Cost about $20-long term fix unknown but for the moment we have 110v power.
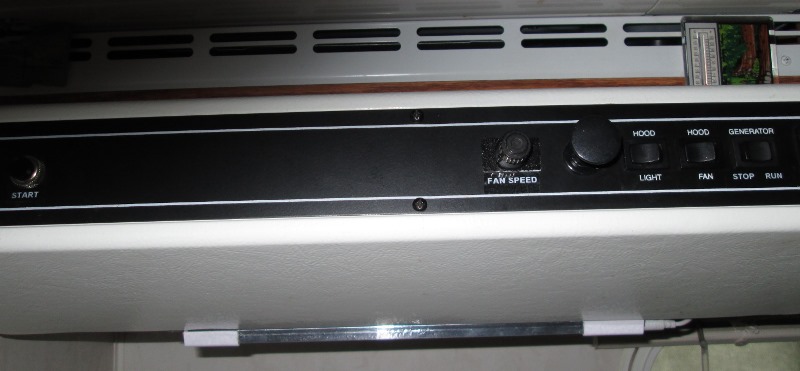
Ended up relabeling switches for clarity. Change Generator switch 'START' to 'RUN', add START to new momentary switch.
Last comment, though most would not do the bypass and replace board- IF you're out in the middle of nowhere-the gen. starter just grunts-an option for something to check. What I found is though the relay is bad-if you momentarily apply 12v power to the blue wire terminal while holding start button, once it starts spinning it would continue. Or you could pack it up & go home if generator dependant.
- Update 07/2019... just finished exercising the gen., its still working 6 1/2 years and counting...
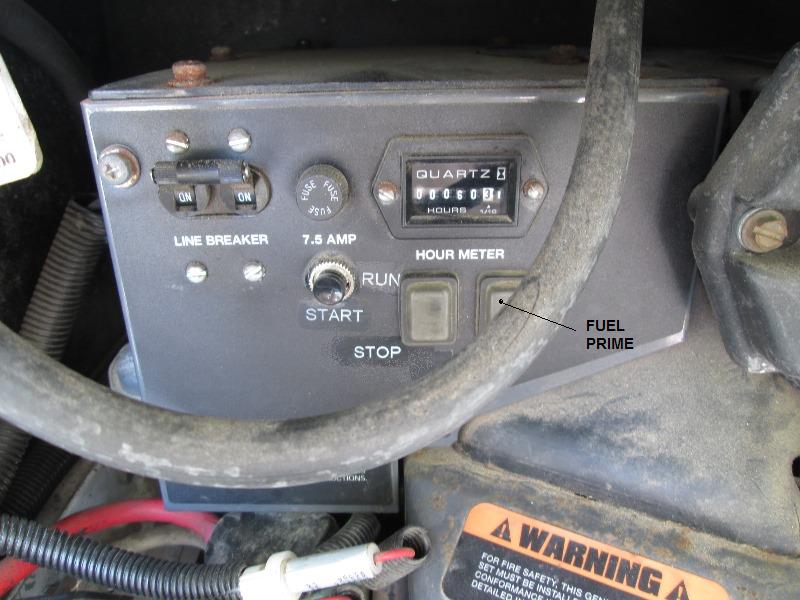
just documenting...The buttons though function same, are a little different on the gen verses inside panel, plus prime button.
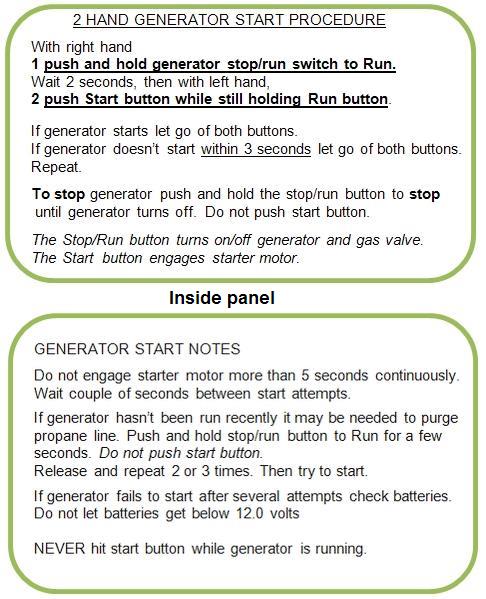
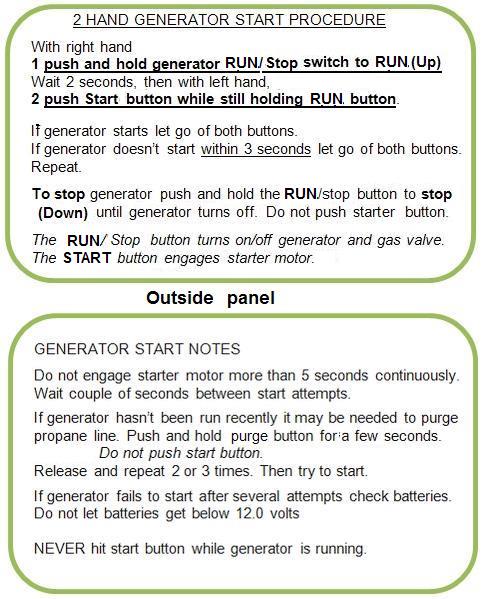
Copy is in camper inside of cabinet door and on generator door.
Speaking of which...
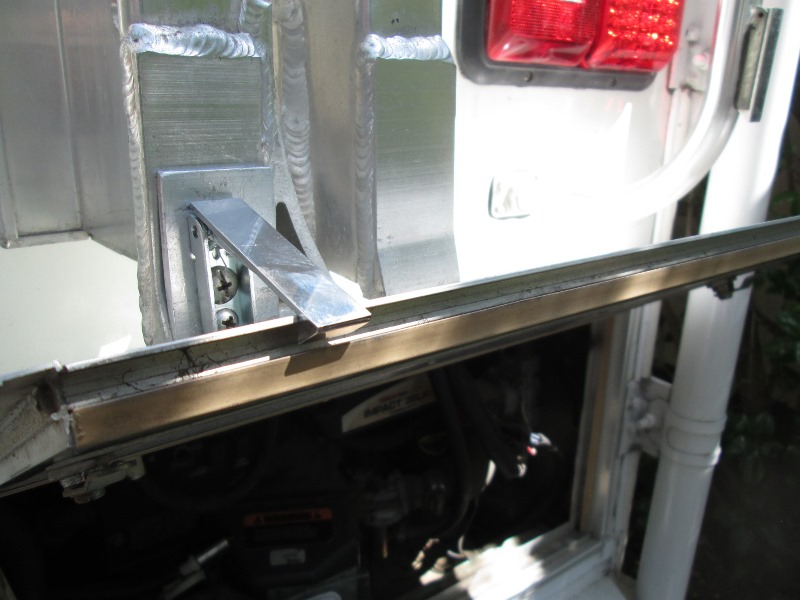
Stop and fixed generator door after 14 years. First thing I did, opening up generator to start this morning, hit the corner of door with my head...usually tie up with a bungie. On the right you can see original clip that held door open. It's been non functional since 2005 when ramp to get scooter on/off front was mounted to ladder for storage.
Back to Ourelkhorn Camper Modifications page