In dash air bag compressor switch install
Couple of years after installing Air Lift bags-decided to go for in dash controls. We were camping at Big Basin and got hit with major rain storm. The camp site we were in had a lil bridge that went over a culvert. By the time I got the air bags filled not only was I soaked and freezing the water was up to the wheels. Enough of that.

I purchased Quick Shot System compressor by Air-lift, kit w/ 2 gal.air tank, dual control, includes quick connect air line & chuck. I purchased thru http://www.truckspring.com. Its a good site to compare systems. They carry both Air-Lift & Firestone kits, compressor systems and/or just the bags. The quick shot system w/ dual control allows adjusting air bags individually, also has a quick connect fitting with supplied hose& chuck to use for general air use (tires etc). Picked up a small accessary kit w/ blow nozzle etc & extra hose. I modified the kits included hose with a quick connect (was a screw on air chuck) on the end so I can combine hoses or any accesories as needed. (I do carry a small 110v comp for more serious air needs).


Thanks to good friend Mike, turned out really cool install. We did quite a bit of imagineering before we decided on a plan. Broke it down into 3 plans. Install compressor & tank, plumb lines & wiring, dash mod to accept the gages. We fabed an aluminum plate on mounts of small angle to stiffen the plate. Mounted up between bed walls. It offers some protection for the pump.
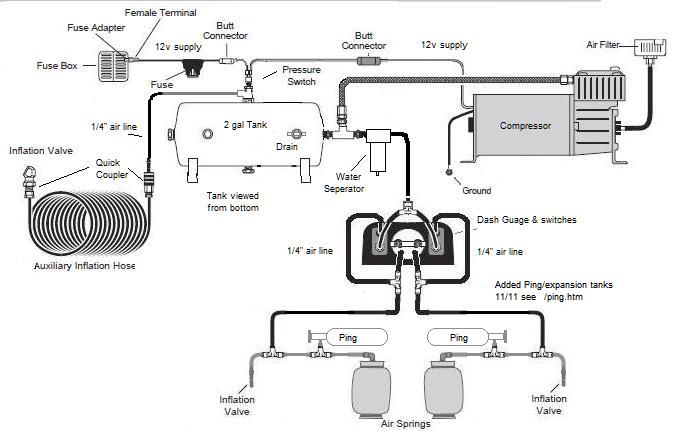
Bascially how we plumbed
I left manual fills intact. Shown is added water seperator and much later added the 'ping' expansion tanks (linked below)

The angle legs are bolted to inside faces of bed floor sheet metal box supports, extending almost to bed wall. The plate spans and is bolted to angles. Bolted the compressor on plate which puts the compressor up in between the bed walls. (Didn't take pics during the install, these have been added 5 years later) There is enough slack in all lines(cutting some zip ties) that plate w/comp mounted can be dropped.
Viewed from the top, looking from rear tire toward front of truck, I cant see this, havnt seen compressor since it was installed 5+ years ago. Being a block from the beach I was really surprised, most of the rust is surface, need to get in there and clean it up. Camera held at arms length lets you see things you generally cant, like around corners etc. The picture is very deceiving-the actual gap is about an 1" between plate and bed wall.

Another view, from below, looking up and toward front of truck. Cant really see front support. This is all Ive seen since the install until I shoved the camera up.

Air tank I was able to bolt directly to frame.There were holes in the frame so we transfered those to tank legs, redrilling the tank instead of frame. I also added a small water separator between the compressor and line going to dash, available any hardware store.


The air intake tubeing and air intake filter are installed back of pass seat. shorter run for the intake filter. I figured air intake would be better inside getting drier air to tank.
The quick connect hose coupler for air hose I put in floor beside pass seat. Again short run, conveniant and clean. With hardware mounted, air lines and electrical run to dash location, all that was left was modifying my dash. But its Sunday afternoon, I had some other commitments, so to save reinstalling dash and having to remove again I got to drive all week with no dash.

Final assembly; Not having any "under dash" on our 01 Ford I decided to remove gauges and switch from supplied mount and install in dash. I used the mount plate that gauge and switches came in for template. I modified the relative locations a little bit-cant move them much with the stock tubing configuration of the switch setup. I also added a main switch w/ pilot that feeds power to the compressor. I didn't want it powered all the time (or not have the ability to easily turn off the compressor should a problem arise.
MIke went inside-said he couldn't watch-ha. VERY carefully used dremel to cut it out dash-figured the worst could happen is having to make a plate to mount switches on then cover up dash mess. Or worst case I'd have to buy a new plastic dash cover. I successfully cut out for gauge and switches, mounted and finished hooking every thing up. Probably the most difficult step. Cutting the dash, pre installing the switches & gage while dash is off was easy, but the final hook up is with dash partially reinstalled, trying to reach behind from under neath, from on top well difficult but not impossible. Some of you may have factory installed accessories in the location I used. As the final dash hookup is last step, you can test the system before reinstalling the dash.

All in all it all worked-came out better than I expected, certainly not factory, not custom, not too hokey but clean& functional, I like it. Its nice. In usage I can get pretty level at camp just using the air bags. Its nice to adjust the air to road conditions, though I don't while driving.
A word-the dual needle gauges are fairly deep- kinda hard to read. A bezel that angled gage up would be the ticket. Maybe next time. Ford dash panel pops off pretty easy for access - with a bit of persuasion after removing the radio, heater knobs etc. (Radio tool you can make out of stiff coat hanger, bend 2 U shapes w/bout 3" legs matching hole spacing on radio, insert into radio to release the internal clips).
Pics added 11/09-of compressor & tank mount.
Update 10/2019
. Replace compressor switch. Don't know where I got original 30amp dash mounted switch. It failed last trip out. As it had odd offset couldn't find anything to replace. Ended up cutting piece of poly to make a panel covering old hole and to use an off-the-shelf switch.
.

Ended up remaking panel to cover area between switches and under gage.

Old switch lasted 15 years. Noted though I didn't use relay which puzzles me, switch sees full load, so will be adding a relay. Nice is the panel other than covering old hole, also allows removal without taking dash apart, ('cause all I had on hand was yellow/changing to switch with green pilot)

done: Swapped switch, rewired adding relay
.
11/11 Ping tanks page Added Ping (expansion) tanks
12/12 replace leaking switch added an angled bezel to gage
Back to our F250 truck page
Back to Ourelkhorn Camper Modifications page