

![]()
Introduction:
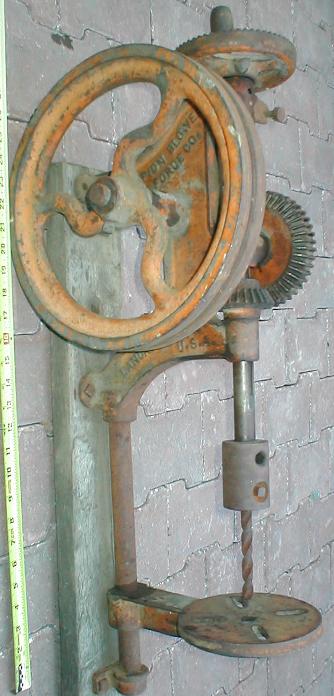
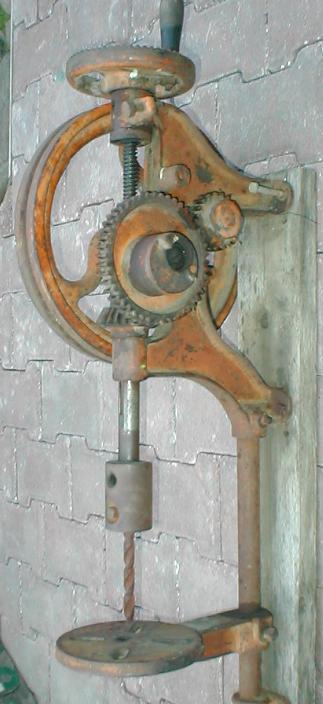
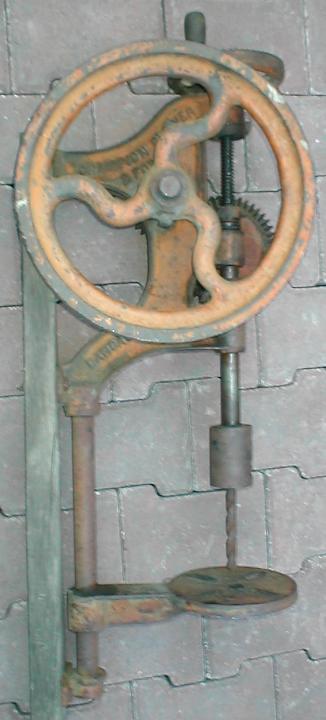
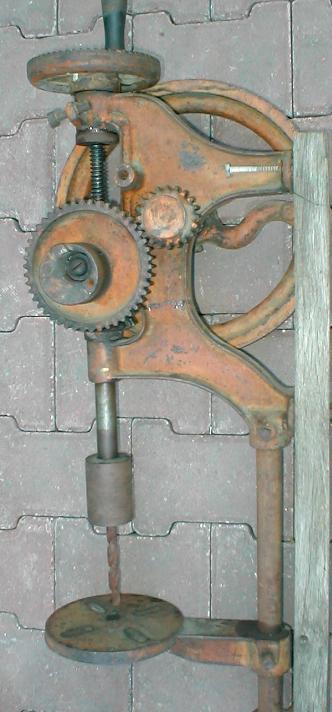
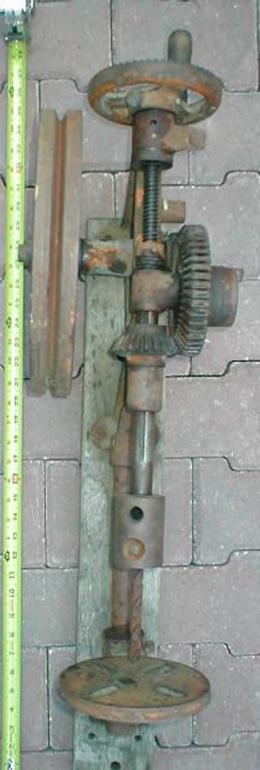
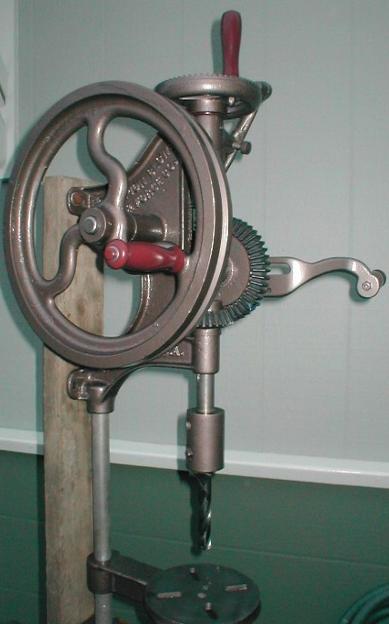
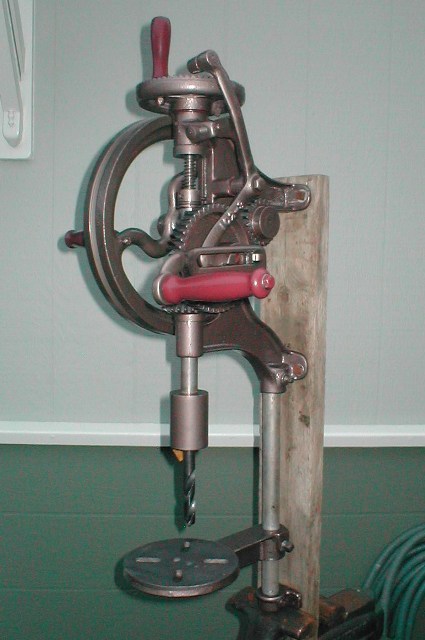
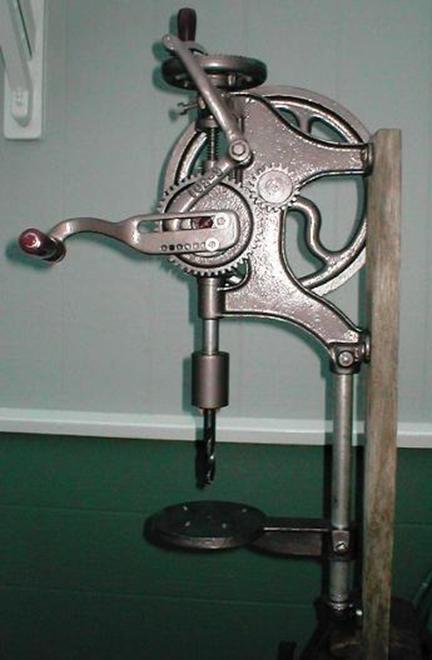
Cast Iron hand operated /or powered post drill. Manufactured by Champion Blower & Forge Co. This drill is unnumbered with no date, Assumed approx post 1909-19xx. Overall 32” height, 3” stroke 6” throat, 1/2 id chuck part of spindle accepts bit with ground flat, secured by set bolt. Self feed option a simple pivot arm, one end rode on intermediate gear cam, pawl on other end engaged teeth on top handle wheel. Power crank handle on right side bolted onto face of intermediate gear. Handle arm had a slot that sat over 2 raised bosses on intermediate gear eccentric hub. . More common (and only catalog pic’s I've seen) handle slides thru the hub. As to there being several models over a quite a few years, interchangeability of some parts and little surviving documentation its difficult to date-let alone determine what is factory. ie the large flywheel, I've seen several pics with ones similar, flat outer rim with v groove, I've also seen same flywheel but without groove,. So flywheel options available or owners updated to accept V-groove, who knows. Some drills with 5 spoke hub round rim.
My History with drill:
I traded neighbor for some work time years ago. I often helped out older widower with chores around her place when I was a kid. She decided she wanted to clean her husbands shop out that was attached to old barn that needed roof. Had never been in it, actually I don't think anyone had in the 10 years since he passed. Apparently he did maintenance and such for ranch they owned. Something break he'd bring it home to fix. Was like walking into a time machine. I listened as she told stories, talking bout projects, when they got this or that tool. We went thru stuff for bout an hour. I was drawn to this post drill, just fascinated me. She asked if I wanted it. I told her I couldn't take, to which she said, "No you take it, I know you'll appreciate it. I have to go to town-lock the doors when you leave, we'll clean it out later".
We never went back in.
That was 40+ years ago.
-
I've used the drill a lot in the past, hooking up various motors, but mostly for years its just been there. I recently had to rebuild my shop and the drill got stuck outside. Yesterday with nothing better to do I started playing with it. Nothing would move due to setting in the rain . So I started oiling wiping rust out till it was working freely again. I was always curious to what the assembly that allowed it to auto feed was. Obviously, with the gear on top handle, eccentric boss on center gear etc, it at one time had one, but was long since gone. Appears it has a broken dog on gear that something attached to. So that's when I entered the mfg name and started searching. After finding so much on line that totally amazed me, I found pics of what the feed assembly looked like. Now I want to restore it.
Here are a few pictures in all its original glory. I'm kind of drawn to old stuff, in its original patina that’s only acquired with age. Even the Golden rod paint though not original, told part of the story of this drills history. These drills were painted black from the factory, shipped on the backing board. Mine was missing the feed arm & pawl, hand crank arm & handle and handle on flywheel
I was very reluctant to change the appearance of this drill, however once I discovered what the missing pieces were I decided to try to refurbish to original functionality. I wanted to see it work. Then a fella on the Old Machinery forum (owwm.org), Steve,user ChesntutHill offered a reworked feed arm. Wow parts for a turn of the century drill. So definitely we are proceeding, bring this ol drill back to life.
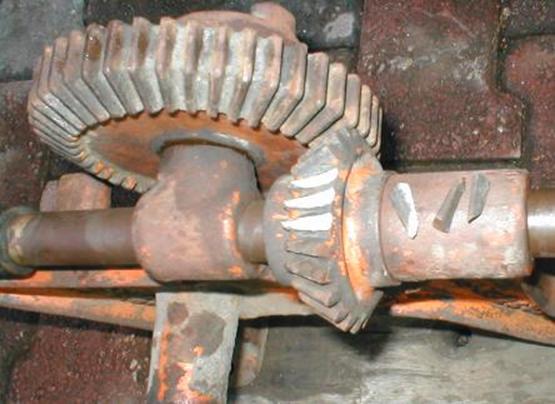
A word of caution, these are cast iron, which can break. In disassembly, the threaded depth rod that inserts into spindle had a burr. Using a brass drift to separate, hammer glanced off, breaking off 3 teeth on the spindle bevel gear. heart sank
I was very fortunate, Steve also had “spare” gear and generously offered to help with the rehab. Teeth can be rebuilt but not easy.
I'd also note, the auto feed assembly is the cause for many of these drills being broke. Once the bit reaches maximum depth and cannot continue to extend, the feed arm is still pushing a tooth at a time trying to. There is no release. Result is something is going to break, typically the arm.
Some of the details I discovered when I stripped the paint. Top of body has been welded. Handle on flywheel had been broke off, someone unsuccessfully tried to add a slot to broke off screw to extract. Two teeth on intermediate gear have been brazed. One of the 2 handle bosses on eccentric gear was broke off, crank arm & handle missing. For me I just see as part of this drills working history.
Former owner repainted after repairing, I assume after rewelding body. I thought about repainting the golden rod to preserve some of drills life history, be kinda of cool. However once de rusted and a fresh coat of golden rod drill certainly wouldn't look like its age. Going to the work of putting drill back together I decided to repaint a color a bit more period, though not black. I’ll replace the gear I broke, add feed arm, 2 missing handles, and make a replacement crank arm utilizing the broken eccentric gear.
Broke down and ready to clean up. Though drill is pretty simple, one area that is not clear is separating drill quill rod from threaded rod.
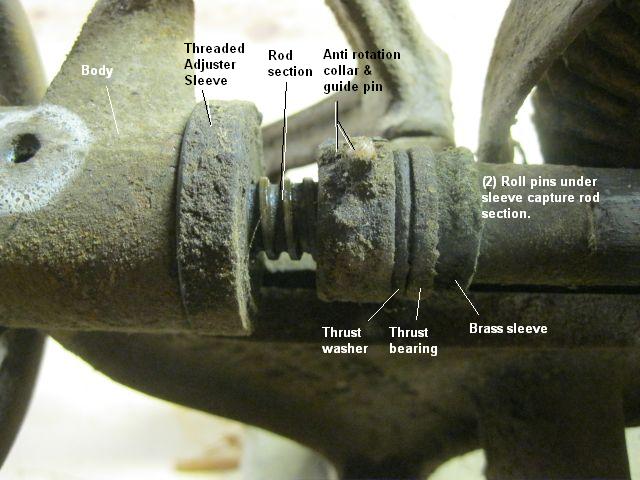
Mostly because it typically looks like this. The brass sleeve covers the 2 short pins that secure rods together-its simply not obvious. Look above and you can see end of thread rod that inserts into quill, has a grove for capturing pins. As mine the brass sleeve was pretty mangled I could see pins.
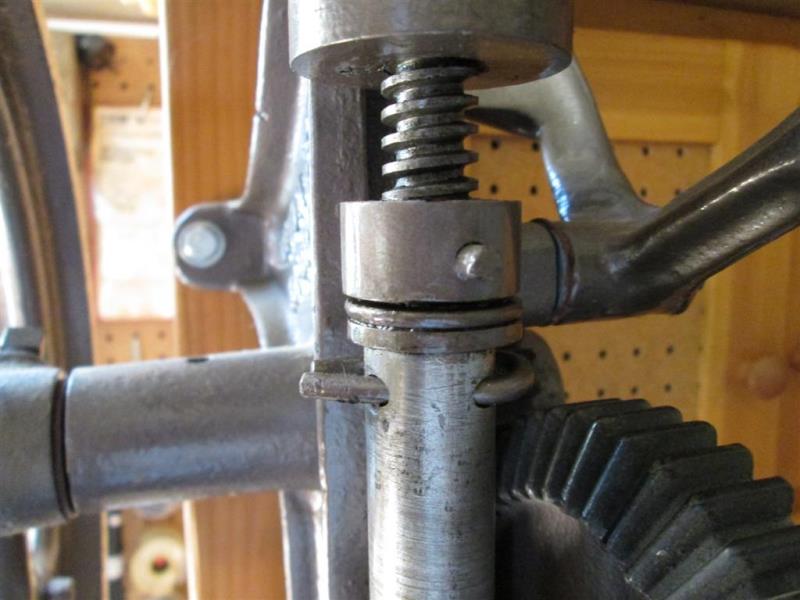
Not remaking sleeve, and not enough left on mine to retain the 2 pins I used one short piece of 3/16 rod bent into U shape, inserted and slightly closed to retain pins.
Discovered a process folks are using-electrolysis tank , referred to as “Spooging” for rust removal.
I wont go into detail but basically you add a table spoon of washing or baking soda to a gallon of water in a plastic tub. Lay your de greased part to be cleaned in tub. Scrounge up any old STEEL (saw blade, rebar scrap etc.DO NOT use stainless steel) as a sacrificial bit. Set up old steel to side insuring it cant touch your good part. Hook a low voltage supply source. An old battery charger works well-10amps is what I used. Hook up NEGATIVE to part your cleaning, hook positive to sacrificial metal. Unless you want to dissolve and ruin your good part-again NEGATIVE to your good part that you want cleaned (and wish to keep), positive to crap metal. The only danger in this is process creates hydrogen gas EXPLOSIVE!! So you could either dissolve pit ruin you part or blow into the neighbors yard. But this simple process save hours of scrubbing/derusting, actually in the process it removes old paint. Just pay attention to polarity keep away from sparks, water heater etc.
Fun stuff. Look around on line
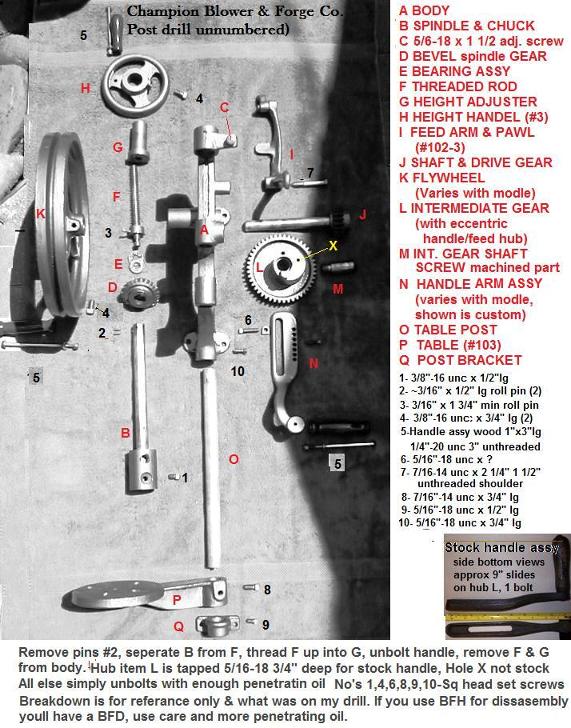
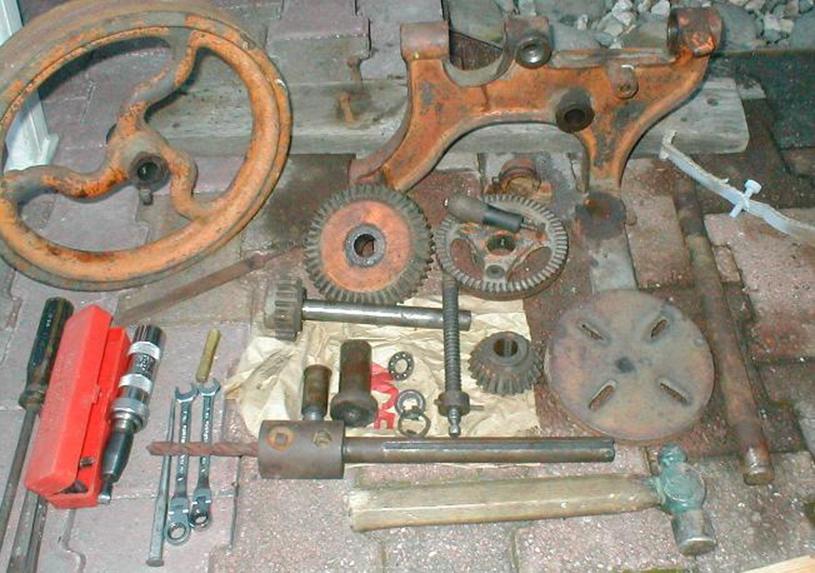
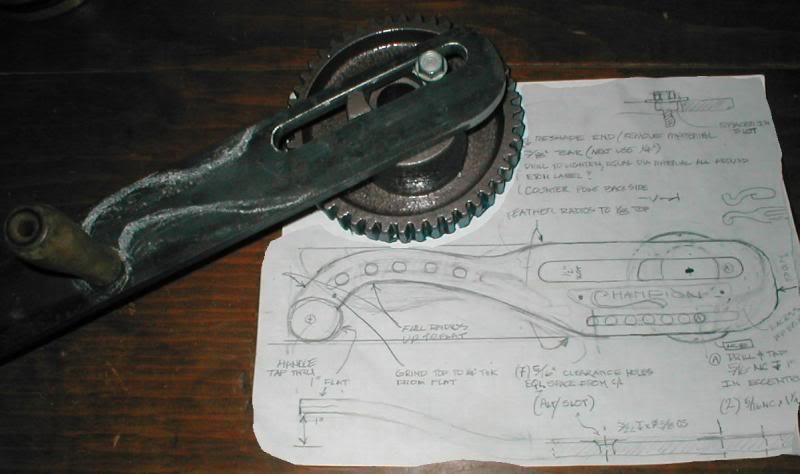
FYI and mine, A bit later after painting but since I had it apart I laid out and made an exploded picture of all the parts before assembly. Labels are my own made up nomenclature…..
Needed to make main crank handel arm (outlined below) and 2 wooden handles. Reworked hex bolt heads to match heads on existing square head bolts.
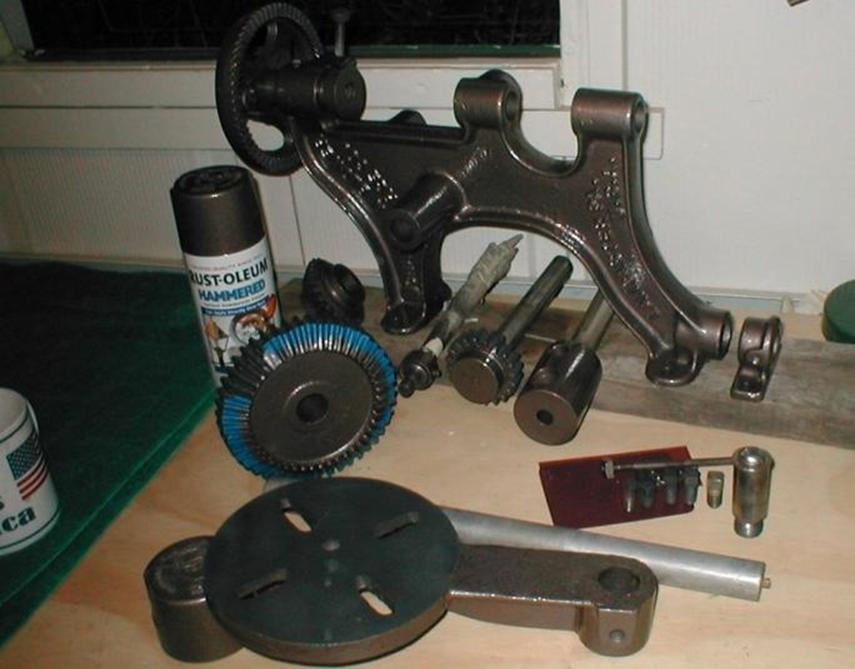
Decided to paint parts so paint can cure while I fab the new crank handle. Flywheel is still in spooge tank, when done Ill drill out broken handle bolt and paint it. After a lot of debating on colors I found a can of hammered brown, left from another project. Quite dark so it will look good, nice texture. The wood handles I'm painting dark maroon.
Masked off all shafts and primed everything including gear teeth and table top so they don't rust until final reassembly. I used rustoleum black primer. Then masked teeth & table and painted.
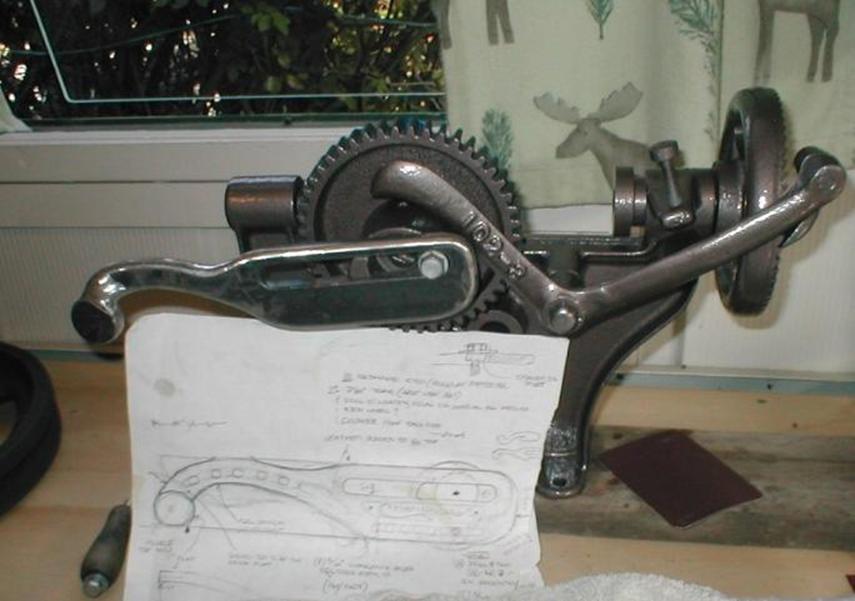
And Feed arm arrived! Very cool. Marked 102-3. Neat always wondered how it attached & worked.
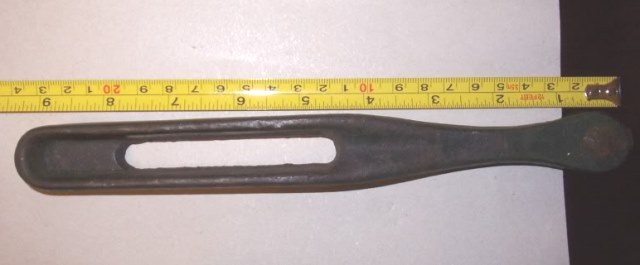
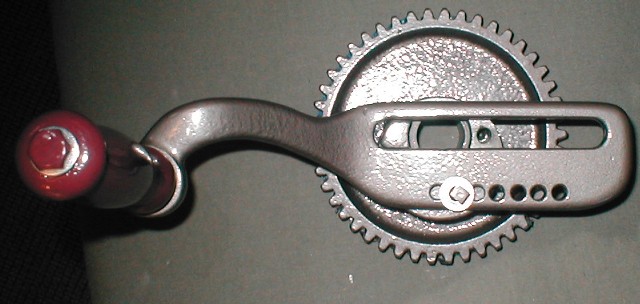
Started my crank arm. Slotted for adjustment as original but wider base to add a second bolt. Decided to give a little flare and match profile of flywheel spokes. It could very well be that original handle was removed due to this drill had been setup on a motor. I sure wouldn't want this handle swinging around if electric powered. Still lean toward 2nd nub broken off but I cant verify. If unbroken then a spacer, like I'm adding, was used. Factory handle looked like a skillet handle.
Update: I was given pictures of factory handle FYI Thanks again to Steve 'ChestnutHill'.
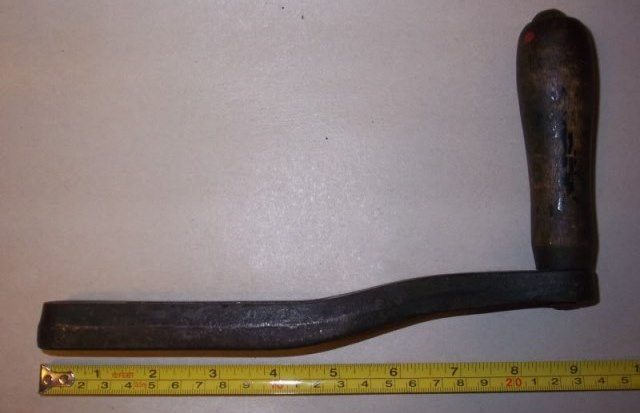
Cast, ~9 1/4" long, about an 1" wide with 1" stand off. 5" wood handle.
Back side that faced gear has recess that boss sat in
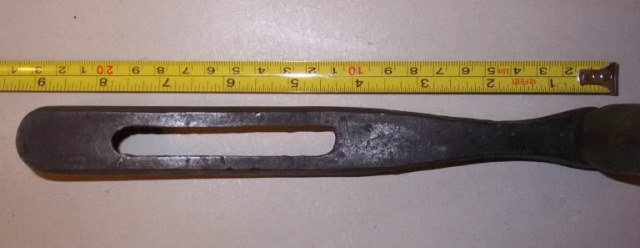
This was actually fun. In the main slot where hub boss is broke off I'm using a square nut as spacer. When main handle bolt (not shown) and second added bolt tightened arm will be secure. If I find an original handle, I’ll mount it to back board. As I used 2” flat bar material was to thin so I used holes verses a second slot. If this was a daily used machine Id remake with 2 1/4”.
Finished handle. Original boss as guide, new spacer replacing broke boss for main bolt and smaller new bolt. I ended up bending handle end to about 2 1/2" standoff.
Flywheel is drilled out and re-tapped for its handle. ONLY reason is this is non powered, using handle on flywheel increase torque applied by 2.5 times (also that much slower than main crank handle. Found some wood handles, just had to modify overall & thread lengths. I'm threading handle bolts into parts with a lock nut on back side. Ground all bolt head tops semi round.
Ready for reassembly. The original mount board has a 1/2" twist, several splits, so I'm going to replace. Kinda hate to as I believe its original but its just in bad shape. pics of finished drill...

Lot of fun, now to get mounted in shop…adding a 4x4 post on workbench-linked on shops main page (or directly HERE)
Links
Vintage Machinery.org a wealth of information on all old wood/metal working machinery
OWWM.orgThe OWWM Forums, part of Vintage covers both wood and metal working machines, if you've got some time...
Back to top of page
Back to shop tool mods
Back to Our Shop main page