Add Circulating Pump for Instant Hot Water at Camper Bath Faucet
-
The purpose
To get hot water in our truck camper bath faucet meant standing there draining precious water while filling our holding tank. Both unacceptable and we do not do. Especially cold mornings, water is COLD. By the time I'm done water has barley gotten warm, if has changed at all. Were not talking about consistent hot thru the shower, which for some reason discussion always drifts to. Its just simply walking into bath, turn on hot water and its cold. Stays cold unless you waste a lot.
We don't let it run till it gets hot. So, turn on hot, get your measure of water then turn off. What hot water has traveled up the pipe sets there mixing with the cold, cold pipes absorbing heat, turn on hot again & a little more travels up pipe, turn off, cycle repeats, never see hot water. This effort to conserve both water and holding tank likely doubles the time to see hot water. To get hot water with constant flow probably uses a good 1/2 quart. That would be each time thru out the day.
Solution is simple, and several ways to accomplish. The execution isn't. A small pump that pulls water from the hot line and pushes it into the cold line. Its a closed system, so the water loops, its flowing but in the pipes not down the drain, until hot water reaches pump. The hot water then only needs to travel distance from recirculation pump to faucet verses from water heater. Distance would be camper specific, ours is about 12" verses 12+' if I install a pump just below faucet.
Other variables are cold water & pipe temperatures, IE the actual amount of water in pipes between faucet and water heater is maybe 8oz (1 cup), however filling a cup in morning I still wont see hot water. Second part is wrapping the pipes. Even when I see hot water- if air temp cold water cools off very quickly when faucet turned off with no water flowing. As I can not access majority of piping wont be addressing but retaining heat would be nice.
- The "Proof of concept"
On the round-to-it for several years I'm finally tackling. Few years ago, actually May of 2013 (current date is Nov 2015) I bought a small pump and some fittings.
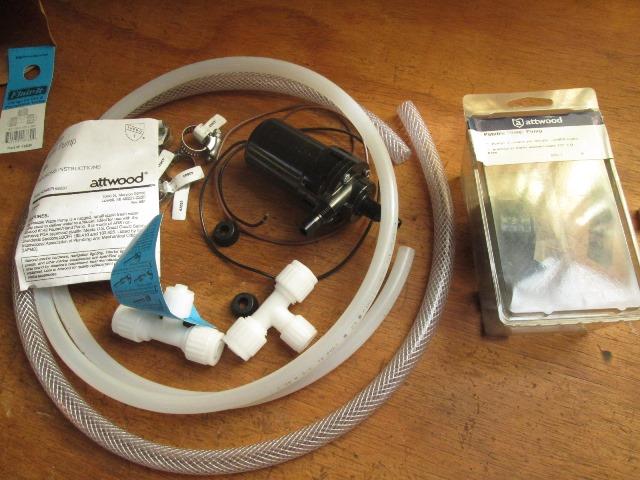
Its an Atwood 6127-7. 12V rated at 3gpm. It was $15. Its intended to pull water from source to stand alone faucet- not a system pump. Cheap enough to experiment with. Figured if this works I can always get a better pump. But its been setting on the shelf ever since. One was cutting rigid PEX water lines to install, other is simple lack of clear access, and I need to find source for check valve. Lastly I don't know if pumping between hot and cold at the bathroom sink in camper will even work due to existing plumbing, IE check valves on water heater etc.
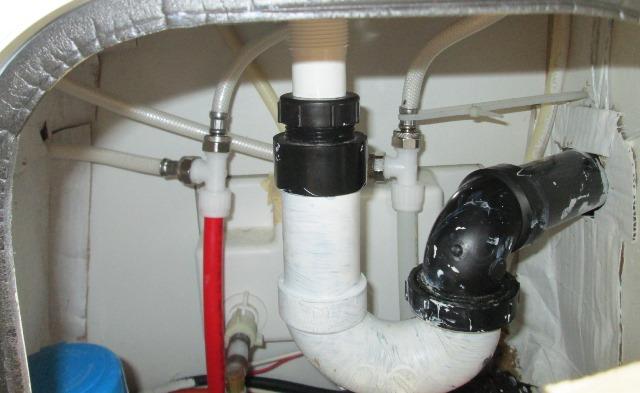
Subject came up again and I revisited. Last year I replaced faucet and added separate shower faucet using flex lines. Looking under sink, though access is a real pain, It would be easier now to add pump and in a way to be easily reverted. Want the hot outlet to pump as close to faucet as possible so add Tee just before flex line to faucet. Nice if I could add tee directly to faucet but just not practical. The cold tee can be anywhere, but Ill add below existing cold tee, as this would solve it having been installed a bit to low. The added tees will be with 3/8" outlets to simply match this pump using barbs and 3/8" tube.
I'm jumping ahead here...I'm modifying an already modified system, spending the least amount of money, time and attention to detail on a temporary install to find out if this works. This is NOT how you (or I now that I know it works) would install a circulating pump. Concept same, simple in-line pump between hot and cold at farthest end of loop. But better pump, sized to easily accept flex lines, maybe with built in check valve. Tees to accept flex lines etc.
Pump will need a switch, this will be simple manual setup. Push momentary switch for a few seconds to circulate the water. Realized as this pump will be in closed loop, water needs to be present. To ensure it isn't turned on Ill tie its switch feed to the switched power for main water pump.
Plan is to remove the flex line to existing hot tee 1/2" IPS thread, use coupling and add another tee reattach the flex line. Cold side Ill remove the existing tee, cut off 1/2" of PEX water line to get clean tube, install new reducing tee, couple existing tee with short piece of PEX to it. This would move the existing cold tee up, which in my case will also resolve the tee for shower having been installed a little to low. Then its mount the pump on wall, run 3/8" poly tube to it from new tees. I want to verify this will work before any wiring. Also the plumbing, if this doesn't work I can remove the tees to restore as plumbing was
Cool, If it works. Still need a check valve.
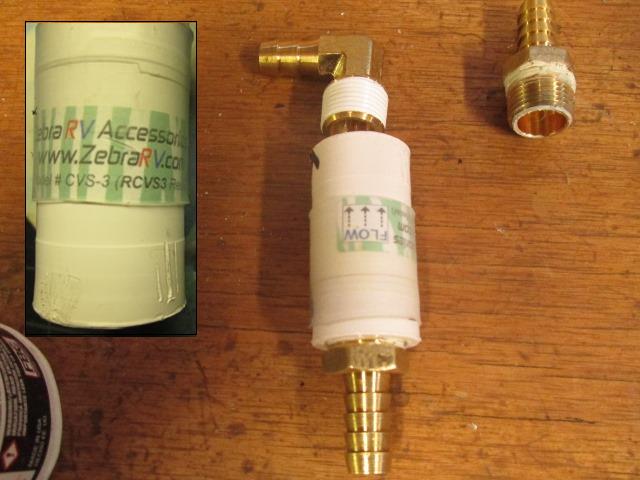
The missing ingredient. Found this little 3/8" in line check valve. Its just a rubber disk, requires very little pressure to open which should work with this little pump. Its only function is to keep cold water from freely flowing into hot line, some resistance to hot freely flowing into cold. So were a go. Again I'm installing all this with no idea it will work. Everything I'm doing is done with the allowance to easily be undone.
The Install
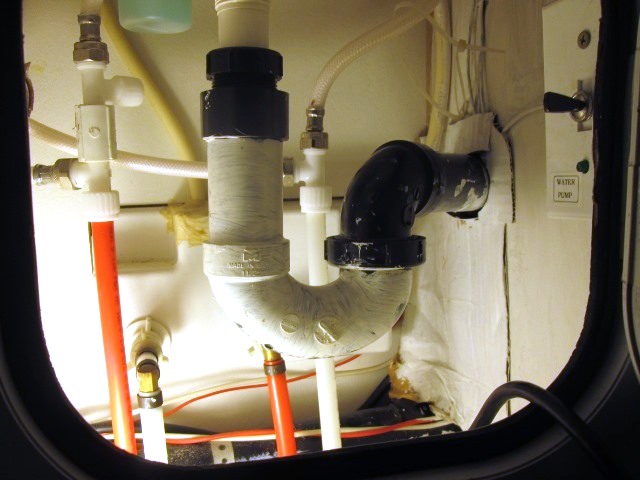
Started. Local hardware has limited selection of PEX fittings. I used Flair-It fittings. For the hot side required cutting off the 1/2" barb ends to expose the 1/2" IPS thread, face off end that flex line seals to. (Flair-It does make these). Joined the 2 tees with 1/2" pvc coupling.
The cold will be simpler and use of unmodified factory mfg. tee on the pex lines. Other than modifying hot tee, working thru 10" hole pretty easy.
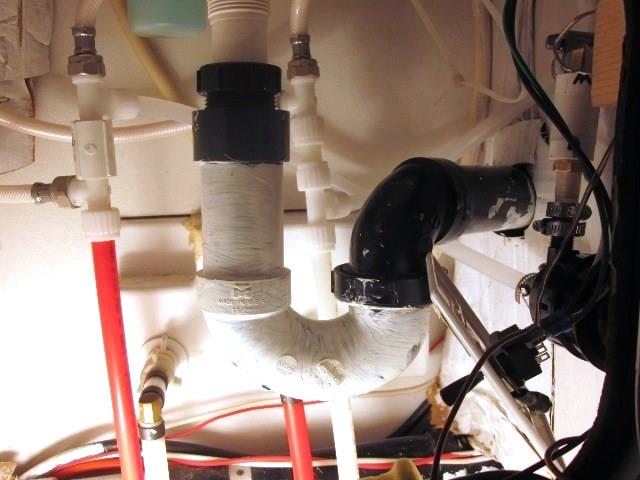
Looks like dog poop but plumbing done for now. I would have liked and planned for the pump to be on back wall and bit more sanitary install, but access just not working. Needed to ensure some water kept in lines to pump hence the odd routing and levels- pump below inlet source (hot tee) and cold line check valve vertically, cold outlet above. Should retain enough water to not be issue. Which probably isn't as I'm installing. The pump is self priming if below source, normal install as intended, wont move air. As I'm installing inline on pressurized line (main pump on) not really an issue as if it were drawing from tank. This is only circulating not pressurizing. Still if system drained and purging air possibly could get stuck in front of pump. That is my excuse. Otherwise this really cant be seen but is pretty hookey. Threaded flex lines instead of the hose barbs and clamps would do wonders, just money but.
Anxious to get closed up so I can check for leaks but mostly to light hot water heater. Ran the 3/8" poly tube from tees to pump. REALLY not liking the barb connections on pump. Doubled 2 small clamps, still don't trust. Its fittings are 1/4" IPS thread with 3/8" barb so you can use either threaded or barb hose connection. I'm using the barbs, but IF this works Ill cut off the pumps barbs and screw on brass barb adapter. The pump barbs are really short, single barb and being ABS afraid to tighten. Worst case I also picked up a couple of 3/8 caps for the Flair-It tee outlets. They will live in a baggie tied to pump. Any issue whatsoever I can remove both lines to pump restoring system. If /this works and down the road I need to replace pump or just get a wild hair all this hose barb/band clamp crap will get axed.
I pulled the water pump remote switch panel to access power for testing the pump function once water heats up. Turned on water and bled system. We have no leaks! Note: extra step bleeding air is after bleeding faucet is turning on cold tap bumping the recirculating pump. May not be problem later but new there was quite a bit of air in that loop. Fired up water heater.
IT WORKS
After about 15 minuets heater shut off, with little expectancy touch pump lead to power. Within a few seconds water was hot at faucet! Pretty cool. Like I said I really didn't know if this would work. Tomorrow Ill wire in momentary switch.
Adding to this page this morning noted missing barb in the picture above. Opps...didn't leak between pump and check valve. Too funny. More reason to change to brass barbs. Eager to finish but pulling the switch to shop to pre wire.
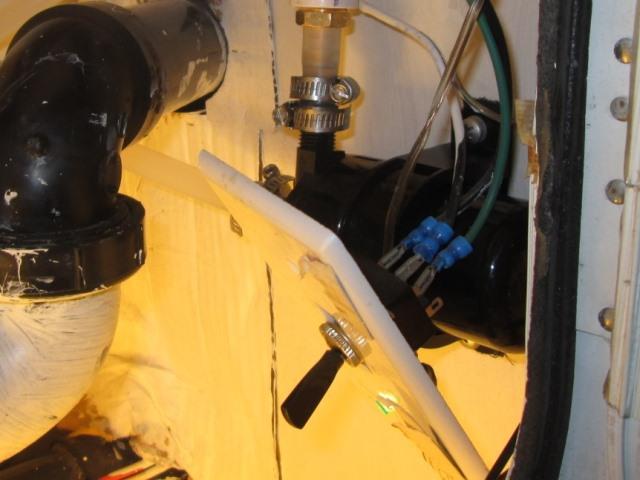
The remote switch I added years ago is a 3 way DPDT. It happens to be double pole with one side unused. Ill solder jumpers from exiting feeds to opposite side, plug pump into center. Easily unplugged if issue, pump can only be turned on if main pump is on.
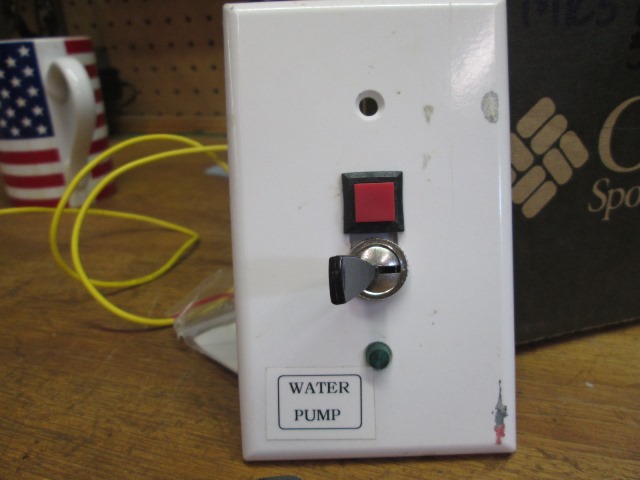
Got the switch plate opened enough to install the momentary switch. That'll work...
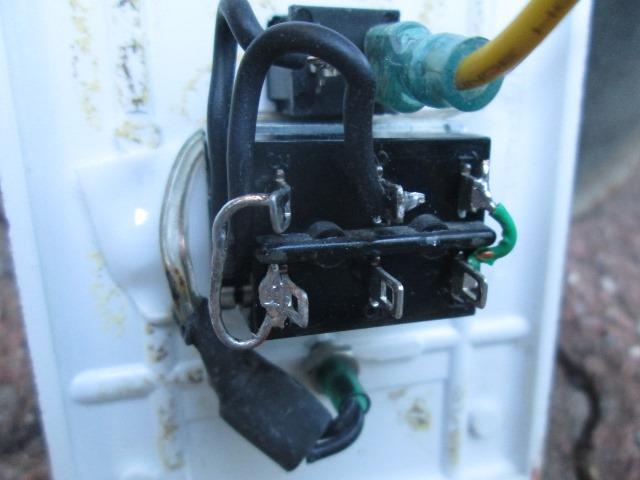
Remote water pump switch jumpered. Either water pump switch, this remote or the one in kitchen will send power also to momentary switch for circulating pump.
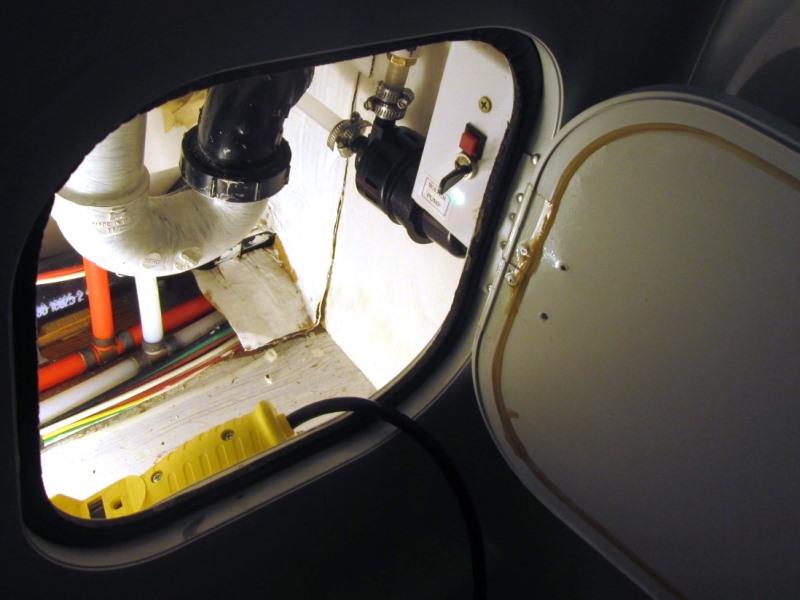
And done. Played with it. Pump is really quite. From a cold start I'm getting about 5-10 seconds and water is HOT. For a 'what the heck, give it a try' project kind of amazed. Surprised me.
But we have "instant" hot water on demand. Pretty hookey and simplistic but it works. Had I known it would work would have done a bit different. And actually a long time ago. I honestly assumed I would be pulling it all out. For the cost and just killing some time experiment what can I say. Might clean up this cupboard while I'm here. Maybe some reflectex bubble to line this compartment. Had divided off with cardboard long time ago as its open to outside compartment and huge open areas behind cabinets (unheated) so its always cold and air moves. Then when done wash my hands in HOT water :)
To be done when I get around to it.
make backing mount plate for pump
Re plumb pump, cutting off barbs & use threaded connections or thread on brass barbs
Bush check valve 3/8" FPT to 1/4" FPT install directly to pump threaded outlet
replace both 3/8 tube lines with flex lines if can get from flair-it tee threads ? to 1/4" MPT on hot,3/8"ftp on cold
or use flair-it female adapter at pump-(goal is to get rid of band clamps)
- Round 2
Well sooner than later, DAY 3 pump started leaking at outlet barbs. Slight but enough to warrant pulling it apart-I assumed would be problem. Really wanted to redo anyway, though if hadn't started leaking may have been a while.
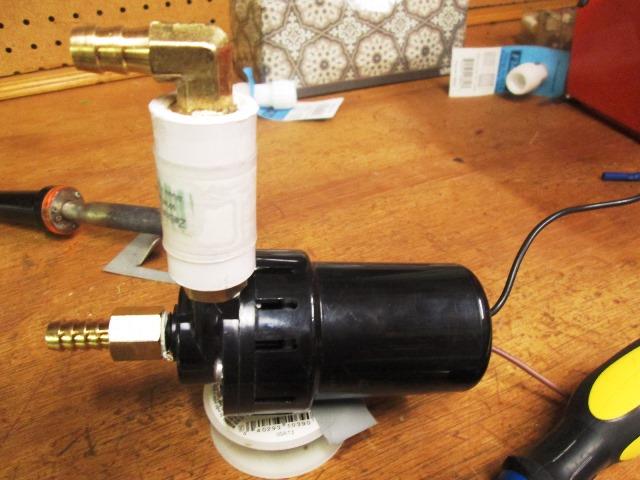
New and improved.
Took pump out to shop. I did look at changing to flex lines but would need to change tees, adapt or replace pump, not happening now. Stripped pump and cut off its 3/8" barbs to use its 1/4" pipe threads. Threaded on brass barb fitting to pump inlet (1/4" FPTx3/8" hose barb). Used a brass bushing (3/8" MPT x 1/4" FPT)to install the check valve directly to pump outlet. Cut back the pump wires, solder an inline fuse holder. Using 2 amp fuse so pump cant take down main pump. Crimped on some bullet ends for easier removal with out having to remove the switch assembly.
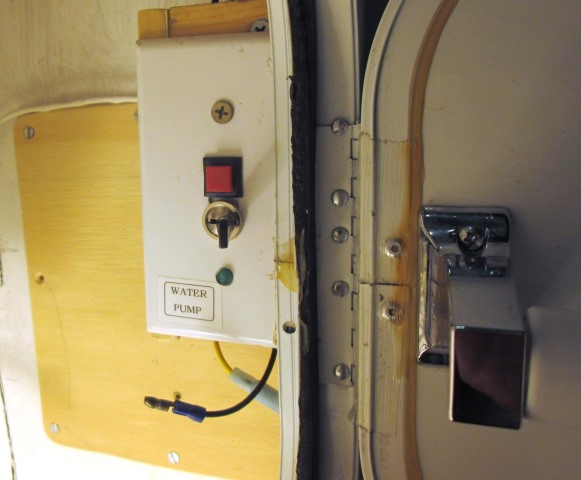
Cut small 1/4 ply back board to mount pump. Glued & screwed to wall. Added matched bullets to wiring from switch.
- Side track
Ready to reinstall pump but I'm stalled. I keep seeing the way drain is plumbed. Open the door to this under sink cabinet your greeted with 1 1/2" P trap. Area inside is fairly large but can barely get a spare roll of TP inside. I don't know why its plumbed as it is.
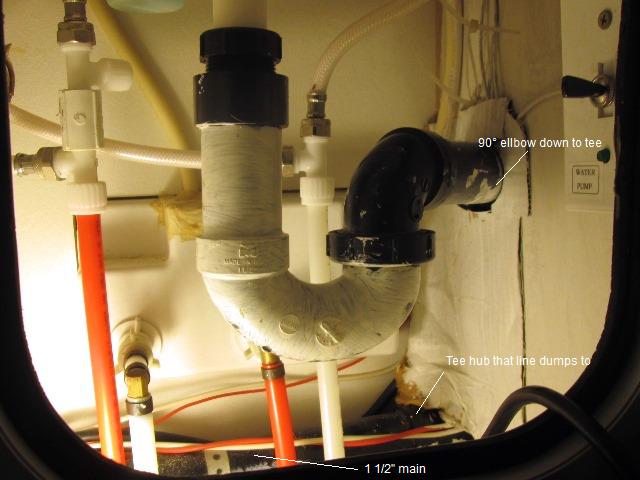
The drain line goes to the right then down to a sanitary tee, The tee 'could' have been placed in line with sink, stand pipe in back so P trap rotated toward back and raised Several inches. I understand less why 1 1/2" on this little sink.
The added new water lines go under/over drain line, I could address before reinstalling pump and lines loose-. Virtually impossible to put tee and stand pipe where it should be- however I could cut the horizontal line- 45° it and swing an 1 1/4" p-trap toward back. hmmm.... Wont happen after reinstalling pump. Heeelp- I'm stuck under the bathroom sink and I cant get out....
Several hours & 2 trips to hardware- Drain resized and relocated.
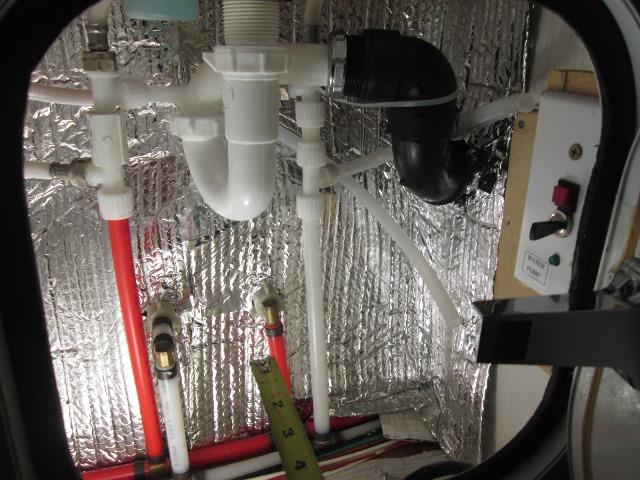
Some detail/pics here re plumb bath drain page. Added the reflectex (aluminum foil laminated bubble wrap) while drain out & water lines loose. Should help a bit with direct radiant cold but doubtful much otherwise as it isn't sealed, loose to be easily removed. Does cover the primer I sloped in there for visibility and sealing the raw fiberglass, it is brighter.
Remounted the pump.
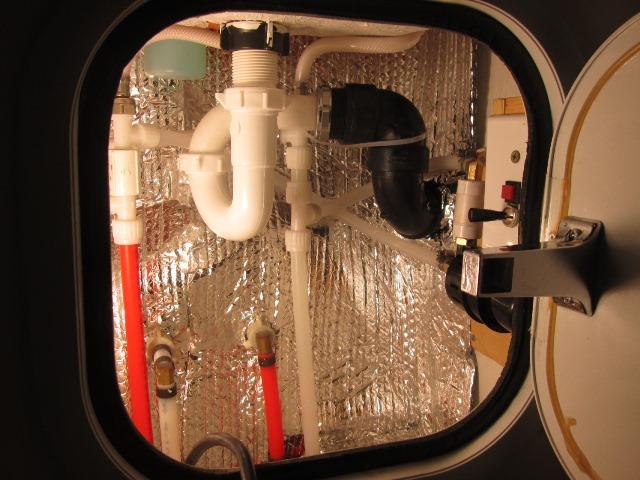
Much better fit, a lot cleaner. Bled the system, no leaks-yet. Shut of valves sure would be nice. Filled the sink couple of times then released to check drain connections. I wasn't sure about the decreased tail drop and smaller 1 1/4" p-trap and how it would affect drain. It honestly flowed faster than it ever has? Everything dry so were good. I left the system pressurized (pump off) and check in the morning for leaks and still pressurized.
Almost glad pump connection started leaking. Got to clean up the temporary install. Add backing board for mount & fix the pump mount. Don't think mentioned, the pump mount is 2 halves and a foam strip. When mounted supposed to clamp the pump, it didn't. Falling out. Just wrapped pump with a couple of layers cloth friction tape. As practical as the circulating pump will be-more stoked with being able to use the under sink cabinet for storing "items".
To do- paint the added wood & repaint the exposed walls. I may run some foil tape on bubble wrap seams, still easily removed if I need to work on something. That and replace the cold water line flex to faucet. Raising the tee helped with the strain on the shower flex line but made the too short sink line worse. Pushing line over, (hence the zip), need to get line about twice as long so I can loop. Maybe stabilize the vertical pex lines somehow. Noted earlier that the zip tie had slipped off tee and was on line. That could have only occurred if the line was flopping around while on the road.
Fire up heater and time the pump. I'm looking around for a simple timer instead of holding button-yea that lazy. No more than typed it in, adjustable12v timer, can set up using a relay to stay powered after momentary released. Tap the existing momentary, timer comes on energizing the relay, power stays on predetermined set time from .1 seconds to hours. Cost more than the pump... but simple. $15 @3rdbrakelight.com. I could see a lot of uses for it.
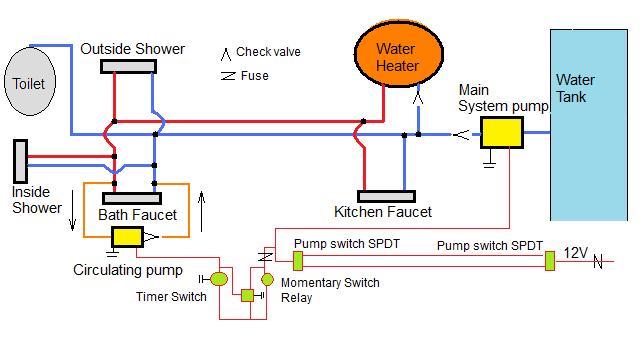
Simple diagram of added circulating pump and switching. When timer arrives Ill wire it in and update.
Bottom line is we have in line pump to have hot water at bathroom sink. There are similar small $20 pumps with 1/2" connection, using with 1/2" outlet tees be a lot easier to install using flex lines.
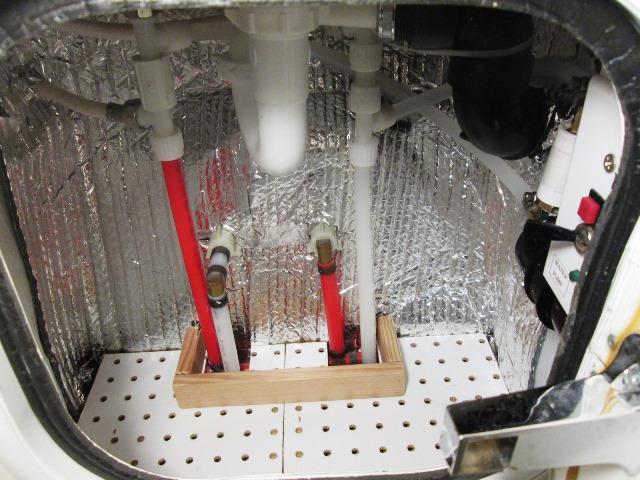
Lastly, made a false bottom to raise stuff and protect the wiring/plumbing on the floor. Plus air space. 2 halves easily removable. Also shown on the drain relocation page. I may and had planned on small 3 side box to set inside the frame but I think I'm done.
Now where was I...oh yea adding USB charging ports.
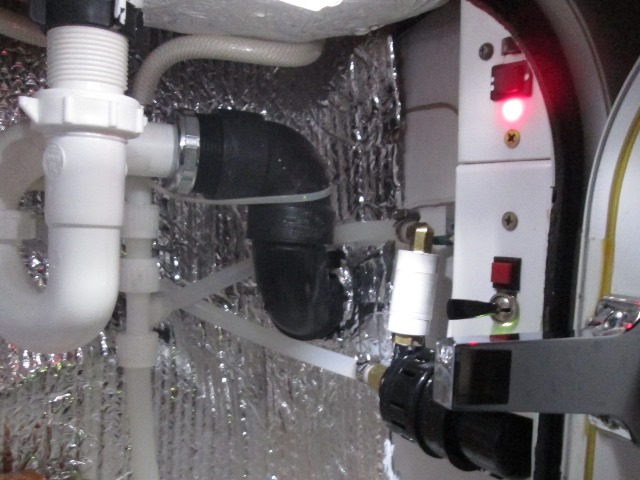
Added an adjustable timer that's triggered by the momentary. No more holding the button. Also added a light inside cabinet while I was wiring. Both shown on timer page
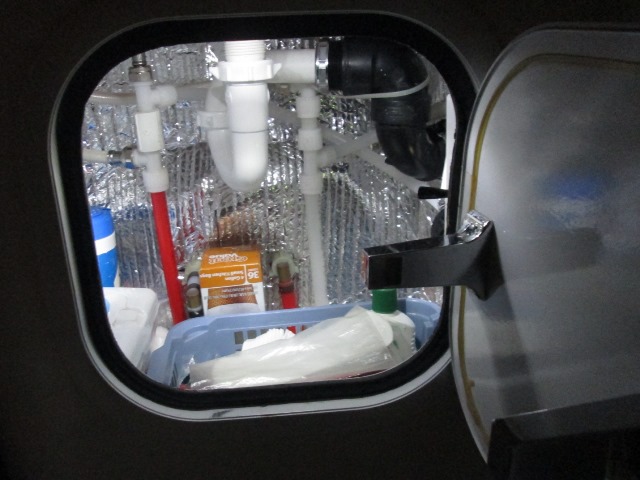
I'm sure when she's washing her face in the morning the instant hot water will be appreciated, but got a feeling this little light as much so. It was impossible to see in there.
Certainly nothing to be copied though ideas may be gleaned. AS messy as this page is-very simple install-the hardest part being working thru small door.
Small inline pump
Check valve
Momentary switch
2 tees
Water lines (really suggest setting up with flex lines)
Mich wire & connectors
Need a source for 12v ground and access to water pump 12v hot wire ( so circ pump only can run when water in lines).
There are way better installs folks have done-some quite elaborate. Depends on what & how you want to do it or how much you want to spend. I have about $40 into the basic install to see if simple system would work. Lot of time to piddle around. Add timer, switch, stuff I had on hand probably that much again. Off & on project over couple of weeks, opportunity to add light, rerouting of drain and clean up of cabinet just a bonus to having instant hot water.
Back to the top
Forward to Round 3 adding a timer to circulating pump page
Back to semi related bath drain relocation page
Back to Ourelkhorn Camper Modifications page 5835